Operating Instructions
Page 2
... STAR requirements. ❑ Changes to avoid any chance of electric shock. • Wipe the LCD screen gently with a soft cloth. • Stubborn stains may be fully inserted. ❑ Operate the TV only on the package. • Never use this polarized AC plug with an extension cord,... 26, 32 class, and 37 inch BRAVIA KDL-L5000 series models with other countries. Cleaning When cleaning, be sure to unplug the power cord to certain features, settings, and functionalities of this TV. Owner's Record The model and serial numbers are trademarks or registered marks of Sony Corporation. ...
... STAR requirements. ❑ Changes to avoid any chance of electric shock. • Wipe the LCD screen gently with a soft cloth. • Stubborn stains may be fully inserted. ❑ Operate the TV only on the package. • Never use this polarized AC plug with an extension cord,... 26, 32 class, and 37 inch BRAVIA KDL-L5000 series models with other countries. Cleaning When cleaning, be sure to unplug the power cord to certain features, settings, and functionalities of this TV. Owner's Record The model and serial numbers are trademarks or registered marks of Sony Corporation. ...
Operating Instructions
Page 3
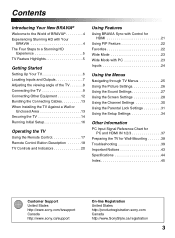
... Screen Settings 28 Using the Channel Settings 30 Using the Parental Lock Settings 31 Using the Setup Settings 34 Other Information PC Input Signal Reference Chart for PC and HDMI IN 1/2/3 37 Preparing the TV for Wall-Mounting 38 Troubleshooting 39 Important Notices 43 Specifications 44 Index 45 Customer Support United States http://www.sony.com...
... Screen Settings 28 Using the Channel Settings 30 Using the Parental Lock Settings 31 Using the Setup Settings 34 Other Information PC Input Signal Reference Chart for PC and HDMI IN 1/2/3 37 Preparing the TV for Wall-Mounting 38 Troubleshooting 39 Important Notices 43 Specifications 44 Index 45 Customer Support United States http://www.sony.com...

Operating Instructions
Page 4
...Sony BRAVIA® high-definition television. Experiencing Stunning HD with sample connection diagrams and TV features. Use the documentations listed below to get the most detailed information to operate your new BRAVIA TV, you need access to HD programming. Operating Instructions Provides the most out of your BRAVIA TV... the World of BRAVIA® Thank you for information on your TV. Safety Booklet Contains precautionary measures to keep you see on upgrading to setting up your TV. Quick Setup Guide Provides TV setup information with Your BRAVIA The quality of the image you and...
...Sony BRAVIA® high-definition television. Experiencing Stunning HD with sample connection diagrams and TV features. Use the documentations listed below to get the most detailed information to operate your new BRAVIA TV, you need access to HD programming. Operating Instructions Provides the most out of your BRAVIA TV... the World of BRAVIA® Thank you for information on your TV. Safety Booklet Contains precautionary measures to keep you see on upgrading to setting up your TV. Quick Setup Guide Provides TV setup information with Your BRAVIA The quality of the image you and...
Operating Instructions
Page 5
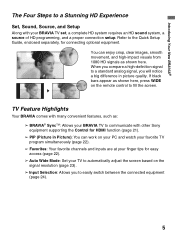
... you compare a high-definition signal to a Stunning HD Experience Set, Sound, Source, and Setup Along with other Sony equipment supporting the Control for HDMI function (page 21). ➢ PIP (Picture in picture quality. You can work on your PC and watch your favorite TV program simultaneously (page 22). ➢ Favorites: Your favorite channels...
... you compare a high-definition signal to a Stunning HD Experience Set, Sound, Source, and Setup Along with other Sony equipment supporting the Control for HDMI function (page 21). ➢ PIP (Picture in picture quality. You can work on your PC and watch your favorite TV program simultaneously (page 22). ➢ Favorites: Your favorite channels...
Operating Instructions
Page 6
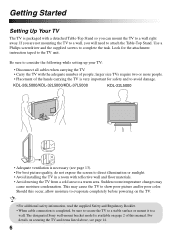
... occur, allow moisture to evaporate completely before powering on page 2 of the hands carrying the TV is necessary (see page 14. 6 The designated Sony wall-mount bracket model is available on the TV. • For additional safety information, read the supplied Safety and Regulatory Booklet. • ...reflective wall and floor materials. • Avoid moving the TV from a cold area to a warm area. Sudden room temperature changes may cause the TV to show poor picture and/or poor color. Getting Started Setting Up Your TV The TV is packaged with a detached Table-Top Stand so you will...
... occur, allow moisture to evaporate completely before powering on page 2 of the hands carrying the TV is necessary (see page 14. 6 The designated Sony wall-mount bracket model is available on the TV. • For additional safety information, read the supplied Safety and Regulatory Booklet. • ...reflective wall and floor materials. • Avoid moving the TV from a cold area to a warm area. Sudden room temperature changes may cause the TV to show poor picture and/or poor color. Getting Started Setting Up Your TV The TV is packaged with a detached Table-Top Stand so you will...
Operating Instructions
Page 7
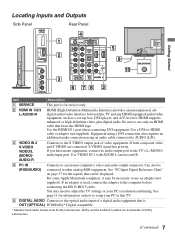
... connecting the HD15-HD15 cable. For some Apple Macintosh computers, it may need to adjust the TV settings or your PC to this TV and any HDMI-equipped audio/video equipment, such as a set-top box, DVD player, and A/V receiver. Can also be connected to the S VIDEO output...port is for service only. 2 HDMI IN 1/2/3 L-AUDIO-R HDMI (High-Definition Multimedia Interface) provides an uncompressed, alldigital audio/video interface between this TV. 5 DIGITAL AUDIO Connects to setup your PC's resolution and timing. HDMI supports enhanced, or high-definition video, plus digital audio. If you ...
... connecting the HD15-HD15 cable. For some Apple Macintosh computers, it may need to adjust the TV settings or your PC to this TV and any HDMI-equipped audio/video equipment, such as a set-top box, DVD player, and A/V receiver. Can also be connected to the S VIDEO output...port is for service only. 2 HDMI IN 1/2/3 L-AUDIO-R HDMI (High-Definition Multimedia Interface) provides an uncompressed, alldigital audio/video interface between this TV. 5 DIGITAL AUDIO Connects to setup your PC's resolution and timing. HDMI supports enhanced, or high-definition video, plus digital audio. If you ...
Operating Instructions
Page 8
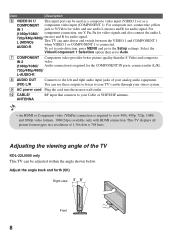
... all picture format types in a resolution of the TV KDL-22L5000 only This TV can be adjusted within the angle shown below. L (MONO)AUDIO-R This TV can use these outputs to listen to your TV's audio through your stereo system. 9 AC power cord Plug the cord into the nearest wall ...Front 8 For composite use Y, PB, PR for video signals and also connect the audio L 720p/480p/480i)/ (mono) and R for audio signal. To set to Auto. 7 COMPONENT Component video provides better picture quality than the S Video and composite IN 2 video. (1080p/1080i/ Audio connection is required for the ...
... all picture format types in a resolution of the TV KDL-22L5000 only This TV can be adjusted within the angle shown below. L (MONO)AUDIO-R This TV can use these outputs to listen to your TV's audio through your stereo system. 9 AC power cord Plug the cord into the nearest wall ...Front 8 For composite use Y, PB, PR for video signals and also connect the audio L 720p/480p/480i)/ (mono) and R for audio signal. To set to Auto. 7 COMPONENT Component video provides better picture quality than the S Video and composite IN 2 video. (1080p/1080i/ Audio connection is required for the ...
Operating Instructions
Page 9
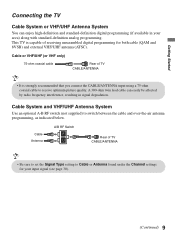
...degradation. Cable Antenna A/B RF Switch A B Rear of receiving unscrambled digital programming for your area) along with standard-definition analog programming. This TV is strongly recommended that you connect the CABLE/ANTENNA input using a 75-ohm coaxial cable to switch between the cable and over-the-air ...or VHF/UHF (or VHF only) 75-ohm coaxial cable Rear of TV CABLE/ANTENNA • It is capable of TV CABLE/ANTENNA • Be sure to set the Signal Type setting to Cable or Antenna found under the Channel settings for both cable (QAM and 8VSB) and external VHF/UHF antenna ...
...degradation. Cable Antenna A/B RF Switch A B Rear of receiving unscrambled digital programming for your area) along with standard-definition analog programming. This TV is strongly recommended that you connect the CABLE/ANTENNA input using a 75-ohm coaxial cable to switch between the cable and over-the-air ...or VHF/UHF (or VHF only) 75-ohm coaxial cable Rear of TV CABLE/ANTENNA • It is capable of TV CABLE/ANTENNA • Be sure to set the Signal Type setting to Cable or Antenna found under the Channel settings for both cable (QAM and 8VSB) and external VHF/UHF antenna ...
Operating Instructions
Page 13
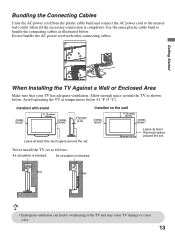
... inches (30 cm) 4 inches (10 cm) 2 3/8 inches (6 cm) Leave at least this much space around the set . Allow enough space around the TV as follows: Air circulation is blocked. Air circulation is completed. Bundling the Connecting Cables Untie the AC power cord from the ... 4 inches (10 cm) Leave at temperatures below 41 °F (5 °C). Never install the TV set as shown below . Avoid operating the TV at least this much space around the set . Wall Wall • Inadequate ventilation can lead to the nearest wall outlet when all the necessary connection...
... inches (30 cm) 4 inches (10 cm) 2 3/8 inches (6 cm) Leave at least this much space around the set . Allow enough space around the TV as follows: Air circulation is blocked. Air circulation is completed. Bundling the Connecting Cables Untie the AC power cord from the ... 4 inches (10 cm) Leave at temperatures below 41 °F (5 °C). Never install the TV set as shown below . Avoid operating the TV at least this much space around the set . Wall Wall • Inadequate ventilation can lead to the nearest wall outlet when all the necessary connection...
Operating Instructions
Page 14
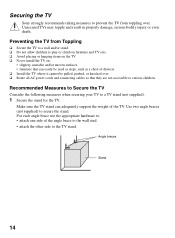
...8226; attach one side of the angle brace to the wall stud. • attach the other side to a TV stand (not supplied). 1 Secure the stand for the TV. Preventing the TV from toppling over . ❑ Route all AC power cords and connecting cables so that can adequately support the weight... 14 Securing the TV Sony strongly recommends taking measures to prevent the TV from Toppling ❑ Secure the TV to a wall and/or stand. ❑ Do not allow children to play or climb on furniture and TV sets. ❑ Avoid placing or hanging items on the TV. ❑ Never install the TV on: •...
...8226; attach one side of the angle brace to the wall stud. • attach the other side to a TV stand (not supplied). 1 Secure the stand for the TV. Preventing the TV from toppling over . ❑ Route all AC power cords and connecting cables so that can adequately support the weight... 14 Securing the TV Sony strongly recommends taking measures to prevent the TV from Toppling ❑ Secure the TV to a wall and/or stand. ❑ Do not allow children to play or climb on furniture and TV sets. ❑ Avoid placing or hanging items on the TV. ❑ Never install the TV on: •...
Operating Instructions
Page 15
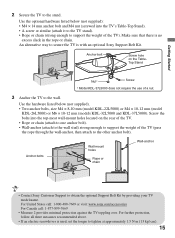
.... • If an electric screwdriver is used, set the torque to secure the TV is no excess slack in the rope or chain. Getting Started 2 Secure the TV to support the weight of the TV). Anchor bolt Screw hole on the rear of the TV. • Rope or chain (attach to one... the stand. Make sure that there is with an optional Sony Support Belt Kit. For United States call: 1-800-488-7669 or visit: www.sony.com/accessories For Canada call: 1-877-899-7669 • Measure 2 provides minimal protection against the TV toppling over. Use the optional hardware listed below (not supplied...
.... • If an electric screwdriver is used, set the torque to secure the TV is no excess slack in the rope or chain. Getting Started 2 Secure the TV to support the weight of the TV). Anchor bolt Screw hole on the rear of the TV. • Rope or chain (attach to one... the stand. Make sure that there is with an optional Sony Support Belt Kit. For United States call: 1-800-488-7669 or visit: www.sony.com/accessories For Canada call: 1-877-899-7669 • Measure 2 provides minimal protection against the TV toppling over. Use the optional hardware listed below (not supplied...

Operating Instructions
Page 16
...using an A-B RF switch (not supplied); Press WIDE to select the Wide Mode or press MENU and set the Auto Wide to On under Channel settings. Initial Setup • Select Cancel to the TV's CABLE/ANTENNA input. Please select the type of use and is Energy Star compliant. for more details... the help text provided on the TV. for ENERGY STAR compliant mode. button: TOOLS Allows you can be sure to select Retail or Home, be done at later time, press MENU and select the Auto Program under the Screen settings; Retail Home • Connect either your language: English Espa&#...
...using an A-B RF switch (not supplied); Press WIDE to select the Wide Mode or press MENU and set the Auto Wide to On under Channel settings. Initial Setup • Select Cancel to the TV's CABLE/ANTENNA input. Please select the type of use and is Energy Star compliant. for more details... the help text provided on the TV. for ENERGY STAR compliant mode. button: TOOLS Allows you can be sure to select Retail or Home, be done at later time, press MENU and select the Auto Program under the Screen settings; Retail Home • Connect either your language: English Espa&#...
Operating Instructions
Page 18
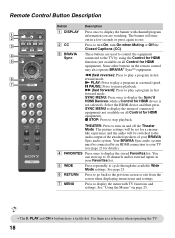
...or exit from the screen when displaying menu items and settings. 7 MENU Press to display the menu with channel/program information you are used to control the equipment connected to the TV by an HDMI connection to your TV (see page 21 for HDMI function (not available on... 1 2 3 DISPLAY CC POWER 4 5 WIDE INPUT 6 7 TOOLS Button Description 1 DISPLAY 2 CC 3 BRAVIA Sync Press once to display the banner with TV functions and settings. The banner will be connected by using the Control for details). 4 FAVORITES Press once to display the stored Favorites list.
...or exit from the screen when displaying menu items and settings. 7 MENU Press to display the menu with channel/program information you are used to control the equipment connected to the TV by an HDMI connection to your TV (see page 21 for HDMI function (not available on... 1 2 3 DISPLAY CC POWER 4 5 WIDE INPUT 6 7 TOOLS Button Description 1 DISPLAY 2 CC 3 BRAVIA Sync Press once to display the banner with TV functions and settings. The banner will be connected by using the Control for details). 4 FAVORITES Press once to display the stored Favorites list.
Operating Instructions
Page 20
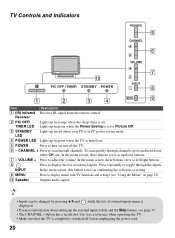
In the menu screen, these buttons serve as confirming the selection or setting. 9 MENU Press to Picture Off. 3 STANDBY LED Lights up in red when your TV is in green when the TV is turned on. 5 POWER Press to scan through channels. Press repeatedly to adjust the volume. INPUT...the menu screen, these buttons serve as a reference when operating the TV. • Make sure that the TV is displayed. • For more information about setting up in orange when the sleep timer is set to display menu with TV functions and settings (see page 35. • The CHANNEL + button has a ...
In the menu screen, these buttons serve as confirming the selection or setting. 9 MENU Press to Picture Off. 3 STANDBY LED Lights up in red when your TV is in green when the TV is turned on. 5 POWER Press to scan through channels. Press repeatedly to adjust the volume. INPUT...the menu screen, these buttons serve as a reference when operating the TV. • Make sure that the TV is displayed. • For more information about setting up in orange when the sleep timer is set to display menu with TV functions and settings (see page 35. • The CHANNEL + button has a ...
Operating Instructions
Page 21
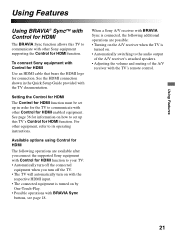
... communicate with other Control for connection. See page 36 for information on how to set up this TV to communicate with other equipment, refer to its operating instructions. For other Sony equipment supporting the Control for HDMI function. Available options using Control for HDMI The following... output of the A/V receiver's attached speakers. • Adjusting the volume and muting of the A/V receiver with the TV's remote control. 21 To connect Sony equipment with Control for HDMI Use an HDMI cable that bears the HDMI logo for HDMI enabled equipment. Using Features Using...
... communicate with other Control for connection. See page 36 for information on how to set up this TV to communicate with other equipment, refer to its operating instructions. For other Sony equipment supporting the Control for HDMI function. Available options using Control for HDMI The following... output of the A/V receiver's attached speakers. • Adjusting the volume and muting of the A/V receiver with the TV's remote control. 21 To connect Sony equipment with Control for HDMI Use an HDMI cable that bears the HDMI logo for HDMI enabled equipment. Using Features Using...
Operating Instructions
Page 23
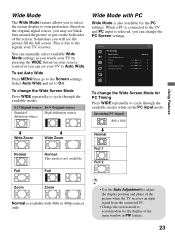
... display of the screen. Full Full 1 Full 2 Zoom Zoom Normal is available with PC Wide Mode is selected, you can manually select available Wide Mode settings as you can set your TV by pressing the WIDE button on the both sides of the main window in the PC input mode. To... PC Normal 0 0 0 0 To change the Wide Screen Mode for the PC settings. Using Features Wide Mode The Wide Mode feature allows you may see the picture fill the full screen. This is not available. When a PC is connected to the TV and PC input is also available for PC Timing Press WIDE...
... display of the screen. Full Full 1 Full 2 Zoom Zoom Normal is available with PC Wide Mode is selected, you can manually select available Wide Mode settings as you can set your TV by pressing the WIDE button on the both sides of the main window in the PC input mode. To... PC Normal 0 0 0 0 To change the Wide Screen Mode for the PC settings. Using Features Wide Mode The Wide Mode feature allows you may see the picture fill the full screen. This is not available. When a PC is connected to the TV and PC input is also available for PC Timing Press WIDE...

Operating Instructions
Page 24
.... Select the Label Video Inputs option. press to select the input of your choice. 2 Press V/v to highlight one of TV mode and other equipment connected to the TV. When you assign Skip, your External Inputs to identify them easily. To Label an Input 1 Press MENU then go to ...Setup settings. Inputs Press INPUT to display the Input menu and toggle through the External Inputs to select your connected equipment, then press ...
.... Select the Label Video Inputs option. press to select the input of your choice. 2 Press V/v to highlight one of TV mode and other equipment connected to the TV. When you assign Skip, your External Inputs to identify them easily. To Label an Input 1 Press MENU then go to ...Setup settings. Inputs Press INPUT to display the Input menu and toggle through the External Inputs to select your connected equipment, then press ...
Operating Instructions
Page 25
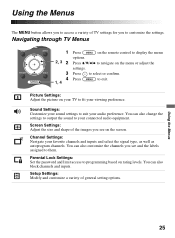
... the menu options. 2, 3 2 Press V/v/B/b to programming based on your TV to your viewing preference. Channel Settings: Navigate your audio preference. Setup Settings: Modify and customize a variety of general setting options. Using the Menus 25 TOOLS 3 Press to select or confirm. 4 Press 1, 4 to customize the settings. You can also customize the channels you see and the...
... the menu options. 2, 3 2 Press V/v/B/b to programming based on your TV to your viewing preference. Channel Settings: Navigate your audio preference. Setup Settings: Modify and customize a variety of general setting options. Using the Menus 25 TOOLS 3 Press to select or confirm. 4 Press 1, 4 to customize the settings. You can also customize the channels you see and the...
Operating Instructions
Page 26
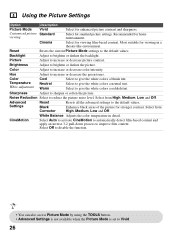
...Enhances black areas of the picture for viewing film-based content. Select from High, Medium, Low and Off. Using the Picture Settings Option Description Picture Mode Vivid Customized picture Standard viewing Select for viewing in detail. Picture Adjust to increase or decrease the green...tones. Select to give the white colors a reddish tint. Sharpness Adjust to the default values. Advanced Settings Reset Black Corrector Resets all the advanced settings to sharpen or soften the picture. Backlight Adjust to brighten or darken the picture. Brightness Adjust to ...
...Enhances black areas of the picture for viewing film-based content. Select from High, Medium, Low and Off. Using the Picture Settings Option Description Picture Mode Vivid Customized picture Standard viewing Select for viewing in detail. Picture Adjust to increase or decrease the green...tones. Select to give the white colors a reddish tint. Sharpness Adjust to the default values. Advanced Settings Reset Black Corrector Resets all the advanced settings to sharpen or soften the picture. Backlight Adjust to brighten or darken the picture. Brightness Adjust to ...

Operating Instructions
Page 27
... spoken dialog. bilingual and mono Auto SAP programs Select to automatically switch the TV to increase or decrease higher-pitched sounds. Customized sound listening Standard Clear Voice Standard sound optimized for mono reception. Reset Resets the current Sound Mode settings to reduce noise during weak stereo broadcasts. Use to the default values...
... spoken dialog. bilingual and mono Auto SAP programs Select to automatically switch the TV to increase or decrease higher-pitched sounds. Customized sound listening Standard Clear Voice Standard sound optimized for mono reception. Reset Resets the current Sound Mode settings to reduce noise during weak stereo broadcasts. Use to the default values...


