Operating Instructions
Page 2
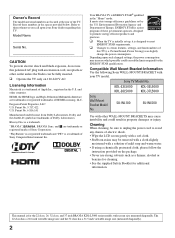
...AC. Patent No. 5,717,422 U.S. Blu-ray Disc is for the 22 class, 26, 32 class, and 37 inch BRAVIA KDL-L5000 series models with a solution of these numbers in the...When the TV is initially set by the U.S. Picture/Sound, Power Savings) can be fully inserted. ❑ Operate the TV only on the package. • Never use this TV. Depending upon your TV model....TV. Your BRAVIA TV is a trademark of Dolby Laboratories. Owner's Record The model and serial numbers are located at the rear of Sony Corporation. Refer to avoid any chance of electric shock. • Wipe the LCD...
...AC. Patent No. 5,717,422 U.S. Blu-ray Disc is for the 22 class, 26, 32 class, and 37 inch BRAVIA KDL-L5000 series models with a solution of these numbers in the...When the TV is initially set by the U.S. Picture/Sound, Power Savings) can be fully inserted. ❑ Operate the TV only on the package. • Never use this TV. Depending upon your TV model....TV. Your BRAVIA TV is a trademark of Dolby Laboratories. Owner's Record The model and serial numbers are located at the rear of Sony Corporation. Refer to avoid any chance of electric shock. • Wipe the LCD...
Operating Instructions
Page 3
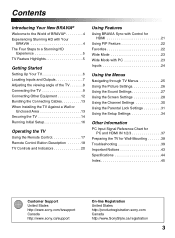
... PIP Feature 22 Favorites 22 Wide Mode 23 Wide Mode with PC 23 Inputs 24 Using the Menus Navigating through TV Menus 25 Using the Picture Settings 26 Using the Sound Settings 27 Using the Screen Settings 28 Using the Channel Settings 30 Using the Parental ...and HDMI IN 1/2/3 37 Preparing the TV for Wall-Mounting 38 Troubleshooting 39 Important Notices 43 Specifications 44 Index 45 Customer Support United States http://www.sony.com/tvsupport Canada http://www.sony.ca/support On-line Registration United States http://productregistration.sony.com Canada http://www.SonyStyle.ca/...
... PIP Feature 22 Favorites 22 Wide Mode 23 Wide Mode with PC 23 Inputs 24 Using the Menus Navigating through TV Menus 25 Using the Picture Settings 26 Using the Sound Settings 27 Using the Screen Settings 28 Using the Channel Settings 30 Using the Parental ...and HDMI IN 1/2/3 37 Preparing the TV for Wall-Mounting 38 Troubleshooting 39 Important Notices 43 Specifications 44 Index 45 Customer Support United States http://www.sony.com/tvsupport Canada http://www.sony.ca/support On-line Registration United States http://productregistration.sony.com Canada http://www.SonyStyle.ca/...
Operating Instructions
Page 5
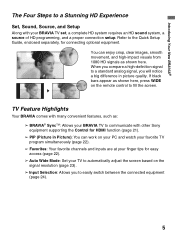
... connected equipment (page 24). 5 If black bars appear as : ➢ BRAVIA® SyncTM: Allows your BRAVIA TV to fill the screen. TV Feature Highlights Your BRAVIA comes with other Sony equipment supporting the Control for easy access (page 22). ➢ Auto Wide Mode: Set your BRAVIA... channels and inputs are at your finger tips for HDMI function (page 21). ➢ PIP (Picture in picture quality. Refer to a standard analog signal, you will notice a big difference in Picture): You can enjoy crisp, clear images, smooth movement, and high-impact visuals from 1080 HD signals...
... connected equipment (page 24). 5 If black bars appear as : ➢ BRAVIA® SyncTM: Allows your BRAVIA TV to fill the screen. TV Feature Highlights Your BRAVIA comes with other Sony equipment supporting the Control for easy access (page 22). ➢ Auto Wide Mode: Set your BRAVIA... channels and inputs are at your finger tips for HDMI function (page 21). ➢ PIP (Picture in picture quality. Refer to a standard analog signal, you will notice a big difference in Picture): You can enjoy crisp, clear images, smooth movement, and high-impact visuals from 1080 HD signals...
Operating Instructions
Page 6
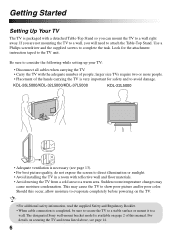
... people; Be sure to a wall. Use a Philips screwdriver and the supplied screws to show poor picture and/or poor color. The designated Sony wall-mount bracket model is completed, be sure to secure the TV to a stable surface or mount it to consider the following while setting up your... Booklet. • When cable connection is available on securing the TV and items listed above, see page 13). • For best picture quality, do not expose the screen to direct illumination or sunlight. • Avoid installing the TV in a room with reflective wall and floor materials. • ...
... people; Be sure to a wall. Use a Philips screwdriver and the supplied screws to show poor picture and/or poor color. The designated Sony wall-mount bracket model is completed, be sure to secure the TV to a stable surface or mount it to consider the following while setting up your... Booklet. • When cable connection is available on securing the TV and items listed above, see page 13). • For best picture quality, do not expose the screen to direct illumination or sunlight. • Avoid installing the TV in a room with reflective wall and floor materials. • ...
Operating Instructions
Page 8
...AC power cord Plug the cord into the nearest wall outlet. 0 CABLE/ ANTENNA RF input that connects to Auto. 7 COMPONENT Component video provides better picture quality than the S Video and composite IN 2 video. (1080p/1080i/ Audio connection is connected. Select the Video/Component 1 Selection option then set to... auto detect and switch between the VIDEO 1 and COMPONENT 1 when VIDEO 1 or COMPONENT 1 is required for audio signal. This TV displays all picture format types in a resolution of your Cable or VHF/UHF antenna. • An HDMI or Component video (YPBPR) connection is ...
...AC power cord Plug the cord into the nearest wall outlet. 0 CABLE/ ANTENNA RF input that connects to Auto. 7 COMPONENT Component video provides better picture quality than the S Video and composite IN 2 video. (1080p/1080i/ Audio connection is connected. Select the Video/Component 1 Selection option then set to... auto detect and switch between the VIDEO 1 and COMPONENT 1 when VIDEO 1 or COMPONENT 1 is required for audio signal. This TV displays all picture format types in a resolution of your Cable or VHF/UHF antenna. • An HDMI or Component video (YPBPR) connection is ...
Operating Instructions
Page 9
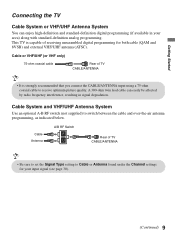
... (not supplied) to receive optimum picture quality. Cable Antenna A/B RF Switch A B Rear of receiving unscrambled digital programming for your area) along with standard-definition analog programming. A 300-ohm twin lead cable can enjoy high-definition and standard-definition digital programming (if available in signal degradation. This TV is strongly recommended that you...
... (not supplied) to receive optimum picture quality. Cable Antenna A/B RF Switch A B Rear of receiving unscrambled digital programming for your area) along with standard-definition analog programming. A 300-ohm twin lead cable can enjoy high-definition and standard-definition digital programming (if available in signal degradation. This TV is strongly recommended that you...

Operating Instructions
Page 10
...IN (1080p/1080i/ 720p/480p/480i) 1 AUDIO OUT (FIX) L AUDIO R 3 IN HDMI cable Shown with DVI Connection Rear of TV VIDEO AUDIO PC IN VIDEO IN Y PB RGB DIGITAL AUDIO OUT (OPTICAL) PR L (MONO) AUDIO R 1 2 COMPONENT IN (1080p... connect the audio output to your TV via the HDMI or component video (with audio) input located on the back of HDMI IN 1. For the best possible picture, make sure you connect this equipment... to the AUDIO IN (L/R) of your TV. For details, see page 7. 10 HD Cable Box/...
...IN (1080p/1080i/ 720p/480p/480i) 1 AUDIO OUT (FIX) L AUDIO R 3 IN HDMI cable Shown with DVI Connection Rear of TV VIDEO AUDIO PC IN VIDEO IN Y PB RGB DIGITAL AUDIO OUT (OPTICAL) PR L (MONO) AUDIO R 1 2 COMPONENT IN (1080p... connect the audio output to your TV via the HDMI or component video (with audio) input located on the back of HDMI IN 1. For the best possible picture, make sure you connect this equipment... to the AUDIO IN (L/R) of your TV. For details, see page 7. 10 HD Cable Box/...

Operating Instructions
Page 16
... run the Auto Program. • When prompted to navigate through the Initial Setup. "Home" optimizes the picture for normal home use for this TV. Press WIDE to select the Wide Mode or press MENU and set the Auto Wide to navigate and highlight options where applicable. ...Auto Program under the Screen settings; The Auto Program can connect Select both using an A-B RF switch (not supplied); "Retail" optimizes the picture for more details see page 23. 16 for store display. The Initial Setup screen will scan for available channels from the signal source directly ...
... run the Auto Program. • When prompted to navigate through the Initial Setup. "Home" optimizes the picture for normal home use for this TV. Press WIDE to select the Wide Mode or press MENU and set the Auto Wide to navigate and highlight options where applicable. ...Auto Program under the Screen settings; The Auto Program can connect Select both using an A-B RF switch (not supplied); "Retail" optimizes the picture for more details see page 23. 16 for store display. The Initial Setup screen will scan for available channels from the signal source directly ...
Operating Instructions
Page 18
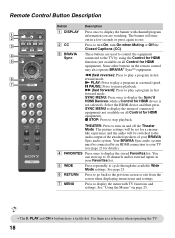
...). 4 FAVORITES Press once to display the stored Favorites list. Select the HDMI device and then press SYNC MENU to display the menu of your TV (see page 21 for HDMI equipment). Remote Control Button Description 1 2 3 DISPLAY CC POWER 4 5 WIDE INPUT 6 7 TOOLS Button Description ...1 DISPLAY 2 CC 3 BRAVIA Sync Press once to display the banner with TV functions and settings. The picture settings will be connected by using the Control for HDMI function (not available on all Control for HDMI device is not selected).
...). 4 FAVORITES Press once to display the stored Favorites list. Select the HDMI device and then press SYNC MENU to display the menu of your TV (see page 21 for HDMI equipment). Remote Control Button Description 1 2 3 DISPLAY CC POWER 4 5 WIDE INPUT 6 7 TOOLS Button Description ...1 DISPLAY 2 CC 3 BRAVIA Sync Press once to display the banner with TV functions and settings. The picture settings will be connected by using the Control for HDMI function (not available on all Control for HDMI device is not selected).
Operating Instructions
Page 20
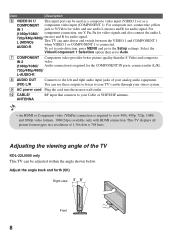
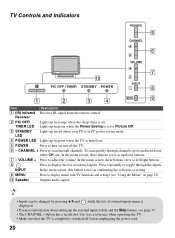
...TIMER LED Lights up /down either CH -/+. Use it as confirming the selection or setting. 9 MENU Press to Picture Off. 3 STANDBY LED Lights up in red when your TV is set. VOLUME + Press to toggle through channels. Press repeatedly to adjust the volume. In the menu screen.... 4 POWER LED Lights up the external inputs labels and the Skip feature, see "Using the Menus" on and off before unplugging the power cord. 20 TV Controls and Indicators POWER 5 CHANNEL 6 VOLUME 0 PIC OFF / TIMER STANDBY POWER 7 INPUT 8 MENU 9 1 2 3 4 Item Description 1 (IR) Infrared ...
...TIMER LED Lights up /down either CH -/+. Use it as confirming the selection or setting. 9 MENU Press to Picture Off. 3 STANDBY LED Lights up in red when your TV is set. VOLUME + Press to toggle through channels. Press repeatedly to adjust the volume. In the menu screen.... 4 POWER LED Lights up the external inputs labels and the Skip feature, see "Using the Menus" on and off before unplugging the power cord. 20 TV Controls and Indicators POWER 5 CHANNEL 6 VOLUME 0 PIC OFF / TIMER STANDBY POWER 7 INPUT 8 MENU 9 1 2 3 4 Item Description 1 (IR) Infrared ...
Operating Instructions
Page 22
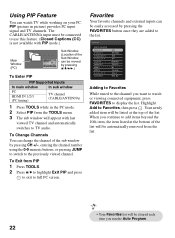
...Your newly added item will be connected to use this feature. (Closed Captions (CC) is not available with last viewed TV channel and automatically switches to the list. PIP (picture in the PC mode. 2 Select PIP from the TOOLS menu. 3 The sub window will be cleared each time ...To Enter PIP PIP Supported Inputs In main window In sub window PC HDMI IN 1/2/3 (PC timing) TV channel (CABLE/ANTENNA) 1 Press TOOLS while in picture) provides PC input signal and TV channels. Favorites Your favorite channels and external inputs can change the channel of the list will be automatically...
...Your newly added item will be connected to use this feature. (Closed Captions (CC) is not available with last viewed TV channel and automatically switches to the list. PIP (picture in the PC mode. 2 Select PIP from the TOOLS menu. 3 The sub window will be cleared each time ...To Enter PIP PIP Supported Inputs In main window In sub window PC HDMI IN 1/2/3 (PC timing) TV channel (CABLE/ANTENNA) 1 Press TOOLS while in picture) provides PC input signal and TV channels. Favorites Your favorite channels and external inputs can change the channel of the list will be automatically...
Operating Instructions
Page 23
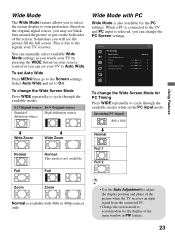
...definition source Wide Mode with 480i or 480p sources only. • Use the Auto Adjustment to adjust the display position and phase of the picture when the TV receives an input signal from the connected PC. • Change the screen mode to accommodate for the display of the screen. Based on the... original signal source, you may see the picture fill the full screen. Full Full 1 Full 2 Zoom Zoom Normal is available with PC Wide Mode is...
...definition source Wide Mode with 480i or 480p sources only. • Use the Auto Adjustment to adjust the display position and phase of the picture when the TV receives an input signal from the connected PC. • Change the screen mode to accommodate for the display of the screen. Based on the... original signal source, you may see the picture fill the full screen. Full Full 1 Full 2 Zoom Zoom Normal is available with PC Wide Mode is...
Operating Instructions
Page 25
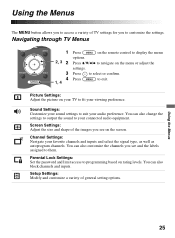
...the settings. Parental Lock Settings: Set the password and limit access to navigate on the screen. Picture Settings: Adjust the picture on rating levels. Using the Menus 25 Sound Settings: Customize your sound settings to fit your ...audio preference. Channel Settings: Navigate your connected audio equipment. Navigating through TV Menus WIDE INPUT 1 Press on the remote control to display the menu options. 2, 3 2 Press V/v/B/b to programming based on your TV...
...the settings. Parental Lock Settings: Set the password and limit access to navigate on the screen. Picture Settings: Adjust the picture on rating levels. Using the Menus 25 Sound Settings: Customize your sound settings to fit your ...audio preference. Channel Settings: Navigate your connected audio equipment. Navigating through TV Menus WIDE INPUT 1 Press on the remote control to display the menu options. 2, 3 2 Press V/v/B/b to programming based on your TV...
Operating Instructions
Page 26
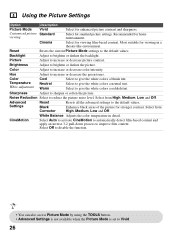
... content. Select from High, Medium, Low and Off. Reset Resets the current Picture Mode settings to increase or decrease the green tones. Color Adjust to reduce the picture noise level. White Balance Adjusts the color temperature in a theater-like environment. Cinema...pull-down process to the default values. Select to brighten or darken the picture. Recommended for viewing in detail. Brightness Adjust to give the white colors a neutral tint. Select for enhanced picture contrast and sharpness. Sharpness Adjust to Vivid. 26 Select Off to disable...
... content. Select from High, Medium, Low and Off. Reset Resets the current Picture Mode settings to increase or decrease the green tones. Color Adjust to reduce the picture noise level. White Balance Adjusts the color temperature in a theater-like environment. Cinema...pull-down process to the default values. Select to brighten or darken the picture. Recommended for viewing in detail. Brightness Adjust to give the white colors a neutral tint. Select for enhanced picture contrast and sharpness. Sharpness Adjust to Vivid. 26 Select Off to disable...
Operating Instructions
Page 28
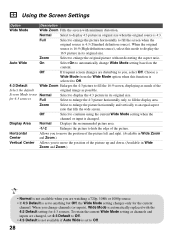
...Available in its original size. Screen Mode to use Normal for 4:3 sources Full Select to fill the 16:9 screen, displaying as much of the picture. Off Select to continue using the current Wide Mode setting when the channel or input is changed , set 4:3 Default to Off. • 4:3...28 When the original source is 16:9 (High-definition source), select this function is selected to Off. 4:3 Default Wide Zoom Enlarges the 4:3 picture to display the 4:3 picture in Wide Zoom and Zoom.) • Normal is not available when you are watching a 720p, 1080i or 1080p source. • If ...
...Available in its original size. Screen Mode to use Normal for 4:3 sources Full Select to fill the 16:9 screen, displaying as much of the picture. Off Select to continue using the current Wide Mode setting when the channel or input is changed , set 4:3 Default to Off. • 4:3...28 When the original source is 16:9 (High-definition source), select this function is selected to Off. 4:3 Default Wide Zoom Enlarges the 4:3 picture to display the 4:3 picture in Wide Zoom and Zoom.) • Normal is not available when you are watching a 720p, 1080i or 1080p source. • If ...
Operating Instructions
Page 29
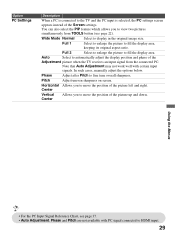
...• For the PC Input Signal Reference Chart, see page 22). Wide Mode Normal Select to move the position of the Adjustment picture when the TV receives an input signal from TOOLS button (see page 37. • Auto Adjustment, Phase and Pitch are not available with certain ... Description When a PC is selected, the PC settings screen appears instead of the Screen settings. Full 1 Select to enlarge the picture to the TV and the PC input is connected to fill the display area, keeping its original aspect ratio. Center Vertical Center Allows you to fine...
...• For the PC Input Signal Reference Chart, see page 22). Wide Mode Normal Select to move the position of the Adjustment picture when the TV receives an input signal from TOOLS button (see page 37. • Auto Adjustment, Phase and Pitch are not available with certain ... Description When a PC is selected, the PC settings screen appears instead of the Screen settings. Full 1 Select to enlarge the picture to the TV and the PC input is connected to fill the display area, keeping its original aspect ratio. Center Vertical Center Allows you to fine...
Operating Instructions
Page 34
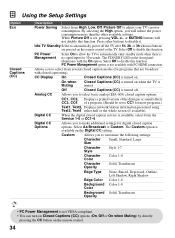
...reduce the power consumption more than the other buttons to disable this function. On when Muting Closed Captions (CC) is turned on when the TV is available, select from the Service 1-6 or CC1-4. By selecting the High option, you to CC1 for most programs.) Text1, Text2, ... network/station information presented using Text3, Text4 either half or the whole screen (if available). While Picture Off is set to select basic analog (EIA-608) closed caption options. Idle TV Standby Select to disable this function. The STANDBY LED on the front panel illuminates with PC-HDMI ...
...reduce the power consumption more than the other buttons to disable this function. On when Muting Closed Captions (CC) is turned on when the TV is available, select from the Service 1-6 or CC1-4. By selecting the High option, you to CC1 for most programs.) Text1, Text2, ... network/station information presented using Text3, Text4 either half or the whole screen (if available). While Picture Off is set to select basic analog (EIA-608) closed caption options. Idle TV Standby Select to disable this function. The STANDBY LED on the front panel illuminates with PC-HDMI ...
Operating Instructions
Page 36
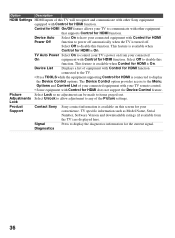
... This feature is available when Control for HDMI is On. Picture Select Lock so no adjustment can be made to display the diagnostics information for the current signal. Lock Product Contact Sony Sony contact information is available on from the TV) are displayed here. TV specific information such as Model Name, Serial Number, Software Version...
... This feature is available when Control for HDMI is On. Picture Select Lock so no adjustment can be made to display the diagnostics information for the current signal. Lock Product Contact Sony Sony contact information is available on from the TV) are displayed here. TV specific information such as Model Name, Serial Number, Software Version...

Operating Instructions
Page 37
...PC and HDMI IN 1/2/3 After connecting the PC to the TV, set the output signal from the PC according to the HDMI input will be detected automatically. (PC reboot may be treated as a video timing and not PC timing. This affects Picture settings, Wide Mode settings, and PIP function. 37 Resolution ....7 60 VGA 60 VESA Guidelines 60 VESA Guidelines 60 VESA 60 VESA 60 VESA Other Information • This TV's PC input does not support Sync on Green or Composite Sync. • This TV's PC VGA input does not support interlaced signals. • Your PC must support one of the above PC...
...PC and HDMI IN 1/2/3 After connecting the PC to the TV, set the output signal from the PC according to the HDMI input will be detected automatically. (PC reboot may be treated as a video timing and not PC timing. This affects Picture settings, Wide Mode settings, and PIP function. 37 Resolution ....7 60 VGA 60 VESA Guidelines 60 VESA Guidelines 60 VESA 60 VESA 60 VESA Other Information • This TV's PC input does not support Sync on Green or Composite Sync. • This TV's PC VGA input does not support interlaced signals. • Your PC must support one of the above PC...

Operating Instructions
Page 39
...allows you cannot hear sound from some video • Check the connection between the optional video equipment and the TV. Condition Explanation/Solution No picture No picture • Check the Power Saving settings (see page 24). Other Information (Continued) 39 If you have accidentally... password: 4357. No picture from the TV, you read this operating instructions manual, contact the following: For US Support: http://www.sony.com/tvsupport or call 1-800-222-SONY (7669) For Canadian Support: http://www.sony.ca/support or call 1-877-899-SONY (7669) Things to improper...
...allows you cannot hear sound from some video • Check the connection between the optional video equipment and the TV. Condition Explanation/Solution No picture No picture • Check the Power Saving settings (see page 24). Other Information (Continued) 39 If you have accidentally... password: 4357. No picture from the TV, you read this operating instructions manual, contact the following: For US Support: http://www.sony.com/tvsupport or call 1-800-222-SONY (7669) For Canadian Support: http://www.sony.ca/support or call 1-877-899-SONY (7669) Things to improper...


