Handycam® Handbook
Page 3
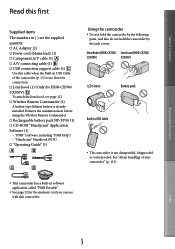
...; Power cord (Mains lead) (1) Component A/V cable (1) A/V connecting cable (1) USB connection support cable (1) Use this camcorder. See "About handling of the camcorder (p. 15) is too short for connection. Lens hood (1) (Only for the memory card you can use with this cable when the Built-in USB Cable of your camcorder" (p. 115). This camcorder has a built-in USB Cable The camcorder is already installed. Viewfinder (HDR-CX700/ Lens hood (HDR-CX700/ CX700V) CX700V) LCD Screen Battery pack...
...; Power cord (Mains lead) (1) Component A/V cable (1) A/V connecting cable (1) USB connection support cable (1) Use this camcorder. See "About handling of the camcorder (p. 15) is too short for connection. Lens hood (1) (Only for the memory card you can use with this cable when the Built-in USB Cable of your camcorder" (p. 115). This camcorder has a built-in USB Cable The camcorder is already installed. Viewfinder (HDR-CX700/ Lens hood (HDR-CX700/ CX700V) CX700V) LCD Screen Battery pack...
Handycam® Handbook
Page 5
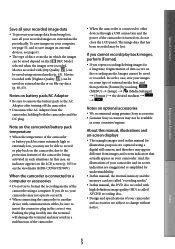
... prevent your image data from being activated in a malfunction of the camcorder. When the camcorder is turned on the recording media. Notes on -screen displays The example images used in this manual for illustration purposes are subject to insert the connector plug in some type of external media first, and then perform [Format] by touching (MENU) [Setup] [ (Media Settings)] [Format] the desired medium . Movies recorded with...
... prevent your image data from being activated in a malfunction of the camcorder. When the camcorder is turned on the recording media. Notes on -screen displays The example images used in this manual for illustration purposes are subject to insert the connector plug in some type of external media first, and then perform [Format] by touching (MENU) [Setup] [ (Media Settings)] [Format] the desired medium . Movies recorded with...

Handycam® Handbook
Page 35
... VCR using more than one audio input jack) Connect the yellow plug of the A/V connecting cable to the video input jack and connect the white (left /right/enter buttons of the remote commander of your TV. Notes There may be some operations you play selected movies or display selected photos by pressing up/ down/left channel) or red (right channel) plug to each model of BRAVIA. You can display the camcorder screens...
... VCR using more than one audio input jack) Connect the yellow plug of the A/V connecting cable to the video input jack and connect the white (left /right/enter buttons of the remote commander of your TV. Notes There may be some operations you play selected movies or display selected photos by pressing up/ down/left channel) or red (right channel) plug to each model of BRAVIA. You can display the camcorder screens...
Handycam® Handbook
Page 41
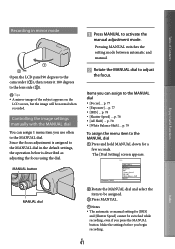
... Contents Recording in the default settings, the operation below is assigned to adjust the focus. Controlling the image settings manually with the MANUAL dial You can assign to the MANUAL dial [Focus] ... p. 78 [White Balance Shift] ... Make the settings before you begin recording. Pressing MANUAL switches the setting mode between automatic and manual. Rotate the MANUAL dial to the MANUAL dial in mirror mode Open the LCD panel 90 degrees to the camcorder (...
... Contents Recording in the default settings, the operation below is assigned to adjust the focus. Controlling the image settings manually with the MANUAL dial You can assign to the MANUAL dial [Focus] ... p. 78 [White Balance Shift] ... Make the settings before you begin recording. Pressing MANUAL switches the setting mode between automatic and manual. Rotate the MANUAL dial to the MANUAL dial in mirror mode Open the LCD panel 90 degrees to the camcorder (...

Handycam® Handbook
Page 42
... may occur, or color may change the assigned item of the MANUAL dial. Table of Contents Enjoy Useful Functions Manual settings will override [AE Shift]. If you set either one of [Exposure], [IRIS], or [Shutter Speed], the settings of other media by touching (MENU) [Camera/Mic] [ (Camera Settings)] [Dial Setting]. Even if you open the IRIS wider (a smaller F-stop), the in-focus range becomes narrower...
... may occur, or color may change the assigned item of the MANUAL dial. Table of Contents Enjoy Useful Functions Manual settings will override [AE Shift]. If you set either one of [Exposure], [IRIS], or [Shutter Speed], the settings of other media by touching (MENU) [Camera/Mic] [ (Camera Settings)] [Dial Setting]. Even if you open the IRIS wider (a smaller F-stop), the in-focus range becomes narrower...

Handycam® Handbook
Page 44
Delete the music file by touching (MENU) [Setup] [ (Playback Settings)] [Empty Music], then transfer the music file again. In this case, you can restore them with Highlight Playback using the supplied software "PMB" or "Music Transfer," a software installed together with "PMB." For operating instructions, see Music Transfer help. To erase a saved scenario Touch [ Scenario Erase] on your camcorder, and play them using [Empty Music], the music data recorded on the screen after a Highlight Playback has finished...
Delete the music file by touching (MENU) [Setup] [ (Playback Settings)] [Empty Music], then transfer the music file again. In this case, you can restore them with Highlight Playback using the supplied software "PMB" or "Music Transfer," a software installed together with "PMB." For operating instructions, see Music Transfer help. To erase a saved scenario Touch [ Scenario Erase] on your camcorder, and play them using [Empty Music], the music data recorded on the screen after a Highlight Playback has finished...

Handycam® Handbook
Page 63
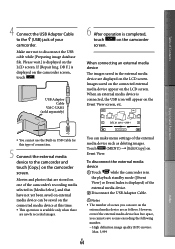
... external media device (USB storage devices), such as an external hard disk drive. Enjoy Useful Functions Index US 63 Table of Contents Saving images on an external media device You can save movies and photos on an external media device playback of your camcorder. You can import images saved on available external media devices, go to the Sony support website in some countries/regions. Connect your camcorder to the wall outlet (wall socket) using the supplied AC Adaptor (p. 16). Refer to the instruction manual...
... external media device (USB storage devices), such as an external hard disk drive. Enjoy Useful Functions Index US 63 Table of Contents Saving images on an external media device You can save movies and photos on an external media device playback of your camcorder. You can import images saved on available external media devices, go to the Sony support website in some countries/regions. Connect your camcorder to the wall outlet (wall socket) using the supplied AC Adaptor (p. 16). Refer to the instruction manual...
Handycam® Handbook
Page 64
...) 6 After operation is displayed on the camcorder screen, touch . Enjoy Useful Functions You cannot use the Built-in USB Cable for this time. This operation is available only when there are displayed on the LCD screen. Touch (MENU) [Edit/Copy] on the LCD screen. However, even if the external media device has free space, you can make menu settings of connection. 5 Connect the external media device to disconnect the USB cable while [Preparing image database file. You can save scenes exceeding...
...) 6 After operation is displayed on the camcorder screen, touch . Enjoy Useful Functions You cannot use the Built-in USB Cable for this time. This operation is available only when there are displayed on the LCD screen. Touch (MENU) [Edit/Copy] on the LCD screen. However, even if the external media device has free space, you can make menu settings of connection. 5 Connect the external media device to disconnect the USB cable while [Preparing image database file. You can save scenes exceeding...
Handycam® Handbook
Page 74
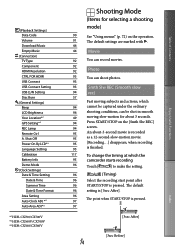
... when START/STOP is pressed. (Playback Settings) Data Code Volume Download Music Empty Music (Connection) TV Type Component HDMI Resolution CTRL FOR HDMI USB Connect USB Connect Setting USB LUN Setting Disc Burn (General Settings) Beep LCD Brightness Your Location*2 GPS Setting*2 REC Lamp Remote Ctrl A. Shut Off Power On By LCD*3 Language Setting Calibration Battery Info Demo Mode (Clock Settings) Date & Time Setting Date & Time Summer Time Date & Time Format Area Setting Auto Clock ADJ *2 Auto Area ADJ*2 *1 HDR-CX700/CX700V *2 HDR-CX560V/CX700V *3 HDR-CX560/CX560V Shooting Mode (Items for...
... when START/STOP is pressed. (Playback Settings) Data Code Volume Download Music Empty Music (Connection) TV Type Component HDMI Resolution CTRL FOR HDMI USB Connect USB Connect Setting USB LUN Setting Disc Burn (General Settings) Beep LCD Brightness Your Location*2 GPS Setting*2 REC Lamp Remote Ctrl A. Shut Off Power On By LCD*3 Language Setting Calibration Battery Info Demo Mode (Clock Settings) Date & Time Setting Date & Time Summer Time Date & Time Format Area Setting Auto Clock ADJ *2 Auto Area ADJ*2 *1 HDR-CX700/CX700V *2 HDR-CX560V/CX700V *3 HDR-CX560/CX560V Shooting Mode (Items for...

Handycam® Handbook
Page 81
...; Active Provides a more powerful SteadyShot effect. Conversion Lens When using a conversion lens (sold separately), then the image becomes natural. On The SteadyShot function is performed digitally. Note You can magnify images up to 10 times using optical zooming, unless [ SteadyShot] is set to focus automatically. Set [ SteadyShot] to [Off] ( ) when using the optimum compensation for camera shake and focus for camera shake. Digital Zoom You can compensate...
...; Active Provides a more powerful SteadyShot effect. Conversion Lens When using a conversion lens (sold separately), then the image becomes natural. On The SteadyShot function is performed digitally. Note You can magnify images up to 10 times using optical zooming, unless [ SteadyShot] is set to focus automatically. Set [ SteadyShot] to [Off] ( ) when using the optimum compensation for camera shake and focus for camera shake. Digital Zoom You can compensate...

Handycam® Handbook
Page 84
...-in Zoom Mic You can record a movie with vivid sound appropriate to record an exciting and powerful sound in flash, or an external flash (sold separately) that is not suitable for recording sound. Normal Records various ambient sounds, converting them into the appropriate level. You can record a movie with less wind noise by cutting the low-frequency sound input from the built-in or out. Audio Mode You can change the recording sound format. ...
...-in Zoom Mic You can record a movie with vivid sound appropriate to record an exciting and powerful sound in flash, or an external flash (sold separately) that is not suitable for recording sound. Normal Records various ambient sounds, converting them into the appropriate level. You can record a movie with less wind noise by cutting the low-frequency sound input from the built-in or out. Audio Mode You can change the recording sound format. ...

Handycam® Handbook
Page 98
...; Copying/Connecting to image quality will neither copy nor retain your camcorder and take it after about 1 minute, and turn the camcorder on. Press RESET (p. 123) using a pointed object, and turn the camcorder on other devices........p. 104 Connecting to shoot after about 1 minute. Turn off your data. Overall operations/Wireless Remote Commander p. 98 Batteries/power sources p. 99 LCD screen/viewfinder (HDR-CX700/ CX700V p. 100 Memory card p. 100 Recording p. 101 Playback...
...; Copying/Connecting to image quality will neither copy nor retain your camcorder and take it after about 1 minute, and turn the camcorder on. Press RESET (p. 123) using a pointed object, and turn the camcorder on other devices........p. 104 Connecting to shoot after about 1 minute. Turn off your data. Overall operations/Wireless Remote Commander p. 98 Batteries/power sources p. 99 LCD screen/viewfinder (HDR-CX700/ CX700V p. 100 Memory card p. 100 Recording p. 101 Playback...
Handycam® Handbook
Page 100
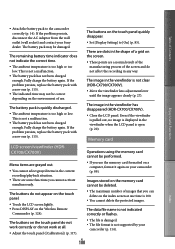
... supported by your Sony dealer. The buttons do not appear on the touch panel. Touch the LCD screen lightly. Press DISPLAY on the touch panel quickly disappear. Set [Display Setting] to the camcorder correctly (p. 14). The data file name is not indicated correctly or flashes. The file is damaged. The file format is not clear (HDR-CX700/CX700V). Move the viewfinder lens adjustment lever until the image...
... supported by your Sony dealer. The buttons do not appear on the touch panel. Touch the LCD screen lightly. Press DISPLAY on the touch panel quickly disappear. Set [Display Setting] to the camcorder correctly (p. 14). The data file name is not indicated correctly or flashes. The file is damaged. The file format is not clear (HDR-CX700/CX700V). Move the viewfinder lens adjustment lever until the image...

Handycam® Handbook
Page 109
... playback image on a TV, it must be connected. You need an NTSC-systembased TV with an AUDIO/VIDEO input jack. Australia, Austria, Belgium, China, Czech Republic, Denmark, Finland, Germany, Holland, Hong Kong, Hungary, Italy, Kuwait, Malaysia, New Zealand, Norway, Poland, Portugal, Singapore, Slovak Republic, Spain, Sweden, Switzerland, Thailand, United Kingdom, etc. Touch (MENU) [Setup] [ (Clock Settings)] [Date & Time Setting] [Daylight Savings...
... playback image on a TV, it must be connected. You need an NTSC-systembased TV with an AUDIO/VIDEO input jack. Australia, Austria, Belgium, China, Czech Republic, Denmark, Finland, Germany, Holland, Hong Kong, Hungary, Italy, Kuwait, Malaysia, New Zealand, Norway, Poland, Portugal, Singapore, Slovak Republic, Spain, Sweden, Switzerland, Thailand, United Kingdom, etc. Touch (MENU) [Setup] [ (Clock Settings)] [Date & Time Setting] [Daylight Savings...

Handycam® Handbook
Page 113
... Enjoy Useful Functions Great Britain Based upon electronic data © National Land Survey Sweden. Top-Map Ltd. Doing so may occur in the following cases (the data will not be compensated for): If you eject the memory card, or turn off your camcorder while your camcorder is reading or writing image files on the memory card (while the access lamp is lit or flashing) ...
... Enjoy Useful Functions Great Britain Based upon electronic data © National Land Survey Sweden. Top-Map Ltd. Doing so may occur in the following cases (the data will not be compensated for): If you eject the memory card, or turn off your camcorder while your camcorder is reading or writing image files on the memory card (while the access lamp is lit or flashing) ...

Handycam® Handbook
Page 126
... Camera Data 90 Capturing photos from a movie 54 Charging the battery pack..........14 Charging the battery pack abroad 16, 109 Cinematone 80 Clock Set 18 Component 92 Connection 33 Conversion Lens 81 Convert Highlight Playback scenes/scenarios 45 Coordinates 90 Copy 52 Copying a disc 60 Creating a disc 55 Creating AVCHD disc 59 CTRL FOR HDMI 93 D Data Code 19, 90 Date/Time 19 Date & Time Setting 96 Delete 50 Demo Mode 96 Dial Setting 41 Digital Zoom 81 Disc Burn 57 Disc recorder 70 Display Setting...
... Camera Data 90 Capturing photos from a movie 54 Charging the battery pack..........14 Charging the battery pack abroad 16, 109 Cinematone 80 Clock Set 18 Component 92 Connection 33 Conversion Lens 81 Convert Highlight Playback scenes/scenarios 45 Coordinates 90 Copy 52 Copying a disc 60 Creating a disc 55 Creating AVCHD disc 59 CTRL FOR HDMI 93 D Data Code 19, 90 Date/Time 19 Date & Time Setting 96 Delete 50 Demo Mode 96 Dial Setting 41 Digital Zoom 81 Disc Burn 57 Disc recorder 70 Display Setting...
Handycam® Handbook
Page 127
... Photo Capture 54 Photos 27, 32 Playback Function 88 Playing 29 Playing AVCHD disc 59 Portrait 79 Power on 18 Power On By LCD 95 Precautions 111 Protect 51 PS 38 R REC Lamp 94 Rec Mode 37 Recording 24 Recording media 21 Red Eye Reduction 84 Remote Ctrl 95 Repair 98 Repair Img.DB F 103 RESET 123 S Saving images in external media 63 Scenario 44 Scenario Erase 44 Scenario Save 44 Scene Selection 79 Screen indicators 120 Self-diagnosis display...
... Photo Capture 54 Photos 27, 32 Playback Function 88 Playing 29 Playing AVCHD disc 59 Portrait 79 Power on 18 Power On By LCD 95 Precautions 111 Protect 51 PS 38 R REC Lamp 94 Rec Mode 37 Recording 24 Recording media 21 Red Eye Reduction 84 Remote Ctrl 95 Repair 98 Repair Img.DB F 103 RESET 123 S Saving images in external media 63 Scenario 44 Scenario Erase 44 Scenario Save 44 Scene Selection 79 Screen indicators 120 Self-diagnosis display...
Operating Guide (Large File - 12.06 MB)
Page 10
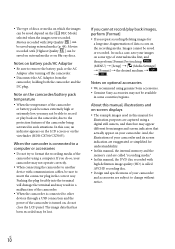
...; In this manual, the internal memory and the memory card are called "recording media." In this case, an indicator appears on the LCD screen or on the viewfinder (HDR-CX700/CX700V). The image data that actually appear on your images on some countries/regions. Movies recorded with [60p Quality ] can be saved using a digital still camera, and therefore may be saved or recorded. In such a case, save your camcorder. Pushing the plug forcibly into...
...; In this manual, the internal memory and the memory card are called "recording media." In this case, an indicator appears on the LCD screen or on the viewfinder (HDR-CX700/CX700V). The image data that actually appear on your images on some countries/regions. Movies recorded with [60p Quality ] can be saved using a digital still camera, and therefore may be saved or recorded. In such a case, save your camcorder. Pushing the plug forcibly into...

Operating Guide (Large File - 12.06 MB)
Page 42
... format the internal recording media of the software. In this , the camcorder will not operate correctly. Do not insert AVCHD recording discs that exceeds 2 GB or larger and saves the parts as separate files on a computer, however, the files will be connected to the internet for the installation.) You may erase its contents without following the procedures displayed. (The computer must be handled properly by the import function...
... format the internal recording media of the software. In this , the camcorder will not operate correctly. Do not insert AVCHD recording discs that exceeds 2 GB or larger and saves the parts as separate files on a computer, however, the files will be connected to the internet for the installation.) You may erase its contents without following the procedures displayed. (The computer must be handled properly by the import function...
Operating Guide (Large File - 12.06 MB)
Page 78
... 30 Media Select 21 Media Settings 21 Memory card 22 "Memory Stick" media 22 "Memory Stick PRO-HG Duo" media 22 "Memory Stick PRO Duo" media 22 Menus 58 Movies 25, 33 N NightShot 30 P Photos 27, 34 Playing 31 PMB (Picture Motion Browser 43 Power on 18 Precautions 69 PS 29 R Recording 24 Recording and playback time....65 Recording media 21 Recording time of movies/ number of recordable photos....65 Repair 63 RESET 77 S Saving images in external media 48 Screen indicators 74 Self-diagnosis display 64 Setting the date and time...........18 Software 40 Specifications 71...
... 30 Media Select 21 Media Settings 21 Memory card 22 "Memory Stick" media 22 "Memory Stick PRO-HG Duo" media 22 "Memory Stick PRO Duo" media 22 Menus 58 Movies 25, 33 N NightShot 30 P Photos 27, 34 Playing 31 PMB (Picture Motion Browser 43 Power on 18 Precautions 69 PS 29 R Recording 24 Recording and playback time....65 Recording media 21 Recording time of movies/ number of recordable photos....65 Repair 63 RESET 77 S Saving images in external media 48 Screen indicators 74 Self-diagnosis display 64 Setting the date and time...........18 Software 40 Specifications 71...


