Instruction Manual
Page 2
... please read these numbers whenever you are not sure of the type of electric shock to fit, contact your Sony dealer regarding this product. For those sets designed to operate from the type of any kind into the power outlet...could result in the space provided below. Owner's Record The model and serial numbers are located on the set. 2 DSC-T700 Serial No WARNING To reduce fire or shock hazard, do not expose the unit to these safety instructions completely before operating.... Refer to rain or moisture. If the plug should be operated only from battery power, or other ).
... please read these numbers whenever you are not sure of the type of electric shock to fit, contact your Sony dealer regarding this product. For those sets designed to operate from the type of any kind into the power outlet...could result in the space provided below. Owner's Record The model and serial numbers are located on the set. 2 DSC-T700 Serial No WARNING To reduce fire or shock hazard, do not expose the unit to these safety instructions completely before operating.... Refer to rain or moisture. If the plug should be operated only from battery power, or other ).

Instruction Manual
Page 4
...For more information regarding recycling of rechargeable batteries, call : Sony Customer Information Center 1-800-222-SONY (7669) The number below is subject to operate this product, you . and Canada [ RECYCLING LITHIUM-ION BATTERIES Lithium-Ion batteries are cautioned that may cause undesired operation... damaged or leaking Lithium-Ion batteries. Battery charger This power unit is intended to be correctly orientated in this first CAUTION Replace the battery with Part 15 of Conformity Trade Name: SONY Model No.: DSC-T700 Responsible Party: Sony Electronics Inc. Address:16530 Via...
...For more information regarding recycling of rechargeable batteries, call : Sony Customer Information Center 1-800-222-SONY (7669) The number below is subject to operate this product, you . and Canada [ RECYCLING LITHIUM-ION BATTERIES Lithium-Ion batteries are cautioned that may cause undesired operation... damaged or leaking Lithium-Ion batteries. Battery charger This power unit is intended to be correctly orientated in this first CAUTION Replace the battery with Part 15 of Conformity Trade Name: SONY Model No.: DSC-T700 Responsible Party: Sony Electronics Inc. Address:16530 Via...
Instruction Manual
Page 6
...health which could otherwise be handed over to the applicable collection point for the recycling of electrical and electronic equipment. Hand the battery over the product at end-of-life to conserve natural resources. In case of products that for the recycling of electrical and... waste disposal service or the shop where you will help to the applicable collection point for the recycling of waste batteries. To ensure that the battery will help prevent potential negative consequences for the environment and human health, which could otherwise be caused by inappropriate waste...
...health which could otherwise be handed over to the applicable collection point for the recycling of electrical and electronic equipment. Hand the battery over the product at end-of-life to conserve natural resources. In case of products that for the recycling of electrical and... waste disposal service or the shop where you will help to the applicable collection point for the recycling of waste batteries. To ensure that the battery will help prevent potential negative consequences for the environment and human health, which could otherwise be caused by inappropriate waste...
Instruction Manual
Page 8
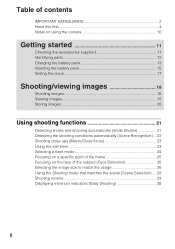
Table of contents IMPORTANT SAFEGUARDS 2 Read this first 4 Notes on using the camera 10 Getting started 11 Checking the accessories supplied 11 Identifying parts 12 Charging the battery pack 13 Inserting the battery pack 15 Setting the clock 17 Shooting/viewing images 18 Shooting images 18 Viewing images 19 Storing images 20 Using shooting...
Table of contents IMPORTANT SAFEGUARDS 2 Read this first 4 Notes on using the camera 10 Getting started 11 Checking the accessories supplied 11 Identifying parts 12 Charging the battery pack 13 Inserting the battery pack 15 Setting the clock 17 Shooting/viewing images 18 Shooting images 18 Viewing images 19 Storing images 20 Using shooting...
Instruction Manual
Page 10
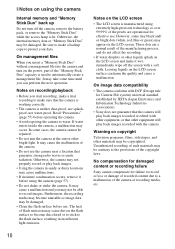
...moisture condensation occurs, remove it wet, immediately wipe off the camera, remove the battery pack, or remove the "Memory Stick Duo" while the access lamp is lit. Be sure to make sure that the camera will play back images recorded or edited with a soft cloth... for damaged content or recording failure Sony cannot compensate for Camera File system) universal standard established by JEITA (Japan Electronics and Information Technology Industries Association). • Sony does not guarantee that the camera is working correctly. • The camera is neither dust-proof, nor splashproof...
...moisture condensation occurs, remove it wet, immediately wipe off the camera, remove the battery pack, or remove the "Memory Stick Duo" while the access lamp is lit. Be sure to make sure that the camera will play back images recorded or edited with a soft cloth... for damaged content or recording failure Sony cannot compensate for Camera File system) universal standard established by JEITA (Japan Electronics and Information Technology Industries Association). • Sony does not guarantee that the camera is working correctly. • The camera is neither dust-proof, nor splashproof...
Instruction Manual
Page 11
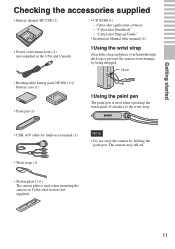
... off. • Wrist strap (1) • Station plate G (1) The station plate is used when mounting the camera on Cyber-shot station (not supplied). 11 Getting started Getting started Checking the accessories supplied • Battery charger BC-CSD (1) • CD-ROM (1) - "Cyber-shot Step-up Guide" • Instruction Manual (this manual) (1) • Power cord (mains lead) (1) (not supplied...
... off. • Wrist strap (1) • Station plate G (1) The station plate is used when mounting the camera on Cyber-shot station (not supplied). 11 Getting started Getting started Checking the accessories supplied • Battery charger BC-CSD (1) • CD-ROM (1) - "Cyber-shot Step-up Guide" • Instruction Manual (this manual) (1) • Power cord (mains lead) (1) (not supplied...
Instruction Manual
Page 12
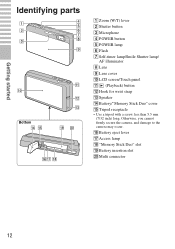
P Battery eject lever Q Access lamp R "Memory Stick Duo" slot S Battery insertion slot T Multi connector 12 Getting started Identifying parts Bottom A Zoom (W/T) lever B Shutter button C Microphone D POWER button E POWER lamp F Flash G Self-timer lamp/Smile Shutter lamp/ AF illuminator H Lens I Lens cover J LCD screen/Touch panel K (Playback) button L Hook for wrist strap M Speaker N Battery/"Memory Stick Duo" cover O Tripod receptacle • Use a tripod with a screw less than 5.5 mm (7/32 inch) long. Otherwise, you cannot firmly secure the camera, and damage to the camera may occur.
P Battery eject lever Q Access lamp R "Memory Stick Duo" slot S Battery insertion slot T Multi connector 12 Getting started Identifying parts Bottom A Zoom (W/T) lever B Shutter button C Microphone D POWER button E POWER lamp F Flash G Self-timer lamp/Smile Shutter lamp/ AF illuminator H Lens I Lens cover J LCD screen/Touch panel K (Playback) button L Hook for wrist strap M Speaker N Battery/"Memory Stick Duo" cover O Tripod receptacle • Use a tripod with a screw less than 5.5 mm (7/32 inch) long. Otherwise, you cannot firmly secure the camera, and damage to the camera may occur.
Instruction Manual
Page 13
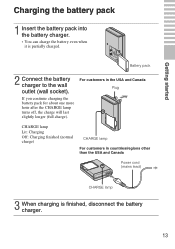
... for about one more hour after the CHARGE lamp turns off, the charge will last slightly longer (full charge). Battery pack 2 Connect the battery charger to the wall outlet (wall socket). For customers in the USA and Canada Plug CHARGE lamp Lit: Charging Off: Charging finished (normal charge) ... in countries/regions other than the USA and Canada Power cord (mains lead) CHARGE lamp 3 When charging is partially charged. Getting started Charging the battery pack 1 Insert the battery pack into the battery charger. • You can charge the battery even when it is finished, disconnect the...
... for about one more hour after the CHARGE lamp turns off, the charge will last slightly longer (full charge). Battery pack 2 Connect the battery charger to the wall outlet (wall socket). For customers in the USA and Canada Plug CHARGE lamp Lit: Charging Off: Charging finished (normal charge) ... in countries/regions other than the USA and Canada Power cord (mains lead) CHARGE lamp 3 When charging is partially charged. Getting started Charging the battery pack 1 Insert the battery pack into the battery charger. • You can charge the battery even when it is finished, disconnect the...
Instruction Manual
Page 14
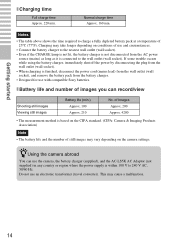
Normal charge time Approx. 160 min. Do not use with compatible Sony batteries. This may vary depending on the camera settings. of images you can use the camera, the battery charger (supplied), and the AC-LS5K AC Adaptor (not supplied) in any country or region where the power supply is connected to ...power source (mains) as long as it is within 100 V to the wall outlet (wall socket). zUsing the camera abroad You can record/view Shooting still images Viewing still images Battery life (min.) Approx. 100 Approx. 210 No. Notes • The table above shows the time required to...
Normal charge time Approx. 160 min. Do not use with compatible Sony batteries. This may vary depending on the camera settings. of images you can use the camera, the battery charger (supplied), and the AC-LS5K AC Adaptor (not supplied) in any country or region where the power supply is connected to ...power source (mains) as long as it is within 100 V to the wall outlet (wall socket). zUsing the camera abroad You can record/view Shooting still images Viewing still images Battery life (min.) Approx. 100 Approx. 210 No. Notes • The table above shows the time required to...

Instruction Manual
Page 15
Align the v mark on the battery with the battery eject lever, then insert the battery while pressing the lever in the direction of the arrow. 3 Close the cover. 15 Getting started Inserting the battery pack 1 Open the cover. 2 Insert the battery pack.
Align the v mark on the battery with the battery eject lever, then insert the battery while pressing the lever in the direction of the arrow. 3 Close the cover. 15 Getting started Inserting the battery pack 1 Open the cover. 2 Insert the battery pack.
Instruction Manual
Page 16
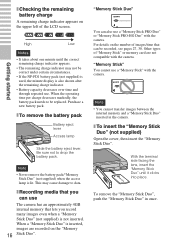
...appears on the "Memory 16 Stick Duo". x To remove the battery pack Battery eject lever Access lamp Slide the battery eject lever. "Memory Stick" You cannot use a "Memory Stick PRO Duo" or "Memory Stick PRO-HG Duo" with the camera. With the terminal side facing the lens, insert the "Memory Stick...Other types of the LCD screen. To remove the "Memory Stick Duo", push the "Memory Stick Duo" in the camera. This may not be replaced. Note • Never remove the battery pack/"Memory Stick Duo" (not supplied) when the access lamp is inserted, images are recorded on the upper left...
...appears on the "Memory 16 Stick Duo". x To remove the battery pack Battery eject lever Access lamp Slide the battery eject lever. "Memory Stick" You cannot use a "Memory Stick PRO Duo" or "Memory Stick PRO-HG Duo" with the camera. With the terminal side facing the lens, insert the "Memory Stick...Other types of the LCD screen. To remove the "Memory Stick Duo", push the "Memory Stick Duo" in the camera. This may not be replaced. Note • Never remove the battery pack/"Memory Stick Duo" (not supplied) when the access lamp is inserted, images are recorded on the upper left...

Instruction Manual
Page 42
... • is recommended. 42 appears on the screen of the camera. 1 To a USB jack Cable for multi-use terminal from the camera while the camera is displayed. When the indicator changes to , you can start using a battery with little remaining charge, you may not be corrupted. x Importing... images to your computer using "PMB" 1 Insert a fully charged battery pack to the camera, then press the (Playback) button. 2 Connect the camera to transfer the data or the data may be able to your computer. "Connecting..." For details, see the ...
... • is recommended. 42 appears on the screen of the camera. 1 To a USB jack Cable for multi-use terminal from the camera while the camera is displayed. When the indicator changes to , you can start using a battery with little remaining charge, you may not be corrupted. x Importing... images to your computer using "PMB" 1 Insert a fully charged battery pack to the camera, then press the (Playback) button. 2 Connect the camera to transfer the data or the data may be able to your computer. "Connecting..." For details, see the ...

Instruction Manual
Page 45
The [Normal] display returns temporarily. Changing camera settings 45 Histogram: A histogram is selected. zHistogram and brightness settings The following setting can be accessed by touching . To display the buttons,... viewing images in bright outside light, reset to the left side. Brightness: This sets the backlight brightness ([Normal]/[Bright]). However, the battery power may decrease faster under such condition. Changing camera settings Changing the screen display 1 Touch t desired mode t . (Normal): Displays buttons and icons (Simple): Displays only buttons (Image ...
The [Normal] display returns temporarily. Changing camera settings 45 Histogram: A histogram is selected. zHistogram and brightness settings The following setting can be accessed by touching . To display the buttons,... viewing images in bright outside light, reset to the left side. Brightness: This sets the backlight brightness ([Normal]/[Bright]). However, the battery power may decrease faster under such condition. Changing camera settings Changing the screen display 1 Touch t desired mode t . (Normal): Displays buttons and icons (Simple): Displays only buttons (Image ...
Instruction Manual
Page 53
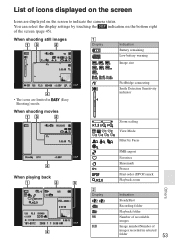
... images Image number/Number of the screen (page 45). When shooting still images A Display Indication Battery remaining Low battery warning Image size • The icons are displayed on the bottom right of images recorded in Shooting...) mode. (Easy When shooting movies When playing back PictBridge connecting Smile Detection Sensitivity indicator B Display 96 8/8 Zoom scaling View Mode Filter by touching the indication on the screen to indicate the camera...
... images Image number/Number of the screen (page 45). When shooting still images A Display Indication Battery remaining Low battery warning Image size • The icons are displayed on the bottom right of images recorded in Shooting...) mode. (Easy When shooting movies When playing back PictBridge connecting Smile Detection Sensitivity indicator B Display 96 8/8 Zoom scaling View Mode Filter by touching the indication on the screen to indicate the camera...
Instruction Manual
Page 55
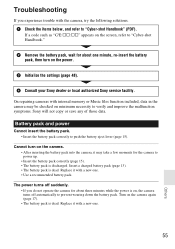
... power Cannot insert the battery pack. • Insert the battery pack correctly to verify and improve the malfunction symptoms. Sony will not copy or save any of those data. On repairing cameras with internal memory or Music files function included, data in the camera may take a few moments for the camera to "Cyber-shot Handbook" (PDF). Replace it...
... power Cannot insert the battery pack. • Insert the battery pack correctly to verify and improve the malfunction symptoms. Sony will not copy or save any of those data. On repairing cameras with internal memory or Music files function included, data in the camera may take a few moments for the camera to "Cyber-shot Handbook" (PDF). Replace it...

Instruction Manual
Page 56
... were shot using other cameras. • The camera is in Folder View (page 34). • This is caused by copying images on the "Memory Stick Duo" shot using the AC Adaptor (not supplied). When [Brightness] of the following: - Insert the charged battery pack (page 13). • The battery pack ... it to (Movie) when shooting movies. • The image size is set the shooting mode other cameras. Cannot charge the battery pack while inside the camera. • You cannot charge the battery pack using other than [640(Fine)]. - Change the "Memory Stick Duo". • You cannot record...
... were shot using other cameras. • The camera is in Folder View (page 34). • This is caused by copying images on the "Memory Stick Duo" shot using the AC Adaptor (not supplied). When [Brightness] of the following: - Insert the charged battery pack (page 13). • The battery pack ... it to (Movie) when shooting movies. • The image size is set the shooting mode other cameras. Cannot charge the battery pack while inside the camera. • You cannot charge the battery pack using other than [640(Fine)]. - Change the "Memory Stick Duo". • You cannot record...
Instruction Manual
Page 57
...one month it becomes completely discharged. If moisture condensation occurs Turn off . 57 Others On the internal rechargeable backup battery This camera has an internal rechargeable battery for use under the temperatures between 0°C and 40°C (32°F and 104°F). In this malfunction...condense inside the lens, you do not use the camera at all of the internal rechargeable backup battery Insert charged battery pack in the internal memory. Precaution when disposing of the camera. Precautions Do not use/store the camera in the following places • In an extremely ...
...one month it becomes completely discharged. If moisture condensation occurs Turn off . 57 Others On the internal rechargeable backup battery This camera has an internal rechargeable battery for use under the temperatures between 0°C and 40°C (32°F and 104°F). In this malfunction...condense inside the lens, you do not use the camera at all of the internal rechargeable backup battery Insert charged battery pack in the internal memory. Precaution when disposing of the camera. Precautions Do not use/store the camera in the following places • In an extremely ...

Instruction Manual
Page 58
...Image device: 7.7 mm (1/2.3 type) color CCD, Primary color filter Total pixel number of camera: Approx. 10.3 Megapixels Effective pixel number of dots: 921 600 (1920 × 480) dots [Power, general] Power: Rechargeable battery pack NP-BD1, 3.6 V NP-FD1 (not supplied), 3.6 V AC-LS5K AC Adaptor...; 24 × 91 mm (2 1/2 × 31/32 × 3 5/8 inches) (W/H/D) Mass: Approx. 75 g (2.7 oz) Rechargeable battery pack NP-BD1 Used battery: Lithium-ion battery Maximum voltage: DC 4.2 V Nominal voltage: DC 3.6 V Capacity: 2.4 Wh (680 mAh) Design and specifications are subject to change without notice....
...Image device: 7.7 mm (1/2.3 type) color CCD, Primary color filter Total pixel number of camera: Approx. 10.3 Megapixels Effective pixel number of dots: 921 600 (1920 × 480) dots [Power, general] Power: Rechargeable battery pack NP-BD1, 3.6 V NP-FD1 (not supplied), 3.6 V AC-LS5K AC Adaptor...; 24 × 91 mm (2 1/2 × 31/32 × 3 5/8 inches) (W/H/D) Mass: Approx. 75 g (2.7 oz) Rechargeable battery pack NP-BD1 Used battery: Lithium-ion battery Maximum voltage: DC 4.2 V Nominal voltage: DC 3.6 V Capacity: 2.4 Wh (680 mAh) Design and specifications are subject to change without notice....


