
Instruction Manual
Page 12
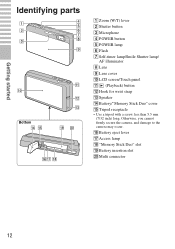
Getting started Identifying parts Bottom A Zoom (W/T) lever B Shutter button C Microphone D POWER button E POWER lamp F Flash G Self-timer lamp/Smile Shutter lamp/ AF illuminator H Lens I Lens cover J LCD screen/Touch panel K (Playback) button L Hook for wrist strap M Speaker N Battery/"Memory Stick Duo" cover O Tripod receptacle • Use a tripod with a screw less than 5.5 mm (7/32 inch) long. Otherwise, you cannot firmly secure the camera, and damage to the camera may occur. P Battery eject lever Q Access lamp R "Memory Stick Duo" slot S Battery insertion slot T Multi connector 12
Getting started Identifying parts Bottom A Zoom (W/T) lever B Shutter button C Microphone D POWER button E POWER lamp F Flash G Self-timer lamp/Smile Shutter lamp/ AF illuminator H Lens I Lens cover J LCD screen/Touch panel K (Playback) button L Hook for wrist strap M Speaker N Battery/"Memory Stick Duo" cover O Tripod receptacle • Use a tripod with a screw less than 5.5 mm (7/32 inch) long. Otherwise, you cannot firmly secure the camera, and damage to the camera may occur. P Battery eject lever Q Access lamp R "Memory Stick Duo" slot S Battery insertion slot T Multi connector 12
Instruction Manual
Page 19
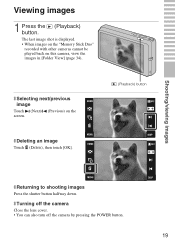
... pressing the POWER button. 19 The last image shot is displayed. • When images on the "Memory Stick Duo" recorded with other cameras cannot be played back on the screen. Viewing images 1 Press the (Playback) button. x Selecting next/previous image Touch (Next)/ (Previous) on this camera, view the images in [Folder View] (page 34). x Deleting...
... pressing the POWER button. 19 The last image shot is displayed. • When images on the "Memory Stick Duo" recorded with other cameras cannot be played back on the screen. Viewing images 1 Press the (Playback) button. x Selecting next/previous image Touch (Next)/ (Previous) on this camera, view the images in [Folder View] (page 34). x Deleting...

Instruction Manual
Page 25
... a child's face. (Adult Priority): Detects and shoots with a face is touched on the screen. (Auto): Selects the face the camera is to choose a focus point automatically, touch . : Face detected. : No face detected. You can change the focus position. 1 Point the camera at the subject, then touch the point of the subject and focuses on it. Using...
... a child's face. (Adult Priority): Detects and shoots with a face is touched on the screen. (Auto): Selects the face the camera is to choose a focus point automatically, touch . : Face detected. : No face detected. You can change the focus position. 1 Point the camera at the subject, then touch the point of the subject and focuses on it. Using...
Instruction Manual
Page 31
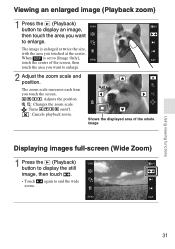
...the position. : Changes the zoom scale. : Turns / / / on/off. : Cancels playback zoom. Shows the displayed area of the screen, then touch the area you touched at the center. When is enlarged at twice the size, with the area you want to enlarge. 2 Adjust the zoom scale and position.... The zoom scale increases each time you want to enlarge. The image is set to [Image Only], touch the center of the whole image Displaying images full-screen (Wide Zoom) 1 Press the (Playback) button to end the wide Using viewing functions 31 again to display the ...
...the position. : Changes the zoom scale. : Turns / / / on/off. : Cancels playback zoom. Shows the displayed area of the screen, then touch the area you touched at the center. When is enlarged at twice the size, with the area you want to enlarge. 2 Adjust the zoom scale and position.... The zoom scale increases each time you want to enlarge. The image is set to [Image Only], touch the center of the whole image Displaying images full-screen (Wide Zoom) 1 Press the (Playback) button to end the wide Using viewing functions 31 again to display the ...
Instruction Manual
Page 32
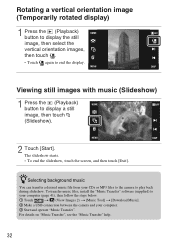
...]. 2 Make a USB connection between the camera and your CDs or MP3 files to the camera to display a still image, then touch (Slideshow). 2 Touch [Start]. To transfer music files, install the "Music Transfer" software (supplied) to end the display. The slideshow starts. • To end the slideshow, touch the screen, and then touch [Exit]. Viewing still images with...
...]. 2 Make a USB connection between the camera and your CDs or MP3 files to the camera to display a still image, then touch (Slideshow). 2 Touch [Start]. To transfer music files, install the "Music Transfer" software (supplied) to end the display. The slideshow starts. • To end the slideshow, touch the screen, and then touch [Exit]. Viewing still images with...
Instruction Manual
Page 33
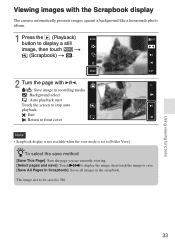
Using viewing functions Viewing images with the Scrapbook display The camera automatically presents images against a background like a homemade photo album. 1 Press the (Playback) button to display a still image, then touch t (Scrapbook) t . 2 Turn the page with / . / : Save image in the scrapbook. The image size to be saved... zTo select the save method [Save This Page]: Save the page you are currently viewing. [Select pages and save]: Touch / to display the image, then touch the image to save. [Save All Pages in Scrapbook]: Saves all images in recording media : Background select : Auto ...
Using viewing functions Viewing images with the Scrapbook display The camera automatically presents images against a background like a homemade photo album. 1 Press the (Playback) button to display a still image, then touch t (Scrapbook) t . 2 Turn the page with / . / : Save image in the scrapbook. The image size to be saved... zTo select the save method [Save This Page]: Save the page you are currently viewing. [Select pages and save]: Touch / to display the image, then touch the image to save. [Save All Pages in Scrapbook]: Saves all images in recording media : Background select : Auto ...
Instruction Manual
Page 34
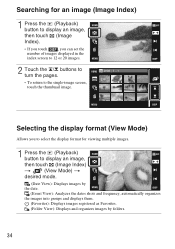
... 1 Press the (Playback) button to display an image, then touch (Image Index). • If you touch , you to select the display format for viewing multiple images. 1 Press the (Playback) button to the single-image screen, touch the thumbnail image. Selecting the display format (View Mode) Allows...buttons to turn the pages. • To return to display an image, then touch (Image Index) t (View Mode) t desired mode. (Date View): Displays images by the date. (Event View): Analyzes the dates shots and frequency, automatically organizes the images into groups and displays them. (Favorites): ...
... 1 Press the (Playback) button to display an image, then touch (Image Index). • If you touch , you to select the display format for viewing multiple images. 1 Press the (Playback) button to the single-image screen, touch the thumbnail image. Selecting the display format (View Mode) Allows...buttons to turn the pages. • To return to display an image, then touch (Image Index) t (View Mode) t desired mode. (Date View): Displays images by the date. (Event View): Analyzes the dates shots and frequency, automatically organizes the images into groups and displays them. (Favorites): ...

Instruction Manual
Page 36
Deleting multiple images 1 Touch (Image Index) t (Delete). 2 Select images for deletion. 1 Touch / to turn the pages, then touch the images you want to the selected images. 2 Repeat step 1. 3 Touch t [OK]. You can switch between single-image and index screen using , when selecting images. The mark is attached to delete. x Deleting in date, event or folder units t (Delete) t (All in Date Range), (All in Event) or Folder) t t [OK]. (All in This 36 Deleting images Deleting the currently displayed image 1 Touch (Delete) t [OK] (page 19).
Deleting multiple images 1 Touch (Image Index) t (Delete). 2 Select images for deletion. 1 Touch / to turn the pages, then touch the images you want to the selected images. 2 Repeat step 1. 3 Touch t [OK]. You can switch between single-image and index screen using , when selecting images. The mark is attached to delete. x Deleting in date, event or folder units t (Delete) t (All in Date Range), (All in Event) or Folder) t t [OK]. (All in This 36 Deleting images Deleting the currently displayed image 1 Touch (Delete) t [OK] (page 19).

Instruction Manual
Page 39
...print images by the following procedure. on the printer. Printing still images If you have a PictBridge compliant printer, you want to print. 5 Touch the desired setting item, then [OK]. The USB mode is printed. Export the images to a "Memory Stick Duo" with "PMB", then...print shop. 1 Import images to the computer (page 42). 2 Insert the "Memory Stick Duo" to the camera. 3 Select images to the printer with the cable for multiuse terminal (supplied). 3 Turn on the top of the screen t [Cyber-shot(Album/ 4 Select [Cyber-shot(Memory Stick)] under the drive, then click [Export].
...print images by the following procedure. on the printer. Printing still images If you have a PictBridge compliant printer, you want to print. 5 Touch the desired setting item, then [OK]. The USB mode is printed. Export the images to a "Memory Stick Duo" with "PMB", then...print shop. 1 Import images to the computer (page 42). 2 Insert the "Memory Stick Duo" to the camera. 3 Select images to the printer with the cable for multiuse terminal (supplied). 3 Turn on the top of the screen t [Cyber-shot(Album/ 4 Select [Cyber-shot(Memory Stick)] under the drive, then click [Export].

Instruction Manual
Page 45
... returns temporarily. The graph display indicates a bright image when skewed to the right side, and a dark image when skewed to [Bright]. Changing camera settings 45 Changing camera settings Changing the screen display 1 Touch t desired mode t . (Normal): Displays buttons and icons (Simple): Displays only buttons (Image Only): Hides buttons and icons Note • disappears from...
... returns temporarily. The graph display indicates a bright image when skewed to the right side, and a dark image when skewed to [Bright]. Changing camera settings 45 Changing camera settings Changing the screen display 1 Touch t desired mode t . (Normal): Displays buttons and icons (Simple): Displays only buttons (Image Only): Hides buttons and icons Note • disappears from...
Instruction Manual
Page 46
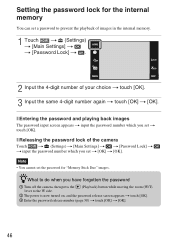
...) button while moving the zoom (W/T) lever to prevent the playback of images in the internal memory. 1 Touch t (Settings) t [Main Settings] t t [Password Lock] t . 2 Input the 4-digit number of the camera Touch t (Settings) t [Main Settings] t t [Password Lock] t t input the password number which ...you set t [OK] t [OK]. x Entering the password and playing back images The password input screen appears t input the password number which...
...) button while moving the zoom (W/T) lever to prevent the playback of images in the internal memory. 1 Touch t (Settings) t [Main Settings] t t [Password Lock] t . 2 Input the 4-digit number of the camera Touch t (Settings) t [Main Settings] t t [Password Lock] t t input the password number which ...you set t [OK] t [OK]. x Entering the password and playing back images The password input screen appears t input the password number which...
Instruction Manual
Page 48
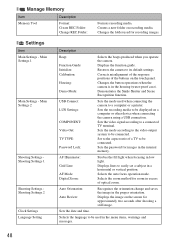
...: Digital Zoom: Strobes the fill light when focusing in the proper orientation. Auto Orientation: Auto Review: Recognizes the orientation change and saves the image in low light. Displays the image on a computer or other device when connecting the camera using a USB connection. Sets the recording media to be displayed on the screen for...
...: Digital Zoom: Strobes the fill light when focusing in the proper orientation. Auto Orientation: Auto Review: Recognizes the orientation change and saves the image in low light. Displays the image on a computer or other device when connecting the camera using a USB connection. Sets the recording media to be displayed on the screen for...
Instruction Manual
Page 49
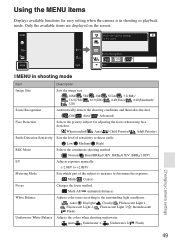
Only the available items are displayed on the screen. x MENU in shooting or playback mode. Using the MENU items Displays available functions for easy setting when the camera is in shooting mode Item Description Image Size Sets the image size. ( 10M/ 5M/ 3M/ VGA/ 3:2(8M...)/ 320) Scene Recognition Automatically detects the shooting conditions and then takes the shot. ( Off/ Auto/ Advanced) Face Detection Selects the priority subject for adjusting the focus when using face detection. ( When touched/ Auto/ Child Priority/ Adult Priority) Smile Detection Sensitivity Sets the level ...
Only the available items are displayed on the screen. x MENU in shooting or playback mode. Using the MENU items Displays available functions for easy setting when the camera is in shooting mode Item Description Image Size Sets the image size. ( 10M/ 5M/ 3M/ VGA/ 3:2(8M...)/ 320) Scene Recognition Automatically detects the shooting conditions and then takes the shot. ( Off/ Auto/ Advanced) Face Detection Selects the priority subject for adjusting the focus when using face detection. ( When touched/ Auto/ Child Priority/ Adult Priority) Smile Detection Sensitivity Sets the level ...
Instruction Manual
Page 53
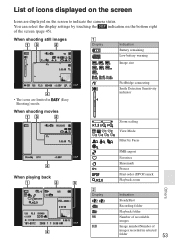
List of the screen (page 45). You can select the display settings by Faces PMB export Favorites Sharemark Protect Print order (DPOF) mark Playback zoom Others Indication SteadyShot Recording ... shooting movies When playing back PictBridge connecting Smile Detection Sensitivity indicator B Display 96 8/8 Zoom scaling View Mode Filter by touching the indication on the bottom right of icons displayed on the screen Icons are limited in selected folder 53 When shooting still images A Display Indication Battery remaining Low battery warning Image size...
List of the screen (page 45). You can select the display settings by Faces PMB export Favorites Sharemark Protect Print order (DPOF) mark Playback zoom Others Indication SteadyShot Recording ... shooting movies When playing back PictBridge connecting Smile Detection Sensitivity indicator B Display 96 8/8 Zoom scaling View Mode Filter by touching the indication on the bottom right of icons displayed on the screen Icons are limited in selected folder 53 When shooting still images A Display Indication Battery remaining Low battery warning Image size...
Instruction Manual
Page 57
Do not touch the camera with a soft cloth to shoot with the power off. 57 Others If ...sunscreen or insecticide. - However, even if this may cause malfunction or damage the camera. On cleaning Cleaning the LCD screen Wipe the screen surface with the camera in extremely cold or hot places that if you can still use under the temperatures...and other place with an LCD cleaning kit (not supplied) to record clear images. On operating temperatures Your camera is brought directly from a cold to charge this case, be repaired. Therefore, when disposing of your hand....
Do not touch the camera with a soft cloth to shoot with the power off. 57 Others If ...sunscreen or insecticide. - However, even if this may cause malfunction or damage the camera. On cleaning Cleaning the LCD screen Wipe the screen surface with the camera in extremely cold or hot places that if you can still use under the temperatures...and other place with an LCD cleaning kit (not supplied) to record clear images. On operating temperatures Your camera is brought directly from a cold to charge this case, be repaired. Therefore, when disposing of your hand....


