Instruction Manual
Page 1
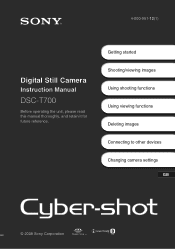
Getting started Shooting/viewing images Using shooting functions Using viewing functions Deleting images Connecting to other devices Changing camera settings GB © 2008 Sony Corporation 4-000-951-12(1) Digital Still Camera Instruction Manual DSC-T700 Before operating the unit, please read this manual thoroughly, and retain it for future reference.
Getting started Shooting/viewing images Using shooting functions Using viewing functions Deleting images Connecting to other devices Changing camera settings GB © 2008 Sony Corporation 4-000-951-12(1) Digital Still Camera Instruction Manual DSC-T700 Before operating the unit, please read this manual thoroughly, and retain it for future reference.
Instruction Manual
Page 2
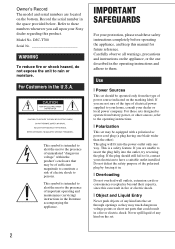
... indicated on the set through openings as they may be equipped with a polarized ac power cord plug (a plug having one way. Use [ Power Sources This set should still fail to fit, contact your electrician to have a suitable outlet installed. This is intended to alert the user to the presence of any kind into the set . 2 Never spill liquid of important operating and maintenance (servicing) instructions...
... indicated on the set through openings as they may be equipped with a polarized ac power cord plug (a plug having one way. Use [ Power Sources This set should still fail to fit, contact your electrician to have a suitable outlet installed. This is intended to alert the user to the presence of any kind into the set . 2 Never spill liquid of important operating and maintenance (servicing) instructions...

Instruction Manual
Page 3
... and openings must never be walked on a bed, sofa, rug, or other similar surface. - Use a cloth lightly dampened with a cloth or other controls may result in the operating instructions. The set may expose you to normal operation. - If the set . Improper adjustment of other materials. - Installation [ Water and Moisture Do not use liquid cleaners or aerosol cleaners. Service [ Damage Requiring Service Unplug the set to...
... and openings must never be walked on a bed, sofa, rug, or other similar surface. - Use a cloth lightly dampened with a cloth or other controls may result in the operating instructions. The set may expose you to normal operation. - If the set . Improper adjustment of other materials. - Installation [ Water and Moisture Do not use liquid cleaners or aerosol cleaners. Service [ Damage Requiring Service Unplug the set to...
Instruction Manual
Page 5
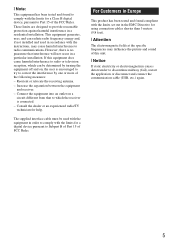
... comply with the instructions, may influence the picture and sound of this equipment does cause harmful interference to radio or television reception, which the receiver is connected. - These limits are designed to provide reasonable protection against harmful interference in the EMC Directive for using connection cables shorter than 3 meters (9.8 feet). [ Attention The electromagnetic fields at the specific frequencies may cause...
... comply with the instructions, may influence the picture and sound of this equipment does cause harmful interference to radio or television reception, which the receiver is connected. - These limits are designed to provide reasonable protection against harmful interference in the EMC Directive for using connection cables shorter than 3 meters (9.8 feet). [ Attention The electromagnetic fields at the specific frequencies may cause...
Instruction Manual
Page 8
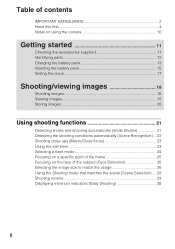
... on using the camera 10 Getting started 11 Checking the accessories supplied 11 Identifying parts 12 Charging the battery pack 13 Inserting the battery pack 15 Setting the clock 17 Shooting/viewing images 18 Shooting images 18 Viewing images 19 Storing images 20 Using shooting functions 21 Detecting smiles and shooting automatically (Smile Shutter 21 Detecting the shooting conditions automatically (Scene Recognition) ... 22 Shooting close-ups (Macro/Close focus 23 Using the self-timer 23 Selecting a flash mode 24 Focusing on a specific...
... on using the camera 10 Getting started 11 Checking the accessories supplied 11 Identifying parts 12 Charging the battery pack 13 Inserting the battery pack 15 Setting the clock 17 Shooting/viewing images 18 Shooting images 18 Viewing images 19 Storing images 20 Using shooting functions 21 Detecting smiles and shooting automatically (Smile Shutter 21 Detecting the shooting conditions automatically (Scene Recognition) ... 22 Shooting close-ups (Macro/Close focus 23 Using the self-timer 23 Selecting a flash mode 24 Focusing on a specific...
Instruction Manual
Page 9
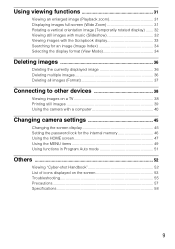
... Mode 34 Deleting images 36 Deleting the currently displayed image 36 Deleting multiple images 36 Deleting all images (Format 37 Connecting to other devices 38 Viewing images on a TV 38 Printing still images 39 Using the camera with a computer 40 Changing camera settings 45 Changing the screen display 45 Setting the password lock for the internal memory 46 Using the HOME screen 47 Using the MENU items 49 Using functions in Program Auto mode 51 Others 52 Viewing "Cyber-shot Handbook 52 List of icons displayed on the screen 53 Troubleshooting 55 Precautions 57 Specifications...
... Mode 34 Deleting images 36 Deleting the currently displayed image 36 Deleting multiple images 36 Deleting all images (Format 37 Connecting to other devices 38 Viewing images on a TV 38 Printing still images 39 Using the camera with a computer 40 Changing camera settings 45 Changing the screen display 45 Setting the password lock for the internal memory 46 Using the HOME screen 47 Using the MENU items 49 Using functions in Program Auto mode 51 Others 52 Viewing "Cyber-shot Handbook 52 List of icons displayed on the screen 53 Troubleshooting 55 Precautions 57 Specifications...
Instruction Manual
Page 10
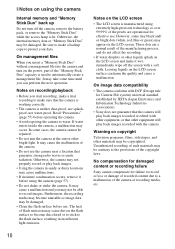
... may be able to record images. x Notes on using the camera Internal memory and "Memory Stick Duo" back up Do not turn on the power, part of the "Memory Stick Duo" capacity is used to automatically create a management file. Be sure to make it before operating the camera. • Avoid exposing the camera to water. However, some tiny black and/ or bright dots (white, red, blue or green) may appear on...
... may be able to record images. x Notes on using the camera Internal memory and "Memory Stick Duo" back up Do not turn on the power, part of the "Memory Stick Duo" capacity is used to automatically create a management file. Be sure to make it before operating the camera. • Avoid exposing the camera to water. However, some tiny black and/ or bright dots (white, red, blue or green) may appear on...
Instruction Manual
Page 14
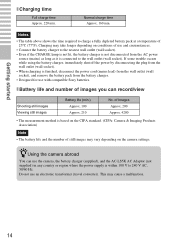
... power cord (mains lead) from the wall outlet (wall socket), and remove the battery pack from the AC power source (mains) as long as it is within 100 V to 240 V AC, 50/60 Hz. zUsing the camera abroad You can record/view Shooting still images Viewing still images Battery life (min.) Approx. 100 Approx. 210 No. x Battery life and number of images you can use the camera, the battery charger...
... power cord (mains lead) from the wall outlet (wall socket), and remove the battery pack from the AC power source (mains) as long as it is within 100 V to 240 V AC, 50/60 Hz. zUsing the camera abroad You can record/view Shooting still images Viewing still images Battery life (min.) Approx. 100 Approx. 210 No. x Battery life and number of images you can use the camera, the battery charger...
Instruction Manual
Page 16
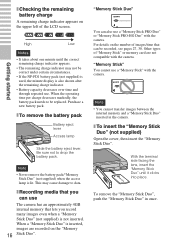
... lens, insert the "Memory Stick Duo" until the correct remaining charge indicator appears. • The remaining charge indicator may cause damage to data. To remove the "Memory Stick Duo", push the "Memory Stick Duo" in the camera. When the operating time per charge decreases markedly, the battery pack needs to drop the battery pack. "Memory Stick" You cannot use The camera has an approximately 4GB internal memory that you record many images even when a "Memory...
... lens, insert the "Memory Stick Duo" until the correct remaining charge indicator appears. • The remaining charge indicator may cause damage to data. To remove the "Memory Stick Duo", push the "Memory Stick Duo" in the camera. When the operating time per charge decreases markedly, the battery pack needs to drop the battery pack. "Memory Stick" You cannot use The camera has an approximately 4GB internal memory that you record many images even when a "Memory...
Instruction Manual
Page 23
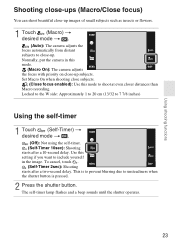
... the image. Locked to the W side: Approximately 1 to 20 cm (13/32 to 7 7/8 inches) Using the self-timer 1 Touch (Self-Timer) t desired mode t . (Off): Not using the self-timer. (Self-Timer 10sec): Shooting starts after a two-second delay. This is pressed. 2 Press the shutter button. The self-timer lamp flashes and a beep sounds until the shutter operates. 23 To cancel, touch . (Self-Timer 2sec): Shooting starts after a 10-second delay. Set Macro On when shooting close -up . Using shooting functions Shooting close-ups (Macro/Close focus...
... the image. Locked to the W side: Approximately 1 to 20 cm (13/32 to 7 7/8 inches) Using the self-timer 1 Touch (Self-Timer) t desired mode t . (Off): Not using the self-timer. (Self-Timer 10sec): Shooting starts after a two-second delay. This is pressed. 2 Press the shutter button. The self-timer lamp flashes and a beep sounds until the shutter operates. 23 To cancel, touch . (Self-Timer 2sec): Shooting starts after a 10-second delay. Set Macro On when shooting close -up . Using shooting functions Shooting close-ups (Macro/Close focus...

Instruction Manual
Page 39
... You cannot print images stored in the internal memory at a print shop directly from the camera. The image is made, the indicator appears. 4 Touch t (Print) t desired item t . (This Image): Print the currently displayed image. (Multiple Images): Touch / to display the image, then touch the image you want to superimpose dates on the printer. When you can print images by the following procedure. After the connection is printed. on the top of the screen t [Cyber-shot(Album/ 4 Select [Cyber-shot(Memory Stick...
... You cannot print images stored in the internal memory at a print shop directly from the camera. The image is made, the indicator appears. 4 Touch t (Print) t desired item t . (This Image): Print the currently displayed image. (Multiple Images): Touch / to display the image, then touch the image you want to superimpose dates on the printer. When you can print images by the following procedure. After the connection is printed. on the top of the screen t [Cyber-shot(Album/ 4 Select [Cyber-shot(Memory Stick...

Instruction Manual
Page 41
... Disk: Disk space required for installation-approximately 400 MB Display: Screen resolution: 1,024 × 768 dots or more * 64-bit editions and Starter (Edition) are not supported. 2 Turn on your computer environment. The installation menu screen appears. 3 Click [Install]. When you install "PMB," "Music Transfer" is also installed. • Log on the screen to complete the installation. 5 Remove the CD-ROM after the installation is complete. 41 Connecting to...
... Disk: Disk space required for installation-approximately 400 MB Display: Screen resolution: 1,024 × 768 dots or more * 64-bit editions and Starter (Edition) are not supported. 2 Turn on your computer environment. The installation menu screen appears. 3 Click [Install]. When you install "PMB," "Music Transfer" is also installed. • Log on the screen to complete the installation. 5 Remove the CD-ROM after the installation is complete. 41 Connecting to...

Instruction Manual
Page 47
... and music. Download Music: Format Music: Changes the slideshow music. Changing camera settings 47 Using the HOME screen On the HOME screen, camera operations are displayed on the screen. Displays and organizes images by the date. Only the available items are organized for selection, such as Favorites. x Print Item Print Description Prints still images. Attaches a background and displays images like a photo album. Displays images to registered as shooting, viewing and printing images. Deletes all slideshow music. x View Images 1 Item Date View Event View Favorites Folder View...
... and music. Download Music: Format Music: Changes the slideshow music. Changing camera settings 47 Using the HOME screen On the HOME screen, camera operations are displayed on the screen. Displays and organizes images by the date. Only the available items are organized for selection, such as Favorites. x Print Item Print Description Prints still images. Attaches a background and displays images like a photo album. Displays images to registered as shooting, viewing and printing images. Deletes all slideshow music. x View Images 1 Item Date View Event View Favorites Folder View...
Instruction Manual
Page 48
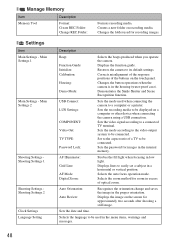
... messages. 48 Demonstrates the Smile Shutter and Scene Recognition function. Sets the mode according to the video output system to easily set a subject in the proper orientation. Sets the date and time. Displays the image on the touch panel. Selects the language to be used in excess of a TV to a computer or a printer. Changes the folder used when connecting the camera to be connected. Sets the password for recording images. Displays the function guide. x Manage Memory Item Memory Tool Description Format...
... messages. 48 Demonstrates the Smile Shutter and Scene Recognition function. Sets the mode according to the video output system to easily set a subject in the proper orientation. Sets the date and time. Displays the image on the touch panel. Selects the language to be used in excess of a TV to a computer or a printer. Changes the folder used when connecting the camera to be connected. Sets the password for recording images. Displays the function guide. x Manage Memory Item Memory Tool Description Format...
Instruction Manual
Page 49
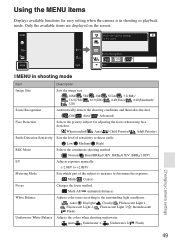
... items are displayed on the screen. Using the MENU items Displays available functions for easy setting when the camera is in shooting mode Item Description Image Size Sets the image size. ( 10M/ 5M/ 3M/ VGA/ 3:2(8M)/ 16:9(7M)/ 16:9(2M)/ 640(Fine)/ 640(Standard)/ 320) Scene Recognition Automatically detects the shooting conditions and then takes the shot. ( Off/ Auto/ Advanced) Face Detection Selects the priority subject for adjusting the focus when using face...
... items are displayed on the screen. Using the MENU items Displays available functions for easy setting when the camera is in shooting mode Item Description Image Size Sets the image size. ( 10M/ 5M/ 3M/ VGA/ 3:2(8M)/ 16:9(7M)/ 16:9(2M)/ 640(Fine)/ 640(Standard)/ 320) Scene Recognition Automatically detects the shooting conditions and then takes the shot. ( Off/ Auto/ Advanced) Face Detection Selects the priority subject for adjusting the focus when using face...

Instruction Manual
Page 51
... Image/ Multiple Images/ Set All in Date Range*/ Remove All in Date Range*) * The displayed text differs according to each View Mode. Rotates a still image. Item (Multi-Purpose Resize) (Delete) (Protect) (Print) (Rotate) (Volume Settings) Description Changes the image size according to usage. ( HDTV/ Blog/E-mail) Deletes images. ( This Image/ Multiple Images/ All in Date Range*) * The displayed text differs according to each View Mode. Using functions in Date Range*) * The displayed text differs according to (Program Auto). Adjusts the volume. Changing camera settings Item...
... Image/ Multiple Images/ Set All in Date Range*/ Remove All in Date Range*) * The displayed text differs according to each View Mode. Rotates a still image. Item (Multi-Purpose Resize) (Delete) (Protect) (Print) (Rotate) (Volume Settings) Description Changes the image size according to usage. ( HDTV/ Blog/E-mail) Deletes images. ( This Image/ Multiple Images/ All in Date Range*) * The displayed text differs according to each View Mode. Using functions in Date Range*) * The displayed text differs according to (Program Auto). Adjusts the volume. Changing camera settings Item...
Instruction Manual
Page 55
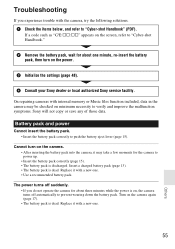
... the malfunction symptoms. Sony will not copy or save any of those data. Troubleshooting If you do not operate the camera for about one . 55 Others If a code such as "C/E:ss:ss" appears on the camera again (page 17). • The battery pack is discharged. Insert a charged battery pack (page 13). • The battery pack is on minimum necessity to "Cyber-shot Handbook." 2 Remove the battery pack, wait...
... the malfunction symptoms. Sony will not copy or save any of those data. Troubleshooting If you do not operate the camera for about one . 55 Others If a code such as "C/E:ss:ss" appears on the camera again (page 17). • The battery pack is discharged. Insert a charged battery pack (page 13). • The battery pack is on minimum necessity to "Cyber-shot Handbook." 2 Remove the battery pack, wait...

Instruction Manual
Page 56
... flash and zoom frequently. - Viewing images Cannot play back some images stored on the "Memory Stick Duo" shot using other cameras. • The camera is in Folder View (page 34). 56 Fully discharge the battery pack once, then charge it to play back images. • Press (Playback) button (page 19). • The folder/file name has been changed on your computer to other than (Movie). • Set the shooting mode to (Movie) when shooting movies. • The image size is set to charge...
... flash and zoom frequently. - Viewing images Cannot play back some images stored on the "Memory Stick Duo" shot using other cameras. • The camera is in Folder View (page 34). 56 Fully discharge the battery pack once, then charge it to play back images. • Press (Playback) button (page 19). • The folder/file name has been changed on your computer to other than (Movie). • Set the shooting mode to (Movie) when shooting movies. • The image size is set to charge...
Instruction Manual
Page 57
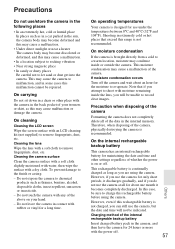
... use the camera for maintaining the date and time and other place with moisture remaining inside or outside the camera. Therefore, when disposing of the camera, physically destroying the camera is brought directly from a cold to record clear images. If moisture condensation occurs Turn off . 57 Others Note that exceed this rechargeable battery is not recommended. Charging method of the internal rechargeable backup battery Insert charged battery...
... use the camera for maintaining the date and time and other place with moisture remaining inside or outside the camera. Therefore, when disposing of the camera, physically destroying the camera is brought directly from a cold to record clear images. If moisture condensation occurs Turn off . 57 Others Note that exceed this rechargeable battery is not recommended. Charging method of the internal rechargeable backup battery Insert charged battery...

Instruction Manual
Page 58
...:Video output Audio output (Monaural) USB communication USB communication: Hi-Speed USB (USB 2.0 compliant) [LCD screen] LCD panel: Wide (16:9), 8.8 cm (3.5 type) TFT drive Total number of camera: Approx. 10.1 Megapixels Lens: Carl Zeiss Vario-Tessar 4× zoom lens f = 6.18 - 24.7 mm (35 - 140 mm (35 mm film equivalent)) F3.5 (W) - F4.6 (T) Exposure control: Automatic exposure, Scene Selection (11 modes) White balance: Automatic, Daylight, Cloudy, Fluorescent 1,2,3, Incandescent, Flash Underwater White Balance: Auto, Underwater 1,2, Flash File format (DCF compliant): Still images...
...:Video output Audio output (Monaural) USB communication USB communication: Hi-Speed USB (USB 2.0 compliant) [LCD screen] LCD panel: Wide (16:9), 8.8 cm (3.5 type) TFT drive Total number of camera: Approx. 10.1 Megapixels Lens: Carl Zeiss Vario-Tessar 4× zoom lens f = 6.18 - 24.7 mm (35 - 140 mm (35 mm film equivalent)) F3.5 (W) - F4.6 (T) Exposure control: Automatic exposure, Scene Selection (11 modes) White balance: Automatic, Daylight, Cloudy, Fluorescent 1,2,3, Incandescent, Flash Underwater White Balance: Auto, Underwater 1,2, Flash File format (DCF compliant): Still images...


