Instruction Manual
Page 9
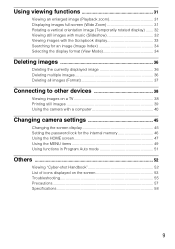
... still images 39 Using the camera with a computer 40 Changing camera settings 45 Changing the screen display 45 Setting the password lock for the internal memory 46 Using the HOME screen 47 Using the MENU items 49 Using functions in Program Auto mode 51 Others 52 Viewing "Cyber-shot Handbook 52 List of icons...
... still images 39 Using the camera with a computer 40 Changing camera settings 45 Changing the screen display 45 Setting the password lock for the internal memory 46 Using the HOME screen 47 Using the MENU items 49 Using functions in Program Auto mode 51 Others 52 Viewing "Cyber-shot Handbook 52 List of icons...
Instruction Manual
Page 11
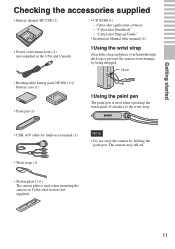
"Cyber-shot Step-up Guide" • Instruction Manual (this manual) (1) • ...the wrist strap. • USB, A/V cable for multi-use terminal (1) Note • Do not carry the camera by being dropped. Hook • Rechargeable battery pack NP-BD1 (1)/ Battery case (1) • Paint pen (1) ...It attaches to prevent the camera from damage by holding the paint pen. Getting started Getting started Checking the accessories supplied • Battery charger BC-CSD (1) • CD-ROM (1) - Cyber-shot application software - "Cyber-shot Handbook" - The camera may fall off. •...
"Cyber-shot Step-up Guide" • Instruction Manual (this manual) (1) • ...the wrist strap. • USB, A/V cable for multi-use terminal (1) Note • Do not carry the camera by being dropped. Hook • Rechargeable battery pack NP-BD1 (1)/ Battery case (1) • Paint pen (1) ...It attaches to prevent the camera from damage by holding the paint pen. Getting started Getting started Checking the accessories supplied • Battery charger BC-CSD (1) • CD-ROM (1) - Cyber-shot application software - "Cyber-shot Handbook" - The camera may fall off. •...
Instruction Manual
Page 38
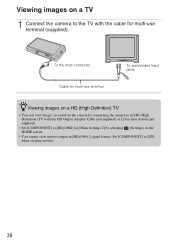
Connecting to other devices Viewing images on a TV 1 Connect the camera to the TV with the cable for multi-use terminal (supplied). Set [COMPONENT] to [HD(1080i)] in [Main Settings 2] by selecting (Settings) on the HOME ... To audio/video input jacks zViewing images on a HD (High Definition) TV • You can view images recorded on the camera by connecting the camera to an HD (High Definition) TV with the HD Output Adaptor Cable (not supplied) or Cyber-shot station (not supplied). • Set [COMPONENT] to [SD] when viewing movies. 38
Connecting to other devices Viewing images on a TV 1 Connect the camera to the TV with the cable for multi-use terminal (supplied). Set [COMPONENT] to [HD(1080i)] in [Main Settings 2] by selecting (Settings) on the HOME ... To audio/video input jacks zViewing images on a HD (High Definition) TV • You can view images recorded on the camera by connecting the camera to an HD (High Definition) TV with the HD Output Adaptor Cable (not supplied) or Cyber-shot station (not supplied). • Set [COMPONENT] to [SD] when viewing movies. 38

Instruction Manual
Page 39
..."Memory Stick Duo" to the print shop. 1 Import images to the computer (page 42). 2 Insert the "Memory Stick Duo" to the camera. 3 Select images to other devices zPrinting at a shop You cannot print images stored in the internal memory at a print shop directly from the...(Multiple Images): Touch / to display the image, then touch the image you want to superimpose dates on the top of the screen t [Cyber-shot(Album/ 4 Select [Cyber-shot(Memory Stick)] under the drive, then click [Export]. When you want to print. 5 Touch the desired setting item, then [OK]. Printing ...
..."Memory Stick Duo" to the print shop. 1 Import images to the computer (page 42). 2 Insert the "Memory Stick Duo" to the camera. 3 Select images to other devices zPrinting at a shop You cannot print images stored in the internal memory at a print shop directly from the...(Multiple Images): Touch / to display the image, then touch the image you want to superimpose dates on the top of the screen t [Cyber-shot(Album/ 4 Select [Cyber-shot(Memory Stick)] under the drive, then click [Export]. When you want to print. 5 Touch the desired setting item, then [OK]. Printing ...
Instruction Manual
Page 52
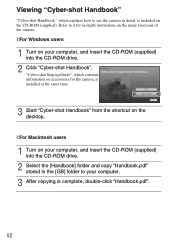
... Guide", which explains how to use the camera in the [GB] folder to your computer, and insert the CD-ROM (supplied) into the CD-ROM drive. 2 Click "Cyber-shot Handbook". Others Viewing "Cyber-shot Handbook" "Cyber-shot Handbook," which contains information on accessories for in-depth instructions on your ...Refer to it for the camera, is complete, double-click "Handbook.pdf". 52 x For Macintosh users 1 Turn on the many functions of the camera. x For Windows users 1 Turn on your computer. 3 After copying is installed at the same time. 3 Start "Cyber-shot Handbook" from the shortcut on...
... Guide", which explains how to use the camera in the [GB] folder to your computer, and insert the CD-ROM (supplied) into the CD-ROM drive. 2 Click "Cyber-shot Handbook". Others Viewing "Cyber-shot Handbook" "Cyber-shot Handbook," which contains information on accessories for in-depth instructions on your ...Refer to it for the camera, is complete, double-click "Handbook.pdf". 52 x For Macintosh users 1 Turn on the many functions of the camera. x For Windows users 1 Turn on your computer. 3 After copying is installed at the same time. 3 Start "Cyber-shot Handbook" from the shortcut on...
Instruction Manual
Page 55
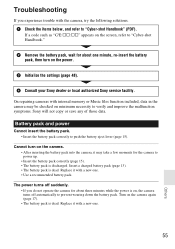
...Sony will not copy or save any of those data. The power turns off automatically to "Cyber-shot Handbook" (PDF). If a code such as "C/E:ss:ss" appears on the screen, refer to "Cyber-shot Handbook." 2 Remove the battery pack, wait for about one minute, re-insert the battery pack, then turn on the camera.... • After inserting the battery pack into the camera, it with a new one . 55 Others Cannot turn on...
...Sony will not copy or save any of those data. The power turns off automatically to "Cyber-shot Handbook" (PDF). If a code such as "C/E:ss:ss" appears on the screen, refer to "Cyber-shot Handbook." 2 Remove the battery pack, wait for about one minute, re-insert the battery pack, then turn on the camera.... • After inserting the battery pack into the camera, it with a new one . 55 Others Cannot turn on...

Instruction Manual
Page 59
Trademarks • The following marks are trademarks of Sony Corporation. , "Cyber-shot," "Memory Stick," , "Memory Stick PRO," , "Memory Stick Duo," , "Memory Stick PRO Duo," , "Memory Stick PRO-HG Duo," , "Memory Stick Micro," "MagicGate," , "PhotoTV HD," "Info LITHIUM" &#...
Trademarks • The following marks are trademarks of Sony Corporation. , "Cyber-shot," "Memory Stick," , "Memory Stick PRO," , "Memory Stick Duo," , "Memory Stick PRO Duo," , "Memory Stick PRO-HG Duo," , "Memory Stick Micro," "MagicGate," , "PhotoTV HD," "Info LITHIUM" &#...


