
Instruction Manual
Page 3
... of any service or repairs to the set, ask the service technician to determine that it from the wall outlet and disconnect the antenna or cable system. Never block the slots and openings by items placed upon or against them, paying particular attention to qualified service personnel. [ Replacement parts When replacement...
... of any service or repairs to the set, ask the service technician to determine that it from the wall outlet and disconnect the antenna or cable system. Never block the slots and openings by items placed upon or against them, paying particular attention to qualified service personnel. [ Replacement parts When replacement...
Instruction Manual
Page 5
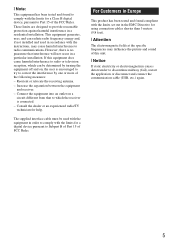
... discontinue midway (fail), restart the application or disconnect and connect the communication cable (USB, etc.) again. 5 For Customers in Europe This product has been tested and found to comply with the limits for a Class B digital device, pursuant to Part 15 of the following measures: - [ Note:... This equipment has been tested and found compliant with the limits set out in the EMC Directive for using connection cables shorter than 3 meters (9.8 feet). [ Attention The...
... discontinue midway (fail), restart the application or disconnect and connect the communication cable (USB, etc.) again. 5 For Customers in Europe This product has been tested and found to comply with the limits for a Class B digital device, pursuant to Part 15 of the following measures: - [ Note:... This equipment has been tested and found compliant with the limits set out in the EMC Directive for using connection cables shorter than 3 meters (9.8 feet). [ Attention The...
Instruction Manual
Page 11
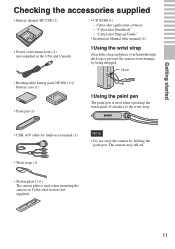
..., A/V cable for multi-use terminal (1) Note • Do not carry the camera by being dropped. The camera may fall off. • Wrist strap (1) • Station plate G (1) The station plate is used when mounting the camera on Cyber-shot station (not supplied). 11 It attaches to prevent the camera from damage by holding the paint pen. "Cyber-shot Handbook" - Cyber-shot application...
..., A/V cable for multi-use terminal (1) Note • Do not carry the camera by being dropped. The camera may fall off. • Wrist strap (1) • Station plate G (1) The station plate is used when mounting the camera on Cyber-shot station (not supplied). 11 It attaches to prevent the camera from damage by holding the paint pen. "Cyber-shot Handbook" - Cyber-shot application...
Instruction Manual
Page 38
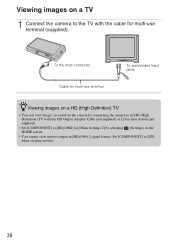
...in [Main Settings 2] by selecting (Settings) on a TV 1 Connect the camera to [SD] when viewing movies. 38 Set [COMPONENT] to the TV with the cable for multi-use terminal (supplied). To the multi connector Cable for multi-use terminal To audio/video input jacks zViewing images on a HD ...(High Definition) TV • You can view images recorded on the camera by connecting the camera to an HD (High Definition) TV with the HD Output Adaptor Cable (not supplied) or Cyber-shot station (not supplied). • Set [COMPONENT] to [HD(1080i)] in [HD(1080i)] signal ...
...in [Main Settings 2] by selecting (Settings) on a TV 1 Connect the camera to [SD] when viewing movies. 38 Set [COMPONENT] to the TV with the cable for multi-use terminal (supplied). To the multi connector Cable for multi-use terminal To audio/video input jacks zViewing images on a HD ...(High Definition) TV • You can view images recorded on the camera by connecting the camera to an HD (High Definition) TV with the HD Output Adaptor Cable (not supplied) or Cyber-shot station (not supplied). • Set [COMPONENT] to [HD(1080i)] in [HD(1080i)] signal ...

Instruction Manual
Page 39
...Photo Library supported)]. When you want to enable USB connection between the camera and the printer. 1 Touch t (Settings) t [Main Settings] t [USB Connect] t t [PictBridge] t . on the top of the screen t [Cyber-shot(Album/ 4 Select [Cyber-shot(Memory Stick)] under the drive, then click [Export]. For details, ...shop. 1 Import images to the computer (page 42). 2 Insert the "Memory Stick Duo" to the camera. 3 Select images to a "Memory Stick Duo" with the cable for multiuse terminal (supplied). 3 Turn on images, consult your photo printing service shop. 39 Connecting to ...
...Photo Library supported)]. When you want to enable USB connection between the camera and the printer. 1 Touch t (Settings) t [Main Settings] t [USB Connect] t t [PictBridge] t . on the top of the screen t [Cyber-shot(Album/ 4 Select [Cyber-shot(Memory Stick)] under the drive, then click [Export]. For details, ...shop. 1 Import images to the computer (page 42). 2 Insert the "Memory Stick Duo" to the camera. 3 Select images to a "Memory Stick Duo" with the cable for multiuse terminal (supplied). 3 Turn on images, consult your photo printing service shop. 39 Connecting to ...

Instruction Manual
Page 42
... Insert a fully charged battery pack to the camera, then press the (Playback) button. 2 Connect the camera to your computer. For details, see the "PMB Guide". Notes • Do not disconnect the cable for multi-use terminal from the camera while the camera is displayed. Using the AC Adaptor (not ...supplied) and the USB / A/V / DC IN cable for multi-use terminal (not supplied) is displayed on the screen of the camera. When the indicator changes to...
... Insert a fully charged battery pack to the camera, then press the (Playback) button. 2 Connect the camera to your computer. For details, see the "PMB Guide". Notes • Do not disconnect the cable for multi-use terminal from the camera while the camera is displayed. Using the AC Adaptor (not ...supplied) and the USB / A/V / DC IN cable for multi-use terminal (not supplied) is displayed on the screen of the camera. When the indicator changes to...


