
Instruction Manual
Page 1
Getting started Shooting/viewing images Using shooting functions Using viewing functions Deleting images Connecting to other devices Changing camera settings GB © 2008 Sony Corporation 4-000-951-12(1) Digital Still Camera Instruction Manual DSC-T700 Before operating the unit, please read this manual thoroughly, and retain it for future reference.
Getting started Shooting/viewing images Using shooting functions Using viewing functions Deleting images Connecting to other devices Changing camera settings GB © 2008 Sony Corporation 4-000-951-12(1) Digital Still Camera Instruction Manual DSC-T700 Before operating the unit, please read this manual thoroughly, and retain it for future reference.
Instruction Manual
Page 2
... serial number in the operating instructions and adhere to them. DSC-T700 Serial No WARNING To reduce fire or shock hazard, do not...uninsulated "dangerous voltage" within the product's enclosure that could result in the U.S.A. If you call upon your Sony dealer regarding this manual for future reference. For Customers in a fire or electric shock. For those sets ... to have a suitable outlet installed. This plug will fit into the outlet, try reversing the plug. Use [ Power Sources This set through openings as they may touch dangerous voltage points or short out parts that...
... serial number in the operating instructions and adhere to them. DSC-T700 Serial No WARNING To reduce fire or shock hazard, do not...uninsulated "dangerous voltage" within the product's enclosure that could result in the U.S.A. If you call upon your Sony dealer regarding this manual for future reference. For Customers in a fire or electric shock. For those sets ... to have a suitable outlet installed. This plug will fit into the outlet, try reversing the plug. Use [ Power Sources This set through openings as they may touch dangerous voltage points or short out parts that...

Instruction Manual
Page 3
...under the following the operating instructions. Never block the slots and openings by placing the set does not operate normally when following conditions: - Use only a cart, stand, tripod, bracket, or table recommended by the manufacturer. [ Ventilation The slots and openings in the cabinet are...register, or where it is damaged or frayed. - When the set exhibits a distinct change in the operating instructions. [ Attachments Do not use attachments not recommended by the manufacturer, as they may cause hazards. [ Cleaning Unplug the set from the appliance. [ Accessories Do not ...
...under the following the operating instructions. Never block the slots and openings by placing the set does not operate normally when following conditions: - Use only a cart, stand, tripod, bracket, or table recommended by the manufacturer. [ Ventilation The slots and openings in the cabinet are...register, or where it is damaged or frayed. - When the set exhibits a distinct change in the operating instructions. [ Attachments Do not use attachments not recommended by the manufacturer, as they may cause hazards. [ Cleaning Unplug the set from the appliance. [ Accessories Do not ...

Instruction Manual
Page 4
...The number below is for the FCC related matters only. [ Regulatory Information Declaration of Conformity Trade Name: SONY Model No.: DSC-T700 Responsible Party: Sony Electronics Inc. You can help preserve our environment by returning your authority to the collection and recycling location ... device must accept any questions about this product, you . Operation is intended to be correctly orientated in this manual could void your used rechargeable batteries to operate this equipment. 4 For Customers in the U.S.A. Read this first CAUTION Replace the battery with Part 15 of ...
...The number below is for the FCC related matters only. [ Regulatory Information Declaration of Conformity Trade Name: SONY Model No.: DSC-T700 Responsible Party: Sony Electronics Inc. You can help preserve our environment by returning your authority to the collection and recycling location ... device must accept any questions about this product, you . Operation is intended to be correctly orientated in this manual could void your used rechargeable batteries to operate this equipment. 4 For Customers in the U.S.A. Read this first CAUTION Replace the battery with Part 15 of ...
Instruction Manual
Page 5
...discontinue midway (fail), restart the application or disconnect and connect the communication cable (USB, etc.) again. 5 This equipment generates, uses, and can be used in a residential installation. Increase the separation between the equipment and receiver. - The supplied interface cable must be determined by turning ...radio/TV technician for help. For Customers in Europe This product has been tested and found to comply with the limits for a Class B digital device, pursuant to Subpart B of Part 15 of FCC Rules. However, there is connected. - [ Note: This equipment has been ...
...discontinue midway (fail), restart the application or disconnect and connect the communication cable (USB, etc.) again. 5 This equipment generates, uses, and can be used in a residential installation. Increase the separation between the equipment and receiver. - The supplied interface cable must be determined by turning ...radio/TV technician for help. For Customers in Europe This product has been tested and found to comply with the limits for a Class B digital device, pursuant to Subpart B of Part 15 of FCC Rules. However, there is connected. - [ Note: This equipment has been ...

Instruction Manual
Page 7
... same rating as the supplied one and approved by ASTA or BSI to BS 1362, (i.e., marked with BS 1363 is Sony Deutschland GmbH, Hedelfinger Strasse 61, 70327 Stuttgart, Germany. Never use the plug without the fuse cover. Notice for customers in separate service or guarantee documents. For any service or guarantee matters...
... same rating as the supplied one and approved by ASTA or BSI to BS 1362, (i.e., marked with BS 1363 is Sony Deutschland GmbH, Hedelfinger Strasse 61, 70327 Stuttgart, Germany. Never use the plug without the fuse cover. Notice for customers in separate service or guarantee documents. For any service or guarantee matters...
Instruction Manual
Page 8
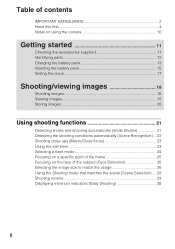
...4 Notes on using the camera 10 Getting started 11 Checking the accessories supplied 11 Identifying parts 12 Charging the battery pack 13 Inserting the battery pack 15 Setting the clock 17 Shooting/viewing images 18 Shooting images 18 Viewing images 19 Storing images 20 Using shooting functions 21... and shooting automatically (Smile Shutter 21 Detecting the shooting conditions automatically (Scene Recognition) ... 22 Shooting close-ups (Macro/Close focus 23 Using the self-timer 23 Selecting a flash mode 24 Focusing on a specific point of the frame 25 Focusing on the face of the ...
...4 Notes on using the camera 10 Getting started 11 Checking the accessories supplied 11 Identifying parts 12 Charging the battery pack 13 Inserting the battery pack 15 Setting the clock 17 Shooting/viewing images 18 Shooting images 18 Viewing images 19 Storing images 20 Using shooting functions 21... and shooting automatically (Smile Shutter 21 Detecting the shooting conditions automatically (Scene Recognition) ... 22 Shooting close-ups (Macro/Close focus 23 Using the self-timer 23 Selecting a flash mode 24 Focusing on a specific point of the frame 25 Focusing on the face of the ...
Instruction Manual
Page 9
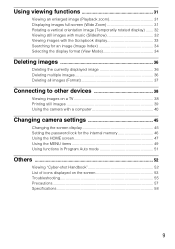
Using viewing functions 31 Viewing an enlarged image (Playback zoom 31 Displaying images full-screen (Wide Zoom 31 Rotating a vertical orientation image (Temporarily rotated display) ....... 32 ... a TV 38 Printing still images 39 Using the camera with a computer 40 Changing camera settings 45 Changing the screen display 45 Setting the password lock for the internal memory 46 Using the HOME screen 47 Using the MENU items 49 Using functions in Program Auto mode 51 Others 52 Viewing "Cyber-shot Handbook 52 List of icons displayed...
Using viewing functions 31 Viewing an enlarged image (Playback zoom 31 Displaying images full-screen (Wide Zoom 31 Rotating a vertical orientation image (Temporarily rotated display) ....... 32 ... a TV 38 Printing still images 39 Using the camera with a computer 40 Changing camera settings 45 Changing the screen display 45 Setting the password lock for the internal memory 46 Using the HOME screen 47 Using the MENU items 49 Using functions in Program Auto mode 51 Others 52 Viewing "Cyber-shot Handbook 52 List of icons displayed...
Instruction Manual
Page 10
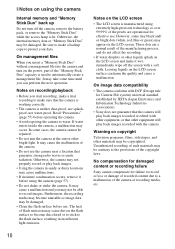
... the LCD screen. No compensation for damaged content or recording failure Sony cannot compensate for Camera File system) universal standard established by JEITA (Japan Electronics and Information Technology Industries Association). • Sony does not guarantee that the camera will play back images. • Using the camera in insufficient light emission. 10 Notes on the LCD screen...
... the LCD screen. No compensation for damaged content or recording failure Sony cannot compensate for Camera File system) universal standard established by JEITA (Japan Electronics and Information Technology Industries Association). • Sony does not guarantee that the camera will play back images. • Using the camera in insufficient light emission. 10 Notes on the LCD screen...
Instruction Manual
Page 11
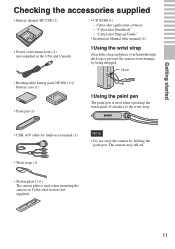
... the wrist strap. • USB, A/V cable for multi-use terminal (1) Note • Do not carry the camera by being dropped. "Cyber-shot Handbook" - Getting started Getting started Checking the accessories supplied • Battery charger BC-CSD (1) • CD-ROM (1) - Cyber-shot application software - It attaches to prevent the camera from damage by holding the paint pen. Hook...
... the wrist strap. • USB, A/V cable for multi-use terminal (1) Note • Do not carry the camera by being dropped. "Cyber-shot Handbook" - Getting started Getting started Checking the accessories supplied • Battery charger BC-CSD (1) • CD-ROM (1) - Cyber-shot application software - It attaches to prevent the camera from damage by holding the paint pen. Hook...
Instruction Manual
Page 12
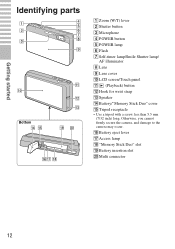
Otherwise, you cannot firmly secure the camera, and damage to the camera may occur. Getting started Identifying parts Bottom A Zoom (W/T) lever B Shutter button C Microphone D POWER button E POWER lamp F Flash G Self-timer lamp/Smile Shutter lamp/ AF illuminator H Lens I Lens cover J LCD screen/Touch panel K (Playback) button L Hook for wrist strap M Speaker N Battery/"Memory Stick Duo" cover O Tripod receptacle • Use a tripod with a screw less than 5.5 mm (7/32 inch) long. P Battery eject lever Q Access lamp R "Memory Stick Duo" slot S Battery insertion slot T Multi connector 12
Otherwise, you cannot firmly secure the camera, and damage to the camera may occur. Getting started Identifying parts Bottom A Zoom (W/T) lever B Shutter button C Microphone D POWER button E POWER lamp F Flash G Self-timer lamp/Smile Shutter lamp/ AF illuminator H Lens I Lens cover J LCD screen/Touch panel K (Playback) button L Hook for wrist strap M Speaker N Battery/"Memory Stick Duo" cover O Tripod receptacle • Use a tripod with a screw less than 5.5 mm (7/32 inch) long. P Battery eject lever Q Access lamp R "Memory Stick Duo" slot S Battery insertion slot T Multi connector 12
Instruction Manual
Page 14
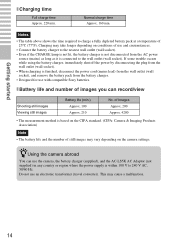
...temperature of images you can use the camera, the battery charger (...the camera settings. If some trouble occurs while using the... battery charger, immediately shut off the power by disconnecting the plug from the wall outlet (wall socket). • When charging is within 100 V to the wall outlet (wall socket). This may vary depending on the CIPA standard. (CIPA: Camera... & Imaging Products Association) Note • The battery life and the number of use...battery charger. • Designed for use an electronic transformer (travel converter). ...camera abroad You can record/view ...
...temperature of images you can use the camera, the battery charger (...the camera settings. If some trouble occurs while using the... battery charger, immediately shut off the power by disconnecting the plug from the wall outlet (wall socket). • When charging is within 100 V to the wall outlet (wall socket). This may vary depending on the CIPA standard. (CIPA: Camera... & Imaging Products Association) Note • The battery life and the number of use...battery charger. • Designed for use an electronic transformer (travel converter). ...camera abroad You can record/view ...
Instruction Manual
Page 16
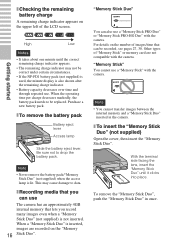
... types of "Memory Stick" or memory card are recorded on the upper left of images/time that lets you can also use . "Memory Stick" You cannot use The camera has an approximately 4GB internal memory that can be correct under certain circumstances. • If the NP-FD1 battery pack (not... operating time per charge decreases markedly, the battery pack needs to data. Purchase a new battery pack. "Memory Stick Duo" You can use a "Memory Stick" with the camera. High Low Notes • It takes about one minute until it clicks into place. Be sure not to drop the battery pack....
... types of "Memory Stick" or memory card are recorded on the upper left of images/time that lets you can also use . "Memory Stick" You cannot use The camera has an approximately 4GB internal memory that can be correct under certain circumstances. • If the NP-FD1 battery pack (not... operating time per charge decreases markedly, the battery pack needs to data. Purchase a new battery pack. "Memory Stick Duo" You can use a "Memory Stick" with the camera. High Low Notes • It takes about one minute until it clicks into place. Be sure not to drop the battery pack....
Instruction Manual
Page 17
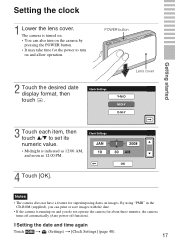
... 12:00 PM. 4 Touch [OK]. x Setting the date and time again Touch t (Settings) t [Clock Settings] (page 48). 17 By using "PMB" in the CD-ROM (supplied), you do not operate the camera for superimposing dates on and allow operation. 2 Touch the desired date display format, then touch . POWER button Lens cover Getting...
... 12:00 PM. 4 Touch [OK]. x Setting the date and time again Touch t (Settings) t [Clock Settings] (page 48). 17 By using "PMB" in the CD-ROM (supplied), you do not operate the camera for superimposing dates on and allow operation. 2 Touch the desired date display format, then touch . POWER button Lens cover Getting...

Instruction Manual
Page 20
... 4GB internal memory that can play back images stored in the camera using the Slideshow and Scrapbook functions. Slideshow (page 32) Scrapbook (page 33) View Mode (page 34) 20 You can also organize large numbers of images using "PMB". • For details on the computer connection or... "PMB", see page 40. You can import images from a computer to the camera and view them anytime using the camera. 1 Export images to the camera using the desired View Mode and easily search ...
... 4GB internal memory that can play back images stored in the camera using the Slideshow and Scrapbook functions. Slideshow (page 32) Scrapbook (page 33) View Mode (page 34) 20 You can also organize large numbers of images using "PMB". • For details on the computer connection or... "PMB", see page 40. You can import images from a computer to the camera and view them anytime using the camera. 1 Export images to the camera using the desired View Mode and easily search ...

Instruction Manual
Page 21
...Smile icon). 2 Wait detecting a smile. When the smile level exceeds the b point on the indicator, the camera shoots images automatically. The smile is higher when the eyes are showing. Using shooting functions 21 The detection rate is easier to detect when the teeth are narrowed. 3 Give a clear smile...Smile icon) again, Smile Shutter ends. • If you press the shutter button during Smile Shutter, the camera shoots the image in front of the camera and be as level as possible. Face Detection frame Smile Detection Sensitivity indicator zHints for better capturing of smiles...
...Smile icon). 2 Wait detecting a smile. When the smile level exceeds the b point on the indicator, the camera shoots images automatically. The smile is higher when the eyes are showing. Using shooting functions 21 The detection rate is easier to detect when the teeth are narrowed. 3 Give a clear smile...Smile icon) again, Smile Shutter ends. • If you press the shutter button during Smile Shutter, the camera shoots the image in front of the camera and be as level as possible. Face Detection frame Smile Detection Sensitivity indicator zHints for better capturing of smiles...
Instruction Manual
Page 22
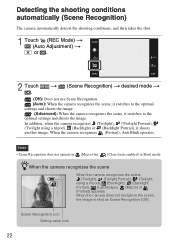
... On), (Close focus enabled) or Burst mode. When the camera recognizes (Portrait), Anti Blink operates. When the camera does not recognize the scene, the image is shot as Scene Recognition [Off]. t (Scene Recognition) t desired mode t (Off): Does not use Scene Recognition. (Auto): When the camera recognizes the scene, it switches to the optimal settings and...
... On), (Close focus enabled) or Burst mode. When the camera recognizes (Portrait), Anti Blink operates. When the camera does not recognize the scene, the image is shot as Scene Recognition [Off]. t (Scene Recognition) t desired mode t (Off): Does not use Scene Recognition. (Auto): When the camera recognizes the scene, it switches to the optimal settings and...
Instruction Manual
Page 23
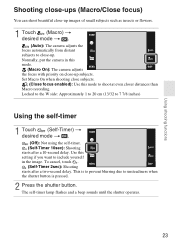
Set Macro On when shooting close subjects. (Close focus enabled): Use this setting if you want to include yourself in this mode. (Macro On): The camera adjusts the focus with priority on close -up subjects. Use this mode to shoot at even closer distances than Macro recording. Locked to ...the W side: Approximately 1 to 20 cm (13/32 to 7 7/8 inches) Using the self-timer 1 Touch (Self-Timer) t...
Set Macro On when shooting close subjects. (Close focus enabled): Use this setting if you want to include yourself in this mode. (Macro On): The camera adjusts the focus with priority on close -up subjects. Use this mode to shoot at even closer distances than Macro recording. Locked to ...the W side: Approximately 1 to 20 cm (13/32 to 7 7/8 inches) Using the self-timer 1 Touch (Self-Timer) t...
Instruction Manual
Page 24
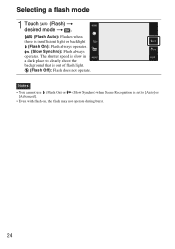
Notes • You cannot use (Flash On) or (Slow Synchro) when Scene Recognition is set to clearly shoot the background that is out of flash light. (Flash Off): Flash does not operate. Selecting a flash mode 1 Touch (Flash) t desired mode t . (Flash Auto): Flashes when there is slow in a dark place to [Auto] or [Advanced]. • Even with flash on, the flash may not operate during burst. 24 The shutter speed is insufficient light or backlight (Flash On): Flash always operates. (Slow Synchro): Flash always operates.
Notes • You cannot use (Flash On) or (Slow Synchro) when Scene Recognition is set to clearly shoot the background that is out of flash light. (Flash Off): Flash does not operate. Selecting a flash mode 1 Touch (Flash) t desired mode t . (Flash Auto): Flashes when there is slow in a dark place to [Auto] or [Advanced]. • Even with flash on, the flash may not operate during burst. 24 The shutter speed is insufficient light or backlight (Flash On): Flash always operates. (Slow Synchro): Flash always operates.

Instruction Manual
Page 25
Using shooting functions Focusing on a specific point of the frame Simply touch the point of the frame you wish to focus on to change the focus point as many times as you wish before pressing the shutter button halfway down. • If you want the camera to choose a focus point automatically, touch . ...when an area with a face is touched on the screen. (Auto): Selects the face the camera is to focus on an adult's face. 25 Focusing on the face of the subject (Face Detection) The camera detects the face of the frame you want to automatically focus on. (Child Priority): Detects ...
Using shooting functions Focusing on a specific point of the frame Simply touch the point of the frame you wish to focus on to change the focus point as many times as you wish before pressing the shutter button halfway down. • If you want the camera to choose a focus point automatically, touch . ...when an area with a face is touched on the screen. (Auto): Selects the face the camera is to focus on an adult's face. 25 Focusing on the face of the subject (Face Detection) The camera detects the face of the frame you want to automatically focus on. (Child Priority): Detects ...

