
Instruction Manual
Page 12
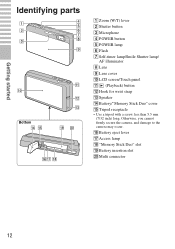
P Battery eject lever Q Access lamp R "Memory Stick Duo" slot S Battery insertion slot T Multi connector 12 Getting started Identifying parts Bottom A Zoom (W/T) lever B Shutter button C Microphone D POWER button E POWER lamp F Flash G Self-timer lamp/Smile Shutter lamp/ AF illuminator H Lens I Lens cover J LCD screen/Touch panel K (Playback) button L Hook for wrist strap M Speaker N Battery/"Memory Stick Duo" cover O Tripod receptacle • Use a tripod with a screw less than 5.5 mm (7/32 inch) long. Otherwise, you cannot firmly secure the camera, and damage to the camera may occur.
P Battery eject lever Q Access lamp R "Memory Stick Duo" slot S Battery insertion slot T Multi connector 12 Getting started Identifying parts Bottom A Zoom (W/T) lever B Shutter button C Microphone D POWER button E POWER lamp F Flash G Self-timer lamp/Smile Shutter lamp/ AF illuminator H Lens I Lens cover J LCD screen/Touch panel K (Playback) button L Hook for wrist strap M Speaker N Battery/"Memory Stick Duo" cover O Tripod receptacle • Use a tripod with a screw less than 5.5 mm (7/32 inch) long. Otherwise, you cannot firmly secure the camera, and damage to the camera may occur.
Instruction Manual
Page 16
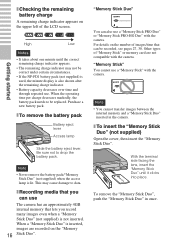
... eject lever. Other types of "Memory Stick" or memory card are recorded on the "Memory 16 Stick Duo". With the terminal side facing the lens, insert the "Memory Stick Duo" until the correct remaining charge indicator appears. • The remaining charge indicator may cause damage to data. When ...charge indicator appears on the upper left of images/time that lets you can use a "Memory Stick" with the camera. x To insert the "Memory Stick Duo" (not supplied) Open the cover, then insert the "Memory Stick Duo". For details on the number of the LCD screen. High Low Notes •...
... eject lever. Other types of "Memory Stick" or memory card are recorded on the "Memory 16 Stick Duo". With the terminal side facing the lens, insert the "Memory Stick Duo" until the correct remaining charge indicator appears. • The remaining charge indicator may cause damage to data. When ...charge indicator appears on the upper left of images/time that lets you can use a "Memory Stick" with the camera. x To insert the "Memory Stick Duo" (not supplied) Open the cover, then insert the "Memory Stick Duo". For details on the number of the LCD screen. High Low Notes •...
Instruction Manual
Page 17
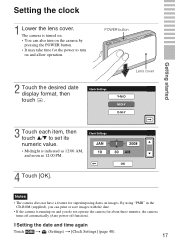
...8226; Midnight is running on and you can also turn on images. Setting the clock 1 Lower the lens cover. The camera is turned on. • You can print or save images with the date. • If the camera is indicated as 12:00 AM, and noon as 12:00 PM. 4 Touch [OK]. x ...Setting the date and time again Touch t (Settings) t [Clock Settings] (page 48). 17 Notes • The camera does not have a feature for about three minutes, the camera turns off automatically (Auto power-off function). By using "PMB" in the CD-ROM (supplied), you do not operate the...
...8226; Midnight is running on and you can also turn on images. Setting the clock 1 Lower the lens cover. The camera is turned on. • You can print or save images with the date. • If the camera is indicated as 12:00 AM, and noon as 12:00 PM. 4 Touch [OK]. x ...Setting the date and time again Touch t (Settings) t [Clock Settings] (page 48). 17 Notes • The camera does not have a feature for about three minutes, the camera turns off automatically (Auto power-off function). By using "PMB" in the CD-ROM (supplied), you do not operate the...
Instruction Manual
Page 18
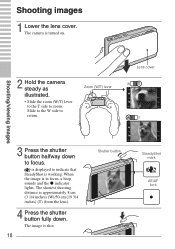
...camera steady as illustrated. • Slide the zoom (W/T) lever to the T side to return. Shooting/viewing images Shooting images 1 Lower the lens cover. Zoom (W/T) lever Lens cover 3 Press the shutter button halfway down . The shortest shooting distance is approximately 8 cm (3 1/4 inches) (W)/50 cm (19 3/4 inches) (T) (from the lens...). 4 Press the shutter button fully down to indicate that SteadyShot is in focus, a beep sounds and the z indicator lights. is displayed to focus. Slide to the W side to zoom. When the image is working. The camera is shot. 18...
...camera steady as illustrated. • Slide the zoom (W/T) lever to the T side to return. Shooting/viewing images Shooting images 1 Lower the lens cover. Zoom (W/T) lever Lens cover 3 Press the shutter button halfway down . The shortest shooting distance is approximately 8 cm (3 1/4 inches) (W)/50 cm (19 3/4 inches) (T) (from the lens...). 4 Press the shutter button fully down to indicate that SteadyShot is in focus, a beep sounds and the z indicator lights. is displayed to focus. Slide to the W side to zoom. When the image is working. The camera is shot. 18...
Instruction Manual
Page 19
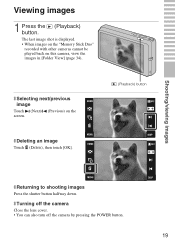
Viewing images 1 Press the (Playback) button. x Turning off the camera Close the lens cover. • You can also turn off the camera by pressing the POWER button. 19 x Deleting an image Touch (Delete), then touch [OK]. (Playback) button Shooting/viewing images x Returning to... shooting images Press the shutter button halfway down. x Selecting next/previous image Touch (Next)/ (Previous) on this camera, view the images in [Folder View] (page 34). The last image shot is displayed. • When images on the "Memory Stick Duo" recorded with other...
Viewing images 1 Press the (Playback) button. x Turning off the camera Close the lens cover. • You can also turn off the camera by pressing the POWER button. 19 x Deleting an image Touch (Delete), then touch [OK]. (Playback) button Shooting/viewing images x Returning to... shooting images Press the shutter button halfway down. x Selecting next/previous image Touch (Next)/ (Previous) on this camera, view the images in [Folder View] (page 34). The last image shot is displayed. • When images on the "Memory Stick Duo" recorded with other...


