
Instruction Manual
Page 1
4-000-951-12(1) Digital Still Camera Instruction Manual DSC-T700 Before operating the unit, please read this manual thoroughly, and retain it for future reference. Getting started Shooting/viewing images Using shooting functions Using viewing functions Deleting images Connecting to other devices Changing camera settings GB © 2008 Sony Corporation
4-000-951-12(1) Digital Still Camera Instruction Manual DSC-T700 Before operating the unit, please read this manual thoroughly, and retain it for future reference. Getting started Shooting/viewing images Using shooting functions Using viewing functions Deleting images Connecting to other devices Changing camera settings GB © 2008 Sony Corporation
Instruction Manual
Page 8
Table of contents IMPORTANT SAFEGUARDS 2 Read this first 4 Notes on using the camera 10 Getting started 11 Checking the accessories supplied 11 Identifying parts 12 Charging the battery pack 13 Inserting the battery pack 15 Setting the clock ...
Table of contents IMPORTANT SAFEGUARDS 2 Read this first 4 Notes on using the camera 10 Getting started 11 Checking the accessories supplied 11 Identifying parts 12 Charging the battery pack 13 Inserting the battery pack 15 Setting the clock ...
Instruction Manual
Page 9
... still images 39 Using the camera with a computer 40 Changing camera settings 45 Changing the screen display 45 Setting the password lock for the internal memory 46 Using the HOME screen 47 Using the MENU items 49 Using functions in Program Auto mode 51 Others 52 Viewing "Cyber-shot Handbook 52 List of icons...
... still images 39 Using the camera with a computer 40 Changing camera settings 45 Changing the screen display 45 Setting the password lock for the internal memory 46 Using the HOME screen 47 Using the MENU items 49 Using functions in Program Auto mode 51 Others 52 Viewing "Cyber-shot Handbook 52 List of icons...
Instruction Manual
Page 10
...8226; The LCD screen is used to protect your data. However, some cases, the camera cannot be damaged. No compensation for damaged content or recording failure Sony cannot compensate for Camera File system) universal standard established by JEITA (Japan Electronics and Information Technology Industries Association).... • Sony does not guarantee that the camera will play back images recorded or edited with a soft cloth. Furthermore, the recording media may ...
...8226; The LCD screen is used to protect your data. However, some cases, the camera cannot be damaged. No compensation for damaged content or recording failure Sony cannot compensate for Camera File system) universal standard established by JEITA (Japan Electronics and Information Technology Industries Association).... • Sony does not guarantee that the camera will play back images recorded or edited with a soft cloth. Furthermore, the recording media may ...
Instruction Manual
Page 11
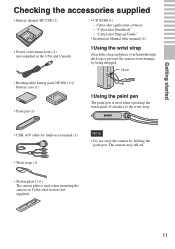
... fall off. • Wrist strap (1) • Station plate G (1) The station plate is used when mounting the camera on Cyber-shot station (not supplied). 11 "Cyber-shot Handbook" - It attaches to prevent the camera from damage by holding the paint pen. Hook • Rechargeable battery pack NP-BD1 (1)/ Battery case (1) • Paint pen (1) x Using the paint pen...
... fall off. • Wrist strap (1) • Station plate G (1) The station plate is used when mounting the camera on Cyber-shot station (not supplied). 11 "Cyber-shot Handbook" - It attaches to prevent the camera from damage by holding the paint pen. Hook • Rechargeable battery pack NP-BD1 (1)/ Battery case (1) • Paint pen (1) x Using the paint pen...
Instruction Manual
Page 12
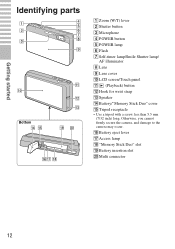
Otherwise, you cannot firmly secure the camera, and damage to the camera may occur. Getting started Identifying parts Bottom A Zoom (W/T) lever B Shutter button C Microphone D POWER button E POWER lamp F Flash G Self-timer lamp/Smile Shutter lamp/ AF illuminator H Lens I Lens cover J LCD screen/Touch panel K (Playback) button L Hook for wrist strap M Speaker N Battery/"Memory Stick Duo" cover O Tripod receptacle • Use a tripod with a screw less than 5.5 mm (7/32 inch) long. P Battery eject lever Q Access lamp R "Memory Stick Duo" slot S Battery insertion slot T Multi connector 12
Otherwise, you cannot firmly secure the camera, and damage to the camera may occur. Getting started Identifying parts Bottom A Zoom (W/T) lever B Shutter button C Microphone D POWER button E POWER lamp F Flash G Self-timer lamp/Smile Shutter lamp/ AF illuminator H Lens I Lens cover J LCD screen/Touch panel K (Playback) button L Hook for wrist strap M Speaker N Battery/"Memory Stick Duo" cover O Tripod receptacle • Use a tripod with a screw less than 5.5 mm (7/32 inch) long. P Battery eject lever Q Access lamp R "Memory Stick Duo" slot S Battery insertion slot T Multi connector 12
Instruction Manual
Page 14
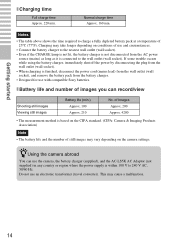
Notes • The table above shows the time required to 240 V AC, 50/60 Hz. Do not use with compatible Sony batteries. This may vary depending on the camera settings. x Battery life and number of Images Approx. 200 Approx. 4200 • The measurement method is connected to the wall ...outlet (wall socket). of images you can use the camera, the battery charger (supplied), and the AC-LS5K AC Adaptor (not supplied) in any country or region where the power supply is finished,...
Notes • The table above shows the time required to 240 V AC, 50/60 Hz. Do not use with compatible Sony batteries. This may vary depending on the camera settings. x Battery life and number of Images Approx. 200 Approx. 4200 • The measurement method is connected to the wall ...outlet (wall socket). of images you can use the camera, the battery charger (supplied), and the AC-LS5K AC Adaptor (not supplied) in any country or region where the power supply is finished,...
Instruction Manual
Page 16
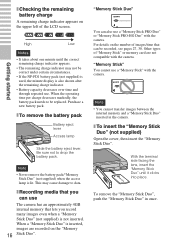
...recorded on the "Memory 16 Stick Duo". "Memory Stick" You cannot use . To remove the "Memory Stick Duo", push the "Memory Stick Duo" in the camera. x Recording media that lets you record many images even when a "Memory Stick Duo" (not supplied) is inserted, images are not compatible with the... inserted in once. Getting started x Checking the remaining battery charge A remaining charge indicator appears on the number of images/time that can also use The camera has an approximately 4GB internal memory that you can use a "Memory Stick PRO Duo" or "Memory Stick PRO-HG Duo" with the...
...recorded on the "Memory 16 Stick Duo". "Memory Stick" You cannot use . To remove the "Memory Stick Duo", push the "Memory Stick Duo" in the camera. x Recording media that lets you record many images even when a "Memory Stick Duo" (not supplied) is inserted, images are not compatible with the... inserted in once. Getting started x Checking the remaining battery charge A remaining charge indicator appears on the number of images/time that can also use The camera has an approximately 4GB internal memory that you can use a "Memory Stick PRO Duo" or "Memory Stick PRO-HG Duo" with the...
Instruction Manual
Page 17
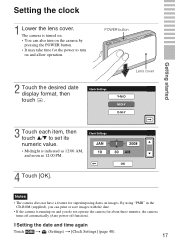
...). Setting the clock 1 Lower the lens cover. POWER button Lens cover Getting started 3 Touch each item, then touch v/V to turn on images. Notes • The camera does not have a feature for the power to set its numeric value. • Midnight is running on and you can also turn on the... time for superimposing dates on and allow operation. 2 Touch the desired date display format, then touch . The camera is turned on. • You can print or save images with the date. • If the camera is indicated as 12:00 AM, and noon as 12:00 PM. 4 Touch [OK]. x Setting the date...
...). Setting the clock 1 Lower the lens cover. POWER button Lens cover Getting started 3 Touch each item, then touch v/V to turn on images. Notes • The camera does not have a feature for the power to set its numeric value. • Midnight is running on and you can also turn on the... time for superimposing dates on and allow operation. 2 Touch the desired date display format, then touch . The camera is turned on. • You can print or save images with the date. • If the camera is indicated as 12:00 AM, and noon as 12:00 PM. 4 Touch [OK]. x Setting the date...
Instruction Manual
Page 18
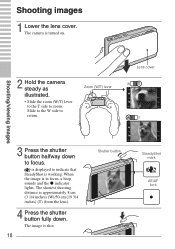
Slide to the W side to zoom. When the image is turned on. The camera is in focus, a beep sounds and the z indicator lights. Shooting/viewing images 2 Hold the camera steady as illustrated. • Slide the zoom (W/T) lever to the T side to return. Zoom (W/T) lever Lens cover 3 Press the shutter button halfway... is approximately 8 cm (3 1/4 inches) (W)/50 cm (19 3/4 inches) (T) (from the lens). 4 Press the shutter button fully down to indicate that SteadyShot is shot. 18 Shutter button SteadyShot mark AE/AF lock Shooting/viewing images Shooting images 1 Lower the lens cover.
Slide to the W side to zoom. When the image is turned on. The camera is in focus, a beep sounds and the z indicator lights. Shooting/viewing images 2 Hold the camera steady as illustrated. • Slide the zoom (W/T) lever to the T side to return. Zoom (W/T) lever Lens cover 3 Press the shutter button halfway... is approximately 8 cm (3 1/4 inches) (W)/50 cm (19 3/4 inches) (T) (from the lens). 4 Press the shutter button fully down to indicate that SteadyShot is shot. 18 Shutter button SteadyShot mark AE/AF lock Shooting/viewing images Shooting images 1 Lower the lens cover.
Instruction Manual
Page 19
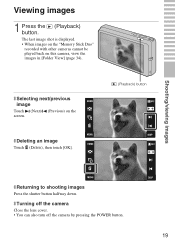
Viewing images 1 Press the (Playback) button. The last image shot is displayed. • When images on the "Memory Stick Duo" recorded with other cameras cannot be played back on the screen. x Turning off the camera Close the lens cover. • You can also turn off the camera by pressing the POWER button. 19 x Deleting an...
Viewing images 1 Press the (Playback) button. The last image shot is displayed. • When images on the "Memory Stick Duo" recorded with other cameras cannot be played back on the screen. x Turning off the camera Close the lens cover. • You can also turn off the camera by pressing the POWER button. 19 x Deleting an...

Instruction Manual
Page 20
... an approximately 4GB internal memory that can play back images stored in the camera using "PMB". • For details on the computer connection or "PMB", see page 40. Slideshow (page 32) Scrapbook (page 33) View Mode (page 34) 20 ...You can also organize large numbers of images using the desired View Mode and easily search through them anytime using the camera. 1 Export images to the camera using the Slideshow and Scrapbook functions. You can import images from a computer to the...
... an approximately 4GB internal memory that can play back images stored in the camera using "PMB". • For details on the computer connection or "PMB", see page 40. Slideshow (page 32) Scrapbook (page 33) View Mode (page 34) 20 ...You can also organize large numbers of images using the desired View Mode and easily search through them anytime using the camera. 1 Export images to the camera using the Slideshow and Scrapbook functions. You can import images from a computer to the...

Instruction Manual
Page 21
Using shooting functions 21 When the smile level exceeds the b point on the indicator, the camera shoots images automatically. The detection rate is easier to detect when the teeth are narrowed. 3 Give a clear smile with the bangs. 2 Try to Smile Shutter ... t (Smile icon). 2 Wait detecting a smile. When you touch (Smile icon) again, Smile Shutter ends. • If you press the shutter button during Smile Shutter, the camera shoots the image in Auto Adjustment, and then returns to orient the face in front of the...
Using shooting functions 21 When the smile level exceeds the b point on the indicator, the camera shoots images automatically. The detection rate is easier to detect when the teeth are narrowed. 3 Give a clear smile with the bangs. 2 Try to Smile Shutter ... t (Smile icon). 2 Wait detecting a smile. When you touch (Smile icon) again, Smile Shutter ends. • If you press the shutter button during Smile Shutter, the camera shoots the image in Auto Adjustment, and then returns to orient the face in front of the...
Instruction Manual
Page 22
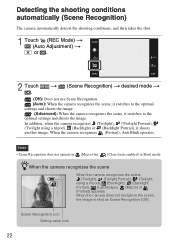
...), (Backlight) or (Backlight Portrait), it switches to the optimal settings and shoots the image. (Advanced): When the camera recognizes the scene, it shoots another image. Detecting the shooting conditions automatically (Scene Recognition) The camera automatically detects the shooting conditions, and then takes the shot. 1 Touch (REC Mode) t (Auto Adjustment) t or . 2 Touch . When the...
...), (Backlight) or (Backlight Portrait), it switches to the optimal settings and shoots the image. (Advanced): When the camera recognizes the scene, it shoots another image. Detecting the shooting conditions automatically (Scene Recognition) The camera automatically detects the shooting conditions, and then takes the shot. 1 Touch (REC Mode) t (Auto Adjustment) t or . 2 Touch . When the...
Instruction Manual
Page 23
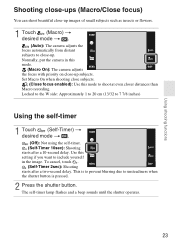
Normally, put the camera in the image. Use this setting if you want to include yourself in this mode to shoot at even closer distances than Macro recording. This ...-ups (Macro/Close focus) You can shoot beautiful close-up images of small subjects such as insects or flowers. 1 Touch (Macro) t desired mode t . (Auto): The camera adjusts the focus automatically from distant subjects to close subjects. (Close focus enabled): Use this mode. (Macro On): The...
Normally, put the camera in the image. Use this setting if you want to include yourself in this mode to shoot at even closer distances than Macro recording. This ...-ups (Macro/Close focus) You can shoot beautiful close-up images of small subjects such as insects or flowers. 1 Touch (Macro) t desired mode t . (Auto): The camera adjusts the focus automatically from distant subjects to close subjects. (Close focus enabled): Use this mode. (Macro On): The...

Instruction Manual
Page 25
...Detection) t desired mode t . (When touched): Detects the face when an area with a face is touched on the screen. (Auto): Selects the face the camera is to automatically focus on. (Child Priority): Detects and shoots with priority on a child's face. (Adult Priority): Detects and shoots with priority on . •...; You can change the focus point as many times as you wish before pressing the shutter button halfway down. • If you want the camera to choose a focus point automatically, touch . : Face detected. : No face detected. Using shooting functions Focusing on a specific point of the...
...Detection) t desired mode t . (When touched): Detects the face when an area with a face is touched on the screen. (Auto): Selects the face the camera is to automatically focus on. (Child Priority): Detects and shoots with priority on a child's face. (Adult Priority): Detects and shoots with priority on . •...; You can change the focus point as many times as you wish before pressing the shutter button halfway down. • If you want the camera to choose a focus point automatically, touch . : Face detected. : No face detected. Using shooting functions Focusing on a specific point of the...
Instruction Manual
Page 27
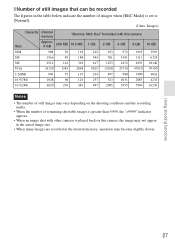
... table below indicate the number of images when [REC Mode] is set to [Normal]. (Units: Images) Capacity Internal memory "Memory Stick Duo" formatted with this camera Size Approx. 4 GB 256 MB 512 MB 1 GB 2 GB 4 GB 8 GB 16 GB 10M 988 56 118 242 493 972 1963 3991 5M 1566.... • When the number of remaining shootable images is greater than 9,999, the ">9999" indicator appears. • When an image shot with other cameras is played back on this camera, the image may not appear in the actual image size. • When many images are recorded in the internal memory, operation may...
... table below indicate the number of images when [REC Mode] is set to [Normal]. (Units: Images) Capacity Internal memory "Memory Stick Duo" formatted with this camera Size Approx. 4 GB 256 MB 512 MB 1 GB 2 GB 4 GB 8 GB 16 GB 10M 988 56 118 242 493 972 1963 3991 5M 1566.... • When the number of remaining shootable images is greater than 9,999, the ">9999" indicator appears. • When an image shot with other cameras is played back on this camera, the image may not appear in the actual image size. • When many images are recorded in the internal memory, operation may...
Instruction Manual
Page 30
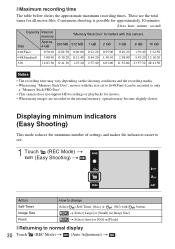
Action Self-Timer Image Size Flash How to only a "Memory Stick PRO Duo". • This camera does not support HD recordings or playbacks for movies. • When many images are the total times for approximately 10 minutes. (Units: hour : minute : second) ...] in the internal memory, operation may vary depending on the shooting conditions and the recording media. • When using "Memory Stick Duo", movies with this camera Size Approx. 4 GB 256 MB 512 MB 1 GB 2 GB 4 GB 8 GB 16 GB 640(Fine) 0:50:10 0:02:50 0:06:00 0:12:20 0:25:00...
Action Self-Timer Image Size Flash How to only a "Memory Stick PRO Duo". • This camera does not support HD recordings or playbacks for movies. • When many images are the total times for approximately 10 minutes. (Units: hour : minute : second) ...] in the internal memory, operation may vary depending on the shooting conditions and the recording media. • When using "Memory Stick Duo", movies with this camera Size Approx. 4 GB 256 MB 512 MB 1 GB 2 GB 4 GB 8 GB 16 GB 640(Fine) 0:50:10 0:02:50 0:06:00 0:12:20 0:25:00...
Instruction Manual
Page 32
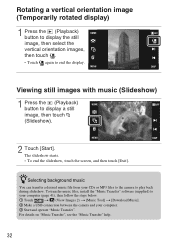
... your computer (page 41), then follow the steps below. 1 Touch t (View Images 2) t [Music Tool] t [Download Music]. 2 Make a USB connection between the camera and your CDs or MP3 files to the camera to play back during slideshow. zSelecting background music You can transfer a desired music file from your computer. 3 Start and operate "Music...
... your computer (page 41), then follow the steps below. 1 Touch t (View Images 2) t [Music Tool] t [Download Music]. 2 Make a USB connection between the camera and your CDs or MP3 files to the camera to play back during slideshow. zSelecting background music You can transfer a desired music file from your computer. 3 Start and operate "Music...
Instruction Manual
Page 33
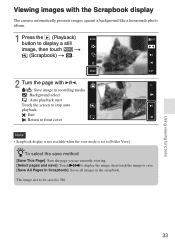
... mode is 3M. 33 The image size to be saved is set to [Folder View]. Using viewing functions Viewing images with the Scrapbook display The camera automatically presents images against a background like a homemade photo album. 1 Press the (Playback) button to display a still image, then touch t (Scrapbook) t . 2 Turn the page with / . / : Save...
... mode is 3M. 33 The image size to be saved is set to [Folder View]. Using viewing functions Viewing images with the Scrapbook display The camera automatically presents images against a background like a homemade photo album. 1 Press the (Playback) button to display a still image, then touch t (Scrapbook) t . 2 Turn the page with / . / : Save...


