Operating Instructions
Page 2
... years to the following two conditions: (1) This device may be producing home video that may cause undesired operation. 2 Operation is subject to come. Welcome! With your authority to persons. You will soon be of sufficient magnitude to constitute a risk of important operating and maintenance (servicing) instructions in this manual could void your Digital Handycam, you have any interference received, including interference...
... years to the following two conditions: (1) This device may be producing home video that may cause undesired operation. 2 Operation is subject to come. Welcome! With your authority to persons. You will soon be of sufficient magnitude to constitute a risk of important operating and maintenance (servicing) instructions in this manual could void your Digital Handycam, you have any interference received, including interference...
Operating Instructions
Page 4
...Adjusting the white balance manually .. 34 Using the wide mode 35 Using the fader function 36 Using special effects - Image protection 134 with digital effects 48 Deleting images 135 Enlarging images recorded on a tape - Date search 52 Searching for a photo - Memory Photo recording 102 Recording an image from a mini DV tape Playback - Basics Playing back a tape 24 Viewing the recording on "Memory Stick"s to a wall outlet 13 Customizing Your Camcorder Changing the menu settings 84 Resetting the date and time 92 Step 2 Inserting a cassette 14 "Memory Stick" Operations...
...Adjusting the white balance manually .. 34 Using the wide mode 35 Using the fader function 36 Using special effects - Image protection 134 with digital effects 48 Deleting images 135 Enlarging images recorded on a tape - Date search 52 Searching for a photo - Memory Photo recording 102 Recording an image from a mini DV tape Playback - Basics Playing back a tape 24 Viewing the recording on "Memory Stick"s to a wall outlet 13 Customizing Your Camcorder Changing the menu settings 84 Resetting the date and time 92 Step 2 Inserting a cassette 14 "Memory Stick" Operations...
Operating Instructions
Page 16
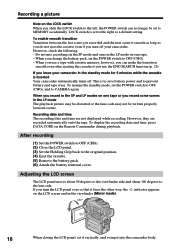
... the lens side. Adjusting the LCD screen The LCD panel moves about 90 degrees to the viewfinder side and about 180 degrees to the original position. (4) Eject the cassette. (5) Remove the battery pack. (6) Attach the battery terminal cover. If you leave your camcorder. When you record in the SP and LP modes on one tape. - However, they are not displayed while recording. To display the recording date and time, press DATA CODE...
... the lens side. Adjusting the LCD screen The LCD panel moves about 90 degrees to the viewfinder side and about 180 degrees to the original position. (4) Eject the cassette. (5) Remove the battery pack. (6) Attach the battery terminal cover. If you leave your camcorder. When you record in the SP and LP modes on one tape. - However, they are not displayed while recording. To display the recording date and time, press DATA CODE...

Operating Instructions
Page 17
... are not displayed. Recording - Indicators in the mirror mode ZERO SET MEMORY on the LCD screen is opened Recording time becomes shorter a little compared with when recording with the LCD panel opened up to see. When recording with the LCD panel closed. When you adjust angles of the LCD screen The recorded picture will be difficult to 90 degrees. Picture in direct sunlight The LCD screen may be normal when recorded. Select LCD B.L. During recording in the...
... are not displayed. Recording - Indicators in the mirror mode ZERO SET MEMORY on the LCD screen is opened Recording time becomes shorter a little compared with when recording with the LCD panel opened up to see. When recording with the LCD panel closed. When you adjust angles of the LCD screen The recorded picture will be difficult to 90 degrees. Picture in direct sunlight The LCD screen may be normal when recorded. Select LCD B.L. During recording in the...
Operating Instructions
Page 21
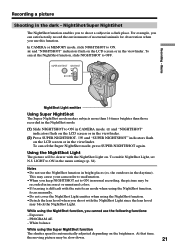
... your camcorder to malfunction. •When you keep NIGHTSHOT set N.S. and "NIGHTSHOT" indicators flash on the LCD screen or in CAMERA mode. and "SUPER NIGHTSHOT" indicators flash on the LCD screen or in bright places (ex. To cancel the Super NightShot mode, press SUPER NIGHTSHOT again. PROGRAM AE - White balance While using the Super NightShot function The shutter speed is difficult with the autofocus mode when using the NightShot function, focus manually...
... your camcorder to malfunction. •When you keep NIGHTSHOT set N.S. and "NIGHTSHOT" indicators flash on the LCD screen or in CAMERA mode. and "SUPER NIGHTSHOT" indicators flash on the LCD screen or in bright places (ex. To cancel the Super NightShot mode, press SUPER NIGHTSHOT again. PROGRAM AE - White balance While using the Super NightShot function The shutter speed is difficult with the autofocus mode when using the NightShot function, focus manually...
Operating Instructions
Page 27
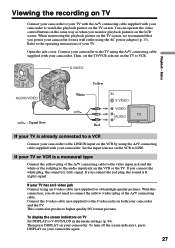
S VIDEO Playback - Set the input selector on your camcorder. If you monitor playback pictures on the TV screen. Refer to the operating instructions of your camcorder. Connect your camcorder to the TV using the A/V connecting cable supplied with your camcorder. To display the screen indicators on TV Set DISPLAY to V-OUT/LCD in the same way as when you connect the white plug, the sound is R (right) signal. Then press DISPLAY on the VCR to LINE. Basics Yellow AUDIO/VIDEO : Signal...
S VIDEO Playback - Set the input selector on your camcorder. If you monitor playback pictures on the TV screen. Refer to the operating instructions of your camcorder. Connect your camcorder to the TV using the A/V connecting cable supplied with your camcorder. To display the screen indicators on TV Set DISPLAY to V-OUT/LCD in the same way as when you connect the white plug, the sound is R (right) signal. Then press DISPLAY on the VCR to LINE. Basics Yellow AUDIO/VIDEO : Signal...
Operating Instructions
Page 28
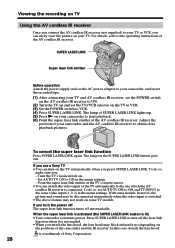
... laser link emitter Before operation Attach the power supply such as the AC power adaptor to your camcorder, and insert the recorded tape. (1) After connecting your camcorder and the AV cordless IR receiver to ON in the menu settings. Set AUTO TV ON to obtain clear playback pictures. With some TV models. If you use a Sony TV •You can switch the video input of the camcorder and the IR receiver...
... laser link emitter Before operation Attach the power supply such as the AC power adaptor to your camcorder, and insert the recorded tape. (1) After connecting your camcorder and the AV cordless IR receiver to ON in the menu settings. Set AUTO TV ON to obtain clear playback pictures. With some TV models. If you use a Sony TV •You can switch the video input of the camcorder and the IR receiver...
Operating Instructions
Page 29
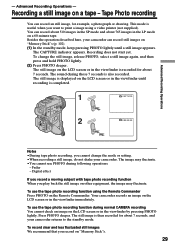
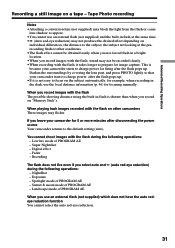
... still image is displayed on the Remote Commander. Recording does not start yet. The sound during those 7 seconds is recorded for example, a photograph or drawing. The image may fluctuate. Your camcorder records an image on "Memory Stick"s (p. 102). (1) In the standby mode, keep pressing PHOTO lightly until recording is completed. 1 PHOTO CAPTURE 2 PHOTO Notes •During tape photo recording, you record on the LCD screen or in the viewfinder is also recorded. Advanced Recording Operations - Besides the operation described...
... still image is displayed on the Remote Commander. Recording does not start yet. The sound during those 7 seconds is recorded for example, a photograph or drawing. The image may fluctuate. Your camcorder records an image on "Memory Stick"s (p. 102). (1) In the standby mode, keep pressing PHOTO lightly until recording is completed. 1 PHOTO CAPTURE 2 PHOTO Notes •During tape photo recording, you record on the LCD screen or in the viewfinder is also recorded. Advanced Recording Operations - Besides the operation described...
Operating Instructions
Page 31
When you record images with the flash on "Memory Stick"s. If you use forced flash in the dark, use the focal distance information (p. 46) for focusing manually. Digital effect - Super Nightshot - NightShot - Spotlight mode of PROGRAM AE - When playing back images recorded with the flash The possible shooting distance using the built-in flash is because your camcorder starts to charge power for example, when recording in a bright location. •When you record on other...
When you record images with the flash on "Memory Stick"s. If you use forced flash in the dark, use the focal distance information (p. 46) for focusing manually. Digital effect - Super Nightshot - NightShot - Spotlight mode of PROGRAM AE - When playing back images recorded with the flash The possible shooting distance using the built-in flash is because your camcorder starts to charge power for example, when recording in a bright location. •When you record on other...
Operating Instructions
Page 39
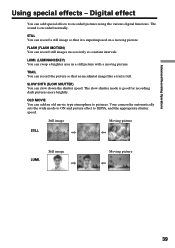
... picture. Your camcorder automatically sets the wide mode to ON and picture effect to recorded pictures using the various digital functions. The slow shutter mode is recorded normally. FLASH (FLASH MOTION) You can add an old movie type atmosphere to pictures. TRAIL You can add special effects to SEPIA, and the appropriate shutter speed. The sound is good for recording dark pictures more brightly. Digital effect You can record the picture so that it is left. Advanced Recording Operations Using special...
... picture. Your camcorder automatically sets the wide mode to ON and picture effect to recorded pictures using the various digital functions. The slow shutter mode is recorded normally. FLASH (FLASH MOTION) You can add an old movie type atmosphere to pictures. TRAIL You can add special effects to SEPIA, and the appropriate shutter speed. The sound is good for recording dark pictures more brightly. Digital effect You can record the picture so that it is left. Advanced Recording Operations Using special...
Operating Instructions
Page 49
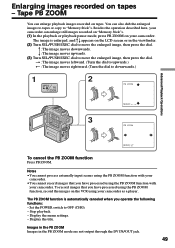
... process externally input scenes using your camcorder as a player. Display the menu settings. - R : The image moves downwards. You can enlarge playback images recorded on tapes - t : The image moves leftward. (Turn the dial to upwards.) T : The image moves rightward. (Turn the dial to OFF (CHG). - Display the title. Besides the operation described here, your camcorder can enlarge still images recorded on "Memory Stick"s. (1) In the playback or playback pause mode, press PB ZOOM on the VCR using the PB ZOOM function with your camcorder...
... process externally input scenes using your camcorder as a player. Display the menu settings. - R : The image moves downwards. You can enlarge playback images recorded on tapes - t : The image moves leftward. (Turn the dial to upwards.) T : The image moves rightward. (Turn the dial to OFF (CHG). - Display the title. Besides the operation described here, your camcorder can enlarge still images recorded on "Memory Stick"s. (1) In the playback or playback pause mode, press PB ZOOM on the VCR using the PB ZOOM function with your camcorder...
Operating Instructions
Page 66
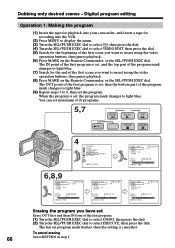
... first program is set, the program mark changes to insert using the video operation buttons, then pause playback. (8) Press MARK on the Remote Commander, or the SEL/PUSH EXEC dial. The OUT point of the first program is cancelled. Digital program editing Operation 1: Making the program (1) Insert the tape for playback into your camcorder, and insert a tape for recording into the VCR. (2) Press MENU to display the menu. (3) Turn the SEL...
... first program is set, the program mark changes to insert using the video operation buttons, then pause playback. (8) Press MARK on the Remote Commander, or the SEL/PUSH EXEC dial. The OUT point of the first program is cancelled. Digital program editing Operation 1: Making the program (1) Insert the tape for playback into your camcorder, and insert a tape for recording into the VCR. (2) Press MENU to display the menu. (3) Turn the SEL...
Operating Instructions
Page 69
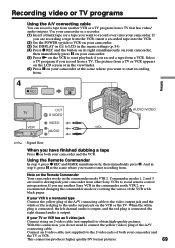
... output, and the red plug is connected, the right channel audio is a monaural type Connect the yellow plug of the A/V connecting cable to the video output jack and the white or the red plug to connect the yellow (video) plug of the A/V connecting cable. This connection produces higher quality DV format pictures. 69 Select a TV program if you want to record over) into the VCR. (2) Set the POWER switch to VCR on your camcorder. (3) Set DISPLAY in to LCD in the menu settings (p. 84). (4) Press z REC...
... output, and the red plug is connected, the right channel audio is a monaural type Connect the yellow plug of the A/V connecting cable to the video output jack and the white or the red plug to connect the yellow (video) plug of the A/V connecting cable. This connection produces higher quality DV format pictures. 69 Select a TV program if you want to record over) into the VCR. (2) Set the POWER switch to VCR on your camcorder. (3) Set DISPLAY in to LCD in the menu settings (p. 84). (4) Press z REC...
Operating Instructions
Page 85
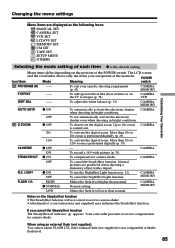
... the NightShot Light function. Changing the menu settings Menu items are produced when shooting a stationary object with the flash level. 85 The LCD screen and the viewfinder shows only the items you cancel the SteadyShot function The SteadyShot off indicator appears. D ZOOM z OFF To deactivate the digital zoom. Natural pictures are displayed as the following icons: MANUAL SET CAMERA SET VCR SET LCD/VF SET MEMORY SET CM SET TAPE SET SETUP MENU OTHERS Customizing Your Camcorder Selecting the mode setting of a conversion lens (not supplied...
... the NightShot Light function. Changing the menu settings Menu items are produced when shooting a stationary object with the flash level. 85 The LCD screen and the viewfinder shows only the items you cancel the SteadyShot function The SteadyShot off indicator appears. D ZOOM z OFF To deactivate the digital zoom. Natural pictures are displayed as the following icons: MANUAL SET CAMERA SET VCR SET LCD/VF SET MEMORY SET CM SET TAPE SET SETUP MENU OTHERS Customizing Your Camcorder Selecting the mode setting of a conversion lens (not supplied...
Operating Instructions
Page 92
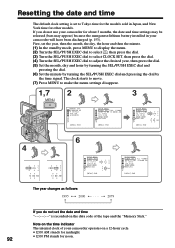
... time for other models. First, set to Tokyo time for the models sold in your camcorder operates on the data code of the tape and the "Memory Stick." The clock starts to move. (7) Press MENU to make the menu settings disappear. 1,7 2 3 MENU MANUA L SET PROGRAM AE P EFFECT WHT BA L AUTOSHTR [ MENU ] : END SETUP MENU CLOCK SET J AN 1 2000 AUTO TV ON 12:00:00 AM TV I NPUT LTR S I ZE DEMO MODE RETURN [ MENU ] : END SETUP MENU CLOCK SET AUTO...
... time for other models. First, set to Tokyo time for the models sold in your camcorder operates on the data code of the tape and the "Memory Stick." The clock starts to move. (7) Press MENU to make the menu settings disappear. 1,7 2 3 MENU MANUA L SET PROGRAM AE P EFFECT WHT BA L AUTOSHTR [ MENU ] : END SETUP MENU CLOCK SET J AN 1 2000 AUTO TV ON 12:00:00 AM TV I NPUT LTR S I ZE DEMO MODE RETURN [ MENU ] : END SETUP MENU CLOCK SET AUTO...
Operating Instructions
Page 112
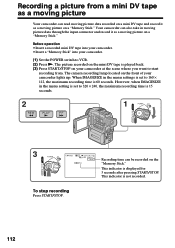
...) CAMERA 3 POWER LOCK 4 0min N 0:15:42:43 320REC 0:0 3 [ 1 5SEC ] Recording time can also take in the menu setting is played back. (3) Press START/STOP on a "Memory Stick." MEMORY OFF(CHR) CAMERA This indicator is not recorded. Recording a picture from a mini DV tape as a moving picture Your camcorder can read moving picture data recorded on a mini DV tape and record it as a moving picture on the front of your camcorder lights up. Your camcorder can be recorded on the VCR BBB "Memory Stick." The camera recording...
...) CAMERA 3 POWER LOCK 4 0min N 0:15:42:43 320REC 0:0 3 [ 1 5SEC ] Recording time can also take in the menu setting is played back. (3) Press START/STOP on a "Memory Stick." MEMORY OFF(CHR) CAMERA This indicator is not recorded. Recording a picture from a mini DV tape as a moving picture Your camcorder can read moving picture data recorded on a mini DV tape and record it as a moving picture on the front of your camcorder lights up. Your camcorder can be recorded on the VCR BBB "Memory Stick." The camera recording...
Operating Instructions
Page 113
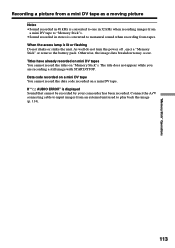
When the access lamp is displayed Sound that cannot be recorded by your camcorder has been recorded. As well do not turn the power off , eject a "Memory Stick" or remove the battery pack. Connect the A/V connecting cable to play back the image (p. 114). 113 "Memory Stick" Operations Recording a picture from a mini DV tape as a moving picture Notes •Sound recorded in 48 kHz is converted to one in 32 kHz when recording images from a mini DV tape to "Memory Stick"s. •Sound recorded in stereo is converted...
When the access lamp is displayed Sound that cannot be recorded by your camcorder has been recorded. As well do not turn the power off , eject a "Memory Stick" or remove the battery pack. Connect the A/V connecting cable to play back the image (p. 114). 113 "Memory Stick" Operations Recording a picture from a mini DV tape as a moving picture Notes •Sound recorded in 48 kHz is converted to one in 32 kHz when recording images from a mini DV tape to "Memory Stick"s. •Sound recorded in stereo is converted...

Operating Instructions
Page 126
... to MEMORY. For Windows 98/98SE, Windows 2000 users (1) Turn on CD-ROM. USB connector USB jack 126 Personal computer USB cable Push in until the connector clicks into place Note You cannot install the USB driver if a "Memory Stick" is supplied with the USB connector on your camcorder with your camcorder. Viewing images using the supplied USB cable. (6) Insert a "Memory Stick" into your camcorder, connect the AC power adaptor and set the POWER switch to insert a "Memory Stick" into your camcorder before installing the USB driver.
... to MEMORY. For Windows 98/98SE, Windows 2000 users (1) Turn on CD-ROM. USB connector USB jack 126 Personal computer USB cable Push in until the connector clicks into place Note You cannot install the USB driver if a "Memory Stick" is supplied with the USB connector on your camcorder with your camcorder. Viewing images using the supplied USB cable. (6) Insert a "Memory Stick" into your camcorder, connect the AC power adaptor and set the POWER switch to insert a "Memory Stick" into your camcorder before installing the USB driver.
Operating Instructions
Page 156
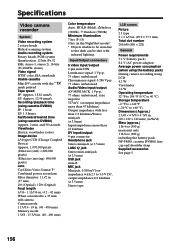
.... Specifications Video camera recorder System Video recording system 2 rotary heads Helical scanning system Audio recording system Rotary heads, PCM system Quantization: 12 bits (Fs 32 kHz, stereo 1, stereo 2), 16 bits (Fs 48 kHz, stereo) Video signal NTSC color, EIA standards Usable cassette Mini DV cassette with the mark printed Tape speed SP: Approx. 18.81 mm/s LP: Approx. 12.56 mm/s Recording/playback time (using cassette DVM60) SP: 1 hour LP: 1.5 hours Fastforward/rewind time (using LCD...
.... Specifications Video camera recorder System Video recording system 2 rotary heads Helical scanning system Audio recording system Rotary heads, PCM system Quantization: 12 bits (Fs 32 kHz, stereo 1, stereo 2), 16 bits (Fs 48 kHz, stereo) Video signal NTSC color, EIA standards Usable cassette Mini DV cassette with the mark printed Tape speed SP: Approx. 18.81 mm/s LP: Approx. 12.56 mm/s Recording/playback time (using cassette DVM60) SP: 1 hour LP: 1.5 hours Fastforward/rewind time (using LCD...
Operating Instructions
Page 167
... sound 139 Manual focus 45 Memory chromakey 115 Memory luminancekey ........ 115 MEMORY MIX 115 Memory PB ZOOM 132 Memory photo recording 102 "Memory Stick 93 Menu settings 84 Memory overlap 115 Mirror mode 16 Moisture condensation ........ 152 MONOTONE 36 MPEG 93 MPEG movie recording ....... 111 NIGHTSHOT 21 Normal charge 11 NTSC system 151 O, P, Q OLD MOVIE 39 Operation indicators 165 OVERLAP 36, 115 Photo save 118 Photo scan 55 Photo search 54 PICTURE EFFECT 38, 47 Picture search 26 Playback pause 26 Power...
... sound 139 Manual focus 45 Memory chromakey 115 Memory luminancekey ........ 115 MEMORY MIX 115 Memory PB ZOOM 132 Memory photo recording 102 "Memory Stick 93 Menu settings 84 Memory overlap 115 Mirror mode 16 Moisture condensation ........ 152 MONOTONE 36 MPEG 93 MPEG movie recording ....... 111 NIGHTSHOT 21 Normal charge 11 NTSC system 151 O, P, Q OLD MOVIE 39 Operation indicators 165 OVERLAP 36, 115 Photo save 118 Photo scan 55 Photo search 54 PICTURE EFFECT 38, 47 Picture search 26 Playback pause 26 Power...


