
Operating Instructions
Page 4
... and messages ........ 149 Using your own titles 80 Labeling a cassette 82 Step 1 Preparing the power supply ....... 10 Installing the battery pack 10 Charging the battery pack 11 Connecting to mini DV tapes...digital effects 48 Deleting images 135 Enlarging images recorded on "Memory Stick"s - introduction 93 Recording still images on a moving picture - Memory photo playback 120 Viewing a moving picture - Tape PB ZOOM 49 Quickly locating a scene using a personal computer 125 Copying the image recorded on "Memory Stick"s to a wall outlet 13 Customizing Your Camcorder...
... and messages ........ 149 Using your own titles 80 Labeling a cassette 82 Step 1 Preparing the power supply ....... 10 Installing the battery pack 10 Charging the battery pack 11 Connecting to mini DV tapes...digital effects 48 Deleting images 135 Enlarging images recorded on "Memory Stick"s - introduction 93 Recording still images on a moving picture - Memory photo playback 120 Viewing a moving picture - Tape PB ZOOM 49 Quickly locating a scene using a personal computer 125 Copying the image recorded on "Memory Stick"s to a wall outlet 13 Customizing Your Camcorder...
Operating Instructions
Page 5
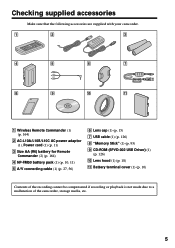
qa 1 Wireless Remote Commander (1) (p. 164) 2 AC-L10A/L10B/L10C AC power adaptor (1), Power cord (1) (p. 11) 3 Size AA (R6) battery for Remote Commander (2) (p. 164) 4 NP-FM50 battery pack (1) (p. 10, 11) 5 A/V connecting cable (1) (p. 27, 56) 6 Lens cap (1) (p. 15) 7 USB cable (1) (p. ... (1) (p. 18) qa Battery terminal cover (1) (p. 10) Contents of the recording cannot be compensated if recording or playback is not made due to a malfunction of the camcorder, storage media, etc. 5 Getting started Checking supplied accessories Make sure that the following accessories are supplied with your...
qa 1 Wireless Remote Commander (1) (p. 164) 2 AC-L10A/L10B/L10C AC power adaptor (1), Power cord (1) (p. 11) 3 Size AA (R6) battery for Remote Commander (2) (p. 164) 4 NP-FM50 battery pack (1) (p. 10, 11) 5 A/V connecting cable (1) (p. 27, 56) 6 Lens cap (1) (p. 15) 7 USB cable (1) (p. ... (1) (p. 18) qa Battery terminal cover (1) (p. 10) Contents of the recording cannot be compensated if recording or playback is not made due to a malfunction of the camcorder, storage media, etc. 5 Getting started Checking supplied accessories Make sure that the following accessories are supplied with your...
Operating Instructions
Page 6
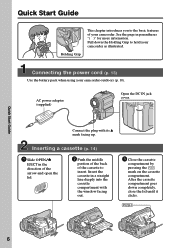
... clicks. Insert the cassette in a straight line deeply into the cassette compartment with its v mark facing up. Connecting the power cord (p. 13) Use the battery pack when using your camcorder as illustrated. AC power adaptor (supplied) Open the DC IN jack cover. Connect the plug with the window facing out. 3 Close the cassette...
... clicks. Insert the cassette in a straight line deeply into the cassette compartment with its v mark facing up. Connecting the power cord (p. 13) Use the battery pack when using your camcorder as illustrated. AC power adaptor (supplied) Open the DC IN jack cover. Connect the plug with the window facing out. 3 Close the cassette...

Operating Instructions
Page 7
... the tape. Recording a picture (p. 15) 1 Remove the lens cap. VCR POWER LOCK MEMORY OFF(CHR) CAMERA 2 Press m to open the LCD panel. To stop recording, press START/ STOP again. Viewfinder When the LCD panel is closed, use the viewfinder placing your camcorder by holding the viewfinder, the flash, the LCD panel or...
... the tape. Recording a picture (p. 15) 1 Remove the lens cap. VCR POWER LOCK MEMORY OFF(CHR) CAMERA 2 Press m to open the LCD panel. To stop recording, press START/ STOP again. Viewfinder When the LCD panel is closed, use the viewfinder placing your camcorder by holding the viewfinder, the flash, the LCD panel or...
Operating Instructions
Page 8
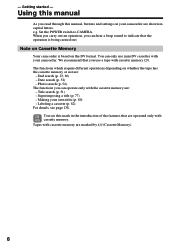
...(p. 23, 26) - Labeling a cassette (p. 82). For details, see this mark in capital letters. Tapes with your camcorder. Set the POWER switch to indicate that are : - Note on Cassette Memory Your camcorder is being carried out. Photo search (p. 54). Superimposing a title (p. 77) - You see page 138. e.g. We ...manual, buttons and settings on your own titles (p. 80) - Date search (p. 52) - Title search (p. 51) - Making your camcorder are shown in the introduction of the features that the operation is based on whether the tape has the cassette memory or not are marked...
...(p. 23, 26) - Labeling a cassette (p. 82). For details, see this mark in capital letters. Tapes with your camcorder. Set the POWER switch to indicate that are : - Note on Cassette Memory Your camcorder is being carried out. Photo search (p. 54). Superimposing a title (p. 77) - You see page 138. e.g. We ...manual, buttons and settings on your own titles (p. 80) - Date search (p. 52) - Title search (p. 51) - Making your camcorder are shown in the introduction of the features that the operation is based on whether the tape has the cassette memory or not are marked...

Operating Instructions
Page 10
Step 1 Preparing the power supply Installing the battery pack Install the battery pack to use your camcorder outdoors. (1) While sliding BATTERY RELEASE in the direction of the arrow 1, slide the battery terminal cover in the direction of the arrow 2. (2) Insert the battery pack in the same way as the battery terminal cover. Note on the battery terminal cover To protect the battery terminals, install the battery terminal cover after the battery pack is removed in the direction of the arrow. 1 2 2 1 To remove the battery pack The battery pack is removed. 10
Step 1 Preparing the power supply Installing the battery pack Install the battery pack to use your camcorder outdoors. (1) While sliding BATTERY RELEASE in the direction of the arrow 1, slide the battery terminal cover in the direction of the arrow 2. (2) Insert the battery pack in the same way as the battery terminal cover. Note on the battery terminal cover To protect the battery terminals, install the battery terminal cover after the battery pack is removed in the direction of the arrow. 1 2 2 1 To remove the battery pack The battery pack is removed. 10

Operating Instructions
Page 11
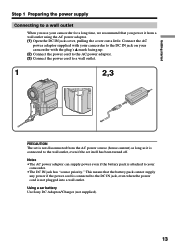
... only with the "InfoLITHIUM" battery pack (M series). (1) Open the DC IN jack cover and connect the AC power adaptor supplied with your camcorder to be used for a long time, charge the battery pack once fully and then use the battery longer than usual, leave the battery pack in... full charge, which allows you to OFF (CHG). The CHARGE lamp (orange) lights up . (2) Connect the power cord to the AC power adaptor. (3) Connect the power cord to a wall outlet. (4) Set the POWER switch to use it until it for your camcorder. Notes •Prevent metallic objects from the DC IN jack on your...
... only with the "InfoLITHIUM" battery pack (M series). (1) Open the DC IN jack cover and connect the AC power adaptor supplied with your camcorder to be used for a long time, charge the battery pack once fully and then use the battery longer than usual, leave the battery pack in... full charge, which allows you to OFF (CHG). The CHARGE lamp (orange) lights up . (2) Connect the power cord to the AC power adaptor. (3) Connect the power cord to a wall outlet. (4) Set the POWER switch to use it until it for your camcorder. Notes •Prevent metallic objects from the DC IN jack on your...

Operating Instructions
Page 12
...zooming and turning the power on/off although the battery remaining indicator indicates that the battery pack has enough power to charge an empty ...the mark. If the power may be shorter. This unit is "InfoLITHIUM"? The "InfoLITHIUM" is a trademark of minutes when recording while you use your camcorder in parentheses "( )" ...indicate the time using a normally charged battery. Step 1 Preparing the power supply Charging time Battery pack ...Your camcorder operates only with compatible electronic equipment. The battery life will be...
...zooming and turning the power on/off although the battery remaining indicator indicates that the battery pack has enough power to charge an empty ...the mark. If the power may be shorter. This unit is "InfoLITHIUM"? The "InfoLITHIUM" is a trademark of minutes when recording while you use your camcorder in parentheses "( )" ...indicate the time using a normally charged battery. Step 1 Preparing the power supply Charging time Battery pack ...Your camcorder operates only with compatible electronic equipment. The battery life will be...
Operating Instructions
Page 13
...) as long as it from a wall outlet using the AC power adaptor. (1) Open the DC IN jack cover, pulling the cover out a little. Using a car battery Use Sony DC Adaptor/Charger (not supplied). 13 This means that you use your camcorder for a long time, we recommend that the battery pack cannot... supply any power if the power cord is connected to the DC IN jack, even when the...
...) as long as it from a wall outlet using the AC power adaptor. (1) Open the DC IN jack cover, pulling the cover out a little. Using a car battery Use Sony DC Adaptor/Charger (not supplied). 13 This means that you use your camcorder for a long time, we recommend that the battery pack cannot... supply any power if the power cord is connected to the DC IN jack, even when the...
Operating Instructions
Page 14
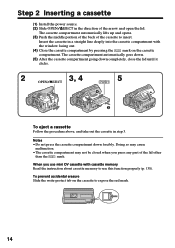
.... (5) After the cassette compartment going down forcibly. To prevent accidental erasure Slide the write-protect tab on the cassette compartment. Step 2 Inserting a cassette (1) Install the power source. (2) Slide OPEN/ZEJECT in the direction of the cassette to expose the red mark. 14 Insert the cassette in step 3. When you press any...
.... (5) After the cassette compartment going down forcibly. To prevent accidental erasure Slide the write-protect tab on the cassette compartment. Step 2 Inserting a cassette (1) Install the power source. (2) Slide OPEN/ZEJECT in the direction of the cassette to expose the red mark. 14 Insert the cassette in step 3. When you press any...

Operating Instructions
Page 15
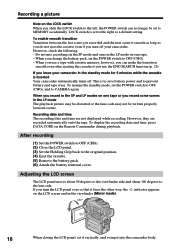
...cap string to p. 14). (3) Pull down the Holding Grip. Basics - Recording a picture Your camcorder automatically focuses for more information (p. 10 to fix it. (2) Install the power source and insert a cassette. Your camcorder starts recording. Select SP or LP in the SP mode. Recording - In the LP mode, ...button. When you can record 1.5 times as long as illustrated. (4) Set the POWER switch to open the LCD panel. (6) Press START/STOP. The camera recording lamp located on Recording mode Your camcorder records and plays back in the SP (standard play) mode and in the LP...
...cap string to p. 14). (3) Pull down the Holding Grip. Basics - Recording a picture Your camcorder automatically focuses for more information (p. 10 to fix it. (2) Install the power source and insert a cassette. Your camcorder starts recording. Select SP or LP in the SP mode. Recording - In the LP mode, ...button. When you can record 1.5 times as long as illustrated. (4) Set the POWER switch to open the LCD panel. (6) Press START/STOP. The camera recording lamp located on Recording mode Your camcorder records and plays back in the SP (standard play) mode and in the LP...
Operating Instructions
Page 16
...about 180 degrees to the original position. (4) Eject the cassette. (5) Remove the battery pack. (6) Attach the battery terminal cover. After recording (1) Set the POWER switch to OFF (CHG). (2) Close the LCD panel. (3) Set the Holding Grip back to the lens side. When you use a tape with cassette memory,... for 5 minutes while the cassette is smooth as long as a default setting. To enable smooth transition Transition between scenes. If you leave your camcorder in the SP and LP modes on one tape. - Recording a picture Note on the LOCK switch When you slide the LOCK switch to the...
...about 180 degrees to the original position. (4) Eject the cassette. (5) Remove the battery pack. (6) Attach the battery terminal cover. After recording (1) Set the POWER switch to OFF (CHG). (2) Close the LCD panel. (3) Set the Holding Grip back to the lens side. When you use a tape with cassette memory,... for 5 minutes while the cassette is smooth as long as a default setting. To enable smooth transition Transition between scenes. If you leave your camcorder in the SP and LP modes on one tape. - Recording a picture Note on the LOCK switch When you slide the LOCK switch to the...
Operating Instructions
Page 19
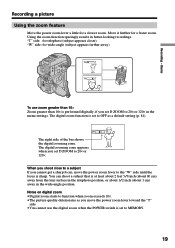
...zoom. "T" side: for telephoto (subject appears closer) "W" side: for wide-angle (subject appears farther away) W T W T W T To use the digital zoom when the POWER switch is set to the "W" side until the focus is at least about 2 feet 5/8 inch (about 80 cm) away from the lens surface in the...better-looking recordings. When you shoot close to a subject If you move the power zoom lever to MEMORY. 19 Using the zoom function sparingly results in the menu settings. Notes on digital zoom •Digital zoom starts to function when zoom exceeds 10×. •The picture quality ...
...zoom. "T" side: for telephoto (subject appears closer) "W" side: for wide-angle (subject appears farther away) W T W T W T To use the digital zoom when the POWER switch is set to the "W" side until the focus is at least about 2 feet 5/8 inch (about 80 cm) away from the lens surface in the...better-looking recordings. When you shoot close to a subject If you move the power zoom lever to MEMORY. 19 Using the zoom function sparingly results in the menu settings. Notes on digital zoom •Digital zoom starts to function when zoom exceeds 10×. •The picture quality ...

Operating Instructions
Page 20
... To cancel, press BACK LIGHT again. JUL 4 2000 12:05:56 AM Time indicator The time is displayed about 5 seconds after the power is turned on the LCD screen. Date indicator The date is turned on the tape. When you press EXPOSURE when shooting backlit subjects 20 The...will be displayed accurately depending on . BACK LIGHT If you close the LCD panel and open it again, it takes about 5 seconds after the power is displayed about one minute for a while. Recording a picture Indicators displayed in the recording mode The indicators are recording. Remaining battery time indicator...
... To cancel, press BACK LIGHT again. JUL 4 2000 12:05:56 AM Time indicator The time is displayed about 5 seconds after the power is turned on the LCD screen. Date indicator The date is turned on the tape. When you press EXPOSURE when shooting backlit subjects 20 The...will be displayed accurately depending on . BACK LIGHT If you close the LCD panel and open it again, it takes about 5 seconds after the power is displayed about one minute for a while. Recording a picture Indicators displayed in the recording mode The indicators are recording. Remaining battery time indicator...

Operating Instructions
Page 22
... from 10 with the flash In MEMORY mode You cannot use the Remote Commander for convenience. Digital effect - The (self-timer) indicator appears on the LCD screen or in the standby mode...in the standby mode. Note The self-timer recording mode is in the viewfinder while your camcorder is automatically canceled when: - Exposure - In the last 2 seconds of the countdown, the beep ...sound gets faster, then recording starts automatically. 1 (self-timer) 2 POWER LOCK START/STOP VCR MEMORY OFF(CHR) CAMERA To stop the self-timer before recording Press START/...
... from 10 with the flash In MEMORY mode You cannot use the Remote Commander for convenience. Digital effect - The (self-timer) indicator appears on the LCD screen or in the standby mode...in the standby mode. Note The self-timer recording mode is in the viewfinder while your camcorder is automatically canceled when: - Exposure - In the last 2 seconds of the countdown, the beep ...sound gets faster, then recording starts automatically. 1 (self-timer) 2 POWER LOCK START/STOP VCR MEMORY OFF(CHR) CAMERA To stop the self-timer before recording Press START/...

Operating Instructions
Page 24
... Make sure that the LCD panel is not a malfunction. - When you leave the power on the LCD screen You can monitor the playback picture in the viewfinder. When monitoring on for a long time Your camcorder becomes warm. If you open or close the LCD panel, you can turn the LCD... panel over and move it back to the camcorder body with your camcorder. (1) Install the power source and insert the recorded tape. (2) Set the POWER switch to VCR while pressing the small green button. (3) Open the LCD panel while pressing OPEN. (4) Press ...
... Make sure that the LCD panel is not a malfunction. - When you leave the power on the LCD screen You can monitor the playback picture in the viewfinder. When monitoring on for a long time Your camcorder becomes warm. If you open or close the LCD panel, you can turn the LCD... panel over and move it back to the camcorder body with your camcorder. (1) Install the power source and insert the recorded tape. (2) Set the POWER switch to VCR while pressing the small green button. (3) Open the LCD panel while pressing OPEN. (4) Press ...

Operating Instructions
Page 26
...resume normal playback, release the button. To view the picture at double speed Press ×2 on your camcorder: however, this function does not work for 5 minutes Your camcorder automatically enters the stop mode. For frame-by -frame Press C on the Remote Commander during playback. ... view a still picture (playback pause) Press X during playback. Playing back a tape Various playback modes To operate video control buttons, set the POWER switch to reverse the playback direction. To locate a scene monitoring the picture (picture search) Keep pressing m or M during playback. To advance the...
...resume normal playback, release the button. To view the picture at double speed Press ×2 on your camcorder: however, this function does not work for 5 minutes Your camcorder automatically enters the stop mode. For frame-by -frame Press C on the Remote Commander during playback. ... view a still picture (playback pause) Press X during playback. Playing back a tape Various playback modes To operate video control buttons, set the POWER switch to reverse the playback direction. To locate a scene monitoring the picture (picture search) Keep pressing m or M during playback. To advance the...
Operating Instructions
Page 27
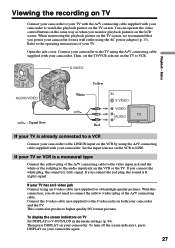
...by using the A/V connecting cable supplied with your camcorder to watch the playback picture on the TV screen. Connect your camcorder to the TV using the A/V connecting cable supplied with your camcorder. If your TV has an S video jack Connect using the AC power adaptor (p. 13). Open the jack cover. ...Set the input selector on the VCR to the S video jacks on both your camcorder and the TV. If you power your camcorder from a wall outlet using an S video cable (not supplied) to obtain high-quality pictures. Connect the S video cable (not supplied) to ...
...by using the A/V connecting cable supplied with your camcorder to watch the playback picture on the TV screen. Connect your camcorder to the TV using the A/V connecting cable supplied with your camcorder. If your TV has an S video jack Connect using the AC power adaptor (p. 13). Open the jack cover. ...Set the input selector on the VCR to the S video jacks on both your camcorder and the TV. If you power your camcorder from a wall outlet using an S video cable (not supplied) to obtain high-quality pictures. Connect the S video cable (not supplied) to ...
Operating Instructions
Page 28
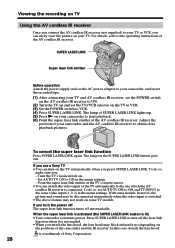
... connected. Set AUTO TV ON to obtain clear playback pictures. SUPER LASER LINK Super laser link emitter Before operation Attach the power supply such as the AC power adaptor to your camcorder, and insert the recorded tape. (1) After connecting your TV. Turn the TV's main switch on your TV and AV... LINK button is a trademark of the AV cordless IR receiver. For details, refer to ON. (2) Turn the TV on and set the POWER switch on the AV cordless IR receiver to the operating instructions of Sony Corporation. 28 If you use a Sony TV •You can easily view the picture on . -
... connected. Set AUTO TV ON to obtain clear playback pictures. SUPER LASER LINK Super laser link emitter Before operation Attach the power supply such as the AC power adaptor to your camcorder, and insert the recorded tape. (1) After connecting your TV. Turn the TV's main switch on your TV and AV... LINK button is a trademark of the AV cordless IR receiver. For details, refer to ON. (2) Turn the TV on and set the POWER switch on the AV cordless IR receiver to the operating instructions of Sony Corporation. 28 If you use a Sony TV •You can easily view the picture on . -
Operating Instructions
Page 31
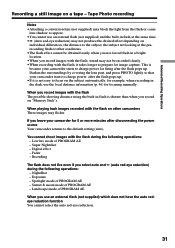
... subject automatically, for focusing manually. Exposure - Landscape mode of PROGRAM AE - This is because your camcorder starts to charge power after disconnecting the power source Your camcorder returns to appear. •You cannot use an external flash (not supplied) which does not have ...on "Memory Stick"s. When playing back images recorded with the flash during the following operations: - Low lux mode of PROGRAM AE - Digital effect - Tape Photo recording Notes •Attaching a conversion lens (not supplied) may not be obtained easily when you use the focal ...
... subject automatically, for focusing manually. Exposure - Landscape mode of PROGRAM AE - This is because your camcorder starts to charge power after disconnecting the power source Your camcorder returns to appear. •You cannot use an external flash (not supplied) which does not have ...on "Memory Stick"s. When playing back images recorded with the flash during the following operations: - Low lux mode of PROGRAM AE - Digital effect - Tape Photo recording Notes •Attaching a conversion lens (not supplied) may not be obtained easily when you use the focal ...

