Operating Instructions
Page 27
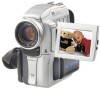
... (video) plug of your TV has an S video jack Connect using the A/V connecting cable supplied with your camcorder. This connection produces higher quality DV format pictures. To display the screen indicators on your camcorder. S VIDEO Playback - If your TV. Connect your camcorder to the TV using the AC power adaptor (p. 13). If you connect the...
... (video) plug of your TV has an S video jack Connect using the A/V connecting cable supplied with your camcorder. This connection produces higher quality DV format pictures. To display the screen indicators on your camcorder. S VIDEO Playback - If your TV. Connect your camcorder to the TV using the AC power adaptor (p. 13). If you connect the...
Operating Instructions
Page 56
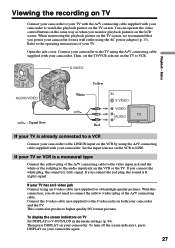
..., press the following systems 8 mm, Hi8, VHS, S-VHS, VHSC, S-VHSC, Betamax, ED Betamax, mini DV, DV, Digital8 If your VCR is output. This connection produces higher quality DV format pictures. 56 SEARCH MODE on the Remote Commander You can edit on the VCR or the TV. Refer to...S VIDEO VIDEO AUDIO : Signal flow When you want to LINE. If your VCR has an S video jack Connect using the A/V connecting cable supplied with your camcorder. (2) Prepare the VCR for recording, then set the input selector to record over) into the VCR, and insert the recorded tape into your...
..., press the following systems 8 mm, Hi8, VHS, S-VHS, VHSC, S-VHSC, Betamax, ED Betamax, mini DV, DV, Digital8 If your VCR is output. This connection produces higher quality DV format pictures. 56 SEARCH MODE on the Remote Commander You can edit on the VCR or the TV. Refer to...S VIDEO VIDEO AUDIO : Signal flow When you want to LINE. If your VCR has an S video jack Connect using the A/V connecting cable supplied with your camcorder. (2) Prepare the VCR for recording, then set the input selector to record over) into the VCR, and insert the recorded tape into your...
Operating Instructions
Page 57
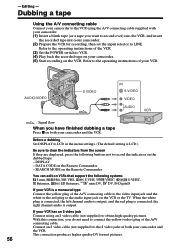
... letters on your camcorder and the connected DV product. Editing DV IN/OUT (not supplied) DV S VIDEO LANC DV IN : Signal flow When you play back the picture using the i.LINK cable (DV connecting cable) See page 140 for high-quality editing. Dubbing a tape Using the i.LINK cable (DV connecting cable) Simply connect the i.LINK cable (DV connecting cable) (not supplied) to DV IN/OUT...
... letters on your camcorder and the connected DV product. Editing DV IN/OUT (not supplied) DV S VIDEO LANC DV IN : Signal flow When you play back the picture using the i.LINK cable (DV connecting cable) See page 140 for high-quality editing. Dubbing a tape Using the i.LINK cable (DV connecting cable) Simply connect the i.LINK cable (DV connecting cable) (not supplied) to DV IN/OUT...
Operating Instructions
Page 58
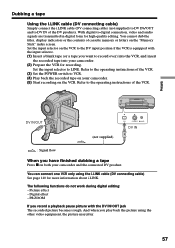
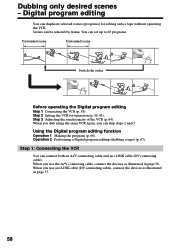
...scene Switch the order Before operating the Digital program editing Step 1 Connecting the VCR (p. 58). You can be selected by frame. When you dub using the same VCR again, you use an i.LINK cable (DV connecting cable), connect the devices as illustrated in ...scenes (programs) for operation (p. 59, 63). Step 3 Adjusting the synchronicity of the VCR (p. 64). Operation 2 Performing a Digital program editing (dubbing a tape) (p. 67). Digital program editing You can connect both an A/V connecting cable and an i.LINK cable (DV connecting cable). Dubbing only desired scenes -
...scene Switch the order Before operating the Digital program editing Step 1 Connecting the VCR (p. 58). You can be selected by frame. When you dub using the same VCR again, you use an i.LINK cable (DV connecting cable), connect the devices as illustrated in ...scenes (programs) for operation (p. 59, 63). Step 3 Adjusting the synchronicity of the VCR (p. 64). Operation 2 Performing a Digital program editing (dubbing a tape) (p. 67). Digital program editing You can connect both an A/V connecting cable and an i.LINK cable (DV connecting cable). Dubbing only desired scenes -

Operating Instructions
Page 63
When you connect using i.LINK cable (DV connecting cable) (not supplied), follow the procedures below. (1) Set the POWER switch to VCR on your camcorder . (2) Turn the power of the connected VCR on, then set its power switch to VCR/VTR. (3) Press ... R TEST RETURN [ MENU ] : END i . L I NK OTHERS ED I R TEST RETURN [ MENU ] : END IR i . Digital program editing Step 2: Setting the VCR to operate with the i.LINK cable (DV connecting cable) When you connect a digital video camera recorder, set the input selector to select i.LINK, then press the dial. I N " " CUT-OUT " I R SETUP P AUS...
When you connect using i.LINK cable (DV connecting cable) (not supplied), follow the procedures below. (1) Set the POWER switch to VCR on your camcorder . (2) Turn the power of the connected VCR on, then set its power switch to VCR/VTR. (3) Press ... R TEST RETURN [ MENU ] : END i . L I NK OTHERS ED I R TEST RETURN [ MENU ] : END IR i . Digital program editing Step 2: Setting the VCR to operate with the i.LINK cable (DV connecting cable) When you connect a digital video camera recorder, set the input selector to select i.LINK, then press the dial. I N " " CUT-OUT " I R SETUP P AUS...
Operating Instructions
Page 65
...beginning of the tape, the first few seconds of your camcorder . •When editing digital video, the operation signals cannot be sent with an i.LINK cable (DV connecting cable), you may not record properly. Editing Dubbing only desired scenes - Digital program editing Notes •You cannot dub the titles,...or the contents of cassette memory. •When you connect with LANC . •When you connect using an i.LINK cable (DV connecting cable) With digital-to-digital connection, video and audio signals are transmitted in the menu settings of the tape may not be able to adjust the ...
...beginning of the tape, the first few seconds of your camcorder . •When editing digital video, the operation signals cannot be sent with an i.LINK cable (DV connecting cable), you may not record properly. Editing Dubbing only desired scenes - Digital program editing Notes •You cannot dub the titles,...or the contents of cassette memory. •When you connect with LANC . •When you connect using an i.LINK cable (DV connecting cable) With digital-to-digital connection, video and audio signals are transmitted in the menu settings of the tape may not be able to adjust the ...
Operating Instructions
Page 67
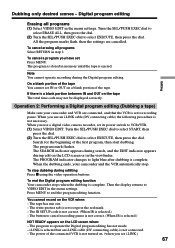
... to cancel recording pause is not correct. (When IR is set Press MENU. To end the Digital program editing function Your camcorder stops when the dubbing is not connected. - i.LINK is selected but an i.LINK cable (DV connecting cable) is complete. Turn the SEL/PUSH EXEC dial to select ERASE ALL, then press the dial...
... to cancel recording pause is not correct. (When IR is set Press MENU. To end the Digital program editing function Your camcorder stops when the dubbing is not connected. - i.LINK is selected but an i.LINK cable (DV connecting cable) is complete. Turn the SEL/PUSH EXEC dial to select ERASE ALL, then press the dial...
Operating Instructions
Page 69
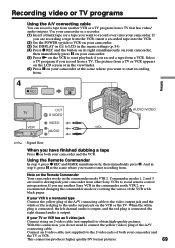
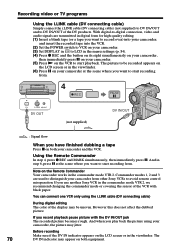
...the yellow (video) plug of the A/V connecting cable. If your camcorder and the TV or VCR. Connect an S video cable (not supplied) to the audio output jack on both your VCR is output. This connection produces higher quality DV format pictures. 69 Using the Remote Commander In step... Press z REC and the button on its right simultaneously on your camcorder, then immediately press X on your camcorder and the VCR. Recording video or TV programs Using the A/V connecting cable You can record a tape from another Sony VCR in the commander mode VTR 2, we recommend changing the commander ...
...the yellow (video) plug of the A/V connecting cable. If your camcorder and the TV or VCR. Connect an S video cable (not supplied) to the audio output jack on both your VCR is output. This connection produces higher quality DV format pictures. 69 Using the Remote Commander In step... Press z REC and the button on its right simultaneously on your camcorder, then immediately press X on your camcorder and the VCR. Recording video or TV programs Using the A/V connecting cable You can record a tape from another Sony VCR in the commander mode VTR 2, we recommend changing the commander ...
Operating Instructions
Page 70
... the picture using the i.LINK cable (DV connecting cable) During digital editing The color of the DV products. However this does not affect the dubbed picture. With digital-to-digital connection, video and audio signals are used to distinguish your camcorder and the VCR. And when you want to start recording from other Sony VCRs to start playback. Before...
... the picture using the i.LINK cable (DV connecting cable) During digital editing The color of the DV products. However this does not affect the dubbed picture. With digital-to-digital connection, video and audio signals are used to distinguish your camcorder and the VCR. And when you want to start recording from other Sony VCRs to start playback. Before...
Operating Instructions
Page 76
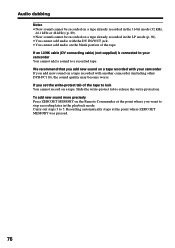
If an i.LINK cable (DV connecting cable) (not supplied) is connected to your camcorder If you set the write-protect tab of the tape. If you add new sound on a tape recorded with another camcorder (including other DCR-PC110), the sound quality may become worse. Carry out steps 3 to a recorded tape. We recommend... that you add new sound on a tape recorded with the DV IN/OUT jack. • You cannot add audio on the...
If an i.LINK cable (DV connecting cable) (not supplied) is connected to your camcorder If you set the write-protect tab of the tape. If you add new sound on a tape recorded with another camcorder (including other DCR-PC110), the sound quality may become worse. Carry out steps 3 to a recorded tape. We recommend... that you add new sound on a tape recorded with the DV IN/OUT jack. • You cannot add audio on the...
Operating Instructions
Page 110
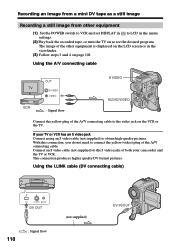
If your camcorder and the TV or VCR. Using the i.LINK cable (DV connecting cable) DV S VIDEO LANC DV OUT 110 : Signal flow (not supplied) DV IN/OUT Connect an S video cable (not supplied) to the S video jacks of the A/V connecting cable. With this connection, you do not need to connect ...both your TV or VCR has an S video jack Connect using an S video cable (not supplied) to obtain high-quality pictures. This connection produces higher quality DV format pictures. Using the A/V connecting cable OUT S VIDEO VIDEO S VIDEO AUDIO/VIDEO : Signal flow Connect the yellow plug...
If your camcorder and the TV or VCR. Using the i.LINK cable (DV connecting cable) DV S VIDEO LANC DV OUT 110 : Signal flow (not supplied) DV IN/OUT Connect an S video cable (not supplied) to the S video jacks of the A/V connecting cable. With this connection, you do not need to connect ...both your TV or VCR has an S video jack Connect using an S video cable (not supplied) to obtain high-quality pictures. This connection produces higher quality DV format pictures. Using the A/V connecting cable OUT S VIDEO VIDEO S VIDEO AUDIO/VIDEO : Signal flow Connect the yellow plug...
Operating Instructions
Page 113
... battery pack. Data code recorded on a mini DV tape You cannot record the data code recorded on "Memory Stick"s. When the access lamp is displayed Sound that cannot be recorded by your camcorder has been recorded. Connect the A/V connecting cable to input images from an external unit used to... monaural sound when recording from a mini DV tape to "Memory Stick"s. •Sound recorded in 32 kHz when recording ...
... battery pack. Data code recorded on a mini DV tape You cannot record the data code recorded on "Memory Stick"s. When the access lamp is displayed Sound that cannot be recorded by your camcorder has been recorded. Connect the A/V connecting cable to input images from an external unit used to... monaural sound when recording from a mini DV tape to "Memory Stick"s. •Sound recorded in 32 kHz when recording ...
Operating Instructions
Page 114
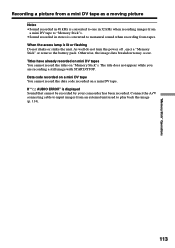
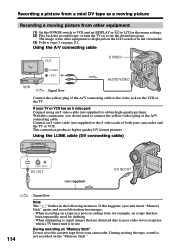
...program. With this happens, eject and insert "Memory Stick" again, and record distortion-free images. - Using the i.LINK cable (DV connecting cable) DV S VIDEO LANC DV OUT (not supplied) DV IN/OUT 114 : Signal flow Note The " " flashes in the menu settings. (2) Play back the recorded tape, ...the VCR or the TV. The image of the A/V connecting cable to input images that has been repeatedly used for dubbing - Recording a picture from a mini DV tape as a moving picture Recording a moving picture from your camcorder. When attempting to the video jack on a tape that are...
...program. With this happens, eject and insert "Memory Stick" again, and record distortion-free images. - Using the i.LINK cable (DV connecting cable) DV S VIDEO LANC DV OUT (not supplied) DV IN/OUT 114 : Signal flow Note The " " flashes in the menu settings. (2) Play back the recorded tape, ...the VCR or the TV. The image of the A/V connecting cable to input images that has been repeatedly used for dubbing - Recording a picture from a mini DV tape as a moving picture Recording a moving picture from your camcorder. When attempting to the video jack on a tape that are...

Operating Instructions
Page 140
...standardized by SONY, and is i.LINK? i.LINK-compatible equipment can be connected, and that operations and data transactions are sometimes not possible on which it is not indicated such as this unit is a digital serial interface for handling digital video, digital audio and... characteristics and specifications of each equipment. Note, however, that can be connected by the i.LINK cable (DV cable). Three maximum baud rates are possible with various digital AV equipment. Mbps stands for controlling other devices via the directly connected equipment. Possible applications are...
...standardized by SONY, and is i.LINK? i.LINK-compatible equipment can be connected, and that operations and data transactions are sometimes not possible on which it is not indicated such as this unit is a digital serial interface for handling digital video, digital audio and... characteristics and specifications of each equipment. Note, however, that can be connected by the i.LINK cable (DV cable). Three maximum baud rates are possible with various digital AV equipment. Mbps stands for controlling other devices via the directly connected equipment. Possible applications are...

Operating Instructions
Page 141
... unit, also refer to the instruction manuals for the equipment to be connected to other i.LINK (DV) compatible equipment made by SONY (e.g. i.LINK and are trademarks. 141 Required i.LINK Cable Use the Sony i.LINK 4-pin-to-4-pin cable (during DV dubbing). VAIO series personal computer) other than video equipment. Additional Information About i.LINK i.LINK functions on...
... unit, also refer to the instruction manuals for the equipment to be connected to other i.LINK (DV) compatible equipment made by SONY (e.g. i.LINK and are trademarks. 141 Required i.LINK Cable Use the Sony i.LINK 4-pin-to-4-pin cable (during DV dubbing). VAIO series personal computer) other than video equipment. Additional Information About i.LINK i.LINK functions on...
Operating Instructions
Page 167
... 11 Adjusting viewfinder 18 Audio dubbing 73 AUDIO MIX 86 Audio mode 89 Auto red-eye reduction .. 30, 105 AUTO SHTR 85 A/V connecting cable 27, 33, 56, 110 BACK LIGHT 20 Battery pack 10 BEEP 91 C, D Camera chromakey 115 Cassette memory 8, 138 Charging battery 11 ...27 (dubbing a tape 56, 57 Continuous 103 Data code 25 Date search 52 DEMO 90 DIGITAL EFFECT 39, 48 Digital program editing ......... 58 DISPLAY 25 DOT 36 Dual sound track tape .......... 139 Dubbing a tape 56 DV connecting cable 57, 110 E END SEARCH 23 Exposure 44 External microphone (not supplied 161 F, G, ...
... 11 Adjusting viewfinder 18 Audio dubbing 73 AUDIO MIX 86 Audio mode 89 Auto red-eye reduction .. 30, 105 AUTO SHTR 85 A/V connecting cable 27, 33, 56, 110 BACK LIGHT 20 Battery pack 10 BEEP 91 C, D Camera chromakey 115 Cassette memory 8, 138 Charging battery 11 ...27 (dubbing a tape 56, 57 Continuous 103 Data code 25 Date search 52 DEMO 90 DIGITAL EFFECT 39, 48 Digital program editing ......... 58 DISPLAY 25 DOT 36 Dual sound track tape .......... 139 Dubbing a tape 56 DV connecting cable 57, 110 E END SEARCH 23 Exposure 44 External microphone (not supplied 161 F, G, ...


