
Operating Instructions
Page 7
... recording. PLAY NOTE Do not pick up your eye against its eyecup. Viewfinder When the LCD panel is closed, use the viewfinder placing your camcorder by holding the viewfinder, the flash, the LCD panel or the battery pack. 7 VCR POWER LOCK MEMORY OFF(CHR) CAMERA 2 Press m to CAMERA ...on the LCD screen. 4 Press START/STOP. REW 3 Press N to open the LCD panel. To stop recording, press START/ STOP again. Recording a picture (p. 15) 1 Remove the lens cap. The picture appears on the LCD screen (p. 24) 1 Set the POWER switch to VCR while pressing the small green button.
... recording. PLAY NOTE Do not pick up your eye against its eyecup. Viewfinder When the LCD panel is closed, use the viewfinder placing your camcorder by holding the viewfinder, the flash, the LCD panel or the battery pack. 7 VCR POWER LOCK MEMORY OFF(CHR) CAMERA 2 Press m to CAMERA ...on the LCD screen. 4 Press START/STOP. REW 3 Press N to open the LCD panel. To stop recording, press START/ STOP again. Recording a picture (p. 15) 1 Remove the lens cap. The picture appears on the LCD screen (p. 24) 1 Set the POWER switch to VCR while pressing the small green button.

Operating Instructions
Page 15
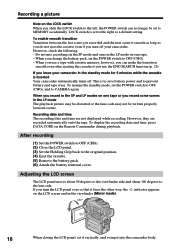
..."Step 1" and "Step 2" for you. (1) Remove the lens cap and pull the lens cap string to CAMERA while pressing the small green button. Your camcorder is set to the standby mode. (5) Press OPEN to p. 14). (3) Pull down the Holding Grip. Your camcorder starts recording. To stop recording, press START/STOP ... •Do not touch the built-in microphone during recording Note on Recording mode Your camcorder records and plays back in the SP (standard play ) mode. Recording - Recording a picture Your camcorder automatically focuses for more information (p. 10 to open the LCD panel. (6) Press START/...
..."Step 1" and "Step 2" for you. (1) Remove the lens cap and pull the lens cap string to CAMERA while pressing the small green button. Your camcorder is set to the standby mode. (5) Press OPEN to p. 14). (3) Pull down the Holding Grip. Your camcorder starts recording. To stop recording, press START/STOP ... •Do not touch the built-in microphone during recording Note on Recording mode Your camcorder records and plays back in the SP (standard play ) mode. Recording - Recording a picture Your camcorder automatically focuses for more information (p. 10 to open the LCD panel. (6) Press START/...
Operating Instructions
Page 16
... the viewfinder side and about 180 degrees to the original position. (4) Eject the cassette. (5) Remove the battery pack. (6) Attach the battery terminal cover. Recording a picture Note on the LOCK ... tape with cassette memory, however, you turn off . LOCK switch is inserted Your camcorder automatically turns off your camcorder in the viewfinder (Mirror mode). 180° 90° 16 When closing the ...switch to OFF (CHG). (2) Close the LCD panel. (3) Set the Holding Grip back to the lens side. This is smooth as long as a default setting. However, check the following: - Recording ...
... the viewfinder side and about 180 degrees to the original position. (4) Eject the cassette. (5) Remove the battery pack. (6) Attach the battery terminal cover. Recording a picture Note on the LOCK ... tape with cassette memory, however, you turn off . LOCK switch is inserted Your camcorder automatically turns off your camcorder in the viewfinder (Mirror mode). 180° 90° 16 When closing the ...switch to OFF (CHG). (2) Close the LCD panel. (3) Set the Holding Grip back to the lens side. This is smooth as long as a default setting. However, check the following: - Recording ...
Operating Instructions
Page 18
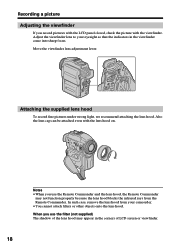
... focus. Move the viewfinder lens adjustment lever. Also the lens cap can be attached even with the viewfinder. In such case, remove the lens hood from the Remote Commander. When you record pictures with the LCD panel closed, check the picture with the lens hood on. Adjust the viewfinder lens to your camcorder. •You cannot attach...
... focus. Move the viewfinder lens adjustment lever. Also the lens cap can be attached even with the viewfinder. In such case, remove the lens hood from the Remote Commander. When you record pictures with the LCD panel closed, check the picture with the lens hood on. Adjust the viewfinder lens to your camcorder. •You cannot attach...

Operating Instructions
Page 142
.... This is not a malfunction. • If 10 minutes elapse after you set to CAMERA. c Install a charged battery pack. (p. 10) • The viewfinder lens is set to OFF in the menu settings. The power goes off. The image on the LCD screen or in the viewfinder. See page 148... Sony service facility. Cause and/or Corrective Actions • The POWER switch is not clear. You can also cancel DEMO MODE. (p. 90) 142 c Set it to expose the red mark. An unknown picture is displayed on the LCD screen or in CAMERA mode, your camcorder automatically starts the demonstration. c Remove ...
.... This is not a malfunction. • If 10 minutes elapse after you set to CAMERA. c Install a charged battery pack. (p. 10) • The viewfinder lens is set to OFF in the menu settings. The power goes off. The image on the LCD screen or in the viewfinder. See page 148... Sony service facility. Cause and/or Corrective Actions • The POWER switch is not clear. You can also cancel DEMO MODE. (p. 90) 142 c Set it to expose the red mark. An unknown picture is displayed on the LCD screen or in CAMERA mode, your camcorder automatically starts the demonstration. c Remove ...

Operating Instructions
Page 152
... None of the tape, or on the lens, the indicator will work. Eject the cassette, turn off your camcorder, and leave it . How to prevent moisture condensation When you use your camcorder in a hot place as follows: •You bring your camcorder from a ski slope into a place warmed... up by a heating device. •You bring your camcorder from an air-conditioned car or room into a warm place, put your camcorder in a high temperature and humidity place. Remove the bag when the air temperature inside the plastic bag has reached the surrounding temperature (...
... None of the tape, or on the lens, the indicator will work. Eject the cassette, turn off your camcorder, and leave it . How to prevent moisture condensation When you use your camcorder in a hot place as follows: •You bring your camcorder from a ski slope into a place warmed... up by a heating device. •You bring your camcorder from an air-conditioned car or room into a warm place, put your camcorder in a high temperature and humidity place. Remove the bag when the air temperature inside the plastic bag has reached the surrounding temperature (...
Operating Instructions
Page 154
... sandy beach or in a cold place, a residual image may appear on the LCD screen. Camcorder care • Remove the tape, and periodically turn on the lens, remove them with a soft cloth. • Clean the camcorder body with a dry soft cloth, or a soft cloth lightly moistened with your fingers or ...a sharp-pointed object. • If your camcorder and have it checked by a Sony dealer before operating it . When...
... sandy beach or in a cold place, a residual image may appear on the LCD screen. Camcorder care • Remove the tape, and periodically turn on the lens, remove them with a soft cloth. • Clean the camcorder body with a dry soft cloth, or a soft cloth lightly moistened with your fingers or ...a sharp-pointed object. • If your camcorder and have it checked by a Sony dealer before operating it . When...

Operating Instructions
Page 158
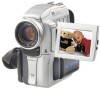
Identifying the parts and controls Camcorder 5 1 6 7 8 2 9 3 0 4 1 Lens Cap (p. 15) 2 OPEN button (p. 15) 3 LCD screen (p. 16) 4 Battery pack/Battery terminal cover (p. 10) 5 Microphone 6 Intelligent accessory shoe (p. 73) 7 Eyecup 8 Viewfinder (p. 18) 9 AUDIO/VIDEO ID-2 ... the shoe on and off. Refer to the end, and then tighten the screw. •To remove an accessory, loosen the screw, and then press down and pull out the accessory. When purchasing Sony video products, Sony recommends that this "GENUINE VIDEO ACCESSORIES" mark. 158 Notes on the intelligent accessory shoe •The...
Identifying the parts and controls Camcorder 5 1 6 7 8 2 9 3 0 4 1 Lens Cap (p. 15) 2 OPEN button (p. 15) 3 LCD screen (p. 16) 4 Battery pack/Battery terminal cover (p. 10) 5 Microphone 6 Intelligent accessory shoe (p. 73) 7 Eyecup 8 Viewfinder (p. 18) 9 AUDIO/VIDEO ID-2 ... the shoe on and off. Refer to the end, and then tighten the screw. •To remove an accessory, loosen the screw, and then press down and pull out the accessory. When purchasing Sony video products, Sony recommends that this "GENUINE VIDEO ACCESSORIES" mark. 158 Notes on the intelligent accessory shoe •The...

