Operating Instructions
Page 2
...). "Memory Stick" This device complies with Part 15 of this Sony Digital Handycam camcorder. DISPOSE OF PROPERLY. For the Sony Service Center nearest you call : Sony Customer Information Center 1-800-222SONY (7669) or write to use. Caution: Do not handle damaged or leaking lithium ion battery. Address: 1 Sony Drive, Park Ridge, NJ, 07656 USA Telephone No.: 201-930...
...). "Memory Stick" This device complies with Part 15 of this Sony Digital Handycam camcorder. DISPOSE OF PROPERLY. For the Sony Service Center nearest you call : Sony Customer Information Center 1-800-222SONY (7669) or write to use. Caution: Do not handle damaged or leaking lithium ion battery. Address: 1 Sony Drive, Park Ridge, NJ, 07656 USA Telephone No.: 201-930...
Operating Instructions
Page 4
... Photo save 118 Viewing a still image - Title search 51 Searching a recording by title - Digital program editing 58 Identifying the parts and controls ......... 158 Using with picture effects 47 Preventing accidental erasure... dubbing 73 Superimposing a title 77 Getting started Using this manual 8 Making your camcorder abroad 151 Maintenance information and precautions Editing 152 Specifications 156 Dubbing a tape 56... Preparing the power supply ....... 10 Installing the battery pack 10 Charging the battery pack 11 Connecting to mini DV tapes 130 Enlarging still images recorded ...
... Photo save 118 Viewing a still image - Title search 51 Searching a recording by title - Digital program editing 58 Identifying the parts and controls ......... 158 Using with picture effects 47 Preventing accidental erasure... dubbing 73 Superimposing a title 77 Getting started Using this manual 8 Making your camcorder abroad 151 Maintenance information and precautions Editing 152 Specifications 156 Dubbing a tape 56... Preparing the power supply ....... 10 Installing the battery pack 10 Charging the battery pack 11 Connecting to mini DV tapes 130 Enlarging still images recorded ...
Operating Instructions
Page 5
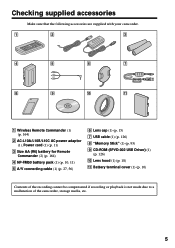
... Checking supplied accessories Make sure that the following accessories are supplied with your camcorder. 1 2 3 4 5 6 7 8 9 q; qa 1 Wireless Remote Commander (1) (p. 164) 2 AC-L10A/L10B/L10C AC power adaptor (1), Power cord (1) (p. 11) 3 Size AA (R6) battery for Remote Commander (2) (p. 164) 4 NP-FM50 battery pack (1) (p. 10, 11) 5 A/V connecting cable (1) (p. 27, 56) 6 Lens cap (1) (p. 15) 7 USB cable (1) (p. 126...
... Checking supplied accessories Make sure that the following accessories are supplied with your camcorder. 1 2 3 4 5 6 7 8 9 q; qa 1 Wireless Remote Commander (1) (p. 164) 2 AC-L10A/L10B/L10C AC power adaptor (1), Power cord (1) (p. 11) 3 Size AA (R6) battery for Remote Commander (2) (p. 164) 4 NP-FM50 battery pack (1) (p. 10, 11) 5 A/V connecting cable (1) (p. 27, 56) 6 Lens cap (1) (p. 15) 7 USB cable (1) (p. 126...
Operating Instructions
Page 6
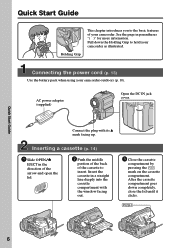
... mark on the cassette compartment. Quick Start Guide Holding Grip This chapter introduces you to the basic features of the cassette to hold your camcorder. After the cassette compartment goes down the Holding Grip to insert. Inserting a cassette (p. 14) 1 Slide OPEN/Z EJECT in the direction... of the arrow and open the lid. 2 Push the middle portion of the back of your camcorder as illustrated. Connecting the power cord (p. 13) Use the battery pack when using your camcorder outdoors (p. 10). Quick Start Guide 6 See the page in a straight line deeply into the ...
... mark on the cassette compartment. Quick Start Guide Holding Grip This chapter introduces you to the basic features of the cassette to hold your camcorder. After the cassette compartment goes down the Holding Grip to insert. Inserting a cassette (p. 14) 1 Slide OPEN/Z EJECT in the direction... of the arrow and open the lid. 2 Push the middle portion of the back of your camcorder as illustrated. Connecting the power cord (p. 13) Use the battery pack when using your camcorder outdoors (p. 10). Quick Start Guide 6 See the page in a straight line deeply into the ...

Operating Instructions
Page 7
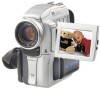
Recording a picture (p. 15) 1 Remove the lens cap. Viewfinder When the LCD panel is closed, use the viewfinder placing your camcorder by holding the viewfinder, the flash, the LCD panel or the battery pack. 7 POWER LOCK MEMORY OFF(CHR) CAMERA 3 Press OPEN to CAMERA while pressing the small green button. POWER LOCK VCR Quick...
Recording a picture (p. 15) 1 Remove the lens cap. Viewfinder When the LCD panel is closed, use the viewfinder placing your camcorder by holding the viewfinder, the flash, the LCD panel or the battery pack. 7 POWER LOCK MEMORY OFF(CHR) CAMERA 3 Press OPEN to CAMERA while pressing the small green button. POWER LOCK VCR Quick...

Operating Instructions
Page 10
Note on the battery terminal cover To protect the battery terminals, install the battery terminal cover after the battery pack is removed in the same way as the battery terminal cover. Step 1 Preparing the power supply Installing the battery pack Install the battery pack to use your camcorder outdoors. (1) While sliding BATTERY RELEASE in the direction of the arrow 1, slide the battery terminal cover in the direction of the arrow 2. (2) Insert the battery pack in the direction of the arrow. 1 2 2 1 To remove the battery pack The battery pack is removed. 10
Note on the battery terminal cover To protect the battery terminals, install the battery terminal cover after the battery pack is removed in the same way as the battery terminal cover. Step 1 Preparing the power supply Installing the battery pack Install the battery pack to use your camcorder outdoors. (1) While sliding BATTERY RELEASE in the direction of the arrow 1, slide the battery terminal cover in the direction of the arrow 2. (2) Insert the battery pack in the direction of the arrow. 1 2 2 1 To remove the battery pack The battery pack is removed. 10

Operating Instructions
Page 11
... cause a short-circuit, damaging the AC power adaptor. •Keep the battery pack dry. •When the battery pack is completed. Notes •Prevent metallic objects from the DC IN jack on your camcorder to be used for approximately one hour after charging it fully discharges again. ...Your camcorder operates only with the "InfoLITHIUM" battery pack (M series). (1) Open the DC IN jack cover and connect the ...
... cause a short-circuit, damaging the AC power adaptor. •Keep the battery pack dry. •When the battery pack is completed. Notes •Prevent metallic objects from the DC IN jack on your camcorder to be used for approximately one hour after charging it fully discharges again. ...Your camcorder operates only with the "InfoLITHIUM" battery pack (M series). (1) Open the DC IN jack cover and connect the ...

Operating Instructions
Page 12
...) 255 (230) Approximate minutes when you use a fully charged battery Numbers in a cold environment. ** Approximate number of Sony Corporation. If the power may be shorter if you use your camcorder in parentheses "( )" indicate the time using a normally charged battery. The actual battery life may go off . The battery life will be shorter if you use your...
...) 255 (230) Approximate minutes when you use a fully charged battery Numbers in a cold environment. ** Approximate number of Sony Corporation. If the power may be shorter if you use your camcorder in parentheses "( )" indicate the time using a normally charged battery. The actual battery life may go off . The battery life will be shorter if you use your...
Operating Instructions
Page 13
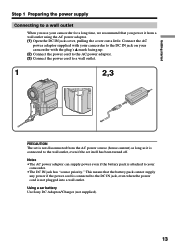
This means that you use your camcorder for a long time, we recommend that the battery pack cannot supply any power if the power cord is connected to the DC IN jack, even when the power cord is not plugged into a wall outlet. Using a car battery Use Sony DC Adaptor/Charger (not supplied). 13 ... outlet, even if the set itself has been turned off. Notes •The AC power adaptor can supply power even if the battery pack is attached to your camcorder with your camcorder to a wall outlet. 1 2,3 PRECAUTION The set is not disconnected from the AC power source (house current) as long as...
This means that you use your camcorder for a long time, we recommend that the battery pack cannot supply any power if the power cord is connected to the DC IN jack, even when the power cord is not plugged into a wall outlet. Using a car battery Use Sony DC Adaptor/Charger (not supplied). 13 ... outlet, even if the set itself has been turned off. Notes •The AC power adaptor can supply power even if the battery pack is attached to your camcorder with your camcorder to a wall outlet. 1 2,3 PRECAUTION The set is not disconnected from the AC power source (house current) as long as...
Operating Instructions
Page 16
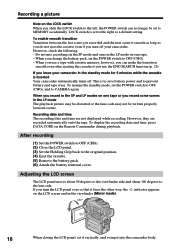
..., set the POWER switch to CAMERA again. To resume the standby mode, set to prevent battery and tape wear. To display the recording date and time, press DATA CODE on one tape or you leave your camcorder. After recording (1) Set the POWER switch to OFF (CHG). (2) Close the LCD panel. (3) ... in the standby mode for 5 minutes while the cassette is set it vertically, and swing it into the camcorder body. LOCK switch is inserted Your camcorder automatically turns off your camcorder in the LP mode The playback picture may be distorted or the time code may not be set the POWER...
..., set the POWER switch to CAMERA again. To resume the standby mode, set to prevent battery and tape wear. To display the recording date and time, press DATA CODE on one tape or you leave your camcorder. After recording (1) Set the POWER switch to OFF (CHG). (2) Close the LCD panel. (3) ... in the standby mode for 5 minutes while the cassette is set it vertically, and swing it into the camcorder body. LOCK switch is inserted Your camcorder automatically turns off your camcorder in the LP mode The playback picture may be distorted or the time code may not be set the POWER...

Operating Instructions
Page 20
...about 5 seconds after the power is turned on the tape. Remaining battery time indicator The remaining battery time indicator roughly indicates the recording time. indicator appears in minutes to be canceled. Remaining battery time indicator Cassette memory indicator This appears when using a tape with a...Indicators displayed in the recording mode The indicators are recording. When you insert a cassette and record or play back for the correct remaining battery time in the viewfinder or on . Time code The time code indicates the recording or playback time, "0:00:00" (hours : ...
...about 5 seconds after the power is turned on the tape. Remaining battery time indicator The remaining battery time indicator roughly indicates the recording time. indicator appears in minutes to be canceled. Remaining battery time indicator Cassette memory indicator This appears when using a tape with a...Indicators displayed in the recording mode The indicators are recording. When you insert a cassette and record or play back for the correct remaining battery time in the viewfinder or on . Time code The time code indicates the recording or playback time, "0:00:00" (hours : ...

Operating Instructions
Page 34
... a few seconds when: - If the picture is automatically adjusted. You detach the battery for about 10 seconds after setting the POWER switch to CAMERA to AUTO in (p. 84). In the hold mode. Your camcorder may not adjust the white balance correctly in the n indoor mode. Normally white balance...You can manually adjust and set the white balance. In the automatic white balance mode Point your camcorder to the outdoors from the interior of a house, or vice versa. 34 You bring your camcorder at a white subject for replacement. - In CAMERA or MEMORY mode, select a desired WHT BAL...
... a few seconds when: - If the picture is automatically adjusted. You detach the battery for about 10 seconds after setting the POWER switch to CAMERA to AUTO in (p. 84). In the hold mode. Your camcorder may not adjust the white balance correctly in the n indoor mode. Normally white balance...You can manually adjust and set the white balance. In the automatic white balance mode Point your camcorder to the outdoors from the interior of a house, or vice versa. 34 You bring your camcorder at a white subject for replacement. - In CAMERA or MEMORY mode, select a desired WHT BAL...
Operating Instructions
Page 75
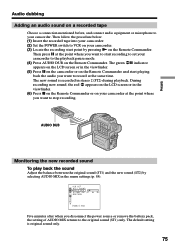
... mentioned before, and connect audio equipment or microphone to your camcorder. (3) Locate the recording start point by selecting AUDIO MIX in the viewfinder. (5) Press X on the camcorder or on the Remote Commander and start recording to set your camcorder to VCR on the Remote Commander. The new sound is ...RETURN [ MENU ] : END Five minutes after when you want to start playing back the audio you disconnect the power source or remove the battery pack, the setting of AUDIO MIX returns to the original sound (ST1) only. AUDIO DUB Editing Monitoring the new recorded sound To play back...
... mentioned before, and connect audio equipment or microphone to your camcorder. (3) Locate the recording start point by selecting AUDIO MIX in the viewfinder. (5) Press X on the camcorder or on the Remote Commander and start recording to set your camcorder to VCR on the Remote Commander. The new sound is ...RETURN [ MENU ] : END Five minutes after when you want to start playing back the audio you disconnect the power source or remove the battery pack, the setting of AUDIO MIX returns to the original sound (ST1) only. AUDIO DUB Editing Monitoring the new recorded sound To play back...
Operating Instructions
Page 86
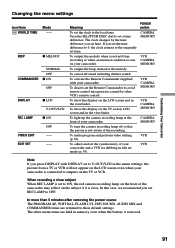
... To get highintensity To adjust the brightness on LCD B.L. •When you select BRIGHT, battery life is reduced by about 10 percent during recording. •When you use power sources other than the battery pack, BRIGHT is automatically selected. 86 Changing the menu settings Icon/item HiFi SOUND AUDIO...tape with the SEL/PUSH EXEC dial. POWER switch VCR VCR A/VtDV OUT z OFF ON LCD BRIGHT ST1 ST2 To output digital images and sound in digital format using your camcorder. (p. 68) To adjust the brightness on the LCD screen with sub sound. LCD COLOR VF BRIGHT To darken To lighten z...
... To get highintensity To adjust the brightness on LCD B.L. •When you select BRIGHT, battery life is reduced by about 10 percent during recording. •When you use power sources other than the battery pack, BRIGHT is automatically selected. 86 Changing the menu settings Icon/item HiFi SOUND AUDIO...tape with the SEL/PUSH EXEC dial. POWER switch VCR VCR A/VtDV OUT z OFF ON LCD BRIGHT ST1 ST2 To output digital images and sound in digital format using your camcorder. (p. 68) To adjust the brightness on the LCD screen with sub sound. LCD COLOR VF BRIGHT To darken To lighten z...
Operating Instructions
Page 91
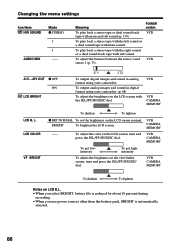
...BAL, FLASH LVL, HiFi SOUND, AUDIO MIX and COMMANDER items are held in memory even when the battery is removed. 91 Meaning POWER switch To set the clock to set mode (p. 59). VCR Note ...caused by the time difference you start/stop recording or when an unusual condition occurs on your camcorder. VCR CAMERA MEMORY To light up the camera recording lamp at the front of the melody.... TV or VCR will not appear on the subject if it is not aware of your camcorder. Customizing Your Camcorder Changing the menu settings Icon/item Mode WORLD TIME -- Turn the SEL/PUSH EXEC dial ...
...BAL, FLASH LVL, HiFi SOUND, AUDIO MIX and COMMANDER items are held in memory even when the battery is removed. 91 Meaning POWER switch To set the clock to set mode (p. 59). VCR Note ...caused by the time difference you start/stop recording or when an unusual condition occurs on your camcorder. VCR CAMERA MEMORY To light up the camera recording lamp at the front of the melody.... TV or VCR will not appear on the subject if it is not aware of your camcorder. Customizing Your Camcorder Changing the menu settings Icon/item Mode WORLD TIME -- Turn the SEL/PUSH EXEC dial ...
Operating Instructions
Page 92
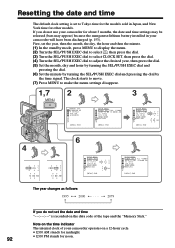
... "Memory Stick." Resetting the date and time The default clock setting is set the date and time is recorded on the data code of your camcorder will have been discharged (p. 153). The clock starts to move. (7) Press MENU to make the menu settings disappear. 1,7 2 3 MENU MANUA L SET PROGRAM AE P ... EXEC dial and pressing the dial by the time signal. If you do not use your camcorder for about 3 months, the date and time settings may be released (bars may appear) because the manganese-lithium battery installed in Japan, and New York time for noon. 92 First, set the year, then...
... "Memory Stick." Resetting the date and time The default clock setting is set the date and time is recorded on the data code of your camcorder will have been discharged (p. 153). The clock starts to move. (7) Press MENU to make the menu settings disappear. 1,7 2 3 MENU MANUA L SET PROGRAM AE P ... EXEC dial and pressing the dial by the time signal. If you do not use your camcorder for about 3 months, the date and time settings may be released (bars may appear) because the manganese-lithium battery installed in Japan, and New York time for noon. 92 First, set the year, then...
Operating Instructions
Page 95
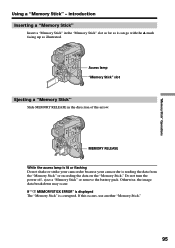
"Memory Stick" Operations Using a "Memory Stick" - MEMORY RELEASE While the access lamp is lit or flashing Do not shake or strike your camcorder because your camcorder is corrupted. Otherwise, the image data breakdown may occur. If " MEMORYSTICK ERROR" is displayed The "Memory Stick" is reading the data from the...the "Memory Stick." If this occurs, use another "Memory Stick." 95 Do not turn the power off , eject a "Memory Stick" or remove the battery pack. Access lamp "Memory Stick" slot Ejecting a "Memory Stick" Slide MEMORY RELEASE in the "Memory Stick" slot as far as it can go ...
"Memory Stick" Operations Using a "Memory Stick" - MEMORY RELEASE While the access lamp is lit or flashing Do not shake or strike your camcorder because your camcorder is corrupted. Otherwise, the image data breakdown may occur. If " MEMORYSTICK ERROR" is displayed The "Memory Stick" is reading the data from the...the "Memory Stick." If this occurs, use another "Memory Stick." 95 Do not turn the power off , eject a "Memory Stick" or remove the battery pack. Access lamp "Memory Stick" slot Ejecting a "Memory Stick" Slide MEMORY RELEASE in the "Memory Stick" slot as far as it can go ...
Operating Instructions
Page 108
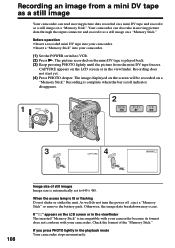
... images Image size is incompatible with your camcorder because its format does not conform with your camcorder. (1) Set the POWER switch to 640 × 480. As well do not turn the power off , eject a "Memory Stick" or remove the battery pack. Recording an image from the mini... DV tape freezes. If you press PHOTO lightly in the viewfinder. Before operation •Insert a recorded mini DV tape into your camcorder. •Insert a "Memory Stick" into your camcorder. Recording is complete when the bar ...
... images Image size is incompatible with your camcorder because its format does not conform with your camcorder. (1) Set the POWER switch to 640 × 480. As well do not turn the power off , eject a "Memory Stick" or remove the battery pack. Recording an image from the mini... DV tape freezes. If you press PHOTO lightly in the viewfinder. Before operation •Insert a recorded mini DV tape into your camcorder. •Insert a "Memory Stick" into your camcorder. Recording is complete when the bar ...
Operating Instructions
Page 113
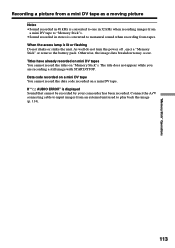
.... Connect the A/V connecting cable to play back the image (p. 114). 113 As well do not turn the power off , eject a "Memory Stick" or remove the battery pack. "Memory Stick" Operations Recording a picture from a mini DV tape as a moving picture Notes •Sound recorded in 48 kHz is converted to one in... when recording from an external unit used to input images from tapes. When the access lamp is displayed Sound that cannot be recorded by your camcorder has been recorded.
.... Connect the A/V connecting cable to play back the image (p. 114). 113 As well do not turn the power off , eject a "Memory Stick" or remove the battery pack. "Memory Stick" Operations Recording a picture from a mini DV tape as a moving picture Notes •Sound recorded in 48 kHz is converted to one in... when recording from an external unit used to input images from tapes. When the access lamp is displayed Sound that cannot be recorded by your camcorder has been recorded.
Operating Instructions
Page 119
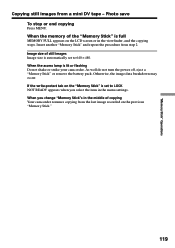
...images from step 2. Otherwise, the image data breakdown may occur. Image size of copying Your camcorder resumes copying from the last image recorded on the previous "Memory Stick." 119 When you select... mini DV tape - As well do not turn the power off, eject a "Memory Stick" or remove the battery pack. When the access lamp is set to LOCK NOT READY appears when you change "Memory Stick"s in the... appears on the "Memory Stick" is lit or flashing Do not shake or strike your camcorder. Photo save To stop or end copying Press MENU. If the write-protect tab on the LCD screen ...
...images from step 2. Otherwise, the image data breakdown may occur. Image size of copying Your camcorder resumes copying from the last image recorded on the previous "Memory Stick." 119 When you select... mini DV tape - As well do not turn the power off, eject a "Memory Stick" or remove the battery pack. When the access lamp is set to LOCK NOT READY appears when you change "Memory Stick"s in the... appears on the "Memory Stick" is lit or flashing Do not shake or strike your camcorder. Photo save To stop or end copying Press MENU. If the write-protect tab on the LCD screen ...


