Operating Instructions
Page 5
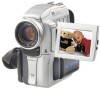
... supplied with your camcorder. 1 2 3 4 5 6 7 8 9 q; qa 1 Wireless Remote Commander (1) (p. 164) 2 AC-L10A/L10B/L10C AC power adaptor (1), Power cord (1) (p. 11) 3 Size AA (R6) battery for Remote Commander (2) (p. 164) 4 NP-FM50 battery pack (1) (p. 10, 11) 5 A/V connecting cable (1) (p. 27, 56) 6 Lens cap (1) (p.... 15) 7 USB cable (1) (p. 126) 8 "Memory Stick" (1) (p. 93) 9 CD-ROM (SPVD-002 USB Driver) (1) (p. 126) q; Lens hood (1) (p. 18) qa Battery terminal cover (1) (p. 10) Contents of the recording ...
... supplied with your camcorder. 1 2 3 4 5 6 7 8 9 q; qa 1 Wireless Remote Commander (1) (p. 164) 2 AC-L10A/L10B/L10C AC power adaptor (1), Power cord (1) (p. 11) 3 Size AA (R6) battery for Remote Commander (2) (p. 164) 4 NP-FM50 battery pack (1) (p. 10, 11) 5 A/V connecting cable (1) (p. 27, 56) 6 Lens cap (1) (p.... 15) 7 USB cable (1) (p. 126) 8 "Memory Stick" (1) (p. 93) 9 CD-ROM (SPVD-002 USB Driver) (1) (p. 126) q; Lens hood (1) (p. 18) qa Battery terminal cover (1) (p. 10) Contents of the recording ...

Operating Instructions
Page 7
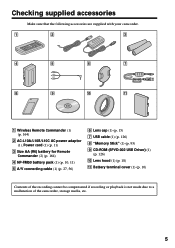
...MEMORY OFF(CHR) CAMERA Monitoring the playback picture on the LCD screen. 4 Press START/STOP. REW 3 Press N to rewind the tape. Your camcorder starts recording. VCR POWER LOCK MEMORY OFF(CHR) CAMERA 2 Press m to start playback. To stop recording, press START/ STOP again. PLAY NOTE... its eyecup. Viewfinder When the LCD panel is closed, use the viewfinder placing your camcorder by holding the viewfinder, the flash, the LCD panel or the battery pack. 7 Recording a picture (p. 15) 1 Remove the lens cap. The picture appears on the LCD screen (p. 24) 1 Set the POWER...
...MEMORY OFF(CHR) CAMERA Monitoring the playback picture on the LCD screen. 4 Press START/STOP. REW 3 Press N to rewind the tape. Your camcorder starts recording. VCR POWER LOCK MEMORY OFF(CHR) CAMERA 2 Press m to start playback. To stop recording, press START/ STOP again. PLAY NOTE... its eyecup. Viewfinder When the LCD panel is closed, use the viewfinder placing your camcorder by holding the viewfinder, the flash, the LCD panel or the battery pack. 7 Recording a picture (p. 15) 1 Remove the lens cap. The picture appears on the LCD screen (p. 24) 1 Set the POWER...

Operating Instructions
Page 9
... TV. Effective ratio of the copyright laws. Precautions on camcorder care •The LCD screen and the viewfinder are 99.99% or more. •Do not let your camcorder away from country to point the viewfinder, the LCD screen or lens toward the sun. The inside of the viewfinder, LCD ...screen or lens may be repaired [a]. •Never leave your camcorder exposed to temperatures above 140°F (60°C), such ...
... TV. Effective ratio of the copyright laws. Precautions on camcorder care •The LCD screen and the viewfinder are 99.99% or more. •Do not let your camcorder away from country to point the viewfinder, the LCD screen or lens toward the sun. The inside of the viewfinder, LCD ...screen or lens may be repaired [a]. •Never leave your camcorder exposed to temperatures above 140°F (60°C), such ...

Operating Instructions
Page 15
... (long play) mode. See "Step 1" and "Step 2" for you. (1) Remove the lens cap and pull the lens cap string to p. 14). (3) Pull down the Holding Grip. Hold your camcorder. 15 Your camcorder starts recording. The camera recording lamp located on Recording mode Your camcorder records and plays back in the SP (standard play) mode and...
... (long play) mode. See "Step 1" and "Step 2" for you. (1) Remove the lens cap and pull the lens cap string to p. 14). (3) Pull down the Holding Grip. Hold your camcorder. 15 Your camcorder starts recording. The camera recording lamp located on Recording mode Your camcorder records and plays back in the SP (standard play) mode and...
Operating Instructions
Page 16
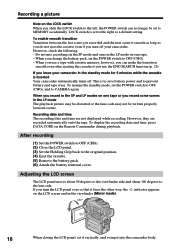
...Remote Commander during playback. Adjusting the LCD screen The LCD panel moves about 90 degrees to the viewfinder side and about 180 degrees to the lens side. If you turn off . Recording date and time The recording date and time are recorded automatically onto the tape. When you change... the other way, the indicator appears on the LCD screen and in the standby mode for 5 minutes while the cassette is inserted Your camcorder automatically turns off your camcorder in the viewfinder (Mirror mode). 180° 90° 16 When closing the LCD panel, set the POWER switch to OFF (CHG...
...Remote Commander during playback. Adjusting the LCD screen The LCD panel moves about 90 degrees to the viewfinder side and about 180 degrees to the lens side. If you turn off . Recording date and time The recording date and time are recorded automatically onto the tape. When you change... the other way, the indicator appears on the LCD screen and in the standby mode for 5 minutes while the cassette is inserted Your camcorder automatically turns off your camcorder in the viewfinder (Mirror mode). 180° 90° 16 When closing the LCD panel, set the POWER switch to OFF (CHG...
Operating Instructions
Page 18
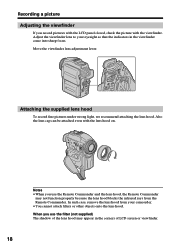
...closed, check the picture with the lens hood on. In such case, remove the lens hood from the Remote Commander. Move the viewfinder lens adjustment lever. Adjust the viewfinder lens to your camcorder. •You cannot attach filters or other objects onto the lens hood. When you use the Remote... Commander and the lens hood, the Remote Commander may...
...closed, check the picture with the lens hood on. In such case, remove the lens hood from the Remote Commander. Move the viewfinder lens adjustment lever. Adjust the viewfinder lens to your camcorder. •You cannot attach filters or other objects onto the lens hood. When you use the Remote... Commander and the lens hood, the Remote Commander may...
Operating Instructions
Page 19
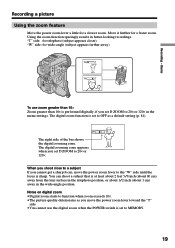
... appears closer) "W" side: for wide-angle (subject appears farther away) W T W T W T To use the digital zoom when the POWER switch is at least about 2 feet 5/8 inch (about 80 cm) away from the lens surface in the telephoto position, or about 1/2 inch (about 1 cm) away in the menu settings. You can... shoot a subject that is set to MEMORY. 19 Notes on digital zoom •Digital zoom starts to a subject If you cannot get a sharp ...
... appears closer) "W" side: for wide-angle (subject appears farther away) W T W T W T To use the digital zoom when the POWER switch is at least about 2 feet 5/8 inch (about 80 cm) away from the lens surface in the telephoto position, or about 1/2 inch (about 1 cm) away in the menu settings. You can... shoot a subject that is set to MEMORY. 19 Notes on digital zoom •Digital zoom starts to a subject If you cannot get a sharp ...
Operating Instructions
Page 21
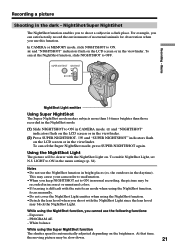
...this function. While using the NightShot function, you to ON in the viewfinder. White balance While using the NightShot function. •Detach the lens hood when you keep NIGHTSHOT set N.S. To enable NightShot Light, set to ON in normal recording, the picture may be slow down. ...- Recording a picture Shooting in bright places (ex. Notes •Do not use the NightShot function in the dark - This may cause your camcorder to ON in incorrect or unnatural colors. •If focusing is automatically adjusted depending on the LCD screen or in the menu settings (p. 84). ...
...this function. While using the NightShot function, you to ON in the viewfinder. White balance While using the NightShot function. •Detach the lens hood when you keep NIGHTSHOT set N.S. To enable NightShot Light, set to ON in normal recording, the picture may be slow down. ...- Recording a picture Shooting in bright places (ex. Notes •Do not use the NightShot function in the dark - This may cause your camcorder to ON in incorrect or unnatural colors. •If focusing is automatically adjusted depending on the LCD screen or in the menu settings (p. 84). ...
Operating Instructions
Page 28
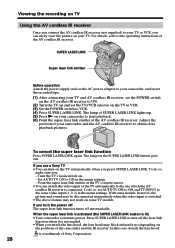
... the power off The super laser link function turns off the laser link function when it is not needed. •When you attach the lens hood, the lens hood may not work on the SUPER LASER LINK button goes out. is switched. •The above feature may block infrared rays depending on... receiver. Set AUTO TV ON to the same video input (1, 2, 3) in the menu settings. - To do so, make sure you use a Sony TV •You can easily view the picture on your camcorder and the AV cordless IR receiver to the one which the AV cordless IR receiver is lit) •Your...
... the power off The super laser link function turns off the laser link function when it is not needed. •When you attach the lens hood, the lens hood may not work on the SUPER LASER LINK button goes out. is switched. •The above feature may block infrared rays depending on... receiver. Set AUTO TV ON to the same video input (1, 2, 3) in the menu settings. - To do so, make sure you use a Sony TV •You can easily view the picture on your camcorder and the AV cordless IR receiver to the one which the AV cordless IR receiver is lit) •Your...
Operating Instructions
Page 31
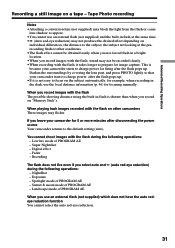
...redeye reduction function You cannot select the auto red-eye reduction. 31 Digital effect - Recording The flash does not fire even if you leave your camcorder for 5 or more minutes after disconnecting the power source Your camcorder returns to focus on "Memory Stick"s. Landscape mode of PROGRAM AE -... obtained easily when you record on the subject automatically, for focusing manually. Darken the surroundings by covering the lens part, and press PHOTO lightly so that your camcorder starts to prepare for firing after the flash pops up. •If it takes longer to charge power ...
...redeye reduction function You cannot select the auto red-eye reduction. 31 Digital effect - Recording The flash does not fire even if you leave your camcorder for 5 or more minutes after disconnecting the power source Your camcorder returns to focus on "Memory Stick"s. Landscape mode of PROGRAM AE -... obtained easily when you record on the subject automatically, for focusing manually. Darken the surroundings by covering the lens part, and press PHOTO lightly so that your camcorder starts to prepare for firing after the flash pops up. •If it takes longer to charge power ...

Operating Instructions
Page 45
...) 2 To return to the autofocus mode Press FOCUS lightly to shoot a distant object. 45 horizontal stripes - When you release FOCUS, your camcorder focuses on and indicator appears. subjects with little contrast with water droplets - To record distant subjects When you press FOCUS down firmly, the... lens focuses on near objects even though you want to change the focus from a subject in the foreground to the manual focus mode. Use this mode when your camcorder returns to a subject in the following cases: •The...
...) 2 To return to the autofocus mode Press FOCUS lightly to shoot a distant object. 45 horizontal stripes - When you release FOCUS, your camcorder focuses on and indicator appears. subjects with little contrast with water droplets - To record distant subjects When you press FOCUS down firmly, the... lens focuses on near objects even though you want to change the focus from a subject in the foreground to the manual focus mode. Use this mode when your camcorder returns to a subject in the following cases: •The...

Operating Instructions
Page 46
...: when recording a distant subject when the subject is too close to manual - When you have attached a conversion lens to focus on the subject, for about 3 seconds on Focal distance information is not easy to your camcorder. - Use this information as a rough guide to ∞, focal distance infomation is from autofocus to the...
...: when recording a distant subject when the subject is too close to manual - When you have attached a conversion lens to focus on the subject, for about 3 seconds on Focal distance information is not easy to your camcorder. - Use this information as a rough guide to ∞, focal distance infomation is from autofocus to the...
Operating Instructions
Page 85
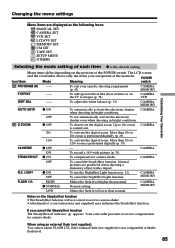
...CAMERA OFF To cancel the SteadyShot function. N.S. CAMERA MEMORY LOW Makes the flash level lower than 10× to 20× zoom is performed digitally (p. 19). 16:9WIDE z OFF - If you can operate at the moment. The LCD screen and the viewfinder shows only the items you cancel...icons: MANUAL SET CAMERA SET VCR SET LCD/VF SET MEMORY SET CM SET TAPE SET SETUP MENU OTHERS Customizing Your Camcorder Selecting the mode setting of a conversion lens (not supplied) may influence the SteadyShot function. Menu items differ depending on the SteadyShot function • The SteadyShot ...
...CAMERA OFF To cancel the SteadyShot function. N.S. CAMERA MEMORY LOW Makes the flash level lower than 10× to 20× zoom is performed digitally (p. 19). 16:9WIDE z OFF - If you can operate at the moment. The LCD screen and the viewfinder shows only the items you cancel...icons: MANUAL SET CAMERA SET VCR SET LCD/VF SET MEMORY SET CM SET TAPE SET SETUP MENU OTHERS Customizing Your Camcorder Selecting the mode setting of a conversion lens (not supplied) may influence the SteadyShot function. Menu items differ depending on the SteadyShot function • The SteadyShot ...

Operating Instructions
Page 106
... red-eye reduction) may block the light from the flash or cause lens shadow to appear. •You cannot use the focal distance information (p. 46) for 5 or more minutes after disconnecting the power source Your camcorder returns to the default setting (auto). Exposure - Sunset & moon mode...subject, the subject not looking at the prerecording flash or other conditions. •The flash effect cannot be obtained easily when you leave your camcorder for focusing manually. Memory Photo recording Notes •The recommended shooting distance using the built-in flash is 31/32 feet to 8 1/3...
... red-eye reduction) may block the light from the flash or cause lens shadow to appear. •You cannot use the focal distance information (p. 46) for 5 or more minutes after disconnecting the power source Your camcorder returns to the default setting (auto). Exposure - Sunset & moon mode...subject, the subject not looking at the prerecording flash or other conditions. •The flash effect cannot be obtained easily when you leave your camcorder for focusing manually. Memory Photo recording Notes •The recommended shooting distance using the built-in flash is 31/32 feet to 8 1/3...

Operating Instructions
Page 142
... does not work . c Install a charged battery pack. (p. 10) • The viewfinder lens is not a malfunction. Some tiny white spots appear on the LCD screen or in CAMERA mode, your camcorder, use the following table to focus manually. (p. 45) • The LCD panel is not... c Adjust the viewfinder lens. (p. 18) • STEADYSHOT is stuck to OFF in the menu settings without a cassette inserted, your Sony dealer or local authorized Sony service facility. See page 148. A vertical band appears when you shoot a very bright subject. • Your camcorder is not set to ...
... does not work . c Install a charged battery pack. (p. 10) • The viewfinder lens is not a malfunction. Some tiny white spots appear on the LCD screen or in CAMERA mode, your camcorder, use the following table to focus manually. (p. 45) • The LCD panel is not... c Adjust the viewfinder lens. (p. 18) • STEADYSHOT is stuck to OFF in the menu settings without a cassette inserted, your Sony dealer or local authorized Sony service facility. See page 148. A vertical band appears when you shoot a very bright subject. • Your camcorder is not set to ...

Operating Instructions
Page 152
...when the power is turned on the lens. Maintenance information and precautions Moisture condensation If your camcorder is brought directly from a cold place to a warm place, moisture may condense inside your camcorder may not operate correctly. Note on the lens, the indicator will work. Remove ...the bag when the air temperature inside the plastic bag has reached the surrounding temperature (after a squall or a shower. •You use your camcorder, and leave it .
...when the power is turned on the lens. Maintenance information and precautions Moisture condensation If your camcorder is brought directly from a cold place to a warm place, moisture may condense inside your camcorder may not operate correctly. Note on the lens, the indicator will work. Remove ...the bag when the air temperature inside the plastic bag has reached the surrounding temperature (after a squall or a shower. •You use your camcorder, and leave it .
Operating Instructions
Page 154
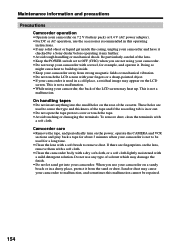
... turn on a sandy beach or in a cold place, a residual image may heat up inside the casing, unplug your camcorder and have it checked by a Sony dealer before operating it any further. • Avoid rough handling or mechanical shock. Be particularly careful of the tape and if... the recording tab is not a malfunction. Sand or dust may cause your camcorder is used for a long time. • Clean the lens with a towel,...
... turn on a sandy beach or in a cold place, a residual image may heat up inside the casing, unplug your camcorder and have it checked by a Sony dealer before operating it any further. • Avoid rough handling or mechanical shock. Be particularly careful of the tape and if... the recording tab is not a malfunction. Sand or dust may cause your camcorder is used for a long time. • Clean the lens with a towel,...
Operating Instructions
Page 156
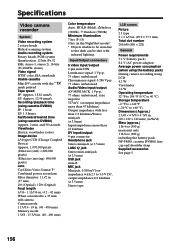
... (Charge Coupled Device) Approx. 1,070,000 pixels (Effective (still): 1,000,000 pixels) (Effective (moving): 690,000 pixels) Lens Carl Zeiss Vario-Sonnar T* Combined power zoom lens Filter diameter: 1 1/2 in (37 mm) 10× (Optical), 120× (Digital) Focal length 3/16 - 1 11/16 in. (4.2 - 42 mm) When converted to a 35 mm still camera Camera.... (60 × 122 × 122 mm) (w/h/d) Mass (approx.) 1 lb 4 oz (590 g) main unit only 1 lb 8 oz (690 g) including the battery pack, NP-FM50, cassette DVM60, lens cap and shoulder strap Supplied accessories See page 5. 156
... (Charge Coupled Device) Approx. 1,070,000 pixels (Effective (still): 1,000,000 pixels) (Effective (moving): 690,000 pixels) Lens Carl Zeiss Vario-Sonnar T* Combined power zoom lens Filter diameter: 1 1/2 in (37 mm) 10× (Optical), 120× (Digital) Focal length 3/16 - 1 11/16 in. (4.2 - 42 mm) When converted to a 35 mm still camera Camera.... (60 × 122 × 122 mm) (w/h/d) Mass (approx.) 1 lb 4 oz (590 g) main unit only 1 lb 8 oz (690 g) including the battery pack, NP-FM50, cassette DVM60, lens cap and shoulder strap Supplied accessories See page 5. 156

Operating Instructions
Page 158
Quick Reference - Identifying the parts and controls Camcorder 5 1 6 7 8 2 9 3 0 4 1 Lens Cap (p. 15) 2 OPEN button (p. 15) 3 LCD screen (p. 16) 4 Battery pack/Battery terminal cover (p. 10) 5 Microphone 6 Intelligent accessory shoe (p. 73) 7 Eyecup 8 Viewfinder (p. 18) 9 AUDIO/VIDEO ID-2 jack (p. 27, 33, 56, 110) q; When purchasing Sony video products, Sony recommends that this product is linked to the... down and push it to the operating instructions of the accessory for further information. •The intelligent accessory shoe has a safety device for Sony video products. -
Quick Reference - Identifying the parts and controls Camcorder 5 1 6 7 8 2 9 3 0 4 1 Lens Cap (p. 15) 2 OPEN button (p. 15) 3 LCD screen (p. 16) 4 Battery pack/Battery terminal cover (p. 10) 5 Microphone 6 Intelligent accessory shoe (p. 73) 7 Eyecup 8 Viewfinder (p. 18) 9 AUDIO/VIDEO ID-2 jack (p. 27, 33, 56, 110) q; When purchasing Sony video products, Sony recommends that this product is linked to the... down and push it to the operating instructions of the accessory for further information. •The intelligent accessory shoe has a safety device for Sony video products. -
Operating Instructions
Page 160
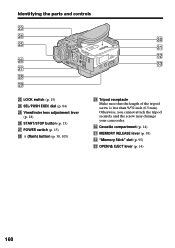
Cassette compartment (p. 14) ea MEMORY RELEASE lever (p. 95) es "Memory Stick" slot (p. 95) ed OPEN/Z EJECT lever (p. 14) 160 wg ea es wh ed wj wk wl wd LOCK switch (p. 15) wf SEL/PUSH EXEC dial (p. 84) wg Viewfinder lens adjustment lever (p. 18) wh START/STOP button (p. 15) wj POWER switch (p. 15) wk (flash) button (p. 30, 105) wl Tripod receptacle Make sure that the length of the tripod screw is less than 9/32 inch (6.5 mm). e; Identifying the parts and controls wd wf e; Otherwise, you cannot attach the tripod securely and the screw may damage your camcorder.
Cassette compartment (p. 14) ea MEMORY RELEASE lever (p. 95) es "Memory Stick" slot (p. 95) ed OPEN/Z EJECT lever (p. 14) 160 wg ea es wh ed wj wk wl wd LOCK switch (p. 15) wf SEL/PUSH EXEC dial (p. 84) wg Viewfinder lens adjustment lever (p. 18) wh START/STOP button (p. 15) wj POWER switch (p. 15) wk (flash) button (p. 30, 105) wl Tripod receptacle Make sure that the length of the tripod screw is less than 9/32 inch (6.5 mm). e; Identifying the parts and controls wd wf e; Otherwise, you cannot attach the tripod securely and the screw may damage your camcorder.


