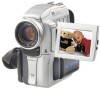
Operating Instructions
Page 2
... not cause harmful interference, and (2)this device must accept any interference received, including interference that you call 416-499-SONY (Canada only). Never expose the battery pack to operate this Sony Digital Handycam camcorder. CAUTION You are cautioned that may call: Sony Customer Information Center 1-800-222SONY (7669) or write to rain or moisture. Welcome! Your...
... not cause harmful interference, and (2)this device must accept any interference received, including interference that you call 416-499-SONY (Canada only). Never expose the battery pack to operate this Sony Digital Handycam camcorder. CAUTION You are cautioned that may call: Sony Customer Information Center 1-800-222SONY (7669) or write to rain or moisture. Welcome! Your...
Operating Instructions
Page 4
...22 END SEARCH 23 - Memory Photo recording 102 Recording an image from a mini DV tape - PRINT MARK ... 137 - Digital effect ....... 39 Using the PROGRAM AE function ......... 42 Adjusting the exposure manually 44 Focusing manually 45 Copying still images from a ... "Memory Stick"s - Insert editing 71 Audio dubbing 73 Superimposing a title 77 Getting started Using this manual 8 Making your camcorder abroad 151 Maintenance information and precautions Editing 152 Specifications 156 Dubbing a tape 56 Dubbing only desired scenes Quick Reference - Basics ...
...22 END SEARCH 23 - Memory Photo recording 102 Recording an image from a mini DV tape - PRINT MARK ... 137 - Digital effect ....... 39 Using the PROGRAM AE function ......... 42 Adjusting the exposure manually 44 Focusing manually 45 Copying still images from a ... "Memory Stick"s - Insert editing 71 Audio dubbing 73 Superimposing a title 77 Getting started Using this manual 8 Making your camcorder abroad 151 Maintenance information and precautions Editing 152 Specifications 156 Dubbing a tape 56 Dubbing only desired scenes Quick Reference - Basics ...
Operating Instructions
Page 5
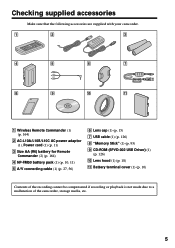
... (1) (p. 18) qa Battery terminal cover (1) (p. 10) Contents of the recording cannot be compensated if recording or playback is not made due to a malfunction of the camcorder, storage media, etc. 5 Getting started Checking supplied accessories Make sure that the following accessories are supplied with your...
... (1) (p. 18) qa Battery terminal cover (1) (p. 10) Contents of the recording cannot be compensated if recording or playback is not made due to a malfunction of the camcorder, storage media, etc. 5 Getting started Checking supplied accessories Make sure that the following accessories are supplied with your...
Operating Instructions
Page 6
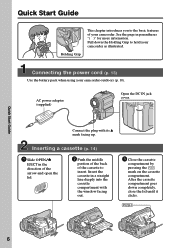
...mark on the cassette compartment. Connecting the power cord (p. 13) Use the battery pack when using your camcorder. After the cassette compartment goes down the Holding Grip to hold your camcorder as illustrated. See the page in a straight line deeply into the cassette compartment with its v mark ...of the arrow and open the lid. 2 Push the middle portion of the back of the cassette to the basic features of your camcorder outdoors (p. 10). Insert the cassette in parentheses "( )" for more information. Quick Start Guide Holding Grip This chapter introduces you to insert....
...mark on the cassette compartment. Connecting the power cord (p. 13) Use the battery pack when using your camcorder. After the cassette compartment goes down the Holding Grip to hold your camcorder as illustrated. See the page in a straight line deeply into the cassette compartment with its v mark ...of the arrow and open the lid. 2 Push the middle portion of the back of the cassette to the basic features of your camcorder outdoors (p. 10). Insert the cassette in parentheses "( )" for more information. Quick Start Guide Holding Grip This chapter introduces you to insert....

Operating Instructions
Page 7
Recording a picture (p. 15) 1 Remove the lens cap. Viewfinder When the LCD panel is closed, use the viewfinder placing your camcorder by holding the viewfinder, the flash, the LCD panel or the battery pack. 7 POWER LOCK VCR Quick Start Guide MEMORY OFF(CHR) CAMERA Monitoring the ... start playback. REW 3 Press N to rewind the tape. POWER LOCK MEMORY OFF(CHR) CAMERA 3 Press OPEN to CAMERA while pressing the small green button. Your camcorder starts recording. PLAY NOTE Do not pick up your eye against its eyecup. VCR 2 Set the POWER switch to open the LCD panel.
Recording a picture (p. 15) 1 Remove the lens cap. Viewfinder When the LCD panel is closed, use the viewfinder placing your camcorder by holding the viewfinder, the flash, the LCD panel or the battery pack. 7 POWER LOCK VCR Quick Start Guide MEMORY OFF(CHR) CAMERA Monitoring the ... start playback. REW 3 Press N to rewind the tape. POWER LOCK MEMORY OFF(CHR) CAMERA 3 Press OPEN to CAMERA while pressing the small green button. Your camcorder starts recording. PLAY NOTE Do not pick up your eye against its eyecup. VCR 2 Set the POWER switch to open the LCD panel.
Operating Instructions
Page 8
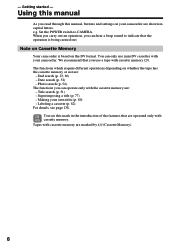
... page 138. Tapes with your own titles (p. 80) - - End search (p. 23, 26) - Photo search (p. 54). Note on Cassette Memory Your camcorder is being carried out. Title search (p. 51) - For details, see this manual As you use mini DV cassettes with cassette memory are : - Date... search (p. 52) - Making your camcorder. The functions which require different operations depending on the DV format. The functions you can hear a beep sound to CAMERA. Labeling a cassette...
... page 138. Tapes with your own titles (p. 80) - - End search (p. 23, 26) - Photo search (p. 54). Note on Cassette Memory Your camcorder is being carried out. Title search (p. 51) - For details, see this manual As you use mini DV cassettes with cassette memory are : - Date... search (p. 52) - Making your camcorder. The functions which require different operations depending on the DV format. The functions you can hear a beep sound to CAMERA. Labeling a cassette...

Operating Instructions
Page 9
... TV color systems differ from rain and sea water. Precautions on a TV, you need an NTSC system-based TV. Letting your camcorder get wet. Keep your camcorder away from country to country. Getting started Using this malfunction cannot be repaired [a]. •Never leave your... Effective ratio of pixels and/or screen are 99.99% or more. •Do not let your camcorder get wet may be copyrighted. However, there may cause your recordings on camcorder care •The LCD screen and the viewfinder are manufactured using high-precision technology. Sometimes this manual Note...
... TV color systems differ from rain and sea water. Precautions on a TV, you need an NTSC system-based TV. Letting your camcorder get wet. Keep your camcorder away from country to country. Getting started Using this malfunction cannot be repaired [a]. •Never leave your... Effective ratio of pixels and/or screen are 99.99% or more. •Do not let your camcorder get wet may be copyrighted. However, there may cause your recordings on camcorder care •The LCD screen and the viewfinder are manufactured using high-precision technology. Sometimes this manual Note...

Operating Instructions
Page 10
Step 1 Preparing the power supply Installing the battery pack Install the battery pack to use your camcorder outdoors. (1) While sliding BATTERY RELEASE in the direction of the arrow 1, slide the battery terminal cover in the direction of the arrow 2. (2) Insert the battery pack in the direction of the arrow. 1 2 2 1 To remove the battery pack The battery pack is removed. 10 Note on the battery terminal cover To protect the battery terminals, install the battery terminal cover after the battery pack is removed in the same way as the battery terminal cover.
Step 1 Preparing the power supply Installing the battery pack Install the battery pack to use your camcorder outdoors. (1) While sliding BATTERY RELEASE in the direction of the arrow 1, slide the battery terminal cover in the direction of the arrow 2. (2) Insert the battery pack in the direction of the arrow. 1 2 2 1 To remove the battery pack The battery pack is removed. 10 Note on the battery terminal cover To protect the battery terminals, install the battery terminal cover after the battery pack is removed in the same way as the battery terminal cover.

Operating Instructions
Page 11
...usual, leave the battery pack in a cool place. 11 Keep the battery pack in place for your camcorder. Notes •Prevent metallic objects from the DC IN jack on your camcorder to OFF (CHG). Your camcorder operates only with the "InfoLITHIUM" battery pack (M series). (1) Open the DC IN jack cover and ... to the AC power adaptor. (3) Connect the power cord to a wall outlet. (4) Set the POWER switch to the DC IN jack with your camcorder. This may cause a short-circuit, damaging the AC power adaptor. •Keep the battery pack dry. •When the battery pack is completed.
...usual, leave the battery pack in a cool place. 11 Keep the battery pack in place for your camcorder. Notes •Prevent metallic objects from the DC IN jack on your camcorder to OFF (CHG). Your camcorder operates only with the "InfoLITHIUM" battery pack (M series). (1) Open the DC IN jack cover and ... to the AC power adaptor. (3) Connect the power cord to a wall outlet. (4) Set the POWER switch to the DC IN jack with your camcorder. This may cause a short-circuit, damaging the AC power adaptor. •Keep the battery pack dry. •When the battery pack is completed.

Operating Instructions
Page 12
... may go off . This unit is a trademark of minutes when recording while you use your camcorder in a cold environment. The battery life will be shorter if you use your camcorder in a cold environment. ** Approximate number of Sony Corporation. Your camcorder operates only with the "InfoLITHIUM" battery. What is a lithium ion battery pack which can...
... may go off . This unit is a trademark of minutes when recording while you use your camcorder in a cold environment. The battery life will be shorter if you use your camcorder in a cold environment. ** Approximate number of Sony Corporation. Your camcorder operates only with the "InfoLITHIUM" battery. What is a lithium ion battery pack which can...
Operating Instructions
Page 13
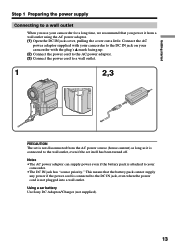
Using a car battery Use Sony DC Adaptor/Charger (not supplied). 13 Getting started Step 1 Preparing the power supply Connecting to a wall outlet When you use your camcorder for a long time, we recommend that the battery pack cannot supply any power if the power cord is connected to your camcorder with the plug's v mark facing... power it is connected to the wall outlet, even if the set itself has been turned off. Connect the AC power adaptor supplied with your camcorder to the DC IN jack on your camcorder. •The DC IN jack has "source priority."
Using a car battery Use Sony DC Adaptor/Charger (not supplied). 13 Getting started Step 1 Preparing the power supply Connecting to a wall outlet When you use your camcorder for a long time, we recommend that the battery pack cannot supply any power if the power cord is connected to your camcorder with the plug's v mark facing... power it is connected to the wall outlet, even if the set itself has been turned off. Connect the AC power adaptor supplied with your camcorder to the DC IN jack on your camcorder. •The DC IN jack has "source priority."

Operating Instructions
Page 15
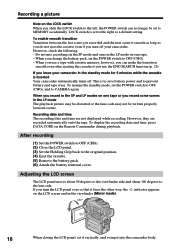
...(2) Install the power source and insert a cassette. Your camcorder starts recording. Select SP or LP in the LP mode on your camcorder, we recommend playing the tape on your camcorder. 15 Basics - Recording a picture Your camcorder automatically focuses for more information (p. 10 to CAMERA while ...pressing the small green button. Hold your camcorder lights up. The camera recording lamp...
...(2) Install the power source and insert a cassette. Your camcorder starts recording. Select SP or LP in the LP mode on your camcorder, we recommend playing the tape on your camcorder. 15 Basics - Recording a picture Your camcorder automatically focuses for more information (p. 10 to CAMERA while ...pressing the small green button. Hold your camcorder lights up. The camera recording lamp...
Operating Instructions
Page 16
...cassette memory, however, you can no longer be written properly between the last scene you recorded and the next scene is inserted Your camcorder automatically turns off your camcorder. This is set to the right as you do not eject the cassette even if you turn the LCD panel over so that... for 5 minutes while the cassette is smooth as long as a default setting. If you turn off . However, check the following: - If you leave your camcorder in the viewfinder (Mirror mode). 180° 90° 16 When closing the LCD panel, set the POWER switch to OFF (CHG). - Recording date and...
...cassette memory, however, you can no longer be written properly between the last scene you recorded and the next scene is inserted Your camcorder automatically turns off your camcorder. This is set to the right as you do not eject the cassette even if you turn the LCD panel over so that... for 5 minutes while the cassette is smooth as long as a default setting. If you turn off . However, check the following: - If you leave your camcorder in the viewfinder (Mirror mode). 180° 90° 16 When closing the LCD panel, set the POWER switch to OFF (CHG). - Recording date and...
Operating Instructions
Page 18
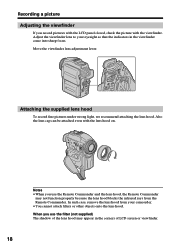
... the infrared rays from your eyesight so that the indicators in the corners of LCD screen or viewfinder. 18 Adjust the viewfinder lens to your camcorder. •You cannot attach filters or other objects onto the lens hood.
... the infrared rays from your eyesight so that the indicators in the corners of LCD screen or viewfinder. 18 Adjust the viewfinder lens to your camcorder. •You cannot attach filters or other objects onto the lens hood.
Operating Instructions
Page 21
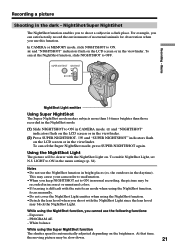
... down. 21 Exposure - PROGRAM AE - At that time, the moving picture may be clearer with the NightShot Light since the lens hood may cause your camcorder to shoot a subject in the dark - NightShot/Super NightShot The NightShot function enables you use this function. To enable NightShot Light, set to ON in...
... down. 21 Exposure - PROGRAM AE - At that time, the moving picture may be clearer with the NightShot Light since the lens hood may cause your camcorder to shoot a subject in the dark - NightShot/Super NightShot The NightShot function enables you use this function. To enable NightShot Light, set to ON in...

Operating Instructions
Page 22
...in the standby mode. Self-timer recording is automatically canceled when: - Self-timer memory photo recording You can also use the Remote Commander for convenience. Digital effect - Use the Remote Commander for this operation. (1) Press (self-timer) in step 2 (p. 32). Note The self-timer recording mode is ... function, you want to OFF (CHG) or VCR. To record still images on the LCD screen or in the viewfinder while your camcorder is useful when you cannot use the Super NightShot function. The POWER switch is about 10 feet (3 m). The maximum shooting distance using...
...in the standby mode. Self-timer recording is automatically canceled when: - Self-timer memory photo recording You can also use the Remote Commander for convenience. Digital effect - Use the Remote Commander for this operation. (1) Press (self-timer) in step 2 (p. 32). Note The self-timer recording mode is ... function, you want to OFF (CHG) or VCR. To record still images on the LCD screen or in the viewfinder while your camcorder is useful when you cannot use the Super NightShot function. The POWER switch is about 10 feet (3 m). The maximum shooting distance using...

Operating Instructions
Page 23
The last 5 seconds of the recorded portion are played back and your camcorder returns to the end of the recorded portion after you eject the cassette. If you use a tape without cassette memory The end search function does ...
The last 5 seconds of the recorded portion are played back and your camcorder returns to the end of the recorded portion after you eject the cassette. If you use a tape without cassette memory The end search function does ...

Operating Instructions
Page 24
... To adjust the volume, press either of the two buttons on the LCD screen You can control playback using the Remote Commander supplied with your camcorder. (1) Install the power source and insert the recorded tape. (2) Set the POWER switch to VCR while pressing the small green button. (3) Open... the LCD panel while pressing OPEN. (4) Press m to rewind the tape. (5) Press N to the camcorder body with the LCD screen facing out. When monitoring on VOLUME. 4 5 2 POWER LOCK VCR REW PLAY MEMORY OFF(CHR) CAMERA 3 6 VOLUME 1 To ...
... To adjust the volume, press either of the two buttons on the LCD screen You can control playback using the Remote Commander supplied with your camcorder. (1) Install the power source and insert the recorded tape. (2) Set the POWER switch to VCR while pressing the small green button. (3) Open... the LCD panel while pressing OPEN. (4) Press m to rewind the tape. (5) Press N to the camcorder body with the LCD screen facing out. When monitoring on VOLUME. 4 5 2 POWER LOCK VCR REW PLAY MEMORY OFF(CHR) CAMERA 3 6 VOLUME 1 To ...

Operating Instructions
Page 25
... various settings Set DATA CODE to tape damage or noise. - Use the Remote Commander for this operation. A blank portion of the tape is your camcorder's information when you use the data code function, bars (-- -- --) appear if: - The indicators appear on the tape but also the recording data... (Data code). In the recording mode, the recording data will not be displayed. Display function Press DISPLAY on your camcorder or the Remote Commander supplied with your camcorder to the TV, the data code appears on the Remote Commander in the menu settings (p. 84). The tape is unreadable...
... various settings Set DATA CODE to tape damage or noise. - Use the Remote Commander for this operation. A blank portion of the tape is your camcorder's information when you use the data code function, bars (-- -- --) appear if: - The indicators appear on the tape but also the recording data... (Data code). In the recording mode, the recording data will not be displayed. Display function Press DISPLAY on your camcorder or the Remote Commander supplied with your camcorder to the TV, the data code appears on the Remote Commander in the menu settings (p. 84). The tape is unreadable...

Operating Instructions
Page 26
..., press N or X. For frame-by -frame Press C on the Remote Commander in the reverse direction, press , then press y on your camcorder: however, this function does not work for 5 minutes Your camcorder automatically enters the stop mode. To search the last scene recorded (END SEARCH) Press END SEARCH in the reverse direction, press...
..., press N or X. For frame-by -frame Press C on the Remote Commander in the reverse direction, press , then press y on your camcorder: however, this function does not work for 5 minutes Your camcorder automatically enters the stop mode. To search the last scene recorded (END SEARCH) Press END SEARCH in the reverse direction, press...


