
Operating Instructions
Page 1
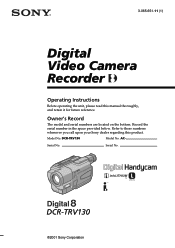
DCR-TRV130 Model No. Serial No. Serial No. Model No. DCR-TRV130 ©2001 Sony Corporation AC- Record the serial number in the space provided below. 3-065-651-11 (1) Digital Video Camera Recorder Operating Instructions Before operating the unit, please read this product. Refer to these numbers whenever you call upon your Sony dealer regarding this manual thoroughly, and retain it for future reference. Owner's Record The model and serial numbers are located on the bottom.
DCR-TRV130 Model No. Serial No. Serial No. Model No. DCR-TRV130 ©2001 Sony Corporation AC- Record the serial number in the space provided below. 3-065-651-11 (1) Digital Video Camera Recorder Operating Instructions Before operating the unit, please read this product. Refer to these numbers whenever you call upon your Sony dealer regarding this manual thoroughly, and retain it for future reference. Owner's Record The model and serial numbers are located on the bottom.
Operating Instructions
Page 5
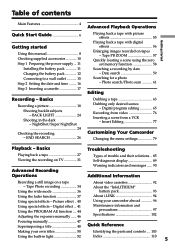
... for a photo - Basics Playing back a tape 27 Viewing the recording on TV 31 Advanced Recording Operations Troubleshooting Types of contents Getting started Main Features 4 Quick Start Guide 6 Getting started Using this manual 8 Checking supplied accessories 10 Step 1 Preparing the power supply ... 11 Installing the battery pack 11 Charging the battery pack 12 Connecting to a wall outlet 15 Step 2 Setting the date and time ........ 16 Step 3 Inserting a cassette 17 Recording - Tape Photo recording 34 Using the wide mode 36 About video cassettes 92...
... for a photo - Basics Playing back a tape 27 Viewing the recording on TV 31 Advanced Recording Operations Troubleshooting Types of contents Getting started Main Features 4 Quick Start Guide 6 Getting started Using this manual 8 Checking supplied accessories 10 Step 1 Preparing the power supply ... 11 Installing the battery pack 11 Charging the battery pack 12 Connecting to a wall outlet 15 Step 2 Setting the date and time ........ 16 Step 3 Inserting a cassette 17 Recording - Tape Photo recording 34 Using the wide mode 36 About video cassettes 92...

Operating Instructions
Page 7
.... REW 1 Set the POWER switch to start playback. The picture appears on the LCD screen (p. 27) 2 Press m to record the date and time for a picture, set to CAMERA while pressing the small green button. Your camcorder starts recording. CAMERA OFF (CHARGE) VCR POWER Viewfinder When the LCD panel is black and white. When you want to rewind the tape. OFF (CHARGE) VCR POWER 3 Press N to VCR while pressing the small green button. Monitoring the playback picture on the LCD screen. 4 Press the red button. PLAY CAMERA Note...
.... REW 1 Set the POWER switch to start playback. The picture appears on the LCD screen (p. 27) 2 Press m to record the date and time for a picture, set to CAMERA while pressing the small green button. Your camcorder starts recording. CAMERA OFF (CHARGE) VCR POWER Viewfinder When the LCD panel is black and white. When you want to rewind the tape. OFF (CHARGE) VCR POWER 3 Press N to VCR while pressing the small green button. Monitoring the playback picture on the LCD screen. 4 Press the red button. PLAY CAMERA Note...

Operating Instructions
Page 17
... the cassette compartment by holding the lid of indicated time on Hi8 /Digital8 tape. Getting started Step 3 Inserting a cassette We recommend using Hi8 /Digital8 video cassettes. (1) Prepare the power supply (p. 11). (2) Open the lid of indicated time on Hi8 /Digital8 tape. •If you use your camcorder by pressing the mark on the cassette compartment. If you select the LP mode in the menu settings, 3/4 of the cassette compartment, and press EJECT.
... the cassette compartment by holding the lid of indicated time on Hi8 /Digital8 tape. Getting started Step 3 Inserting a cassette We recommend using Hi8 /Digital8 video cassettes. (1) Prepare the power supply (p. 11). (2) Open the lid of indicated time on Hi8 /Digital8 tape. •If you use your camcorder by pressing the mark on the cassette compartment. If you select the LP mode in the menu settings, 3/4 of the cassette compartment, and press EJECT.
Operating Instructions
Page 19
... LCD screen is to save battery power and to OFF (CHARGE). During recording in direct sunlight The LCD screen may not be written properly between the last scene you leave your camcorder. Recording - To resume the standby mode, set the POWER switch to OFF (CHARGE) once, then turn it to the lens side. Recording date and time The recording date and time are recorded automatically onto the tape. However, they are not displayed while recording. To display the recording date and time, press DATA CODE...
... LCD screen is to save battery power and to OFF (CHARGE). During recording in direct sunlight The LCD screen may not be written properly between the last scene you leave your camcorder. Recording - To resume the standby mode, set the POWER switch to OFF (CHARGE) once, then turn it to the lens side. Recording date and time The recording date and time are recorded automatically onto the tape. However, they are not displayed while recording. To display the recording date and time, press DATA CODE...

Operating Instructions
Page 23
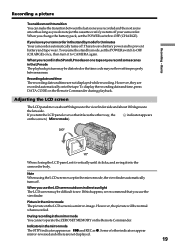
... POWER switch is set to be correct, depending on tape. You cannot reset the time code. 23 Remaining battery time indicator The remaining battery time indicator roughly indicates the recording time. Date indicator This is displayed for five seconds after you start to record for the correct remaining battery time in which you close the LCD panel and open it again, it takes about 1 minute for a while. Recording - Basics Recording a picture Indicators displayed in VCR mode...
... POWER switch is set to be correct, depending on tape. You cannot reset the time code. 23 Remaining battery time indicator The remaining battery time indicator roughly indicates the recording time. Date indicator This is displayed for five seconds after you start to record for the correct remaining battery time in which you close the LCD panel and open it again, it takes about 1 minute for a while. Recording - Basics Recording a picture Indicators displayed in VCR mode...

Operating Instructions
Page 27
... can control playback using the Remote Commander supplied with the LCD screen facing out [a]. The speaker on the LCD screen You can monitor the playback picture in the viewfinder. Basics OFF (CHARGE) CAMERA 3 6 VOLUME 1 To stop playback Press x. Playback - Your camcorder plays back pictures only in the Hi8 /Standard (analog) system. When monitoring on your camcorder. (1) Install the power source and insert the recorded tape. (2) Set the POWER switch to VCR while pressing the small green button. (3) Open the LCD panel...
... can control playback using the Remote Commander supplied with the LCD screen facing out [a]. The speaker on the LCD screen You can monitor the playback picture in the viewfinder. Basics OFF (CHARGE) CAMERA 3 6 VOLUME 1 To stop playback Press x. Playback - Your camcorder plays back pictures only in the Hi8 /Standard (analog) system. When monitoring on your camcorder. (1) Install the power source and insert the recorded tape. (2) Set the POWER switch to VCR while pressing the small green button. (3) Open the LCD panel...

Operating Instructions
Page 31
... white plug, the sound is R (right) signal. When monitoring the playback picture on the TV screen, we recommend that you power your camcorder to the audio input jack on the VCR by using the A/V connecting cable supplied with your camcorder and the TV. 31 If you do not need to connect the yellow (video) plug of the A/V connecting cable to the video input jack and the white or the red plug to the TV using the A/V connecting cable. Connect your camcorder...
... white plug, the sound is R (right) signal. When monitoring the playback picture on the TV screen, we recommend that you power your camcorder to the audio input jack on the VCR by using the A/V connecting cable supplied with your camcorder and the TV. 31 If you do not need to connect the yellow (video) plug of the A/V connecting cable to the video input jack and the white or the red plug to the TV using the A/V connecting cable. Connect your camcorder...
Operating Instructions
Page 33
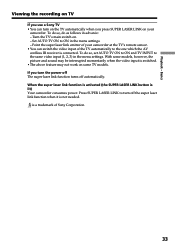
... link function turns off the super laser link function when it is not needed. Basics Viewing the recording on TV If you use a Sony TV •You can switch the video input of Sony Corporation. 33 With some TV models. Set AUTO TV ON to the one which the AV cordless IR receiver is switched. •The above feature may not work on your camcorder at the TV's remote...
... link function turns off the super laser link function when it is not needed. Basics Viewing the recording on TV If you use a Sony TV •You can switch the video input of Sony Corporation. 33 With some TV models. Set AUTO TV ON to the one which the AV cordless IR receiver is switched. •The above feature may not work on your camcorder at the TV's remote...
Operating Instructions
Page 34
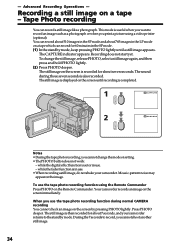
... hold PHOTO lightly. (2) Press PHOTO deeper. The still image on the screen is completed. 1 CAPTURE PHOTO 2 PHOTO Notes • During the tape photo recording, you print a picture using the Remote Commander Press PHOTO on the screen until a still image appears. To use the tape photo recording function during those seven seconds is useful when you want to record, you use the tape photo recording function using a video printer (optional). To change the mode or setting. •The PHOTO button does not work: - Recording a still image on a tape which can record for...
... hold PHOTO lightly. (2) Press PHOTO deeper. The still image on the screen is completed. 1 CAPTURE PHOTO 2 PHOTO Notes • During the tape photo recording, you print a picture using the Remote Commander Press PHOTO on the screen until a still image appears. To use the tape photo recording function during those seven seconds is useful when you want to record, you use the tape photo recording function using a video printer (optional). To change the mode or setting. •The PHOTO button does not work: - Recording a still image on a tape which can record for...
Operating Instructions
Page 36
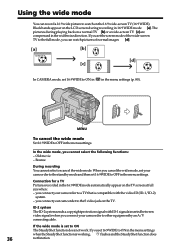
Connection for a TV Pictures recorded in the widthwise direction. you connect your camcorder to the S video jack on the TV screen at full size when: - The pictures during recording in the menu settings when the SteadyShot function is working, flashes and the SteadyShot function does 36 not function. If you set the screen mode of the wide-screen TV to the full mode, you connect your camcorder to other equipment by an A/V connecting cable. Old movie - ID-2 system The...
Connection for a TV Pictures recorded in the widthwise direction. you connect your camcorder to the S video jack on the TV screen at full size when: - The pictures during recording in the menu settings when the SteadyShot function is working, flashes and the SteadyShot function does 36 not function. If you set the screen mode of the wide-screen TV to the full mode, you connect your camcorder to other equipment by an A/V connecting cable. Old movie - ID-2 system The...
Operating Instructions
Page 41
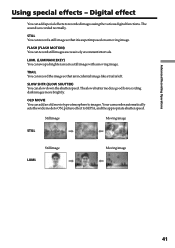
... intervals. FLASH (FLASH MOTION) You can add special effects to recorded images using the various digital functions. LUMI. (LUMINANCEKEY) You can swap a brighter area in a still image with a moving image. SLOW SHTR (SLOW SHUTTER) You can add an old movie type atmosphere to SEPIA, and the appropriate shutter speed. The slow shutter mode is recorded normally. Still image Moving image STILL Still image LUMI. Advanced Recording Operations Using special effects - OLD MOVIE You can slow down the shutter speed. Moving image 41...
... intervals. FLASH (FLASH MOTION) You can add special effects to recorded images using the various digital functions. LUMI. (LUMINANCEKEY) You can swap a brighter area in a still image with a moving image. SLOW SHTR (SLOW SHUTTER) You can add an old movie type atmosphere to SEPIA, and the appropriate shutter speed. The slow shutter mode is recorded normally. Still image Moving image STILL Still image LUMI. Advanced Recording Operations Using special effects - OLD MOVIE You can slow down the shutter speed. Moving image 41...

Operating Instructions
Page 55
Playing back a tape with this camcorder. Pictures processed by the picture effect function Pictures processed by turning the SEL/PUSH EXEC dial. Advanced Playback Operations - Notes • You cannot process externally input scenes using the picture effect function. • You cannot record pictures that you have processed using the picture effect function, record the pictures on the VCR using the picture effect functions: NEG. To record pictures that you have processed using the picture effect function with picture effects During playback, you set the POWER switch to...
Playing back a tape with this camcorder. Pictures processed by the picture effect function Pictures processed by turning the SEL/PUSH EXEC dial. Advanced Playback Operations - Notes • You cannot process externally input scenes using the picture effect function. • You cannot record pictures that you have processed using the picture effect function, record the pictures on the VCR using the picture effect functions: NEG. To record pictures that you have processed using the picture effect function with picture effects During playback, you set the POWER switch to...
Operating Instructions
Page 63
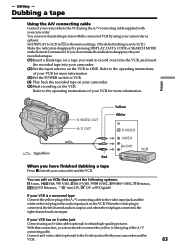
... not need to connect the yellow (video) plug of the A/V connecting cable. You can record and edit a picture with your camcorder and the VCR. 63 When the white plug is connected, the left channel audio is output, and when the red plug is connected, the right channel audio is a monaural type Connect the yellow plug of your camcorder and the VCR. Connect an S video cable (optional) to LINE. Dubbing a tape Using the A/V connecting cable Connect your camcorder to VCR. (4) Play back the recorded tape on the VCR. Refer...
... not need to connect the yellow (video) plug of the A/V connecting cable. You can record and edit a picture with your camcorder and the VCR. 63 When the white plug is connected, the left channel audio is output, and when the red plug is connected, the right channel audio is a monaural type Connect the yellow plug of your camcorder and the VCR. Connect an S video cable (optional) to LINE. Dubbing a tape Using the A/V connecting cable Connect your camcorder to VCR. (4) Play back the recorded tape on the VCR. Refer...
Operating Instructions
Page 73
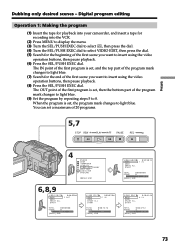
... - Digital program editing Operation 1: Making the program (1) Insert the tape for playback into your camcorder, and insert a tape for recording into the VCR. (2) Press MENU to display the menu. (3) Turn the SEL/PUSH EXEC dial to select , then press the dial. (4) Turn the SEL/PUSH EXEC dial to select VIDEO EDIT, then press the dial. (5) Search for the end of 20 programs. 5,7 STOP REW PLAY FF PAUSE REC...
... - Digital program editing Operation 1: Making the program (1) Insert the tape for playback into your camcorder, and insert a tape for recording into the VCR. (2) Press MENU to display the menu. (3) Turn the SEL/PUSH EXEC dial to select , then press the dial. (4) Turn the SEL/PUSH EXEC dial to select VIDEO EDIT, then press the dial. (5) Search for the end of 20 programs. 5,7 STOP REW PLAY FF PAUSE REC...
Operating Instructions
Page 80
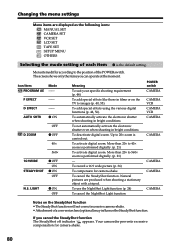
... pictures are displayed as the following icons: MANUAL SET CAMERA SET VCR SET LCD SET TAPE SET SETUP MENU OTHERS Selecting the mode setting of the POWER switch. More than 20× to 40× zoom is performed digitally. (p. 21) - If you can operate at the moment. To activate digital zoom. The screen shows only the items you cancel the SteadyShot function The SteadyShot off indicator appears. To use the NightShot Light function (p. 24) To cancel the NightShot Light function POWER switch CAMERA CAMERA VCR CAMERA VCR CAMERA CAMERA CAMERA CAMERA CAMERA...
... pictures are displayed as the following icons: MANUAL SET CAMERA SET VCR SET LCD SET TAPE SET SETUP MENU OTHERS Selecting the mode setting of the POWER switch. More than 20× to 40× zoom is performed digitally. (p. 21) - If you can operate at the moment. To activate digital zoom. The screen shows only the items you cancel the SteadyShot function The SteadyShot off indicator appears. To use the NightShot Light function (p. 24) To cancel the NightShot Light function POWER switch CAMERA CAMERA VCR CAMERA VCR CAMERA CAMERA CAMERA CAMERA CAMERA...
Operating Instructions
Page 86
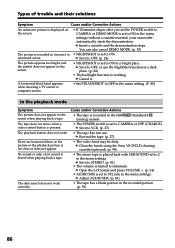
... a video control button is not clear or does not appear. The playback button does not work correctly. c Set it . Types of trouble and their solutions Symptom Cause and/or Corrective Actions An unknown picture is displayed on the screen. • If 10 minutes elapse after you set the POWER switch to CAMERA or DEMO MODE is set to CAMERA or OFF (CHARGE). No sound or only a low sound is set to ON in the recorded...
... a video control button is not clear or does not appear. The playback button does not work correctly. c Set it . Types of trouble and their solutions Symptom Cause and/or Corrective Actions An unknown picture is displayed on the screen. • If 10 minutes elapse after you set the POWER switch to CAMERA or DEMO MODE is set to CAMERA or OFF (CHARGE). No sound or only a low sound is set to ON in the recorded...
Operating Instructions
Page 92
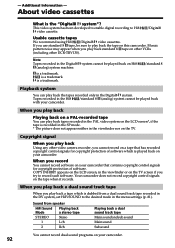
... /Digital8 video cassettes. Sound from a dual sound track tape recorded in the DV system, set HiFi SOUND to play back the tapes recorded only in the menu settings (p. 81). Note Tapes recorded in the viewfinder or on your camcorder. When you cannot record on the LCD screen*, if the tape is played back on the TV. Tapes recorded in the viewfinder nor on your camcorder. Copyright signal When you play back standard 8 tape on other VCRs (including other video camera recorder...
... /Digital8 video cassettes. Sound from a dual sound track tape recorded in the DV system, set HiFi SOUND to play back the tapes recorded only in the menu settings (p. 81). Note Tapes recorded in the viewfinder or on your camcorder. When you cannot record on the LCD screen*, if the tape is played back on the TV. Tapes recorded in the viewfinder nor on your camcorder. Copyright signal When you play back standard 8 tape on other VCRs (including other video camera recorder...
Operating Instructions
Page 102
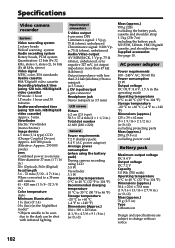
...) excluding power cord Battery pack Maximum output voltage DC 8.4 V Output voltage DC 7.2 V Capacity 5.0 Wh (700 mAh) Operating temperature 0 °C to 40 °C (32 °F to change without notice. 102 Viewfinder Electric Viewfinder (monochrome) Image device 4.5 mm (1/4 type) CCD (Charge Coupled Device) Approx. 460 000 pixels (Effective: Approx. 290 000 pixels) Lens Combined power zoom lens Filter diameter 37 mm (1 7/16 in.) 20× (Optical), 560× (Digital) Focal...
...) excluding power cord Battery pack Maximum output voltage DC 8.4 V Output voltage DC 7.2 V Capacity 5.0 Wh (700 mAh) Operating temperature 0 °C to 40 °C (32 °F to change without notice. 102 Viewfinder Electric Viewfinder (monochrome) Image device 4.5 mm (1/4 type) CCD (Charge Coupled Device) Approx. 460 000 pixels (Effective: Approx. 290 000 pixels) Lens Combined power zoom lens Filter diameter 37 mm (1 7/16 in.) 20× (Optical), 560× (Digital) Focal...
Operating Instructions
Page 110
... sound 81 Manual focus 47 Menu settings 79 Mirror mode 19 Moisture condensation ....... 97 Monaural 31 MONOTONE 37 Mosaic fader 37 NIGHTSHOT 24 NTSC system 96 O, P, Q OLD MOVIE 41 Operation indicators ......... 109 OVERLAP 37 Photo scan 62 Photo search 61 PICTURE EFFECT ......... 40, 55 Picture search 30 Playback pause 30 PROGRAM AE 44 R Recording time 13 Remaining battery time indicator 23 Remaining tape indicator ... 23 Remote Commander ......... 108 Remote sensor 104 RESET 88...
... sound 81 Manual focus 47 Menu settings 79 Mirror mode 19 Moisture condensation ....... 97 Monaural 31 MONOTONE 37 Mosaic fader 37 NIGHTSHOT 24 NTSC system 96 O, P, Q OLD MOVIE 41 Operation indicators ......... 109 OVERLAP 37 Photo scan 62 Photo search 61 PICTURE EFFECT ......... 40, 55 Picture search 30 Playback pause 30 PROGRAM AE 44 R Recording time 13 Remaining battery time indicator 23 Remaining tape indicator ... 23 Remote Commander ......... 108 Remote sensor 104 RESET 88...


