Operating Instructions
Page 2
... cannot use any of a "Memory Stick PRO Duo." Otherwise, the media may be damaged, recorded images may result in a malfunction of your camcorder to insert the connector plug in this Handbook) The operations and handling of your camcorder. Disconnect the AC Adaptor from the Handycam Station holding both the Handycam Station and the DC plug (DCR-SR55E/SR65E/ SR75E/SR85E). Be sure to turn the POWER switch to...
... cannot use any of a "Memory Stick PRO Duo." Otherwise, the media may be damaged, recorded images may result in a malfunction of your camcorder to insert the connector plug in this Handbook) The operations and handling of your camcorder. Disconnect the AC Adaptor from the Handycam Station holding both the Handycam Station and the DC plug (DCR-SR55E/SR65E/ SR75E/SR85E). Be sure to turn the POWER switch to...
Operating Instructions
Page 3
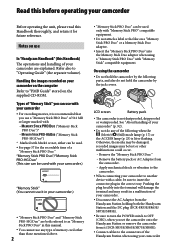
... image and sound are recorded without notice. In this Handbook, the hard disk of your camcorder and "Memory Stick PRO Duo" are called "media." Unless otherwise specifically indicated, illustrations in color) that is grayed out is not available under the current recording or playback conditions. The LCD screen is not possible due to direct sunlight for illustrating the operating procedures. Unauthorized recording of a Carl Zeiss lens. About changing the language setting...
... image and sound are recorded without notice. In this Handbook, the hard disk of your camcorder and "Memory Stick PRO Duo" are called "media." Unless otherwise specifically indicated, illustrations in color) that is grayed out is not available under the current recording or playback conditions. The LCD screen is not possible due to direct sunlight for illustrating the operating procedures. Unauthorized recording of a Carl Zeiss lens. About changing the language setting...

Operating Instructions
Page 4
.... When using a VCR, or a DVD/HDD recorder (p. 46). Doing so may damage the hard disk drive of the camcorder may not be recognized, or recording or playback may not be possible. Especially, during recording/playback, do not apply vibration or shock to your camcorder The hard disk of your data. Notes on the camcorder, due to remove the battery pack or the AC Adaptor after turning off the POWER switch.
.... When using a VCR, or a DVD/HDD recorder (p. 46). Doing so may damage the hard disk drive of the camcorder may not be recognized, or recording or playback may not be possible. Especially, during recording/playback, do not apply vibration or shock to your camcorder The hard disk of your data. Notes on the camcorder, due to remove the battery pack or the AC Adaptor after turning off the POWER switch.

Operating Instructions
Page 6
... setup items) Activating functions using the OPTION MENU 69 Using the OPTION MENU 69 Recording items on the OPTION MENU 70 Viewing items on the OPTION MENU... 70 Functions set in the OPTION MENU 71 Troubleshooting Troubleshooting 76 Warning indicators and messages...... 83 Additional Information Using your camcorder abroad 87 File/folder structure on the camcorder hard disk and "Memory Stick PRO Duo 89 Maintenance and precautions 90 Quick Reference Identifying parts and controls 96 Indicators displayed during recording/ playback 102...
... setup items) Activating functions using the OPTION MENU 69 Using the OPTION MENU 69 Recording items on the OPTION MENU 70 Viewing items on the OPTION MENU... 70 Functions set in the OPTION MENU 71 Troubleshooting Troubleshooting 76 Warning indicators and messages...... 83 Additional Information Using your camcorder abroad 87 File/folder structure on the camcorder hard disk and "Memory Stick PRO Duo 89 Maintenance and precautions 90 Quick Reference Identifying parts and controls 96 Indicators displayed during recording/ playback 102...

Operating Instructions
Page 16
... . DCR-SR55E/SR65E/SR75E/SR85E: Battery pack NP-FH40 (supplied) NP-FH50 NP-FH70 NP-FH100 Playback time* 120 140 140 165 300 350 680 785 Top: When the media is set to the hard disk Bottom: When the media is set to the wall outlet (wall socket) via the AC Adaptor. On the battery pack Before changing the battery pack, turn the POWER switch...
... . DCR-SR55E/SR65E/SR75E/SR85E: Battery pack NP-FH40 (supplied) NP-FH50 NP-FH70 NP-FH100 Playback time* 120 140 140 165 300 350 680 785 Top: When the media is set to the hard disk Bottom: When the media is set to the wall outlet (wall socket) via the AC Adaptor. On the battery pack Before changing the battery pack, turn the POWER switch...

Operating Instructions
Page 18
Changing the language setting You can be ready to shoot after the power is turned on -screen displays to show messages in a specified language. It takes a few seconds for information concerning "World time difference." If the buttons on the touch panel do not appear during playback ([DATA CODE], p. 62). Refer to page 88 for your camcorder unoperated for approximately 5 minutes, to save battery power ([A.SHUT OFF], p. 67...
Changing the language setting You can be ready to shoot after the power is turned on -screen displays to show messages in a specified language. It takes a few seconds for information concerning "World time difference." If the buttons on the touch panel do not appear during playback ([DATA CODE], p. 62). Refer to page 88 for your camcorder unoperated for approximately 5 minutes, to save battery power ([A.SHUT OFF], p. 67...

Operating Instructions
Page 20
... screen. : Hard disk : "Memory Stick PRO Duo" 20 To confirm the media setting Turn the POWER switch repeatedly to set. 4 Touch [YES] . Step 5: Selecting the media You can do recording/playback/editing operations for movies and still images. Hard Disk 2 Touch [MOVIE MEDIA SET] to select the media for movies, and touch [PHOTO MEDIA SET] to change the media, reselect the media. The recordable time with [SP] recording mode (the default setting) is as the recording/playback/ editing media on your camcorder (p. 102). 1 Touch (HOME) (MANAGE MEDIA...
... screen. : Hard disk : "Memory Stick PRO Duo" 20 To confirm the media setting Turn the POWER switch repeatedly to set. 4 Touch [YES] . Step 5: Selecting the media You can do recording/playback/editing operations for movies and still images. Hard Disk 2 Touch [MOVIE MEDIA SET] to select the media for movies, and touch [PHOTO MEDIA SET] to change the media, reselect the media. The recordable time with [SP] recording mode (the default setting) is as the recording/playback/ editing media on your camcorder (p. 102). 1 Touch (HOME) (MANAGE MEDIA...

Operating Instructions
Page 24
... can slow down the playback speed by touching / during Easy Handycam operation Press (HOME) (or ) to display the menu items available for setup changes (p. 9, 56). Notes Most of some buttons/functions during Easy Handycam operation.] appears. 24 Tips When playback from the LCD screen. from the selected movie reaches the last movie, the screen returns to the [VISUAL INDEX] screen. You can adjust the volume...
... can slow down the playback speed by touching / during Easy Handycam operation Press (HOME) (or ) to display the menu items available for setup changes (p. 9, 56). Notes Most of some buttons/functions during Easy Handycam operation.] appears. 24 Tips When playback from the LCD screen. from the selected movie reaches the last movie, the screen returns to the [VISUAL INDEX] screen. You can adjust the volume...
Operating Instructions
Page 34
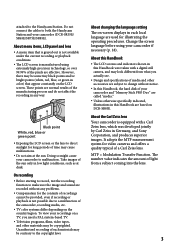
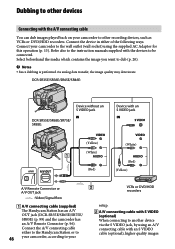
... instruction manuals supplied with the devices to the wall outlet (wall socket) using an A/V connecting cable with an S VIDEO 34 cable (optional), higher quality images VCRs or TVs can be connected. Connecting only the S VIDEO plug will not output audio. Notes Do not connect A/V connecting cables to both your camcorder to be produced than with an S VIDEO cable (optional). The yellow plug connection is not necessary. Connect the white and red plugs (left/right audio) and the S VIDEO plug (S VIDEO...
... instruction manuals supplied with the devices to the wall outlet (wall socket) using an A/V connecting cable with an S VIDEO 34 cable (optional), higher quality images VCRs or TVs can be connected. Connecting only the S VIDEO plug will not output audio. Notes Do not connect A/V connecting cables to both your camcorder to be produced than with an S VIDEO cable (optional). The yellow plug connection is not necessary. Connect the white and red plugs (left/right audio) and the S VIDEO plug (S VIDEO...
Operating Instructions
Page 46
... using the supplied AC Adaptor for this operation (p. 13). Refer also to the instruction manuals supplied with the devices to other recording devices, such as VCRs or DVD/HDD recorders. Connect the device in either to the Handycam Station or to 46 your camcorder, according to your VCRs or DVD/HDD recorders setup. A/V connecting cable with S VIDEO (optional) When connecting to another device via analog data transfer, the image quality may deteriorate. Dubbing to other devices Connecting with the A/V connecting cable...
... using the supplied AC Adaptor for this operation (p. 13). Refer also to the instruction manuals supplied with the devices to other recording devices, such as VCRs or DVD/HDD recorders. Connect the device in either to the Handycam Station or to 46 your camcorder, according to your VCRs or DVD/HDD recorders setup. A/V connecting cable with S VIDEO (optional) When connecting to another device via analog data transfer, the image quality may deteriorate. Dubbing to other devices Connecting with the A/V connecting cable...

Operating Instructions
Page 47
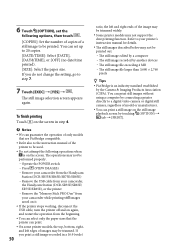
... (VIEW IMAGES). To record the date/time and camera settings data, display them on the screen (p. 62). When you are connecting your camcorder to a monaural device, connect the yellow plug of the A/V connecting cable to the video input jack, and the red (right channel) or the white (left /right audio) and the S VIDEO plug (S VIDEO channel) of the recording device. 4 Start playback on your camcorder, and record it to the input mode. 3 Connect your camcorder to the instruction manuals supplied with S VIDEO (optional) . Connect the white and red plugs...
... (VIEW IMAGES). To record the date/time and camera settings data, display them on the screen (p. 62). When you are connecting your camcorder to a monaural device, connect the yellow plug of the A/V connecting cable to the video input jack, and the red (right channel) or the white (left /right audio) and the S VIDEO plug (S VIDEO channel) of the recording device. 4 Start playback on your camcorder, and record it to the input mode. 3 Connect your camcorder to the instruction manuals supplied with S VIDEO (optional) . Connect the white and red plugs...
Operating Instructions
Page 50
..., then touch . [COPIES]: Set the number of copies of the image may not support the date printing function. To finish printing Touch on the screen. The operations may not be performed properly. Operate the POWER switch Press (VIEW IMAGES) Remove your camcorder from the Handycam Station (DCR-SR55E/SR65E/SR75E/SR85E) Remove the USB cable from your camcorder, the Handycam Station (DCR-SR55E/SR65E/ SR75E/SR85E), or the printer Remove the "Memory Stick PRO Duo" from...
..., then touch . [COPIES]: Set the number of copies of the image may not support the date printing function. To finish printing Touch on the screen. The operations may not be performed properly. Operate the POWER switch Press (VIEW IMAGES) Remove your camcorder from the Handycam Station (DCR-SR55E/SR65E/SR75E/SR85E) Remove the USB cable from your camcorder, the Handycam Station (DCR-SR55E/SR65E/ SR75E/SR85E), or the printer Remove the "Memory Stick PRO Duo" from...
Operating Instructions
Page 51
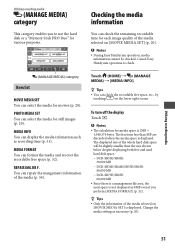
... to check. Touch (HOME) (MANAGE MEDIA) [MEDIA INFO]. Tips You can display the media infomation such as necessary (p. 20). Cancel Easy Handycam operation to use the hard disk or a "Memory Stick PRO Duo" for movies (p. 20). Checking the media information You can format the media and recover the recordable free space (p. 52). MEDIA FORMAT You can check the remaining recordable time for still images (p. 20). Change the media setting as recording time (p. 51). To turn off the display Touch...
... to check. Touch (HOME) (MANAGE MEDIA) [MEDIA INFO]. Tips You can display the media infomation such as necessary (p. 20). Cancel Easy Handycam operation to use the hard disk or a "Memory Stick PRO Duo" for movies (p. 20). Checking the media information You can format the media and recover the recordable free space (p. 52). MEDIA FORMAT You can check the remaining recordable time for still images (p. 20). Change the media setting as recording time (p. 51). To turn off the display Touch...
Operating Instructions
Page 57
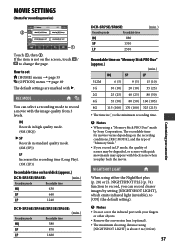
... recording time. Notes When using a "Memory Stick PRO Duo" made by setting [NIGHTSHOT LIGHT], which emits infrared light (invisible), to [ON] (the default setting). Notes Do not cover the infrared port with . REC MODE You can select a recording mode to record, you play back the movie. NIGHTSHOT PLS] (p. 74) function to record a movie with block noise when you can record clearer images by Sony Corporation. NIGHTSHOT LIGHT When using [NIGHTSHOT LIGHT...
... recording time. Notes When using a "Memory Stick PRO Duo" made by setting [NIGHTSHOT LIGHT], which emits infrared light (invisible), to [ON] (the default setting). Notes Do not cover the infrared port with . REC MODE You can select a recording mode to record, you play back the movie. NIGHTSHOT PLS] (p. 74) function to record a movie with block noise when you can record clearer images by Sony Corporation. NIGHTSHOT LIGHT When using [NIGHTSHOT LIGHT...

Operating Instructions
Page 75
... set [BLT-IN ZOOM MIC] to [ON]( ), you can add an old movie effect to [ON], appears. To cancel [D.EFFECT], touch [OFF]. SEPIA Images appear in black and white. This setting is recorded after about 10 seconds. Customizing your camcorder 75 D.EFFECT (Digital effect) When you select [OLD MOVIE], appears and you can record a movie and control the recording sound level as a pale pastel drawing. BLT-IN ZOOM MIC (Builtin zoom microphone...
... set [BLT-IN ZOOM MIC] to [ON]( ), you can add an old movie effect to [ON], appears. To cancel [D.EFFECT], touch [OFF]. SEPIA Images appear in black and white. This setting is recorded after about 10 seconds. Customizing your camcorder 75 D.EFFECT (Digital effect) When you select [OLD MOVIE], appears and you can record a movie and control the recording sound level as a pale pastel drawing. BLT-IN ZOOM MIC (Builtin zoom microphone...
Operating Instructions
Page 76
... hard disk (p. 36) on the hard disk in a cool place. The temperature of your camcorder is set to the default settings. During Easy Handycam operation, some menu items are fixed as follows. [REC MODE]: [SP] [DATA CODE]: [DATE/TIME] The following menu items return to shoot after about 1 minute. However, your camcorder for a while, then turn on. Attach a charged battery pack to the camcorder (p. 13). Connect the plug of data...
... hard disk (p. 36) on the hard disk in a cool place. The temperature of your camcorder is set to the default settings. During Easy Handycam operation, some menu items are fixed as follows. [REC MODE]: [SP] [DATA CODE]: [DATE/TIME] The following menu items return to shoot after about 1 minute. However, your camcorder for a while, then turn on. Attach a charged battery pack to the camcorder (p. 13). Connect the plug of data...
Operating Instructions
Page 77
...Easy Handycam operation. [MOVIE MEDIA SET] [PHOTO MEDIA SET] [FILE NO.] [VOLUME] [TV TYPE] [ DISPLAY] [BEEP] [ INDEX SET] [CLOCK SET] [AREA SET] [SUMMERTIME] [WIDE SELECT] [ IMAGE SIZE] [DEMO MODE] [ LANGUAGE SET] [FLASH MODE]*1 *1 DCR-SR55E/SR65E/SR75E/SR85E Your camcorder gets warm. This is automatically turned off (A.SHUT OFF). Otherwise, the Remote Commander may not function properly. Batteries/Power sources The power abruptly turns off...
...Easy Handycam operation. [MOVIE MEDIA SET] [PHOTO MEDIA SET] [FILE NO.] [VOLUME] [TV TYPE] [ DISPLAY] [BEEP] [ INDEX SET] [CLOCK SET] [AREA SET] [SUMMERTIME] [WIDE SELECT] [ IMAGE SIZE] [DEMO MODE] [ LANGUAGE SET] [FLASH MODE]*1 *1 DCR-SR55E/SR65E/SR75E/SR85E Your camcorder gets warm. This is automatically turned off (A.SHUT OFF). Otherwise, the Remote Commander may not function properly. Batteries/Power sources The power abruptly turns off...

Operating Instructions
Page 90
... operation of all types of "Memory Stick" on the combination of "Memory Stick" Recording/ Playback "Memory Stick Duo" (without a "Memory Stick PRO Duo" attached. "M2" is the abbreviation for the "Memory Stick Micro." A "Memory Stick PRO Duo" formatted by a computer (Windows OS/Mac OS) does not have guaranteed compatibility with your camcorder. Data read/write speed may vary depending on your camcorder is reading or writing image files on your camcorder. (See the list below for replacement...
... operation of all types of "Memory Stick" on the combination of "Memory Stick" Recording/ Playback "Memory Stick Duo" (without a "Memory Stick PRO Duo" attached. "M2" is the abbreviation for the "Memory Stick Micro." A "Memory Stick PRO Duo" formatted by a computer (Windows OS/Mac OS) does not have guaranteed compatibility with your camcorder. Data read/write speed may vary depending on your camcorder is reading or writing image files on your camcorder. (See the list below for replacement...

Operating Instructions
Page 91
... CHG (charge) lamp turns off. We recommend using a large capacity battery pack: NP-FH70/FH100 (optional). Be sure to set the POWER switch to warm it up, and insert it in an ambient temperature of your camcorder, and displays the remaining battery time in some regions.) If you need a Duo-sized M2 Adaptor. An "InfoLITHIUM" battery pack is in recording standby or playback pause. ...
... CHG (charge) lamp turns off. We recommend using a large capacity battery pack: NP-FH70/FH100 (optional). Be sure to set the POWER switch to warm it up, and insert it in an ambient temperature of your camcorder, and displays the remaining battery time in some regions.) If you need a Duo-sized M2 Adaptor. An "InfoLITHIUM" battery pack is in recording standby or playback pause. ...

Operating Instructions
Page 106
... Creating 44 ERASE 45 ERASE ALL 45 MOVE 45 Playback 44 PLAYLIST EDIT 44 PORTRAIT 73 Power cord (Mains lead)....... 13 Pre-installed rechargeable battery 94 Print 49 Printer 49 Q QUICK ON 27 QUICK ON STBY 67 R REC MODE 57 Recording 22, 25 Recording time 15 REDEYE REDUC 61 Remaining Battery 14 Hard disk 51 "Memory Stick PRO Duo 51 REMAINING SET (movie 59 Remote Commander........... 100 REMOTE CTRL (Remote control 67 Repairing the image database file 54 RESET button 97...
... Creating 44 ERASE 45 ERASE ALL 45 MOVE 45 Playback 44 PLAYLIST EDIT 44 PORTRAIT 73 Power cord (Mains lead)....... 13 Pre-installed rechargeable battery 94 Print 49 Printer 49 Q QUICK ON 27 QUICK ON STBY 67 R REC MODE 57 Recording 22, 25 Recording time 15 REDEYE REDUC 61 Remaining Battery 14 Hard disk 51 "Memory Stick PRO Duo 51 REMAINING SET (movie 59 Remote Commander........... 100 REMOTE CTRL (Remote control 67 Repairing the image database file 54 RESET button 97...


