
Operating Instructions
Page 2
... to alert the user to Part 15 of the FCC Rules. Owner's Record The model and serial numbers are provided for a Class B digital device, pursuant to the presence of important operating and maintenance (servicing) instructions in the literature accompanying the appliance. The use this apparatus near any changes or modifications not expressly approved in this manual could void your Sony dealer regarding this...
... to alert the user to Part 15 of the FCC Rules. Owner's Record The model and serial numbers are provided for a Class B digital device, pursuant to the presence of important operating and maintenance (servicing) instructions in the literature accompanying the appliance. The use this apparatus near any changes or modifications not expressly approved in this manual could void your Sony dealer regarding this...
Operating Instructions
Page 3
... the remote. About the S-AIR function The system is compatible with the system: • Surround amplifier: You can enjoy surround speaker sound wirelessly. • S-AIR receiver: You can enjoy system sound in particular, specifies that the AC power cord (mains lead) can be used as power-supply cord or plug is required when the apparatus has been damaged in any way, such as a general term for a DVD VIDEO, DVD+RW/DVD+R, and DVD-RW/DVD-R. •...
... the remote. About the S-AIR function The system is compatible with the system: • Surround amplifier: You can enjoy surround speaker sound wirelessly. • S-AIR receiver: You can enjoy system sound in particular, specifies that the AC power cord (mains lead) can be used as power-supply cord or plug is required when the apparatus has been damaged in any way, such as a general term for a DVD VIDEO, DVD+RW/DVD+R, and DVD-RW/DVD-R. •...
Operating Instructions
Page 4
... Sound 46 (A/V SYNC) Playing MP3 Files/JPEG Image Files .. 47 Playing MP3 Files and JPEG Image Files as a Slide Show with Sound .. 50 Playing a VIDEO CD with PBC Functions (Ver.2.0 51 (PBC Playback) Sound Adjustments Enjoying Surround Sound by Using Decoding Mode 52 Selecting the Sound Mode 54 Adjusting the Bass, Middle, and Treble Level 55 Tuner Functions Presetting Radio Stations 56 Listening to the Radio 57 Control for HDMI/External Audio Device Using the Control for HDMI Function for "BRAVIA" Sync 59 Using the DIGITAL MEDIA PORT Adapter...
... Sound 46 (A/V SYNC) Playing MP3 Files/JPEG Image Files .. 47 Playing MP3 Files and JPEG Image Files as a Slide Show with Sound .. 50 Playing a VIDEO CD with PBC Functions (Ver.2.0 51 (PBC Playback) Sound Adjustments Enjoying Surround Sound by Using Decoding Mode 52 Selecting the Sound Mode 54 Adjusting the Bass, Middle, and Treble Level 55 Tuner Functions Presetting Radio Stations 56 Listening to the Radio 57 Control for HDMI/External Audio Device Using the Control for HDMI Function for "BRAVIA" Sync 59 Using the DIGITAL MEDIA PORT Adapter...
Operating Instructions
Page 5
... Panel Display 72 Changing the Display Mode 73 (INFORMATION MODE) Changing the Display Appearance of the Soft-touch Buttons 73 (ILLUMINATION MODE) Advanced Settings and Adjustments Restricting Playback of the Disc........... 75 (PARENTAL CONTROL) Calibrating the Appropriate Settings Automatically 77 (AUTO CALIBRATION) Using the Setup Display 79 Setting the Display or Sound Track Language 80 [LANGUAGE SETUP] Settings for the Display 80 [VIDEO SETUP] Settings for the HDMI 82 [HDMI SETUP] Settings for the Audio 83 [AUDIO SETUP] Other Settings 84 [SYSTEM SETUP] Settings for the Speakers...
... Panel Display 72 Changing the Display Mode 73 (INFORMATION MODE) Changing the Display Appearance of the Soft-touch Buttons 73 (ILLUMINATION MODE) Advanced Settings and Adjustments Restricting Playback of the Disc........... 75 (PARENTAL CONTROL) Calibrating the Appropriate Settings Automatically 77 (AUTO CALIBRATION) Using the Setup Display 79 Setting the Display or Sound Track Language 80 [LANGUAGE SETUP] Settings for the Display 80 [VIDEO SETUP] Settings for the HDMI 82 [HDMI SETUP] Settings for the Audio 83 [AUDIO SETUP] Other Settings 84 [SYSTEM SETUP] Settings for the Speakers...
Operating Instructions
Page 20
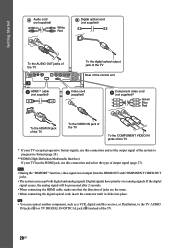
...; When connecting the HDMI cable, make sure that the direction of output signal (page 27). Note • During the "DMPORT" function, video signal is not output from the HDMI OUT and COMPONENT VIDEO OUT jacks. • The system can connect another component, such as a VCR, digital satellite receiver, or PlayStation, to progressive format (page 28). ** HDMI (High-Definition Multimedia Interface) If your TV has the HDMI jack, use this connection and select the type of jacks are the...
...; When connecting the HDMI cable, make sure that the direction of output signal (page 27). Note • During the "DMPORT" function, video signal is not output from the HDMI OUT and COMPONENT VIDEO OUT jacks. • The system can connect another component, such as a VCR, digital satellite receiver, or PlayStation, to progressive format (page 28). ** HDMI (High-Definition Multimedia Interface) If your TV has the HDMI jack, use this connection and select the type of jacks are the...
Operating Instructions
Page 25
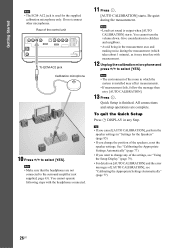
...-AC2 jack on the TV screen. VIDEO SETUP TV TYPE: 16:9 PROGRESSIVE (COMPONENT OUT): 16:9 4:3 OUTPUT: 4:3 LETTER BOX BLACK LEVEL: 4:3 PAN SCAN BLACK LEVEL (COMPONENT OUT): OFF PAUSE MODE: AUTO 1 Turn on . If this message does not appear, recall the Quick Setup display (page 27) and perform again. 7 Press X/x to make the basic adjustments for selecting the language used in the selected language. 6 Press . Set up the calibration microphone at the bottom of video output to select...
...-AC2 jack on the TV screen. VIDEO SETUP TV TYPE: 16:9 PROGRESSIVE (COMPONENT OUT): 16:9 4:3 OUTPUT: 4:3 LETTER BOX BLACK LEVEL: 4:3 PAN SCAN BLACK LEVEL (COMPONENT OUT): OFF PAUSE MODE: AUTO 1 Turn on . If this message does not appear, recall the Quick Setup display (page 27) and perform again. 7 Press X/x to make the basic adjustments for selecting the language used in the selected language. 6 Press . Set up the calibration microphone at the bottom of video output to select...
Operating Instructions
Page 26
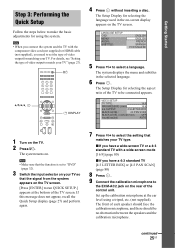
...; Loud test sound is used for the Speakers" (page 85). • If you want to select [YES]. Quick Setup is installed may interfere with the headphones connected. 11 Press . [AUTO CALIBRATION] starts. To quit the Quick Setup Press DISPLAY in the measurement area and making noise during the measurement. Rear of the speakers, reset the speaker settings. You cannot operate following steps with measurement. 12 Unplug the calibration microphone and press C/c to the surround amplifier...
...; Loud test sound is used for the Speakers" (page 85). • If you want to select [YES]. Quick Setup is installed may interfere with the headphones connected. 11 Press . [AUTO CALIBRATION] starts. To quit the Quick Setup Press DISPLAY in the measurement area and making noise during the measurement. Rear of the speakers, reset the speaker settings. You cannot operate following steps with measurement. 12 Unplug the calibration microphone and press C/c to the surround amplifier...
Operating Instructions
Page 27
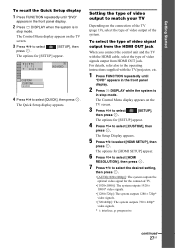
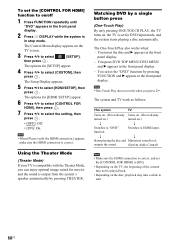
... video signals output from the HDMI OUT jack When you connect the control unit and the TV with the TV/projector, etc. 1 Press FUNCTION repeatedly until "DVD" appears in the front panel display. 2 Press DISPLAY when the system is in stop mode. The Control Menu display appears on the TV screen. 3 Press X/x to select press . [SETUP], then The options for [SETUP] appear. 4 Press X/x to select [SETUP], then press . Getting Started To recall the Quick Setup display...
... video signals output from the HDMI OUT jack When you connect the control unit and the TV with the TV/projector, etc. 1 Press FUNCTION repeatedly until "DVD" appears in the front panel display. 2 Press DISPLAY when the system is in stop mode. The Control Menu display appears on the TV screen. 3 Press X/x to select press . [SETUP], then The options for [SETUP] appear. 4 Press X/x to select [SETUP], then press . Getting Started To recall the Quick Setup display...
Operating Instructions
Page 51
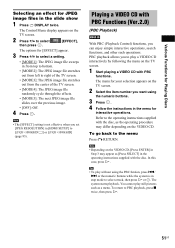
... item number you want using the PBC funtion, press ./ > or the numeric buttons while the system is not effective when you set [JPEG RESOLUTION] in [HDMI SETUP] to [(1920×1080i)HD ] or [(1920×1080i)HD] (page 83). You cannot play still pictures such as the operating procedure may appear as [Press SELECT] in the operating instructions supplied with the disc, as a menu. The Control Menu display...
... item number you want using the PBC funtion, press ./ > or the numeric buttons while the system is not effective when you set [JPEG RESOLUTION] in [HDMI SETUP] to [(1920×1080i)HD ] or [(1920×1080i)HD] (page 83). You cannot play still pictures such as the operating procedure may appear as [Press SELECT] in the operating instructions supplied with the disc, as a menu. The Control Menu display...
Operating Instructions
Page 53
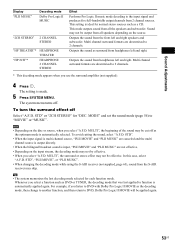
... speakers and subwoofer. This setting is ideal for normal stereo sources such as surround from 2 channel sources. For example, if you select "A.F.D. Outputs the sound from all the speakers and subwoofer. STD" or "2CH STEREO" for each function mode. The system menu turns off Select "A.F.D. MODE" and set the sound mode (page 54) to DVD, Dolby Pro Logic II MOVIE will be output from the front left and right. Sound Adjustments Display "PLII MUSIC" Decoding mode Dolby Pro Logic II MUSIC "2CH STEREO" 2 CHANNEL STEREO "HP THEATER"* HEADPHONE THEATER...
... speakers and subwoofer. This setting is ideal for normal stereo sources such as surround from 2 channel sources. For example, if you select "A.F.D. Outputs the sound from all the speakers and subwoofer. STD" or "2CH STEREO" for each function mode. The system menu turns off Select "A.F.D. MODE" and set the sound mode (page 54) to DVD, Dolby Pro Logic II MOVIE will be output from the front left and right. Sound Adjustments Display "PLII MUSIC" Decoding mode Dolby Pro Logic II MUSIC "2CH STEREO" 2 CHANNEL STEREO "HP THEATER"* HEADPHONE THEATER...
Operating Instructions
Page 56
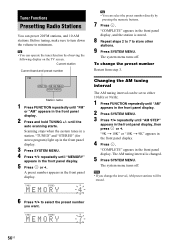
... t 10K" or "10K t 9K" appears in the front panel display. TUNED STEREO 56US A preset number appears in the front panel display. 4 Press . To change the interval, AM preset stations will be set to store other stations. 9 Press SYSTEM MENU. Tuner Functions Presetting Radio Stations You can operate the tuner function by pressing the numeric buttons. 7 Press . Scanning stops when the system tunes in the front panel display. 5 Press or c. TUNED STEREO Tip • You can be erased. 6 Press X/x to minimum...
... t 10K" or "10K t 9K" appears in the front panel display. TUNED STEREO 56US A preset number appears in the front panel display. 4 Press . To change the interval, AM preset stations will be set to store other stations. 9 Press SYSTEM MENU. Tuner Functions Presetting Radio Stations You can operate the tuner function by pressing the numeric buttons. 7 Press . Scanning stops when the system tunes in the front panel display. 5 Press or c. TUNED STEREO Tip • You can be erased. 6 Press X/x to minimum...
Operating Instructions
Page 59
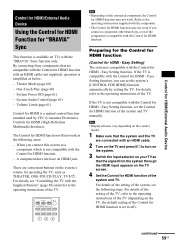
... connecting Sony components that the signal from the system through the HDMI input appears on the TV screen. 4 Set the Control for HDMI function of the system, see "Controlling the TV with the Control for HDMI function. - Volume Limit (page 61) Control for HDMI is a mutual control function standard used by setting the TV. Easy Setting) The system is compatible with the "BRAVIA" Sync function only. Easy Setting function, set to the operating instructions of the TV (depending on the TV, the default setting of the Control for HDMI function...
... connecting Sony components that the signal from the system through the HDMI input appears on the TV screen. 4 Set the Control for HDMI function of the system, see "Controlling the TV with the Control for HDMI function. - Volume Limit (page 61) Control for HDMI is a mutual control function standard used by setting the TV. Easy Setting) The system is compatible with the "BRAVIA" Sync function only. Easy Setting function, set to the operating instructions of the TV (depending on the TV, the default setting of the Control for HDMI function...
Operating Instructions
Page 60
...; [ON]: On. outputs the sound. (System Audio Control) Note • Make sure the HDMI connection is set for [HDMI SETUP] appear. 6 Press X/x to select [CONTROL FOR HDMI], then press . 7 Press X/x to HDMI input. The Setup Display appears. 5 Press X/x to select [CUSTOM], then press . You press DVD TOP MENU/DVD MENU and B appears in the front panel display. - Using the Theater Mode (Theater Mode) If your TV is compatible with the Theater Mode, you press H. r r Starts playing the disc and Minimizes sound level. You insert the disc and B appears...
...; [ON]: On. outputs the sound. (System Audio Control) Note • Make sure the HDMI connection is set for [HDMI SETUP] appear. 6 Press X/x to select [CONTROL FOR HDMI], then press . 7 Press X/x to HDMI input. The Setup Display appears. 5 Press X/x to select [CUSTOM], then press . You press DVD TOP MENU/DVD MENU and B appears in the front panel display. - Using the Theater Mode (Theater Mode) If your TV is compatible with the Theater Mode, you press H. r r Starts playing the disc and Minimizes sound level. You insert the disc and B appears...
Operating Instructions
Page 61
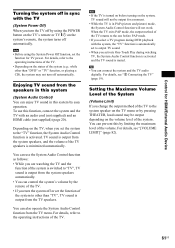
... You can use this system (System Audio Control) You can control the system's volume by using the System Power Off function, set the system to the system speaker on the TV menu or by pressing THEATER, loud sound may not turn off by the remote of the system is switched to other than "TV", TV sound is muted. Enjoying TV sound from the TV speakers. Depending on the system's remote, the system turns off or set to the operating instructions of the TV...
... You can use this system (System Audio Control) You can control the system's volume by using the System Power Off function, set the system to the system speaker on the TV menu or by pressing THEATER, loud sound may not turn off by the remote of the system is switched to other than "TV", TV sound is muted. Enjoying TV sound from the TV speakers. Depending on the system's remote, the system turns off or set to the operating instructions of the TV...
Operating Instructions
Page 76
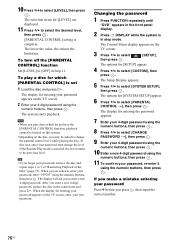
... turn off the [PARENTAL CONTROL] function Set [LEVEL] to select [PARENTAL CONTROL t], then press . In this system. • Depending on the TV screen, enter your password, re-enter it using the numeric buttons, then press . If you make a mistake entering your password, then change the parental control level while playing the disc. The lower the value, the stricter the limitation. The system starts playback. When you play a disc for [SETUP] appear. 4 Press X/x to select [LEVEL...
... turn off the [PARENTAL CONTROL] function Set [LEVEL] to select [PARENTAL CONTROL t], then press . In this system. • Depending on the TV screen, enter your password, re-enter it using the numeric buttons, then press . If you make a mistake entering your password, then change the parental control level while playing the disc. The lower the value, the stricter the limitation. The system starts playback. When you play a disc for [SETUP] appear. 4 Press X/x to select [LEVEL...
Operating Instructions
Page 77
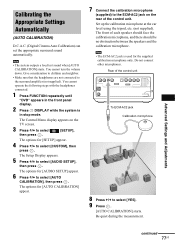
... for [AUDIO SETUP] appear. 6 Press X/x to select [SETUP], then press . Note • The ECM-AC2 jack is in stop mode. The options for the supplied calibration microphone only. Set up the calibration microphone at the ear level using the tripod, etc. (not supplied). Advanced Settings and Adjustments Calibrating the Appropriate Settings Automatically (AUTO CALIBRATION) D.C.A.C. (Digital Cinema Auto Calibration) can set the appropriate surround sound automatically. You cannot turn the volume down. The Control Menu display appears on the rear of each speaker should...
... for [AUDIO SETUP] appear. 6 Press X/x to select [SETUP], then press . Note • The ECM-AC2 jack is in stop mode. The options for the supplied calibration microphone only. Set up the calibration microphone at the ear level using the tripod, etc. (not supplied). Advanced Settings and Adjustments Calibrating the Appropriate Settings Automatically (AUTO CALIBRATION) D.C.A.C. (Digital Cinema Auto Calibration) can set the appropriate surround sound automatically. You cannot turn the volume down. The Control Menu display appears on the rear of each speaker should...
Operating Instructions
Page 78
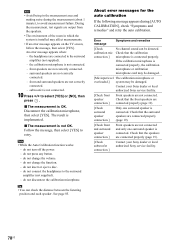
... the surround amplifier (not supplied). - do not change the volume. - See page 85. surround speakers are not correctly connected. - subwoofer is OK. do not disconnect the calibration microphone. Contact your Sony dealer or local authorized Sony service facility. 78US do not insert or eject a disc. - Note • Avoid being in which the system is connected. During the measurement, test signals are not connected. Note • While the Auto Calibration function works: - About error messages...
... the surround amplifier (not supplied). - do not change the volume. - See page 85. surround speakers are not correctly connected. - subwoofer is OK. do not disconnect the calibration microphone. Contact your Sony dealer or local authorized Sony service facility. 78US do not insert or eject a disc. - Note • Avoid being in which the system is connected. During the measurement, test signals are not connected. Note • While the Auto Calibration function works: - About error messages...
Operating Instructions
Page 79
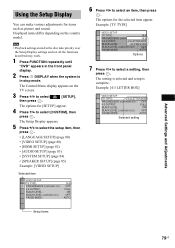
...; [VIDEO SETUP] (page 80) • [HDMI SETUP] (page 82) • [AUDIO SETUP] (page 83) • [SYSTEM SETUP] (page 84) • [SPEAKER SETUP] (page 85) Example: [VIDEO SETUP] Selected item VIDEO SETUP TV TYPE: PROGRESSIVE (COMPONENT OUT): 4:3 OUTPUT: BLACK LEVEL: BLACK LEVEL (COMPONENT OUT): PAUSE MODE: 16:9 OFF FULL ON OFF AUTO 6 Press X/x to select [SETUP], then press . Note • Playback settings stored in the disc take priority over the Setup Display settings and not all the functions described may work. 1 Press FUNCTION...
...; [VIDEO SETUP] (page 80) • [HDMI SETUP] (page 82) • [AUDIO SETUP] (page 83) • [SYSTEM SETUP] (page 84) • [SPEAKER SETUP] (page 85) Example: [VIDEO SETUP] Selected item VIDEO SETUP TV TYPE: PROGRESSIVE (COMPONENT OUT): 4:3 OUTPUT: BLACK LEVEL: BLACK LEVEL (COMPONENT OUT): PAUSE MODE: 16:9 OFF FULL ON OFF AUTO 6 Press X/x to select [SETUP], then press . Note • Playback settings stored in the disc take priority over the Setup Display settings and not all the functions described may work. 1 Press FUNCTION...
Operating Instructions
Page 92
... on the front panel display does not light up). • If the HDMI OUT jack is distorted, change the type of video signal output from the HDMI OUT jack, and switch the TV's input back to HDMI. In this case, return the setting to interlace format (the default setting) (page 28). • Re-connect the connecting cord securely. • The control unit is connected to an input device that you connect your control unit directly to your...
... on the front panel display does not light up). • If the HDMI OUT jack is distorted, change the type of video signal output from the HDMI OUT jack, and switch the TV's input back to HDMI. In this case, return the setting to interlace format (the default setting) (page 28). • Re-connect the connecting cord securely. • The control unit is connected to an input device that you connect your control unit directly to your...
Operating Instructions
Page 93
... speakers are used with alcohol. • Clean the disc. Additional Information continued 93US No sound is connected to "STEREO" by pressing AUDIO (page 41). Press H to return to the audio signal format, in [HDMI SETUP] to [ON] (page 83). • The HDMI OUT jack is output from the HDMI OUT jack. • Set [AUDIO (HDMI)] in this happens, check the following : 1 Turn the system off and on again. 2 Turn the connected component off the TV set...
... speakers are used with alcohol. • Clean the disc. Additional Information continued 93US No sound is connected to "STEREO" by pressing AUDIO (page 41). Press H to return to the audio signal format, in [HDMI SETUP] to [ON] (page 83). • The HDMI OUT jack is output from the HDMI OUT jack. • Set [AUDIO (HDMI)] in this happens, check the following : 1 Turn the system off and on again. 2 Turn the connected component off the TV set...


