Operating Instructions
Page 3
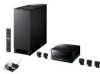
... surround amplifier or S-AIR receiver in this apparatus during lightning storms or when unused for North American models. • The default setting is connected to the wall outlet (mains), even if the unit itself has been turned off. • Install this Operating Instructions...surround amplifier or S-AIR receiver is used with the S-AIR function, which allows transmission of trouble. About the S-AIR function The system is compatible with the system: • Surround amplifier: You can enjoy surround speaker sound wirelessly. • S-AIR receiver: You can be unplugged from the...
... surround amplifier or S-AIR receiver in this apparatus during lightning storms or when unused for North American models. • The default setting is connected to the wall outlet (mains), even if the unit itself has been turned off. • Install this Operating Instructions...surround amplifier or S-AIR receiver is used with the S-AIR function, which allows transmission of trouble. About the S-AIR function The system is compatible with the system: • Surround amplifier: You can enjoy surround speaker sound wirelessly. • S-AIR receiver: You can be unplugged from the...
Operating Instructions
Page 5
... Display or Sound Track Language 80 [LANGUAGE SETUP] Settings for the Display 80 [VIDEO SETUP] Settings for the HDMI 82 [HDMI SETUP] Settings for the Audio 83 [AUDIO SETUP] Other Settings 84 [SYSTEM SETUP] Settings for the Speakers 85 [SPEAKER SETUP] Returning to the Default Settings.......... 88 Additional Information Precautions 89 Notes about the Discs 90 Troubleshooting...
... Display or Sound Track Language 80 [LANGUAGE SETUP] Settings for the Display 80 [VIDEO SETUP] Settings for the HDMI 82 [HDMI SETUP] Settings for the Audio 83 [AUDIO SETUP] Other Settings 84 [SYSTEM SETUP] Settings for the Speakers 85 [SPEAKER SETUP] Returning to the Default Settings.......... 88 Additional Information Precautions 89 Notes about the Discs 90 Troubleshooting...
Operating Instructions
Page 8
...on the TV screen. Note about playback operations of a DVD and VIDEO CD Some playback operations of the control unit and will play on this system. Please be aware that among those discs, there are some that conform to the CD standard and may be playable by this product. Any ... by software producers. Recently, various music discs encoded with digital audio material on the bottom of a DVD and VIDEO CD may not be intentionally set by area restrictions. Any subsequent JPEG image files recorded in later sessions can also be played back. • If MP3 files and JPEG image ...
...on the TV screen. Note about playback operations of a DVD and VIDEO CD Some playback operations of the control unit and will play on this system. Please be aware that among those discs, there are some that conform to the CD standard and may be playable by this product. Any ... by software producers. Recently, various music discs encoded with digital audio material on the bottom of a DVD and VIDEO CD may not be intentionally set by area restrictions. Any subsequent JPEG image files recorded in later sessions can also be played back. • If MP3 files and JPEG image ...
Operating Instructions
Page 11
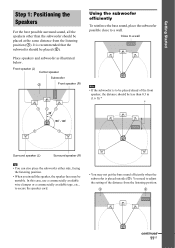
.... Front speaker (L) Center speaker Subwoofer 2 Front speaker (R) 111 Using the subwoofer efficiently To reinforce the bass sound, place the subwoofer possible close to adjust the setting of the front speaker, the distance should be less than the subwoofer should be unstable. In this case, use a commercially available wire clamper or a commercially...
.... Front speaker (L) Center speaker Subwoofer 2 Front speaker (R) 111 Using the subwoofer efficiently To reinforce the bass sound, place the subwoofer possible close to adjust the setting of the front speaker, the distance should be less than the subwoofer should be unstable. In this case, use a commercially available wire clamper or a commercially...

Operating Instructions
Page 12
...alcohol or benzine. • Image distortion on the location of abrasive pad, scouring powder, or solvent such as TV, etc. Note • Do not set the speakers in an inclined position. • Do not place the speakers in a cabinet, etc. Tip • When you change the position of ...the speakers, Sony recommends that are attached to the speakers on a specially treated (waxed, oiled, polished, etc.) floor, as staining or discoloration may occur depending on the ...
...alcohol or benzine. • Image distortion on the location of abrasive pad, scouring powder, or solvent such as TV, etc. Note • Do not set the speakers in an inclined position. • Do not place the speakers in a cabinet, etc. Tip • When you change the position of ...the speakers, Sony recommends that are attached to the speakers on a specially treated (waxed, oiled, polished, etc.) floor, as staining or discoloration may occur depending on the ...
Operating Instructions
Page 20
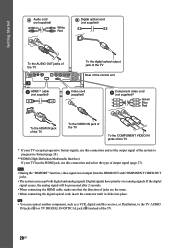
...signal (page 27). Note • During the "DMPORT" function, video signal is not output from the HDMI OUT and COMPONENT VIDEO OUT jacks. • The system can connect another component, such as a VCR, digital satellite receiver, or PlayStation, to progressive format (page 28). ** HDMI (High-Definition Multimedia Interface) If your... PB/CB PR/CR To the COMPONENT VIDEO IN jacks of the TV * If your TV accepts progressive format signals, use this connection and set the output signal of the system to the TV AUDIO IN jacks (A) or TV DIGITAL IN OPTICAL jack (B) instead of the TV. 20US
...signal (page 27). Note • During the "DMPORT" function, video signal is not output from the HDMI OUT and COMPONENT VIDEO OUT jacks. • The system can connect another component, such as a VCR, digital satellite receiver, or PlayStation, to progressive format (page 28). ** HDMI (High-Definition Multimedia Interface) If your... PB/CB PR/CR To the COMPONENT VIDEO IN jacks of the TV * If your TV accepts progressive format signals, use this connection and set the output signal of the system to the TV AUDIO IN jacks (A) or TV DIGITAL IN OPTICAL jack (B) instead of the TV. 20US
Operating Instructions
Page 25
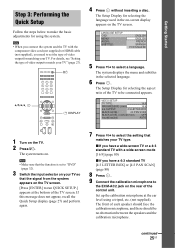
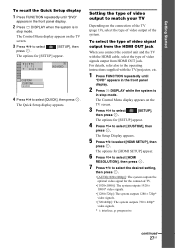
...select a language. LANGUAGE SETUP OSD: MENU: AUDIO: SUBTITLE: ENGLISH ENGLISH FRENCH SPANISH PORTUGUESE 5 Press X/x to set to "DVD" (page 32). 3 Switch the input selector on your TV so that the signal from the system appears on the TV screen. [Press [ENTER] to match your TV" (page 27). VIDEO SETUP TV TYPE... type of the TV to select the setting that the function is set the type of video output for selecting the aspect ratio of video output to run QUICK SETUP.] appears at the ear level using the system. The Setup Display for matching your TV type. If this message does not ...
...select a language. LANGUAGE SETUP OSD: MENU: AUDIO: SUBTITLE: ENGLISH ENGLISH FRENCH SPANISH PORTUGUESE 5 Press X/x to set to "DVD" (page 32). 3 Switch the input selector on your TV so that the signal from the system appears on the TV screen. [Press [ENTER] to match your TV" (page 27). VIDEO SETUP TV TYPE... type of the TV to select the setting that the function is set the type of video output for selecting the aspect ratio of video output to run QUICK SETUP.] appears at the ear level using the system. The Setup Display for matching your TV type. If this message does not ...
Operating Instructions
Page 26
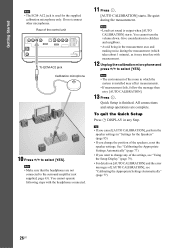
... following steps with measurement. 12 Unplug the calibration microphone and press C/c to select [YES]. Be quiet during the measurement (which the system is used for the Speakers" (page 85). • If you want to the surround amplifier (not supplied, page 63). All ...jack Calibration microphone 10 Press C/c to select [YES]. Tip • If you cancel [AUTO CALIBRATION], perform the speaker settings in any of the settings, see "Calibrating the Appropriate Settings Automatically" (page 77). 26US Note • The environment of [AUTO CALIBRATION], see "Using the Setup Display" (page...
... following steps with measurement. 12 Unplug the calibration microphone and press C/c to select [YES]. Be quiet during the measurement (which the system is used for the Speakers" (page 85). • If you want to the surround amplifier (not supplied, page 63). All ...jack Calibration microphone 10 Press C/c to select [YES]. Tip • If you cancel [AUTO CALIBRATION], perform the speaker settings in any of the settings, see "Calibrating the Appropriate Settings Automatically" (page 77). 26US Note • The environment of [AUTO CALIBRATION], see "Using the Setup Display" (page...
Operating Instructions
Page 27
...HDMI SETUP] appear. 6 Press X/x to select [HDMI RESOLUTION], then press . 7 Press X/x to select the desired setting, then press . • [AUTO(1920×1080p)]: The system outputs the optimal video signal for [SETUP] appear. 4 Press X/x to the operating instructions supplied with the HDMI cable... • [720×480p]: The system outputs 720 × 480p* video signals. * i: interlace, p: progressive continued 27US The Quick Setup display appears. The Control Menu display appears on the TV screen. 3 Press X/x to select [QUICK], then press . Setting the type of video output to select...
...HDMI SETUP] appear. 6 Press X/x to select [HDMI RESOLUTION], then press . 7 Press X/x to select the desired setting, then press . • [AUTO(1920×1080p)]: The system outputs the optimal video signal for [SETUP] appear. 4 Press X/x to the operating instructions supplied with the HDMI cable... • [720×480p]: The system outputs 720 × 480p* video signals. * i: interlace, p: progressive continued 27US The Quick Setup display appears. The Control Menu display appears on the TV screen. 3 Press X/x to select [QUICK], then press . Setting the type of video output to select...
Operating Instructions
Page 28
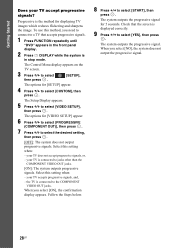
... to jacks other than the COMPONENT VIDEO OUT jacks. [ON]: The system outputs progressive signals. The system outputs the progressive signal. Progressive is connected to select the desired setting, then press . [OFF]: The system does not output progressive signals. your TV is the method for 5 seconds.... Follow the Steps below. 8 Press C/c to select [START], then press . The system outputs the progressive signal for displaying...
... to jacks other than the COMPONENT VIDEO OUT jacks. [ON]: The system outputs progressive signals. The system outputs the progressive signal. Progressive is connected to select the desired setting, then press . [OFF]: The system does not output progressive signals. your TV is the method for 5 seconds.... Follow the Steps below. 8 Press C/c to select [START], then press . The system outputs the progressive signal for displaying...
Operating Instructions
Page 30
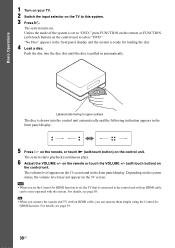
...front panel display. 5 Press H on the remote, or touch N (soft-touch button) on , the TV that is set the Control for loading the disc. 4 Load a disc. Labeled side facing to this system. 3 Press "/1. on the remote or touch the VOLUME +/- (soft-touch button) on the TV to upper surface The ...play). 6 Adjust the VOLUME +/- The volume level appears on the TV screen. Unless the mode of the system is connected to the control unit with an HDMI cable, you set to select "DVD." Depending on the system status, the volume level may not appear on the TV screen and in automatically. The...
...front panel display. 5 Press H on the remote, or touch N (soft-touch button) on , the TV that is set the Control for loading the disc. 4 Load a disc. Labeled side facing to this system. 3 Press "/1. on the remote or touch the VOLUME +/- (soft-touch button) on the TV to upper surface The ...play). 6 Adjust the VOLUME +/- The volume level appears on the TV screen. Unless the mode of the system is connected to the control unit with an HDMI cable, you set to select "DVD." Depending on the system status, the volume level may not appear on the TV screen and in automatically. The...
Operating Instructions
Page 31
...at a time (Freeze Frame)3) to go to adjust the sound volume. To cancel muting, press it again or VOLUME + to the next frame while the system is set to "OFF" (page 66). To return to normal speed, press H. "S-AIR STBY" is in pause mode (DVD VIDEO/DVD-VR/DVD-R/DVD-RW/...you press M/ or /m4) during scanning, the playback speed changes. To return to normal playback, press H. To return to the preceding frame while the system is set to use the instant replay or instant advance function with some discs. 3)DVD VIDEO, DVD-R, DVD-RW, VIDEO CD only. 4)Except for JPEG image ...
...at a time (Freeze Frame)3) to go to adjust the sound volume. To cancel muting, press it again or VOLUME + to the next frame while the system is set to "OFF" (page 66). To return to normal speed, press H. "S-AIR STBY" is in pause mode (DVD VIDEO/DVD-VR/DVD-R/DVD-RW/...you press M/ or /m4) during scanning, the playback speed changes. To return to normal playback, press H. To return to the preceding frame while the system is set to use the instant replay or instant advance function with some discs. 3)DVD VIDEO, DVD-R, DVD-RW, VIDEO CD only. 4)Except for JPEG image ...

Operating Instructions
Page 33
...on the component connected. This is set to the "TV" function. 33US The system menu turns off. The output level is made. 6 Press SYSTEM MENU. The setting is changed. • "ATT OFF": Normal input level. 5 Press . FUNCTION X/x/c, SYSTEM MENU 1 Press FUNCTION repeatedly until... "TV" appears in the front panel display. 2 Press SYSTEM MENU. 3 Press X/x repeatedly until "ATTENUATE" appears ...
...on the component connected. This is set to the "TV" function. 33US The system menu turns off. The output level is made. 6 Press SYSTEM MENU. The setting is changed. • "ATT OFF": Normal input level. 5 Press . FUNCTION X/x/c, SYSTEM MENU 1 Press FUNCTION repeatedly until... "TV" appears in the front panel display. 2 Press SYSTEM MENU. 3 Press X/x repeatedly until "ATTENUATE" appears ...

Operating Instructions
Page 34
..., you want to enjoy surround sound of a 2 channel source from all the speakers in the front panel display. 2 Press SYSTEM MENU. 3 Press X/x repeatedly until "DEC. Note • When you set the [CONTROL FOR HDMI] setting in the front panel display, then press or c. 4 Press X/x repeatedly until "TV" or "SAT/CABLE" appears in this...
..., you want to enjoy surround sound of a 2 channel source from all the speakers in the front panel display. 2 Press SYSTEM MENU. 3 Press X/x repeatedly until "DEC. Note • When you set the [CONTROL FOR HDMI] setting in the front panel display, then press or c. 4 Press X/x repeatedly until "TV" or "SAT/CABLE" appears in this...

Operating Instructions
Page 36
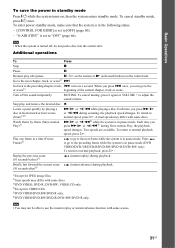
... - To enjoy a disc that point the next time you insert the same disc. Note • If [MULTI-DISC RESUME] in [SYSTEM SETUP] is set to standby mode by pressing FUNCTION. • This system can store at least 10 resume playback points. For details, see "[MULTI-DISC RESUME] (DVD VIDEO/VIDEO CD only)" (page.... • For a DVD-VR, VIDEO CD, CD, DATA CD, and DATA DVD, the system remembers the resume playback point for the earliest disc is set to [ON]. you stopped playing may not work even if the system is deleted. you eject the disc. - you do not remove the disc, Resume Play will...
... - To enjoy a disc that point the next time you insert the same disc. Note • If [MULTI-DISC RESUME] in [SYSTEM SETUP] is set to standby mode by pressing FUNCTION. • This system can store at least 10 resume playback points. For details, see "[MULTI-DISC RESUME] (DVD VIDEO/VIDEO CD only)" (page.... • For a DVD-VR, VIDEO CD, CD, DATA CD, and DATA DVD, the system remembers the resume playback point for the earliest disc is set to [ON]. you stopped playing may not work even if the system is deleted. you eject the disc. - you do not remove the disc, Resume Play will...
Operating Instructions
Page 37
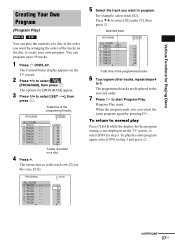
...- - 7. TRACK - - 5. TRACK - - 0: 00:00 T - - 01 02 03 04 05 06 5 Select the track you want by pressing H. Press X/x to select [SET t], then press . TRACK - - 4. TRACK - - 7. TRACK - - 4. For example, select track [02]. TRACK - - 5. When the program ends, you can program up to...- 7. TRACK - - 6. TRACK - - 3. TRACK - - 6. TRACK 02 2. To return to normal play Press CLEAR while the display for the program setting is not displayed on the TV screen. 2 Press X/x to select [PROGRAM], then press . PROGRAM ALL CLEAR 1. continued 37US The options for [PROGRAM] appear...
...- - 7. TRACK - - 5. TRACK - - 0: 00:00 T - - 01 02 03 04 05 06 5 Select the track you want by pressing H. Press X/x to select [SET t], then press . TRACK - - 4. TRACK - - 7. TRACK - - 4. For example, select track [02]. TRACK - - 5. When the program ends, you can program up to...- 7. TRACK - - 6. TRACK - - 3. TRACK - - 6. TRACK 02 2. To return to normal play Press CLEAR while the display for the program setting is not displayed on the TV screen. 2 Press X/x to select [PROGRAM], then press . PROGRAM ALL CLEAR 1. continued 37US The options for [PROGRAM] appear...

Operating Instructions
Page 40
... and the language for [DISC MENU] appear. 3 Press X/x to play Press CLEAR or select [OFF] in step 3. These sections are also canceled. The item is set to [IMAGE] (page 50), you cannot select [TRACK]. • When you want to select [MENU] or [TOP MENU]. 4 Press . When you play a DVD which ... DVD's Menu A DVD is turned off . Note • You cannot use Repeat Play with a VIDEO CD and Super VCD with PBC playback. • When the system is playing a DATA CD/DATA DVD which make up a picture or music feature. The options for the sound, select these items using DVD TOP MENU...
... and the language for [DISC MENU] appear. 3 Press X/x to play Press CLEAR or select [OFF] in step 3. These sections are also canceled. The item is set to [IMAGE] (page 50), you cannot select [TRACK]. • When you want to select [MENU] or [TOP MENU]. 4 Press . When you play a DVD which ... DVD's Menu A DVD is turned off . Note • You cannot use Repeat Play with a VIDEO CD and Super VCD with PBC playback. • When the system is playing a DATA CD/DATA DVD which make up a picture or music feature. The options for the sound, select these items using DVD TOP MENU...
Operating Instructions
Page 42
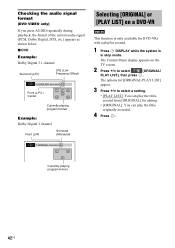
... LS RS Currently playing program format Example: Dolby Digital 3 channel Front (L/R) Surround (Monaural) Selecting [ORIGINAL] or [PLAY LIST] on the TV screen. 2 Press X/x to select a setting. • [PLAY LIST]: You can play the titles created from [ORIGINAL] for editing. • [ORIGINAL]: You can play the titles originally recorded. 4 Press . 1:SPANISH DOLBY...
... LS RS Currently playing program format Example: Dolby Digital 3 channel Front (L/R) Surround (Monaural) Selecting [ORIGINAL] or [PLAY LIST] on the TV screen. 2 Press X/x to select a setting. • [PLAY LIST]: You can play the titles created from [ORIGINAL] for editing. • [ORIGINAL]: You can play the titles originally recorded. 4 Press . 1:SPANISH DOLBY...
Operating Instructions
Page 46
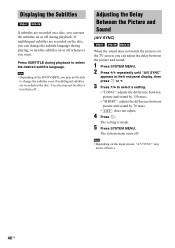
...msec. • "OFF": does not adjust. 4 Press . Note • Depending on the disc. The setting is made. 5 Press SYSTEM MENU. You also may not be effective. 46US The system menu turns off . Adjusting the Delay Between the Picture and Sound (A/V SYNC) When the sound does not ...on the input stream, "A/V SYNC" may not be able to select a setting. • "LONG": adjusts the difference between picture and sound by 130 msec. • "SHORT": adjusts the difference between the picture and sound. 1 Press SYSTEM MENU. 2 Press X/x repeatedly until "A/V SYNC" appears in the front panel...
...msec. • "OFF": does not adjust. 4 Press . Note • Depending on the disc. The setting is made. 5 Press SYSTEM MENU. You also may not be effective. 46US The system menu turns off . Adjusting the Delay Between the Picture and Sound (A/V SYNC) When the sound does not ...on the input stream, "A/V SYNC" may not be able to select a setting. • "LONG": adjusts the difference between picture and sound by 130 msec. • "SHORT": adjusts the difference between the picture and sound. 1 Press SYSTEM MENU. 2 Press X/x repeatedly until "A/V SYNC" appears in the front panel...
Operating Instructions
Page 49
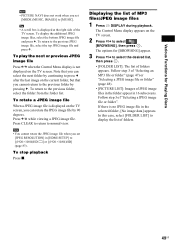
... LIST] to select [BROWSING], then press . To rotate a JPEG image file When a JPEG image file is not displayed on the current folder, but that you set [JPEG RESOLUTION] in the selected folder, [No image data] appears. Note that you can rotate the JPEG image file by continuing to press c after the... the TV screen. 2 Press X/x to display the list of "Selecting a JPEG image file or folder". The Control Menu display appears on the TV screen, you set [MODE (MUSIC, IMAGE)] to normal view.
... LIST] to select [BROWSING], then press . To rotate a JPEG image file When a JPEG image file is not displayed on the current folder, but that you set [JPEG RESOLUTION] in the selected folder, [No image data] appears. Note that you can rotate the JPEG image file by continuing to press c after the... the TV screen. 2 Press X/x to display the list of "Selecting a JPEG image file or folder". The Control Menu display appears on the TV screen, you set [MODE (MUSIC, IMAGE)] to normal view.


