
Operating Instructions
Page 2
... etc. And don't place lighted candles on the apparatus. Model No. This equipment has been tested and found to radio communications. However, there is no guarantee that interference will increase eye hazard....radio frequency energy and, if not installed and used in this manual could void your Sony dealer regarding this product. Owner's Record The model and serial numbers are designed to... reception, which the receiver is intended to alert the user to rain or moisture. DAV-IS50 Serial No 2US WARNING The following measures: - If this equipment does cause harmful interference...
... etc. And don't place lighted candles on the apparatus. Model No. This equipment has been tested and found to radio communications. However, there is no guarantee that interference will increase eye hazard....radio frequency energy and, if not installed and used in this manual could void your Sony dealer regarding this product. Owner's Record The model and serial numbers are designed to... reception, which the receiver is intended to alert the user to rain or moisture. DAV-IS50 Serial No 2US WARNING The following measures: - If this equipment does cause harmful interference...
Operating Instructions
Page 26
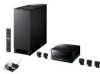
... you want to select [YES]. Do not connect other microphones. Quick Setup is output when [AUTO CALIBRATION] starts. Be quiet during the measurement (which the system is installed may interfere with the headphones connected. 11 Press . [AUTO CALIBRATION] starts. Note • Loud...
... you want to select [YES]. Do not connect other microphones. Quick Setup is output when [AUTO CALIBRATION] starts. Be quiet during the measurement (which the system is installed may interfere with the headphones connected. 11 Press . [AUTO CALIBRATION] starts. Note • Loud...
Operating Instructions
Page 77
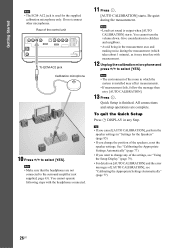
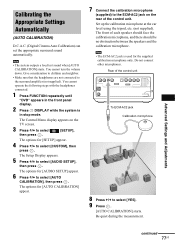
... [AUDIO SETUP], then press . Note • The ECM-AC2 jack is in the front panel display. 2 Press DISPLAY while the system is used for [SETUP] appear. 4 Press X/x to select [AUTO CALIBRATION], then press . The options for the supplied calibration microphone only. Note... • The system outputs a loud test sound when [AUTO CALIBRATION] starts. The Setup Display appears. 5 Press X/x to select [YES]. 9 Press . [AUTO CALIBRATION] starts. Set ...
... [AUDIO SETUP], then press . Note • The ECM-AC2 jack is in the front panel display. 2 Press DISPLAY while the system is used for [SETUP] appear. 4 Press X/x to select [AUTO CALIBRATION], then press . The options for the supplied calibration microphone only. Note... • The system outputs a loud test sound when [AUTO CALIBRATION] starts. The Setup Display appears. 5 Press X/x to select [YES]. 9 Press . [AUTO CALIBRATION] starts. Set ...
Operating Instructions
Page 78
...one surround speaker is installed may be detected. If the calibration microphone is connected. Note • Avoid being in which the system is connected. do not insert or eject a disc. - Check that the speakers are output from the speakers. • ...CALIBRATION], check "Symptoms and remedies" and retry the auto calibration. During the measurement, test signals are connected properly (page 19). [Check subwoofer connection.] Contact your Sony dealer or local authorized Sony service facility. [Check front speaker connection.] Front speakers are not correctly connected. -...
...one surround speaker is installed may be detected. If the calibration microphone is connected. Note • Avoid being in which the system is connected. do not insert or eject a disc. - Check that the speakers are output from the speakers. • ...CALIBRATION], check "Symptoms and remedies" and retry the auto calibration. During the measurement, test signals are connected properly (page 19). [Check subwoofer connection.] Contact your Sony dealer or local authorized Sony service facility. [Check front speaker connection.] Front speakers are not correctly connected. -...
Operating Instructions
Page 85
... the front speaker and subwoofer setting is fixed, you do not connect center or surround speakers, set the parameters for the current disc in the system appears. If the disc does not contain a jacket picture, the [GRAPHICS] picture appears. For details, see "Restricting Playback of the speakers to ... position. For details, see "Returning the [SETUP] settings to 10 discs. Then use the test tone to adjust the level and the balance of the Disc" (page 75). The background is black. The system does not store the resume points in stop mode or while playing a CD, DATA CD (...
... the front speaker and subwoofer setting is fixed, you do not connect center or surround speakers, set the parameters for the current disc in the system appears. If the disc does not contain a jacket picture, the [GRAPHICS] picture appears. For details, see "Restricting Playback of the speakers to ... position. For details, see "Returning the [SETUP] settings to 10 discs. Then use the test tone to adjust the level and the balance of the Disc" (page 75). The background is black. The system does not store the resume points in stop mode or while playing a CD, DATA CD (...

Operating Instructions
Page 87
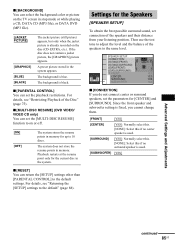
...adjust the volume of all the speakers at one of [LEVEL (FRONT)] or [LEVEL (SURROUND)]. Adjusting the speaker level by using the test tone 1 Press DISPLAY when the system is emitted from each speaker in the [CONNECTION] setting. Be sure to set [SURROUND] to [YES] in sequence. 7 Press ...C/X/x/c to adjust the value of the [SPEAKER SETUP] items, the test tone is emitted from each speaker in sequence. 3 Press X/x to the default ...
...adjust the volume of all the speakers at one of [LEVEL (FRONT)] or [LEVEL (SURROUND)]. Adjusting the speaker level by using the test tone 1 Press DISPLAY when the system is emitted from each speaker in the [CONNECTION] setting. Be sure to set [SURROUND] to [YES] in sequence. 7 Press ...C/X/x/c to adjust the value of the [SPEAKER SETUP] items, the test tone is emitted from each speaker in sequence. 3 Press X/x to the default ...
Operating Instructions
Page 112
S S-AIR 101 S-AIR SETUP 83 S-AIR STBY 66 SCREEN SAVER 84 SETUP 79, 88 Shuffle Play 38 SLEEP 72 Slide Show 50 Slow-motion Play 31 Soft-touch button 29 Sound Mode 54 SPEAKER SETUP 85 SUBTITLE 80 Subwoofer 106 SYSTEM MENU 33, 34, 52, 53, 56, 57, 58, 66, 68, 73, 74 SYSTEM SETUP 84 T TEST TONE 87 TRACK SELECTION 84 TREBLE 55 Troubleshooting 91 TV connection 19 TV TYPE 80 U Unpacking 10 V VIDEO SETUP 80 VOLUME LIMIT 82 112US
S S-AIR 101 S-AIR SETUP 83 S-AIR STBY 66 SCREEN SAVER 84 SETUP 79, 88 Shuffle Play 38 SLEEP 72 Slide Show 50 Slow-motion Play 31 Soft-touch button 29 Sound Mode 54 SPEAKER SETUP 85 SUBTITLE 80 Subwoofer 106 SYSTEM MENU 33, 34, 52, 53, 56, 57, 58, 66, 68, 73, 74 SYSTEM SETUP 84 T TEST TONE 87 TRACK SELECTION 84 TREBLE 55 Troubleshooting 91 TV connection 19 TV TYPE 80 U Unpacking 10 V VIDEO SETUP 80 VOLUME LIMIT 82 112US


