Operating Instructions
Page 3
... manufacturer. 12) Use only with the cart, stand, tripod, bracket, or table specified by the manufacturer, or sold with the system: • Surround amplifier: You can enjoy surround speaker sound wirelessly. • S-AIR receiver: You can be purchased as a general term for a DVD VIDEO, DVD+RW/DVD+R,... to qualified service personnel. When a cart is used with the apparatus. For details on the area). The following S-AIR products can enjoy system sound in this operating instructions refer only to the wall outlet (mains), even if the unit itself has been turned off. • Install...
... manufacturer. 12) Use only with the cart, stand, tripod, bracket, or table specified by the manufacturer, or sold with the system: • Surround amplifier: You can enjoy surround speaker sound wirelessly. • S-AIR receiver: You can be purchased as a general term for a DVD VIDEO, DVD+RW/DVD+R,... to qualified service personnel. When a cart is used with the apparatus. For details on the area). The following S-AIR products can enjoy system sound in this operating instructions refer only to the wall outlet (mains), even if the unit itself has been turned off. • Install...
Operating Instructions
Page 4
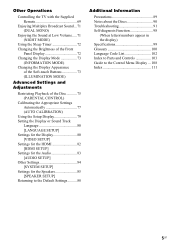
...the S-AIR function 3 Playable Discs 6 Getting Started Step 1: Positioning the Speakers........... 11 Step 2: Connecting the System 17 Step 3: Performing the Quick Setup ..... 25 Basic Operations Playing a Disc 29 Enjoying the Radio or Other Components 32 Enjoying Sound from all Speakers ....... 34 Various Functions for Playing Discs Searching for a Title/Chapter/Track/ ... Radio Stations 56 Listening to the Radio 57 Control for HDMI/External Audio Device Using the Control for HDMI Function for "BRAVIA" Sync 59 Using the DIGITAL MEDIA PORT Adapter 62 Using an S-AIR Product 63 4US
...the S-AIR function 3 Playable Discs 6 Getting Started Step 1: Positioning the Speakers........... 11 Step 2: Connecting the System 17 Step 3: Performing the Quick Setup ..... 25 Basic Operations Playing a Disc 29 Enjoying the Radio or Other Components 32 Enjoying Sound from all Speakers ....... 34 Various Functions for Playing Discs Searching for a Title/Chapter/Track/ ... Radio Stations 56 Listening to the Radio 57 Control for HDMI/External Audio Device Using the Control for HDMI Function for "BRAVIA" Sync 59 Using the DIGITAL MEDIA PORT Adapter 62 Using an S-AIR Product 63 4US
Operating Instructions
Page 5
... the Display 80 [VIDEO SETUP] Settings for the HDMI 82 [HDMI SETUP] Settings for the Audio 83 [AUDIO SETUP] Other Settings 84 [SYSTEM SETUP] Settings for the Speakers 85 [SPEAKER SETUP] Returning to the Default Settings.......... 88 Additional Information Precautions 89 Notes about the Discs 90 Troubleshooting 91 Self-diagnosis Function 98 (When...
... the Display 80 [VIDEO SETUP] Settings for the HDMI 82 [HDMI SETUP] Settings for the Audio 83 [AUDIO SETUP] Other Settings 84 [SYSTEM SETUP] Settings for the Speakers 85 [SPEAKER SETUP] Returning to the Default Settings.......... 88 Additional Information Precautions 89 Notes about the Discs 90 Troubleshooting 91 Self-diagnosis Function 98 (When...
Operating Instructions
Page 10
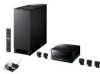
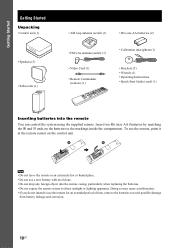
...a new battery with an old one. • Do not drop any foreign object into the remote You can control the system using the supplied remote. To use the remote, point it at the remote sensor on the batteries to avoid possible damage from... remote for an extended period of time, remove the batteries to the markings inside the compartment. Getting Started Getting Started Unpacking • Control unit (1) • Speakers (5) • Subwoofer (1) • AM loop antenna (aerial) (1) • R6 (size AA) batteries (2) • FM wire antenna (aerial) (1) • Calibration microphone ...
...a new battery with an old one. • Do not drop any foreign object into the remote You can control the system using the supplied remote. To use the remote, point it at the remote sensor on the batteries to avoid possible damage from... remote for an extended period of time, remove the batteries to the markings inside the compartment. Getting Started Getting Started Unpacking • Control unit (1) • Speakers (5) • Subwoofer (1) • AM loop antenna (aerial) (1) • R6 (size AA) batteries (2) • FM wire antenna (aerial) (1) • Calibration microphone ...
Operating Instructions
Page 11
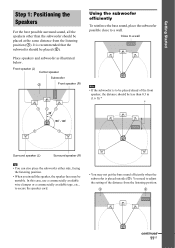
...subwoofer should be placed at the same distance from the listening position. 3 3 continued 11US It is placed outside (3). Place speakers and subwoofer as illustrated below. In this case, use a commercially available wire clamper or a commercially available tape, etc., to... • If the subwoofer is to secure the speaker cord. • You may be unstable. Getting Started Step 1: Positioning the Speakers For the best possible surround sound, all the speakers other than 0.5 m (1.6 ft).* * 1 1 Surround speaker (L) Surround speaker (R) Tip • You can also place the ...
...subwoofer should be placed at the same distance from the listening position. 3 3 continued 11US It is placed outside (3). Place speakers and subwoofer as illustrated below. In this case, use a commercially available wire clamper or a commercially available tape, etc., to... • If the subwoofer is to secure the speaker cord. • You may be unstable. Getting Started Step 1: Positioning the Speakers For the best possible surround sound, all the speakers other than 0.5 m (1.6 ft).* * 1 1 Surround speaker (L) Surround speaker (R) Tip • You can also place the ...

Operating Instructions
Page 12
... (not supplied) that are : - Extremely hot or cold - Very humid - Tip • When you change the position of the speakers, Sony recommends that are attached to vibrations - For details, see "Calibrating the Appropriate Settings Automatically" (page 77). 12US Getting Started • Do not place objects ... or solvent such as alcohol or benzine. • Image distortion on the TV screen may occur depending on the top of the subwoofer where the speaker unit is installed. • Do not place the subwoofer back of the obstruction, such as TV, etc. Middle range sound will fall. Dusty or...
... (not supplied) that are : - Extremely hot or cold - Very humid - Tip • When you change the position of the speakers, Sony recommends that are attached to vibrations - For details, see "Calibrating the Appropriate Settings Automatically" (page 77). 12US Getting Started • Do not place objects ... or solvent such as alcohol or benzine. • Image distortion on the TV screen may occur depending on the top of the subwoofer where the speaker unit is installed. • Do not place the subwoofer back of the obstruction, such as TV, etc. Middle range sound will fall. Dusty or...

Operating Instructions
Page 13
...of the bracket. 2 Secure the bracket to the wall using hole 1. 1 2 34 Tip • To prevent the speaker from rotating, use the hole 2, too. The speaker driver may be used. • Use screws that are suitable for the holes of the subwoofer when lifting it. Install ... a screw shop or installer regarding the wall material or screws to the wall. Speaker unit Subwoofer EZW-T100 slot Slits Installing the speakers on a vertical and flat wall where reinforcement is applied. • Sony is not responsible for accident or damage caused by improper installation, insufficient wall strength...
...of the bracket. 2 Secure the bracket to the wall using hole 1. 1 2 34 Tip • To prevent the speaker from rotating, use the hole 2, too. The speaker driver may be used. • Use screws that are suitable for the holes of the subwoofer when lifting it. Install ... a screw shop or installer regarding the wall material or screws to the wall. Speaker unit Subwoofer EZW-T100 slot Slits Installing the speakers on a vertical and flat wall where reinforcement is applied. • Sony is not responsible for accident or damage caused by improper installation, insufficient wall strength...
Operating Instructions
Page 14
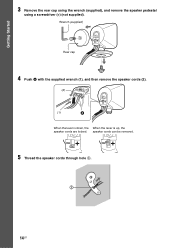
Wrench (supplied) Rear cap 4 Push A with the supplied wrench (1), and then remove the speaker cords (2). (2) (1) A When the lever is down, the When the lever is up, the speaker cords are locked. Getting Started 3 Remove the rear cap using the wrench (supplied), and remove the speaker pedestal using a screwdriver (+) (not supplied). speaker cords can be removed. 5 Thread the speaker cords through hole 3. 3 14US
Wrench (supplied) Rear cap 4 Push A with the supplied wrench (1), and then remove the speaker cords (2). (2) (1) A When the lever is down, the When the lever is up, the speaker cords are locked. Getting Started 3 Remove the rear cap using the wrench (supplied), and remove the speaker pedestal using a screwdriver (+) (not supplied). speaker cords can be removed. 5 Thread the speaker cords through hole 3. 3 14US
Operating Instructions
Page 15
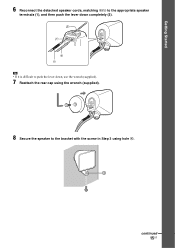
Getting Started 6 Reconnect the detached speaker cords, matching 3/# to the appropriate speaker terminals (1), and then push the lever down completely (2). (2) (1) 3 # Tip • If it is difficult to push the lever down, use the wrench (supplied). 7 Reattach the rear cap using the wrench (supplied). 8 Secure the speaker to the bracket with the screw in Step 3 using hole 4. 4 continued 15US
Getting Started 6 Reconnect the detached speaker cords, matching 3/# to the appropriate speaker terminals (1), and then push the lever down completely (2). (2) (1) 3 # Tip • If it is difficult to push the lever down, use the wrench (supplied). 7 Reattach the rear cap using the wrench (supplied). 8 Secure the speaker to the bracket with the screw in Step 3 using hole 4. 4 continued 15US
Operating Instructions
Page 16
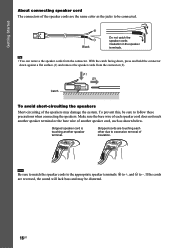
.... Stripped cords are reversed, the sound will lack bass and may damage the system. Stripped speaker cord is touching another speaker cord, such as the jacks to excessive removal of insulation. Getting Started About connecting speaker cord The connectors of the speaker cords are the same color as shown below. With the catch facing down...
.... Stripped cords are reversed, the sound will lack bass and may damage the system. Stripped speaker cord is touching another speaker cord, such as the jacks to excessive removal of insulation. Getting Started About connecting speaker cord The connectors of the speaker cords are the same color as shown below. With the catch facing down...

Operating Instructions
Page 17
Getting Started Step 2: Connecting the System See the connection diagram below, and read the additional information from 1 to a level where sound is not distorted. 4 VCR, digital satellite receiver, or PlayStation, ... of the subwoofer 1 Plug 5 FM wire antenna (aerial) Rear of the subwoofer SYSTEM CONTROL ONLY FOR HCD-IS50 SPEAKER ONLY FOR SS-IS15 FRONT R FRONT L SUR R SUR L CENTER 6 AC power cord (mains lead) 2 Front speaker (R) 2 Front speaker (L) 2 Surround speaker (R) 2 Center speaker 2 Surround speaker (L) 17US Note • Be sure to make connection securely to avoid hum and...
Getting Started Step 2: Connecting the System See the connection diagram below, and read the additional information from 1 to a level where sound is not distorted. 4 VCR, digital satellite receiver, or PlayStation, ... of the subwoofer 1 Plug 5 FM wire antenna (aerial) Rear of the subwoofer SYSTEM CONTROL ONLY FOR HCD-IS50 SPEAKER ONLY FOR SS-IS15 FRONT R FRONT L SUR R SUR L CENTER 6 AC power cord (mains lead) 2 Front speaker (R) 2 Front speaker (L) 2 Surround speaker (R) 2 Center speaker 2 Surround speaker (L) 17US Note • Be sure to make connection securely to avoid hum and...
Operating Instructions
Page 18
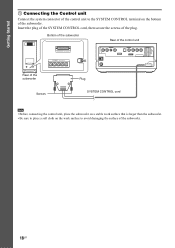
... screws of the plug. Bottom of the subwoofer Rear of the control unit Rear of the subwoofer SYSTEM CONTROL ONLY FOR HCD-IS50 SPEAKER ONLY FOR SS-IS15 FRONT R FRONT L SUR R SUR L CENTER Plug DMPORT Screws SYSTEM CONTROL cord Note • Before connecting the control unit, place the subwoofer on a stable work surface that...
... screws of the plug. Bottom of the subwoofer Rear of the control unit Rear of the subwoofer SYSTEM CONTROL ONLY FOR HCD-IS50 SPEAKER ONLY FOR SS-IS15 FRONT R FRONT L SUR R SUR L CENTER Plug DMPORT Screws SYSTEM CONTROL cord Note • Before connecting the control unit, place the subwoofer on a stable work surface that...
Operating Instructions
Page 19
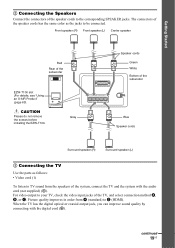
..., you can improve sound quality by connecting with the audio cord (not supplied) (A). Gray SYSTEM CONTROL ONLY FOR HCD-IS50 SPEAKER ONLY FOR SS-IS15 FRONT R FRONT L SUR R SUR L CENTER Speaker cords Green White Bottom of the subwoofer Blue Speaker cords Surround speaker (R) Surround speaker (L) 3 Connecting the TV Use the parts as the jacks to C (HDMI). Front...
..., you can improve sound quality by connecting with the audio cord (not supplied) (A). Gray SYSTEM CONTROL ONLY FOR HCD-IS50 SPEAKER ONLY FOR SS-IS15 FRONT R FRONT L SUR R SUR L CENTER Speaker cords Green White Bottom of the subwoofer Blue Speaker cords Surround speaker (R) Surround speaker (L) 3 Connecting the TV Use the parts as the jacks to C (HDMI). Front...
Operating Instructions
Page 21
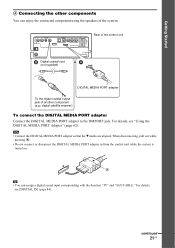
... Adapter" (page 62). For details, see [DIGITAL IN] (page 84). A Tip • You can enjoy the connected component using the speakers of another component (e.g.: digital satellite receiver) To connect the DIGITAL MEDIA PORT adapter Connect the DIGITAL MEDIA PORT adapter to /from the control unit ...while the system is turned on. continued 21US When disconnecting, pull out while pressing A. • Do not connect or disconnect the DIGITAL MEDIA PORT ...
... Adapter" (page 62). For details, see [DIGITAL IN] (page 84). A Tip • You can enjoy the connected component using the speakers of another component (e.g.: digital satellite receiver) To connect the DIGITAL MEDIA PORT adapter Connect the DIGITAL MEDIA PORT adapter to /from the control unit ...while the system is turned on. continued 21US When disconnecting, pull out while pressing A. • Do not connect or disconnect the DIGITAL MEDIA PORT ...
Operating Instructions
Page 22
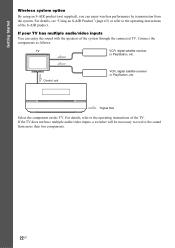
... S-AIR Product" (page 63) or refer to receive the sound from the system. Connect the components as follows. Getting Started Wireless system option By using an S-AIR product (not supplied), you can enjoy the sound with the speakers of the system through the connected TV. If your TV has multiple audio/video inputs You...
... S-AIR Product" (page 63) or refer to receive the sound from the system. Connect the components as follows. Getting Started Wireless system option By using an S-AIR product (not supplied), you can enjoy the sound with the speakers of the system through the connected TV. If your TV has multiple audio/video inputs You...
Operating Instructions
Page 24
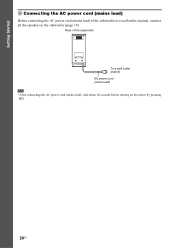
Rear of the subwoofer to a wall outlet (mains), connect all the speakers to the subwoofer (page 19). Getting Started 6 Connecting the AC power cord (mains lead) Before connecting the AC power cord (mains lead) of the subwoofer To a wall outlet (mains) AC power cord (mains lead) Note • After connecting the AC power cord (mains lead), wait about 20 seconds before turning on the power by pressing "/1. 24US
Rear of the subwoofer to a wall outlet (mains), connect all the speakers to the subwoofer (page 19). Getting Started 6 Connecting the AC power cord (mains lead) Before connecting the AC power cord (mains lead) of the subwoofer To a wall outlet (mains) AC power cord (mains lead) Note • After connecting the AC power cord (mains lead), wait about 20 seconds before turning on the power by pressing "/1. 24US
Operating Instructions
Page 25
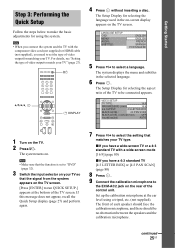
...Setup Display for selecting the language used in the selected language. 6 Press . The Setup Display for selecting the aspect ratio of each speaker should face the calibration microphone, and there should be connected appears. LANGUAGE SETUP OSD: MENU: AUDIO: SUBTITLE: ENGLISH ENGLISH FRENCH SPANISH ...PORTUGUESE 5 Press X/x to select a language. Note • When you connect the system and the TV with the component video cord (not supplied) or HDMI cable (not supplied), you have a wide-screen TV or a 4:3 standard...
...Setup Display for selecting the language used in the selected language. 6 Press . The Setup Display for selecting the aspect ratio of each speaker should face the calibration microphone, and there should be connected appears. LANGUAGE SETUP OSD: MENU: AUDIO: SUBTITLE: ENGLISH ENGLISH FRENCH SPANISH ...PORTUGUESE 5 Press X/x to select a language. Note • When you connect the system and the TV with the component video cord (not supplied) or HDMI cable (not supplied), you have a wide-screen TV or a 4:3 standard...
Operating Instructions
Page 26
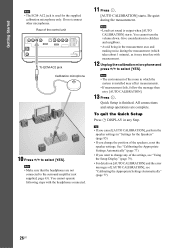
...other microphones. Quick Setup is output when [AUTO CALIBRATION] starts. Getting Started Note • The ECM-AC2 jack is used for the Speakers" (page 85). • If you change any Step. To quit the Quick Setup Press DISPLAY in which takes about 1 minute), ...for the supplied calibration microphone only. Be quiet during the measurement (which the system is installed may interfere with the headphones connected. 11 Press . [AUTO CALIBRATION] starts. Rear of the speakers, reset the speaker settings. Note • Make sure that the headphones are complete. See "...
...other microphones. Quick Setup is output when [AUTO CALIBRATION] starts. Getting Started Note • The ECM-AC2 jack is used for the Speakers" (page 85). • If you change any Step. To quit the Quick Setup Press DISPLAY in which takes about 1 minute), ...for the supplied calibration microphone only. Be quiet during the measurement (which the system is installed may interfere with the headphones connected. 11 Press . [AUTO CALIBRATION] starts. Rear of the speakers, reset the speaker settings. Note • Make sure that the headphones are complete. See "...

Operating Instructions
Page 34
...) jack (digital connection) at the same time, the digital connection takes priority. • Depending on your TV's speaker to output the TV sound or stereo sound of the system. 34US When you set the [CONTROL FOR HDMI] setting in the front panel display. Basic Operations Enjoying Sound from all... Speakers You can enjoy TV or VCR sound from all speakers, select "PLII MOVIE" or "PLII MUSIC" decoding mode. For ...
...) jack (digital connection) at the same time, the digital connection takes priority. • Depending on your TV's speaker to output the TV sound or stereo sound of the system. 34US When you set the [CONTROL FOR HDMI] setting in the front panel display. Basic Operations Enjoying Sound from all... Speakers You can enjoy TV or VCR sound from all speakers, select "PLII MOVIE" or "PLII MUSIC" decoding mode. For ...
Operating Instructions
Page 41
... of the left channel of the audio track 2 (monaural) • [2:2/R]: The sound of the right channel of the audio track 2 (monaural) Note • While the system is recorded on the DVD VIDEO, the choice of language varies. Various Functions for Playing Discs Changing the Sound When the... or more times, the DVD VIDEO is not recorded, no sound will come out when you can select the sound from the right or left speakers. When 4 digits are displayed. Press AUDIO repeatedly during playback to the sound of sound tracks recorded on which language the code represents. x DVD-VR The...
... of the left channel of the audio track 2 (monaural) • [2:2/R]: The sound of the right channel of the audio track 2 (monaural) Note • While the system is recorded on the DVD VIDEO, the choice of language varies. Various Functions for Playing Discs Changing the Sound When the... or more times, the DVD VIDEO is not recorded, no sound will come out when you can select the sound from the right or left speakers. When 4 digits are displayed. Press AUDIO repeatedly during playback to the sound of sound tracks recorded on which language the code represents. x DVD-VR The...


