Camera Operations Guide
Page 2
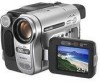
...moisture. The number below . Refer to the collection and recycling location nearest you call upon your Sony dealer regarding recycling of rechargeable batteries, call : Sony Customer Information Center 1-800-222-SONY (7669). For more information regarding this product. Telephone No.: 858-942-2230 This device complies...questions about this product, you may cause undesired operation. Serial No. 2 Read this first Before operating the unit, please read this manual thoroughly, and retain it for the FCC related matters only. WARNING To prevent fire or shock hazard, do not expose the unit...
...moisture. The number below . Refer to the collection and recycling location nearest you call upon your Sony dealer regarding recycling of rechargeable batteries, call : Sony Customer Information Center 1-800-222-SONY (7669). For more information regarding this product. Telephone No.: 858-942-2230 This device complies...questions about this product, you may cause undesired operation. Serial No. 2 Read this first Before operating the unit, please read this manual thoroughly, and retain it for the FCC related matters only. WARNING To prevent fire or shock hazard, do not expose the unit...
Camera Operations Guide
Page 3
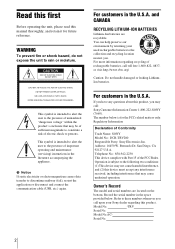
...manual • The images of the LCD screen and the viewfinder used in accordance with specific model names are designed to provide reasonable protection against harmful interference in the wrong direction, the terminal may be contrary to the copyright laws. Notes on a TV, you start reading this equipment. CCD-TRV138: TRV138 CCD... television reception, which the receiver is encouraged to try to make sure the picture and sound are captured using your camcorder. These limits are for long periods of the sun only in color) that to which can use Note on a...
...manual • The images of the LCD screen and the viewfinder used in accordance with specific model names are designed to provide reasonable protection against harmful interference in the wrong direction, the terminal may be contrary to the copyright laws. Notes on a TV, you start reading this equipment. CCD-TRV138: TRV138 CCD... television reception, which the receiver is encouraged to try to make sure the picture and sound are captured using your camcorder. These limits are for long periods of the sun only in color) that to which can use Note on a...
Camera Operations Guide
Page 4
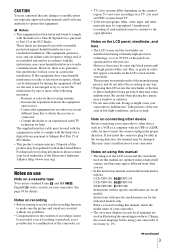
... in the following parts. • The illustrations used on this manual are based on the LCD frame accidentally when you open or close the LCD panel, or when you adjust the angle of the LCD panel. • Do not hold the camcorder by the following illustration. • Be careful not to press... buttons on the model DCR-TRV280. • The screens shown in this manual are from a Windows XP computer. The screens may vary depending on the OS.
... in the following parts. • The illustrations used on this manual are based on the LCD frame accidentally when you open or close the LCD panel, or when you adjust the angle of the LCD panel. • Do not hold the camcorder by the following illustration. • Be careful not to press... buttons on the model DCR-TRV280. • The screens shown in this manual are from a Windows XP computer. The screens may vary depending on the OS.
Camera Operations Guide
Page 5
FADER 30 ,continued 5 Table of a scene - Easy Handycam 26 Adjusting the exposure 27 Adjusting the exposure for backlit subjects 27 Adjusting the exposure manually 28 Recording in mirror mode 24 Superimposing the date and time on 15 Step 4: Adjusting the LCD panel ... Using the built-in light 23 Recording in dark places - NightShot plus 28 Adjusting the focus manually 29 Recording a picture using various effects 30 Fading in and out of Contents CCD-TRV138: TRV138 CCD-TRV338: DCR-TRV280: TRV280 TRV338 Read this first 2 Quick Start Guide Recording movies 8 Recording/Playing...
FADER 30 ,continued 5 Table of a scene - Easy Handycam 26 Adjusting the exposure 27 Adjusting the exposure for backlit subjects 27 Adjusting the exposure manually 28 Recording in mirror mode 24 Superimposing the date and time on 15 Step 4: Adjusting the LCD panel ... Using the built-in light 23 Recording in dark places - NightShot plus 28 Adjusting the focus manually 29 Recording a picture using various effects 30 Fading in and out of Contents CCD-TRV138: TRV138 CCD-TRV338: DCR-TRV280: TRV280 TRV338 Read this first 2 Quick Start Guide Recording movies 8 Recording/Playing...
Camera Operations Guide
Page 7
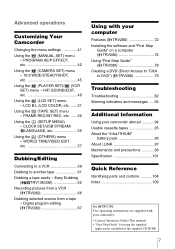
... etc 42 Using the (CAMERA SET) menu - 16:9 WIDE/STEADYSHOT, etc 45 Using the (PLAYER SET)/ (VCR SET) menu - Easy Dubbing ( TRV138/338 62 Recording pictures from a VCR ( TRV280 66 Dubbing selected scenes from a tape - FRAME REC/INT.REC, etc. ......52 Using the (SETUP MENU...Specification 101 Quick Reference Identifying parts and controls ...........104 Index 109 For TRV280: Two operating instructions are supplied with your camcorder: • Camera Operations Guide (This manual) • "First Step Guide" for using the supplied applications (included in the supplied CD-ROM) 7 Digital ...
... etc 42 Using the (CAMERA SET) menu - 16:9 WIDE/STEADYSHOT, etc 45 Using the (PLAYER SET)/ (VCR SET) menu - Easy Dubbing ( TRV138/338 62 Recording pictures from a VCR ( TRV280 66 Dubbing selected scenes from a tape - FRAME REC/INT.REC, etc. ......52 Using the (SETUP MENU...Specification 101 Quick Reference Identifying parts and controls ...........104 Index 109 For TRV280: Two operating instructions are supplied with your camcorder: • Camera Operations Guide (This manual) • "First Step Guide" for using the supplied applications (included in the supplied CD-ROM) 7 Digital ...
Camera Operations Guide
Page 11
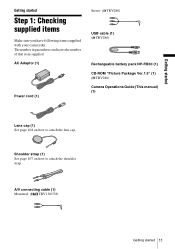
A/V connecting cable (1) Monaural: ( TRV138/338) Getting started Step 1: Checking supplied items Make sure you have following items supplied with your camcorder. Shoulder strap (1) See page 107 on how to attach the shoulder strap. AC Adaptor (1) Power cord (1) Stereo: ( TRV280)... USB cable (1) ( TRV280) Rechargeable battery pack NP-FM30 (1) CD-ROM "Picture Package Ver.1.5" (1) ( TRV280) Camera Operations Guide (This manual) (1) Lens cap...
A/V connecting cable (1) Monaural: ( TRV138/338) Getting started Step 1: Checking supplied items Make sure you have following items supplied with your camcorder. Shoulder strap (1) See page 107 on how to attach the shoulder strap. AC Adaptor (1) Power cord (1) Stereo: ( TRV280)... USB cable (1) ( TRV280) Rechargeable battery pack NP-FM30 (1) CD-ROM "Picture Package Ver.1.5" (1) ( TRV280) Camera Operations Guide (This manual) (1) Lens cap...
Camera Operations Guide
Page 17
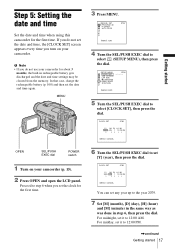
... date and time settings may be cleared from the memory. For midday, set it to select (SETUP MENU), then press the dial. MENU 3 Press MENU. MANUAL SET PROGRAM AE P EFFECT AUTO SHTR STBY [MENU] : END 4 Turn the SEL/PUSH EXEC dial to 12:00 PM. ,continued Getting started Step 5: Setting.... Getting started 17 CLOCK SET STBY Y MD HM 2005 JAN 1 12 : 0 0 AM [MENU] : CANCEL OPEN SEL/PUSH EXEC dial POWER switch 1 Turn on your camcorder. SETUP MENU CLOCK SET USB STREAM LTR SIZE LANGUAGE DEMO MODE RETURN STBY --:--:-- [MENU] : END 5 Turn the SEL/PUSH EXEC dial to 12:00 AM...
... date and time settings may be cleared from the memory. For midday, set it to select (SETUP MENU), then press the dial. MENU 3 Press MENU. MANUAL SET PROGRAM AE P EFFECT AUTO SHTR STBY [MENU] : END 4 Turn the SEL/PUSH EXEC dial to 12:00 PM. ,continued Getting started Step 5: Setting.... Getting started 17 CLOCK SET STBY Y MD HM 2005 JAN 1 12 : 0 0 AM [MENU] : CANCEL OPEN SEL/PUSH EXEC dial POWER switch 1 Turn on your camcorder. SETUP MENU CLOCK SET USB STREAM LTR SIZE LANGUAGE DEMO MODE RETURN STBY --:--:-- [MENU] : END 5 Turn the SEL/PUSH EXEC dial to 12:00 AM...
Camera Operations Guide
Page 19
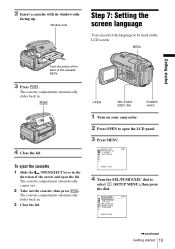
... 1 Turn on the LCD screen. The cassette compartment automatically slides back in . 4 Close the lid. MANUAL SET PROGRAM AE P EFFECT AUTO SHTR STBY [MENU] : END 4 Turn the SEL/PUSH EXEC dial to be used on your camcorder. 2 Press OPEN to open the lid. Window-side Step 7: Setting the screen language You can...
... 1 Turn on the LCD screen. The cassette compartment automatically slides back in . 4 Close the lid. MANUAL SET PROGRAM AE P EFFECT AUTO SHTR STBY [MENU] : END 4 Turn the SEL/PUSH EXEC dial to be used on your camcorder. 2 Press OPEN to open the lid. Window-side Step 7: Setting the screen language You can...
Camera Operations Guide
Page 25
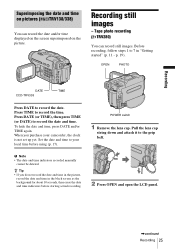
Recording Superimposing the date and time on pictures ( TRV138/338) You can record still images. p. 19). When you ..., follow steps 1 to the grip belt. Press TIME to your camcorder, the clock is not set up yet. b Note • The date and time indicators recorded manually cannot be deleted. Set the date and time to record the time.... z Tip • If you purchase your local time before starting actual recording. 2 Press OPEN and open the LCD panel. ,continued Recording 25 OPEN PHOTO DATE CCD...
Recording Superimposing the date and time on pictures ( TRV138/338) You can record still images. p. 19). When you ..., follow steps 1 to the grip belt. Press TIME to your camcorder, the clock is not set up yet. b Note • The date and time indicators recorded manually cannot be deleted. Set the date and time to record the time.... z Tip • If you purchase your local time before starting actual recording. 2 Press OPEN and open the LCD panel. ,continued Recording 25 OPEN PHOTO DATE CCD...

Camera Operations Guide
Page 28
...EXPOSURE in dark places - Set the NIGHTSHOT PLUS switch to OFF. This may not be reproduced properly. 28 Recording Manual exposure • Adjust the focus manually when it is hard to manual mode, is displayed in the left-hand corner of a picture at the best exposure. Remove the conversion lens (...plus You can avoid backlight shadows on the screen. 2 Turn the SEL/PUSH EXEC dial to automatic exposure Press EXPOSURE. Adjusting the exposure manually You can fix the brightness of the screen. NightShot plus function in dark places (such as when capturing the face of the room. ...
...EXPOSURE in dark places - Set the NIGHTSHOT PLUS switch to OFF. This may not be reproduced properly. 28 Recording Manual exposure • Adjust the focus manually when it is hard to manual mode, is displayed in the left-hand corner of a picture at the best exposure. Remove the conversion lens (...plus You can avoid backlight shadows on the screen. 2 Turn the SEL/PUSH EXEC dial to automatic exposure Press EXPOSURE. Adjusting the exposure manually You can fix the brightness of the screen. NightShot plus function in dark places (such as when capturing the face of the room. ...

Camera Operations Guide
Page 29
... focus is about 3 meters (10 feet). To record horizontal stripes. - z Tip • If you record subjects in complete darkness, set [N.S. You can adjust the focus manually according to [OFF] in the default setting. Use this function in the menu settings. To record a subject behind a window covered with little contrast between the...
... focus is about 3 meters (10 feet). To record horizontal stripes. - z Tip • If you record subjects in complete darkness, set [N.S. You can adjust the focus manually according to [OFF] in the default setting. Use this function in the menu settings. To record a subject behind a window covered with little contrast between the...

Camera Operations Guide
Page 30
REC START/STOP POWER switch Fading in and out of a subject, move the power zoom lever towards W (wide angle) to adjust the zoom for focusing manually • It is easier to currently recording pictures. [BLACK FADER] [WHITE FADER] [MOSAIC FADER] 30 Recording FADER You can add the following effects to focus ...
REC START/STOP POWER switch Fading in and out of a subject, move the power zoom lever towards W (wide angle) to adjust the zoom for focusing manually • It is easier to currently recording pictures. [BLACK FADER] [WHITE FADER] [MOSAIC FADER] 30 Recording FADER You can add the following effects to focus ...
Camera Operations Guide
Page 39
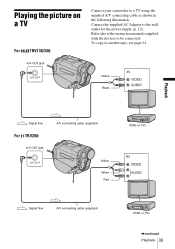
To copy to a TV using the supplied A/V connecting cable as shown in the following illustration. A/V OUT jack Yellow Black Playback Signal flow For TRV280: A/V OUT jack A/V connecting cable (supplied) Yellow White Red VCRs or TVs Signal flow A/V connecting cable (supplied) VCRs or TVs ,continued Playback 39 Playing the picture on a TV For TRV138/338: Connect your camcorder to another tape, see page 61. Connect the supplied AC Adaptor to be connected. Refer also to the instruction manuals supplied with the devices to the wall outlet for the power supply (p. 12).
To copy to a TV using the supplied A/V connecting cable as shown in the following illustration. A/V OUT jack Yellow Black Playback Signal flow For TRV280: A/V OUT jack A/V connecting cable (supplied) Yellow White Red VCRs or TVs Signal flow A/V connecting cable (supplied) VCRs or TVs ,continued Playback 39 Playing the picture on a TV For TRV138/338: Connect your camcorder to another tape, see page 61. Connect the supplied AC Adaptor to be connected. Refer also to the instruction manuals supplied with the devices to the wall outlet for the power supply (p. 12).
Camera Operations Guide
Page 41
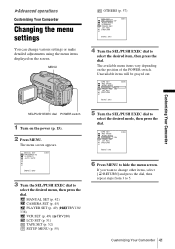
... SET REC MODE AUDIO MODE REMAIN ON FRAME REC I N T. TAPE SET REC MODE AUDIO MODE REMAIN AUTO FRAME REC ON I N T. MANUAL SET (p. 42) CAMERA SET (p. 45) PLAYER SET (p. 49) ( TRV138/ 338) VCR SET (p. 49) ( TRV280) LCD SET (p. 51) TAPE SET (p. 52) SETUP MENU (p. 55) 5 Turn the SEL...the power (p. 15). 2 Press MENU. REC RETURN STBY [MENU] : END Customizing Your Camcorder SEL/PUSH EXEC dial POWER switch 1 Turn on the position of the POWER switch. BAdvanced operations Customizing Your Camcorder Changing the menu settings You can change other items, select [ RETURN] and press the dial...
... SET REC MODE AUDIO MODE REMAIN ON FRAME REC I N T. TAPE SET REC MODE AUDIO MODE REMAIN AUTO FRAME REC ON I N T. MANUAL SET (p. 42) CAMERA SET (p. 45) PLAYER SET (p. 49) ( TRV138/ 338) VCR SET (p. 49) ( TRV280) LCD SET (p. 51) TAPE SET (p. 52) SETUP MENU (p. 55) 5 Turn the SEL...the power (p. 15). 2 Press MENU. REC RETURN STBY [MENU] : END Customizing Your Camcorder SEL/PUSH EXEC dial POWER switch 1 Turn on the position of the POWER switch. BAdvanced operations Customizing Your Camcorder Changing the menu settings You can change other items, select [ RETURN] and press the dial...

Camera Operations Guide
Page 42
MANUAL SET PROGRAM AE P EFFECT AUTO SHTR [MENU] : END PROGRAM AE You can select items listed below in tennis or golf. G AUTO SPOTLIGHT* (spotlight) ( ) Select this when not using PROGRAM AE. PORTRAIT (soft Select to maintain the atmosphere of your camcorder from appearing )... settings are lit by selecting the following settings. Unavailable items will be grayed out. SPORTS* (sports Select to far distance. 42 Customizing Your Camcorder BEACH&SKI* (beach & ski) ( Select to prevent people's faces from appearing excessively white when subjects are marked with G. PROGRAM AE/P ...
MANUAL SET PROGRAM AE P EFFECT AUTO SHTR [MENU] : END PROGRAM AE You can select items listed below in tennis or golf. G AUTO SPOTLIGHT* (spotlight) ( ) Select this when not using PROGRAM AE. PORTRAIT (soft Select to maintain the atmosphere of your camcorder from appearing )... settings are lit by selecting the following settings. Unavailable items will be grayed out. SPORTS* (sports Select to far distance. 42 Customizing Your Camcorder BEACH&SKI* (beach & ski) ( Select to prevent people's faces from appearing excessively white when subjects are marked with G. PROGRAM AE/P ...
Camera Operations Guide
Page 46
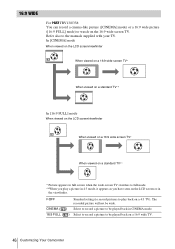
... back in CINEMA mode. 16:9 FULL ( ) Select to record a picture to be wide. 16:9 WIDE For TRV138/338: You can record a cinema-like picture ([CINEMA] mode) or a 16:9 wide picture ([16:9 FULL] mode) to the manuals supplied with your TV. GOFF Standard setting (to record pictures to full mode. **When you have... viewfinder. Refer also to watch on the LCD screen or in 4:3 mode, it appears as you play back on a 16:9 wide TV. 46 Customizing Your Camcorder
... back in CINEMA mode. 16:9 FULL ( ) Select to record a picture to be wide. 16:9 WIDE For TRV138/338: You can record a cinema-like picture ([CINEMA] mode) or a 16:9 wide picture ([16:9 FULL] mode) to the manuals supplied with your TV. GOFF Standard setting (to record pictures to full mode. **When you have... viewfinder. Refer also to watch on the LCD screen or in 4:3 mode, it appears as you play back on a 16:9 wide TV. 46 Customizing Your Camcorder
Camera Operations Guide
Page 47
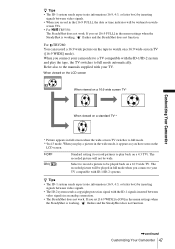
... ( ) Standard setting (to record pictures to play a picture in full screen when the wide-screen TV switches to full mode automatically. Customizing Your Camcorder z Tips • The ID-1 system sends aspect ratio information (16:9, 4:3, or letter box) by inserting signals between video signals. • The... or time indicator will be played back on a 4:3 TV). When you play back on a 16:9 wide TV. Refer also to the manuals supplied with your camcorder to a TV compatible with ID-1/ID-2 systems. z Tips • The ID-1 system sends aspect ratio information (16:9, 4:3, or letter ...
... ( ) Standard setting (to record pictures to play a picture in full screen when the wide-screen TV switches to full mode automatically. Customizing Your Camcorder z Tips • The ID-1 system sends aspect ratio information (16:9, 4:3, or letter box) by inserting signals between video signals. • The... or time indicator will be played back on a 4:3 TV). When you play back on a 16:9 wide TV. Refer also to the manuals supplied with your camcorder to a TV compatible with ID-1/ID-2 systems. z Tips • The ID-1 system sends aspect ratio information (16:9, 4:3, or letter ...
Camera Operations Guide
Page 54
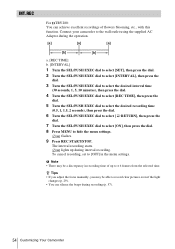
...to record clear pictures even if the light changes (p. 29). • You can achieve excellent recordings of up during recording (p. 57). 54 Customizing Your Camcorder lights up to ± 6 frames from the selected time. b Note • There may be a discrepancy in the menu settings. flashes. 9 ...Press REC START/STOP. z Tips • If you adjust the focus manually, you may be able to hide the menu settings. To cancel recording, set to [OFF] in recording time of flowers blooming, etc., with this...
...to record clear pictures even if the light changes (p. 29). • You can achieve excellent recordings of up during recording (p. 57). 54 Customizing Your Camcorder lights up to ± 6 frames from the selected time. b Note • There may be a discrepancy in the menu settings. flashes. 9 ...Press REC START/STOP. z Tips • If you adjust the focus manually, you may be able to hide the menu settings. To cancel recording, set to [OFF] in recording time of flowers blooming, etc., with this...
Camera Operations Guide
Page 73
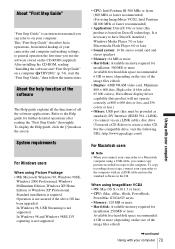
... is not supported. For the compatible drive, visit the following URL: http://www.ppackage.com/) For Macintosh users b Note • When you connect your camcorder and computer and making settings, to general operation the first time you use the standard software in the OS. About "First Step Guide" "First Step... Guide" is an instruction manual you can refer to on your computer 73 Using with an i.LINK cable and use the software stored on the CD-ROM (supplied). In Windows...
... is not supported. For the compatible drive, visit the following URL: http://www.ppackage.com/) For Macintosh users b Note • When you connect your camcorder and computer and making settings, to general operation the first time you use the standard software in the OS. About "First Step Guide" "First Step... Guide" is an instruction manual you can refer to on your computer 73 Using with an i.LINK cable and use the software stored on the CD-ROM (supplied). In Windows...
Camera Operations Guide
Page 75
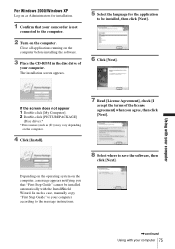
... operating system on the computer before installing the software. 3 Place the CD-ROM in the disc drive of the license agreement] when you that your camcorder is not connected to the message instructions. If the screen does not appear 1 Double-click [My Computer]. 2 Double-click [PICTUREPACKAGE] (Disc drive).* *Drive names (such... you agree, then click [Next]. 8 Select where to be installed automatically with your computer according to the computer. 2 Turn on the computer. In such a case, manually copy "First Step Guide" to your computer 75
... operating system on the computer before installing the software. 3 Place the CD-ROM in the disc drive of the license agreement] when you that your camcorder is not connected to the message instructions. If the screen does not appear 1 Double-click [My Computer]. 2 Double-click [PICTUREPACKAGE] (Disc drive).* *Drive names (such... you agree, then click [Next]. 8 Select where to be installed automatically with your computer according to the computer. 2 Turn on the computer. In such a case, manually copy "First Step Guide" to your computer 75


