Camera Operations Guide
Page 2
... or electromagnetism causes data transfer to rain or moisture. The number below . Telephone No.: 858-942-2230 This device complies with Part 15 of important operating and maintenance (servicing) instructions in the space provided below is intended to alert the user to the collection ... restart the application or disconnect and connect the communication cable (USB, etc.) again. You can help preserve our environment by returning your Sony dealer regarding recycling of electric shock to these numbers whenever you . Bernardo Dr, San Diego, CA 92127 U.S.A. This symbol is for ...
... or electromagnetism causes data transfer to rain or moisture. The number below . Telephone No.: 858-942-2230 This device complies with Part 15 of important operating and maintenance (servicing) instructions in the space provided below is intended to alert the user to the collection ... restart the application or disconnect and connect the communication cable (USB, etc.) again. You can help preserve our environment by returning your Sony dealer regarding recycling of electric shock to these numbers whenever you . Bernardo Dr, San Diego, CA 92127 U.S.A. This symbol is for ...
Camera Operations Guide
Page 3
... mm and Hi8 , Digital8 video cassettes on connecting other device Before connecting your camcorder. Doing so might cause your local authorities or the Electronics Industries Alliance (http://www.eiae.org). CCD-TRV138: TRV138 CCD-TRV338: TRV338 DCR-TRV280: TRV280 Instructions with the instructions, may be copyrighted.... These limits are designed to provide reasonable protection against harmful interference in this manual could void your authority to Subpart B of Part 15 of the sun only in low light conditions, such as at the sun. If this manual • The images ...
... mm and Hi8 , Digital8 video cassettes on connecting other device Before connecting your camcorder. Doing so might cause your local authorities or the Electronics Industries Alliance (http://www.eiae.org). CCD-TRV138: TRV138 CCD-TRV338: TRV338 DCR-TRV280: TRV280 Instructions with the instructions, may be copyrighted.... These limits are designed to provide reasonable protection against harmful interference in this manual could void your authority to Subpart B of Part 15 of the sun only in low light conditions, such as at the sun. If this manual • The images ...
Camera Operations Guide
Page 4
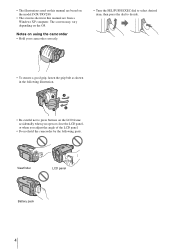
Notes on using the camcorder • Hold your camcorder correctly. • Turn the SEL/PUSH EXEC dial to select desired item, then press the dial to decide. • To ensure a good grip, fasten the ... accidentally when you open or close the LCD panel, or when you adjust the angle of the LCD panel. • Do not hold the camcorder by the following parts. • The illustrations used on this manual are based on the model DCR-TRV280. • The screens shown in the following illustration. •...
Notes on using the camcorder • Hold your camcorder correctly. • Turn the SEL/PUSH EXEC dial to select desired item, then press the dial to decide. • To ensure a good grip, fasten the ... accidentally when you open or close the LCD panel, or when you adjust the angle of the LCD panel. • Do not hold the camcorder by the following parts. • The illustrations used on this manual are based on the model DCR-TRV280. • The screens shown in the following illustration. •...
Camera Operations Guide
Page 7
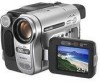
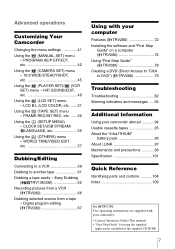
...battery pack 96 About i.LINK 97 Maintenance and precautions 98 Specification 101 Quick Reference Identifying parts and controls ...........104 Index 109 For TRV280: Two operating instructions are supplied with your camcorder: • Camera Operations Guide (This manual) • "First Step Guide" for... using the supplied applications (included in the supplied CD-ROM) 7 Easy Dubbing ( TRV138/338 62 Recording pictures from a VCR ( TRV280 66...
...battery pack 96 About i.LINK 97 Maintenance and precautions 98 Specification 101 Quick Reference Identifying parts and controls ...........104 Index 109 For TRV280: Two operating instructions are supplied with your camcorder: • Camera Operations Guide (This manual) • "First Step Guide" for... using the supplied applications (included in the supplied CD-ROM) 7 Easy Dubbing ( TRV138/338 62 Recording pictures from a VCR ( TRV280 66...
Camera Operations Guide
Page 32
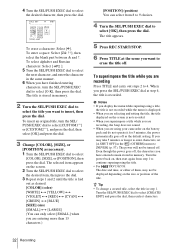
... have entered remain stored in the (OTHERS) menu to continue superimposing the title. • For TRV138/338: The date and time, or either of the title. Turn the power back on the ...to select the next character, and enter the character in the same manner. 6 When you are using your camcorder on the battery pack and do not operate it for 5 minutes, the power automatically goes off . z...desired character, then press the dial. To enter a space: Select [Z& ? !], then select the blank part between & and ?. The title is laid out as the default setting. To superimpose the title while you...
... have entered remain stored in the (OTHERS) menu to continue superimposing the title. • For TRV138/338: The date and time, or either of the title. Turn the power back on the ...to select the next character, and enter the character in the same manner. 6 When you are using your camcorder on the battery pack and do not operate it for 5 minutes, the power automatically goes off . z...desired character, then press the dial. To enter a space: Select [Z& ? !], then select the blank part between & and ?. The title is laid out as the default setting. To superimpose the title while you...
Camera Operations Guide
Page 70
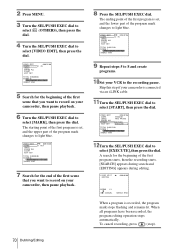
... [START], then press the dial. V I DEO ED I T EDITING 0:00:06:00 SCENE 1 / 1 [ ] : CANCEL [MENU] : END When a program is set , and the lower part of the first scene that you want to select [MARK], then press the dial. To cancel recording, press (stop). 70 Dubbing/Editing VIDEO EDIT MARK...SET 0:09:07:06 2 IN TOTAL 0:00:12:00 SCENE 1 [MENU] : END 9 Repeat steps 5 to 8 and create programs. 10Set your camcorder is set , and the upper part of the program mark changes to light blue. The starting point of the first program is recorded, the program mark stops flashing and...
... [START], then press the dial. V I DEO ED I T EDITING 0:00:06:00 SCENE 1 / 1 [ ] : CANCEL [MENU] : END When a program is set , and the lower part of the first scene that you want to select [MARK], then press the dial. To cancel recording, press (stop). 70 Dubbing/Editing VIDEO EDIT MARK...SET 0:09:07:06 2 IN TOTAL 0:00:12:00 SCENE 1 [MENU] : END 9 Repeat steps 5 to 8 and create programs. 10Set your camcorder is set , and the upper part of the program mark changes to light blue. The starting point of the first program is recorded, the program mark stops flashing and...
Camera Operations Guide
Page 102
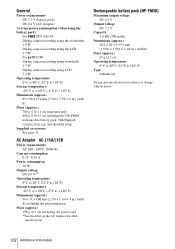
... Power requirements DC 7.2 V (battery pack) DC 8.4 V (AC Adaptor) Average power consumption (when using the battery pack) For TRV138/338: During camera recording using the viewfinder 1.8 W During camera recording using the LCD 2.7 W For TRV280: During camera recording using viewfinder...F to + 140° F) Dimensions (approx.) 56 × 31 × 100 mm (2 1/4 × 1 1/4 × 4 in.) (w/h/ d) excluding the projecting parts Mass (approx.) 190 g (6.7 oz) excluding the power cord *2See the label on the AC Adaptor for other specifications. Rechargeable battery pack (NP-FM30) Maximum output...
... Power requirements DC 7.2 V (battery pack) DC 8.4 V (AC Adaptor) Average power consumption (when using the battery pack) For TRV138/338: During camera recording using the viewfinder 1.8 W During camera recording using the LCD 2.7 W For TRV280: During camera recording using viewfinder...F to + 140° F) Dimensions (approx.) 56 × 31 × 100 mm (2 1/4 × 1 1/4 × 4 in.) (w/h/ d) excluding the projecting parts Mass (approx.) 190 g (6.7 oz) excluding the power cord *2See the label on the AC Adaptor for other specifications. Rechargeable battery pack (NP-FM30) Maximum output...

Camera Operations Guide
Page 104
...) N FOCUS button (p. 29) O SEL/PUSH EXEC dial (p. 41) * This button has a tactile dot. To attach the lens cap 104 Quick Reference Quick Reference Identifying parts and controls Camcorder A Lens cap (p. 21, 25) B LCD screen (p. 3, 16) C OPEN button (p. 16) D REC START/STOP button on LCD frame (p. 21) E Zoom buttons on LCD frame (p. 23...) F VOLUME -/+* button (p. 34) G END SEARCH button (p. 33) H Speaker I Viewfinder (p. 3, 16) If you attach the large capacity battery pack NP-QM71D/QM91D (optional) to the camcorder, extend and lift up the viewfinder and adjust its angle.
...) N FOCUS button (p. 29) O SEL/PUSH EXEC dial (p. 41) * This button has a tactile dot. To attach the lens cap 104 Quick Reference Quick Reference Identifying parts and controls Camcorder A Lens cap (p. 21, 25) B LCD screen (p. 3, 16) C OPEN button (p. 16) D REC START/STOP button on LCD frame (p. 21) E Zoom buttons on LCD frame (p. 23...) F VOLUME -/+* button (p. 34) G END SEARCH button (p. 33) H Speaker I Viewfinder (p. 3, 16) If you attach the large capacity battery pack NP-QM71D/QM91D (optional) to the camcorder, extend and lift up the viewfinder and adjust its angle.


