Camera Operations Guide
Page 5
Table of a scene - Easy Handycam 26 Adjusting the exposure 27 Adjusting the exposure for a longer time 23 Using zoom ...23 ...screen language 19 Recording Recording movies 21 Recording for backlit subjects 27 Adjusting the exposure manually 28 Recording in and out of Contents CCD-TRV138: TRV138 CCD-TRV338: DCR-TRV280: TRV280 TRV338 Read this first 2 Quick Start Guide Recording movies 8 Recording/Playing back with ease - NightShot... Charging the battery pack 12 Using an outside power source 15 Step 3: Turning the power on pictures ( TRV138/338 25 Recording still images -
Table of a scene - Easy Handycam 26 Adjusting the exposure 27 Adjusting the exposure for a longer time 23 Using zoom ...23 ...screen language 19 Recording Recording movies 21 Recording for backlit subjects 27 Adjusting the exposure manually 28 Recording in and out of Contents CCD-TRV138: TRV138 CCD-TRV338: DCR-TRV280: TRV280 TRV338 Read this first 2 Quick Start Guide Recording movies 8 Recording/Playing back with ease - NightShot... Charging the battery pack 12 Using an outside power source 15 Step 3: Turning the power on pictures ( TRV138/338 25 Recording still images -
Camera Operations Guide
Page 6
Data code ( TRV280) ...37 Playing the picture on a tape 34 Playing back in various modes 35 Playing back with ease - END SEARCH 33 Playback Viewing pictures recorded on a TV 39 6 Easy Handycam 36 Various playback functions 37 Displaying the screen indicators 37 Displaying the date/time and camera settings data - Superimposing a title 31 Searching for the last scene of the most recent recording -
Data code ( TRV280) ...37 Playing the picture on a tape 34 Playing back in various modes 35 Playing back with ease - END SEARCH 33 Playback Viewing pictures recorded on a TV 39 6 Easy Handycam 36 Various playback functions 37 Displaying the screen indicators 37 Displaying the date/time and camera settings data - Superimposing a title 31 Searching for the last scene of the most recent recording -
Camera Operations Guide
Page 10
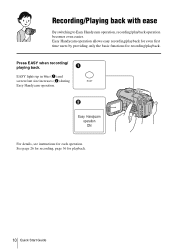
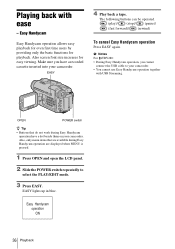
Recording/Playing back with ease By switching to Easy Handycam operation, recording/playback operation becomes even easier. Easy Handycam operation ON For details, see instructions for playback. 10 Quick Start Guide See page 26 for recording, page 36 for each operation. Easy Handycam operation allows easy recording/playback for even first time users by providing only the basic functions for recording/playback. EASY lights up in blue (1) and screen font size increases (2) during Easy Handycam operation. Press EASY when recording/ playing back.
Recording/Playing back with ease By switching to Easy Handycam operation, recording/playback operation becomes even easier. Easy Handycam operation ON For details, see instructions for playback. 10 Quick Start Guide See page 26 for recording, page 36 for each operation. Easy Handycam operation allows easy recording/playback for even first time users by providing only the basic functions for recording/playback. EASY lights up in blue (1) and screen font size increases (2) during Easy Handycam operation. Press EASY when recording/ playing back.
Camera Operations Guide
Page 21
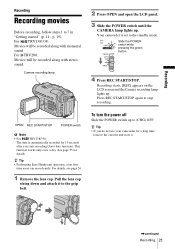
...follow steps 1 to stop recording. Press REC START/STOP again to 7 in "Getting started" (p. 11 - z Tip • Performing Easy Handycam operation, even first time users can record easily. For TRV280: Movies will be recorded along with stereo sound. Slide the POWER switch while pressing the...and open the LCD panel. 3 Slide the POWER switch until the CAMERA lamp lights up . p. 19). For TRV138/338: Movies will be recorded along with monaural sound. Your camcorder is automatically recorded for a long time, remove the cassette and store it to (CHG) OFF. This function ...
...follow steps 1 to stop recording. Press REC START/STOP again to 7 in "Getting started" (p. 11 - z Tip • Performing Easy Handycam operation, even first time users can record easily. For TRV280: Movies will be recorded along with stereo sound. Slide the POWER switch while pressing the...and open the LCD panel. 3 Slide the POWER switch until the CAMERA lamp lights up . p. 19). For TRV138/338: Movies will be recorded along with monaural sound. Your camcorder is automatically recorded for a long time, remove the cassette and store it to (CHG) OFF. This function ...
Camera Operations Guide
Page 26
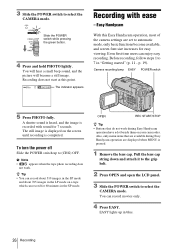
... the picture will become available, and screen font size increases for easy viewing. OPEN REC START/STOP z Tip • Buttons that are available during Easy Handycam operation have a dot beside them on a tape which can record about 510 images in the SP mode and about 765 images in blue. 26 Recording... mode. p. 19). z Tip • You can record for 7 seconds. To turn the power off Slide the POWER switch up in the LP mode on your camcorder. 3 Slide the POWER switch to (CHG) OFF. Even first time users can record movies only. 4 Press EASY.
... the picture will become available, and screen font size increases for easy viewing. OPEN REC START/STOP z Tip • Buttons that are available during Easy Handycam operation have a dot beside them on a tape which can record about 510 images in the SP mode and about 765 images in blue. 26 Recording... mode. p. 19). z Tip • You can record for 7 seconds. To turn the power off Slide the POWER switch up in the LP mode on your camcorder. 3 Slide the POWER switch to (CHG) OFF. Even first time users can record movies only. 4 Press EASY.
Camera Operations Guide
Page 27
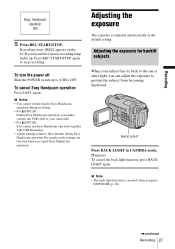
... exposure to prevent the subject from /to Easy Handycam operation during recording. • For TRV280: During Easy Handycam operation, you cannot connect the USB cable to your camcorder. • For TRV280: You cannot use Easy Handycam operation together with USB Streaming. • All the... settings return to their defaults during Easy Handycam operation. appears. Previously made settings...
... exposure to prevent the subject from /to Easy Handycam operation during recording. • For TRV280: During Easy Handycam operation, you cannot connect the USB cable to your camcorder. • For TRV280: You cannot use Easy Handycam operation together with USB Streaming. • All the... settings return to their defaults during Easy Handycam operation. appears. Previously made settings...
Camera Operations Guide
Page 34
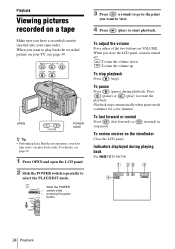
... for a few minutes. Indicators displayed during playback. OPEN POWER switch z Tip • Performing Easy Handycam operation, even first time users can play back the recorded picture on your camcorder. To fast forward or rewind Press (fast forward) or stop ). For details, see page 39.... To pause Press (pause) during playing back For TRV138/338: 60min 0:00:00 34 Playback To adjust the ...
... for a few minutes. Indicators displayed during playback. OPEN POWER switch z Tip • Performing Easy Handycam operation, even first time users can play back the recorded picture on your camcorder. To fast forward or rewind Press (fast forward) or stop ). For details, see page 39.... To pause Press (pause) during playing back For TRV138/338: 60min 0:00:00 34 Playback To adjust the ...
Camera Operations Guide
Page 36
... by providing only the basic functions for easy viewing. Also, only menu items that do not work during Easy Handycam operation are available during Easy Handycam operation have a recorded cassette inserted into your camcorder. OPEN POWER switch z Tip • Buttons that are displayed when MENU is pressed. 1 Press OPEN and open the LCD...
... by providing only the basic functions for easy viewing. Also, only menu items that do not work during Easy Handycam operation are available during Easy Handycam operation have a recorded cassette inserted into your camcorder. OPEN POWER switch z Tip • Buttons that are displayed when MENU is pressed. 1 Press OPEN and open the LCD...
Camera Operations Guide
Page 90
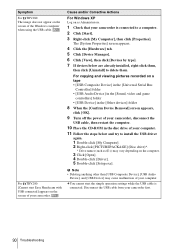
...installed, right-click them . Disconnect the USB cable from your computer. Symptom For TRV280: The image does not appear on the screen of your camcorder. The [System Properties] screen appears. 4 Click the [Hardware] tab. 5 Click [Device Manager]. 6 Click [View], then click [Devices by...], and [USB Device] may vary depending on as Administrators. 1 Check that your camcorder is connected. cYou cannot start Easy Handycam with USB connected] appears on the screen of your camcorder first. 90 Troubleshooting For TRV280: [Cannot start the simple operation settings while the USB...
...installed, right-click them . Disconnect the USB cable from your computer. Symptom For TRV280: The image does not appear on the screen of your camcorder. The [System Properties] screen appears. 4 Click the [Hardware] tab. 5 Click [Device Manager]. 6 Click [View], then click [Devices by...], and [USB Device] may vary depending on as Administrators. 1 Check that your camcorder is connected. cYou cannot start Easy Handycam with USB connected] appears on the screen of your camcorder first. 90 Troubleshooting For TRV280: [Cannot start the simple operation settings while the USB...

Camera Operations Guide
Page 91
.... cFor the compatible drive, visit the following procedures: 1 Select [Start], [Programs] ([All Programs] for Windows XP), [Picture Package], [Handycam Tools], and [USB Streaming Tool], then start up [USB Streaming Tool]. 2 Adjust the slider in the following URL: http://www.ppackage.com/ ...cRefer to "First Step Guide" in Picture Package Auto Video, Producer, CD Backup or VCD Maker. cClose Picture Package on your camcorder to the Windows computer via a USB cable. Troubleshooting Troubleshooting 91 cClose Picture Package, then restart the Windows computer. For TRV280: The...
.... cFor the compatible drive, visit the following procedures: 1 Select [Start], [Programs] ([All Programs] for Windows XP), [Picture Package], [Handycam Tools], and [USB Streaming Tool], then start up [USB Streaming Tool]. 2 Adjust the slider in the following URL: http://www.ppackage.com/ ...cRefer to "First Step Guide" in Picture Package Auto Video, Producer, CD Backup or VCD Maker. cClose Picture Package on your camcorder to the Windows computer via a USB cable. Troubleshooting Troubleshooting 91 cClose Picture Package, then restart the Windows computer. For TRV280: The...
Camera Operations Guide
Page 93
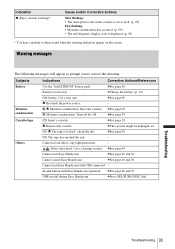
...• Moisture condensation has occurred. (p. 99) • The self-diagnosis display code is locked - cSee page 95. USB invalid during Easy Handycam cPress SEL/PUSH EXEC dial. cSee page 99. Use a cleaning cassette. Q The tape has reached the end. - Cannot record due to correct...18. cThe cassette might be damaged, etc. Dirty video head. Battery level is low. cSee page 99. Cannot start Easy Handycam cSee page 26 and 36. Warning messages The following messages will appear to prompt you to copyright protection. - Subjects Battery ...
...• Moisture condensation has occurred. (p. 99) • The self-diagnosis display code is locked - cSee page 95. USB invalid during Easy Handycam cPress SEL/PUSH EXEC dial. cSee page 99. Use a cleaning cassette. Q The tape has reached the end. - Cannot record due to correct...18. cThe cassette might be damaged, etc. Dirty video head. Battery level is low. cSee page 99. Cannot start Easy Handycam cSee page 26 and 36. Warning messages The following messages will appear to prompt you to copyright protection. - Subjects Battery ...
Camera Operations Guide
Page 109
... DirectX 9.0c 76 Display DISPLAY 58 Display indicator....... 108 DNR 50 Dual sound track tape ........ 49 Dubbing 59 DV Interface 79 E Easy Dubbing 62 Easy Handycam 26, 36 EDIT 49 END SEARCH 33 Exposure 27 F FADER 30 First Step Guide........... 73, 74 Focus 29 Frame recording (FRAME REC 53 Full charge...
... DirectX 9.0c 76 Display DISPLAY 58 Display indicator....... 108 DNR 50 Dual sound track tape ........ 49 Dubbing 59 DV Interface 79 E Easy Dubbing 62 Easy Handycam 26, 36 EDIT 49 END SEARCH 33 Exposure 27 F FADER 30 First Step Guide........... 73, 74 Focus 29 Frame recording (FRAME REC 53 Full charge...


