Camera Operations Guide
Page 5
... 5: Setting the date and time 17 Step 6: Inserting a cassette tape 18 Step 7: Setting the screen language 19 Recording Recording movies 21 Recording for backlit subjects 27 Adjusting the exposure manually 28 Recording in and out of Contents CCD-TRV138: TRV138 CCD-TRV338: DCR-TRV280...: TRV280 TRV338 Read this first 2 Quick Start Guide Recording movies 8 Recording/Playing back with ease - Easy Handycam 26 Adjusting the exposure 27 Adjusting the exposure for a longer...
... 5: Setting the date and time 17 Step 6: Inserting a cassette tape 18 Step 7: Setting the screen language 19 Recording Recording movies 21 Recording for backlit subjects 27 Adjusting the exposure manually 28 Recording in and out of Contents CCD-TRV138: TRV138 CCD-TRV338: DCR-TRV280...: TRV280 TRV338 Read this first 2 Quick Start Guide Recording movies 8 Recording/Playing back with ease - Easy Handycam 26 Adjusting the exposure 27 Adjusting the exposure for a longer...
Camera Operations Guide
Page 6
Superimposing a title 31 Searching for the last scene of the most recent recording - Easy Handycam 36 Various playback functions 37 Displaying the screen indicators 37 Displaying the date/time and camera settings data - END SEARCH 33 Playback Viewing pictures recorded on a TV 39 6 Data code ( TRV280) ...37 Playing the picture on a tape 34 Playing back in various modes 35 Playing back with ease -
Superimposing a title 31 Searching for the last scene of the most recent recording - Easy Handycam 36 Various playback functions 37 Displaying the screen indicators 37 Displaying the date/time and camera settings data - END SEARCH 33 Playback Viewing pictures recorded on a TV 39 6 Data code ( TRV280) ...37 Playing the picture on a tape 34 Playing back in various modes 35 Playing back with ease -
Camera Operations Guide
Page 9
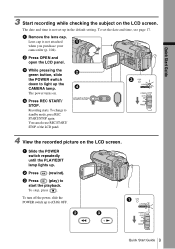
...also use REC START/ STOP of the LCD panel. Quick Start Guide 9 To set up . a Remove the lens cap. Lens cap is not set the date and time, see page 17. The power turns on the LCD screen. START/STOP 4 View the recorded picture on . c Press (play) to standby mode..., press REC START/STOP again. To stop, press . The date and time is not attached when you purchase your camcorder (p. 104). b Press OPEN and open the LCD panel. Recording starts. To change to start the playback. To turn off the power...
...also use REC START/ STOP of the LCD panel. Quick Start Guide 9 To set up . a Remove the lens cap. Lens cap is not set the date and time, see page 17. The power turns on the LCD screen. START/STOP 4 View the recorded picture on . c Press (play) to standby mode..., press REC START/STOP again. To stop, press . The date and time is not attached when you purchase your camcorder (p. 104). b Press OPEN and open the LCD panel. Recording starts. To change to start the playback. To turn off the power...
Camera Operations Guide
Page 17
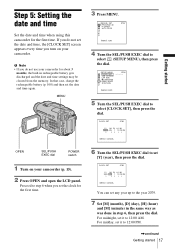
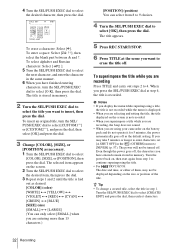
...] : CANCEL OPEN SEL/PUSH EXEC dial POWER switch 1 Turn on your camcorder. Proceed to step 6 when you set [Y] (year), then press the dial. MENU 3 Press MENU. In that case, charge the rechargeable battery (p. 100) and then set the date and time, the [CLOCK SET] screen appears every time you do not... to select (SETUP MENU), then press the dial. For midnight, set it to 12:00 PM. ,continued Getting started Step 5: Setting the date and time Set the date and time when using this camcorder for the first time. For midday, set it to 12:00 AM. If you do not use your...
...] : CANCEL OPEN SEL/PUSH EXEC dial POWER switch 1 Turn on your camcorder. Proceed to step 6 when you set [Y] (year), then press the dial. MENU 3 Press MENU. In that case, charge the rechargeable battery (p. 100) and then set the date and time, the [CLOCK SET] screen appears every time you do not... to select (SETUP MENU), then press the dial. For midnight, set it to 12:00 PM. ,continued Getting started Step 5: Setting the date and time Set the date and time when using this camcorder for the first time. For midday, set it to 12:00 AM. If you do not use your...
Camera Operations Guide
Page 18
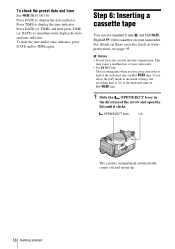
.... If you use standard 8 mm and Hi8 , Digital8 video cassettes on your camcorder is 3/4 of the indicated time on these cassettes (such as writeprotection), see page 95. To check the preset date and time For TRV138/338: Press DATE to display the date indicator. For details on Hi8 tape. 1 Slide the OPEN/EJECT lever in...
.... If you use standard 8 mm and Hi8 , Digital8 video cassettes on your camcorder is 3/4 of the indicated time on these cassettes (such as writeprotection), see page 95. To check the preset date and time For TRV138/338: Press DATE to display the date indicator. For details on Hi8 tape. 1 Slide the OPEN/EJECT lever in...
Camera Operations Guide
Page 21
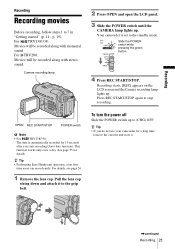
...TRV138/338: Movies will be recorded along with monaural sound. Pull the lens cap string down and attach it . ,continued Recording 21 p. 19). Your camcorder is automatically recorded for 10 seconds after you do not use your camcorder...again to 7 in "Getting started" (p. 11 - z Tip • Performing Easy Handycam operation, even first time users can record easily. Recording starts. [REC] appears on the...the lens cap. OPEN REC START/STOP POWER switch b Note • For TRV138/338: The date is set to (CHG) OFF. For TRV280: Movies will be recorded along with stereo...
...TRV138/338: Movies will be recorded along with monaural sound. Pull the lens cap string down and attach it . ,continued Recording 21 p. 19). Your camcorder is automatically recorded for 10 seconds after you do not use your camcorder...again to 7 in "Getting started" (p. 11 - z Tip • Performing Easy Handycam operation, even first time users can record easily. Recording starts. [REC] appears on the...the lens cap. OPEN REC START/STOP POWER switch b Note • For TRV138/338: The date is set to (CHG) OFF. For TRV280: Movies will be recorded along with stereo...

Camera Operations Guide
Page 22
... a while when you set the counter to preserve battery power ([A.SHUT OFF], p. 57). For TRV138/338: 1 23 4 60min SP REC 0:00:00 6 5 For TRV280: Date/time and camera settings data (p. 37) will automatically turn the power off to 0:00:00, press...mode (SP or LP) C Recording status ([STBY] (standby) or [REC] (recording)) D Tape counter (hour: minute: second) ( TRV138/338) To set the POWER switch to select CAMERA, and then press REC START/STOP. z Tips • You can view this information during...) OFF. • In the default setting, if you do not operate the camcorder for a while.
... a while when you set the counter to preserve battery power ([A.SHUT OFF], p. 57). For TRV138/338: 1 23 4 60min SP REC 0:00:00 6 5 For TRV280: Date/time and camera settings data (p. 37) will automatically turn the power off to 0:00:00, press...mode (SP or LP) C Recording status ([STBY] (standby) or [REC] (recording)) D Tape counter (hour: minute: second) ( TRV138/338) To set the POWER switch to select CAMERA, and then press REC START/STOP. z Tips • You can view this information during...) OFF. • In the default setting, if you do not operate the camcorder for a while.
Camera Operations Guide
Page 24
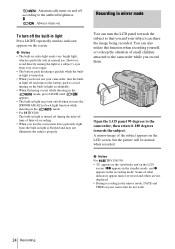
...function when recording yourself, or to keep the attention of small children attracted to the camcorder, then rotate it 180 degrees towards the subject so that you do not work. 24 Recording b Notes For TRV138/338: • appears in light may not illuminate the subject properly. in light... off during the interval time of other indicators appear mirror-reversed and others are not displayed. • During recording in the mirror mode, DATE and TIME on /off when you use the conversion lens (optional), light from very close range. • The battery pack discharges quickly ...
...function when recording yourself, or to keep the attention of small children attracted to the camcorder, then rotate it 180 degrees towards the subject so that you do not work. 24 Recording b Notes For TRV138/338: • appears in light may not illuminate the subject properly. in light... off during the interval time of other indicators appear mirror-reversed and others are not displayed. • During recording in the mirror mode, DATE and TIME on /off when you use the conversion lens (optional), light from very close range. • The battery pack discharges quickly ...
Camera Operations Guide
Page 25
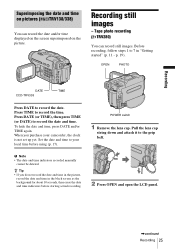
... ( TRV280) You can record the date and/or time displayed on the screen superimposed on pictures ( TRV138/338) You can record still images. To hide the date and time, press DATE and/or TIME again. p. 19). Press DATE (or TIME), then press TIME (or DATE) to record the time. When you...using (p. 17). Press TIME to record the date and time. z Tip • If you purchase your local time before starting actual recording. 2 Press OPEN and open the LCD panel. ,continued Recording 25 Before recording, follow steps 1 to your camcorder, the clock is not set up yet. Recording...
... ( TRV280) You can record the date and/or time displayed on the screen superimposed on pictures ( TRV138/338) You can record still images. To hide the date and time, press DATE and/or TIME again. p. 19). Press DATE (or TIME), then press TIME (or DATE) to record the time. When you...using (p. 17). Press TIME to record the date and time. z Tip • If you purchase your local time before starting actual recording. 2 Press OPEN and open the LCD panel. ,continued Recording 25 Before recording, follow steps 1 to your camcorder, the clock is not set up yet. Recording...
Camera Operations Guide
Page 31
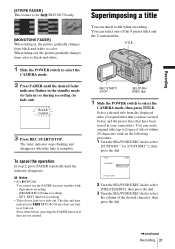
... from color to black-and-white. 1 Slide the POWER switch to color. The fader indicator stops flashing and disappears when the fade is for TRV138/338 also does not fade in the following procedure. 1 Turn the SEL/PUSH EXEC dial to 2 types of title of the desired character, ... select one of the 8 preset titles and the 2 custom titles. You can insert a title when recording. The date and time indicator for TRV138/338 only. [MONOTONE FADER] When fading in your camcorder). TITLE REC START/ STOP SEL/PUSH EXEC dial 1 Slide the POWER switch to fade out). To cancel the operation...
... from color to black-and-white. 1 Slide the POWER switch to color. The fader indicator stops flashing and disappears when the fade is for TRV138/338 also does not fade in the following procedure. 1 Turn the SEL/PUSH EXEC dial to 2 types of title of the desired character, ... select one of the 8 preset titles and the 2 custom titles. You can insert a title when recording. The date and time indicator for TRV138/338 only. [MONOTONE FADER] When fading in your camcorder). TITLE REC START/ STOP SEL/PUSH EXEC dial 1 Slide the POWER switch to fade out). To cancel the operation...
Camera Operations Guide
Page 32
... only select [SMALL] when you have finished entering characters, turn the SEL/ PUSH EXEC dial to continue superimposing the title. • For TRV138/338: The date and time, or either of the title. b Notes • If you display the menu while superimposing a title, the title is not recorded...(p. 57). The title appears. 5 Press REC START/STOP. 6 Press TITLE at step 4, the title is displayed. • When you are using your camcorder on the size or position of them, may take 5 minutes or longer to enter characters, set [A.SHUT OFF] in step 1. To insert an original title...
... only select [SMALL] when you have finished entering characters, turn the SEL/ PUSH EXEC dial to continue superimposing the title. • For TRV138/338: The date and time, or either of the title. b Notes • If you display the menu while superimposing a title, the title is not recorded...(p. 57). The title appears. 5 Press REC START/STOP. 6 Press TITLE at step 4, the title is displayed. • When you are using your camcorder on the size or position of them, may take 5 minutes or longer to enter characters, set [A.SHUT OFF] in step 1. To insert an original title...
Camera Operations Guide
Page 37
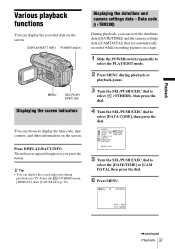
...EDIT mode. 2 Press MENU during playback on the screen. Press DISPLAY/BATT INFO. The indicators appear/disappear as you can view the date/time data ([DATE/TIME]) and the camera settings data ([CAM DATA]) that are automatically recorded while recording pictures on the screen. Select the (OTHERS) ...menu, [DISPLAY], then [V-OUT/LCD] (p. 58). OTHERS DATA CODE OFF WORLD TIME DATE/TIME BEEP CAM DATA A. Displaying the date/time and camera settings data - Data code ( TRV280) During playback, you press the button. z Tip • You can choose...
...EDIT mode. 2 Press MENU during playback on the screen. Press DISPLAY/BATT INFO. The indicators appear/disappear as you can view the date/time data ([DATE/TIME]) and the camera settings data ([CAM DATA]) that are automatically recorded while recording pictures on the screen. Select the (OTHERS) ...menu, [DISPLAY], then [V-OUT/LCD] (p. 58). OTHERS DATA CODE OFF WORLD TIME DATE/TIME BEEP CAM DATA A. Displaying the date/time and camera settings data - Data code ( TRV280) During playback, you press the button. z Tip • You can choose...
Camera Operations Guide
Page 38
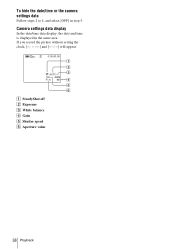
To hide the date/time or the camera settings data Follow steps 2 to 4, and select [OFF] in the same area. Camera settings data display In the date/time data display, the date and time is displayed in step 5. If you record the picture without setting the clock and [--:--:--] will appear. 60min 0:00:00:00 1 2 3 AUTO 100 AWB F1.6 9dB 4 5 6 A SteadyShot off B Exposure C White balance D Gain E Shutter speed F Aperture value 38 Playback
To hide the date/time or the camera settings data Follow steps 2 to 4, and select [OFF] in the same area. Camera settings data display In the date/time data display, the date and time is displayed in step 5. If you record the picture without setting the clock and [--:--:--] will appear. 60min 0:00:00:00 1 2 3 AUTO 100 AWB F1.6 9dB 4 5 6 A SteadyShot off B Exposure C White balance D Gain E Shutter speed F Aperture value 38 Playback
Camera Operations Guide
Page 47
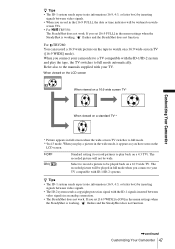
...to play a picture in the menu settings when the SteadyShot is working , flashes and the SteadyShot does not function. ,continued Customizing Your Camcorder 47 Refer also to the manuals supplied with the ID-1/ID-2 system and play the tape, the TV switches to full mode automatically. ...recorded picture will be widened on a standard TV** * Picture appears in the [16:9 FULL], the date or time indicator will be played in full mode when you connect to your TV. Customizing Your Camcorder z Tips • The ID-1 system sends aspect ratio information (16:9, 4:3, or letter box) by...
...to play a picture in the menu settings when the SteadyShot is working , flashes and the SteadyShot does not function. ,continued Customizing Your Camcorder 47 Refer also to the manuals supplied with the ID-1/ID-2 system and play the tape, the TV switches to full mode automatically. ...recorded picture will be widened on a standard TV** * Picture appears in the [16:9 FULL], the date or time indicator will be played in full mode when you connect to your TV. Customizing Your Camcorder z Tips • The ID-1 system sends aspect ratio information (16:9, 4:3, or letter box) by...
Camera Operations Guide
Page 55
... a day for 10 seconds after you start recording. AUTO DATE For TRV138/338: You can select items listed below in the menu settings. Select to deactivate the USB Streaming function. you can adjust vary depending on the power mode of your camcorder on the screen of your computer (USB Streaming). GOFF ON Select...
... a day for 10 seconds after you start recording. AUTO DATE For TRV138/338: You can select items listed below in the menu settings. Select to deactivate the USB Streaming function. you can adjust vary depending on the power mode of your camcorder on the screen of your computer (USB Streaming). GOFF ON Select...
Camera Operations Guide
Page 57
...can adjust the time difference when using your camcorder. Unavailable items will be grayed out. Select to display the date and time during playback. (p. 37) Select to play a melody when you do not operate your camcorder. BEEP Customizing Your Camcorder GMELODY NORMAL OFF A.SHUT OFF Select to ...To select items, see "Changing the menu settings" (p. 41). Select to display date, time and the camera settings data during playback. (p. 37) WORLD TIME You can adjust vary depending on your camcorder abroad. The screen shows the items you set the time difference to 0, the ...
...can adjust the time difference when using your camcorder. Unavailable items will be grayed out. Select to display the date and time during playback. (p. 37) Select to play a melody when you do not operate your camcorder. BEEP Customizing Your Camcorder GMELODY NORMAL OFF A.SHUT OFF Select to ...To select items, see "Changing the menu settings" (p. 41). Select to display date, time and the camera settings data during playback. (p. 37) WORLD TIME You can adjust vary depending on your camcorder abroad. The screen shows the items you set the time difference to 0, the ...
Camera Operations Guide
Page 61
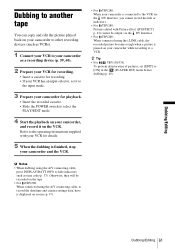
...A/V connecting cable, to record the date/time and camera settings data, have it to the input mode. 3 Prepare your camcorder for recording. • If your camcorder, and record it on the VCR. Dubbing/Editing Dubbing/Editing 61 z Tip • For TRV138/338: To prevent deterioration of pictures..., set it displayed on your camcorder while recording to [ON] in the ...
...A/V connecting cable, to record the date/time and camera settings data, have it to the input mode. 3 Prepare your camcorder for recording. • If your camcorder, and record it on the VCR. Dubbing/Editing Dubbing/Editing 61 z Tip • For TRV138/338: To prevent deterioration of pictures..., set it displayed on your camcorder while recording to [ON] in the ...
Camera Operations Guide
Page 72
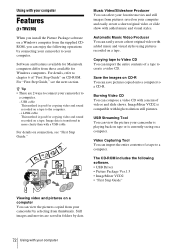
...easily create a short original video with added music and visual styles. Copying tape to a computer. Image data is currently seeing on your camcorder to the computer. - Still images and movies are 2 ways to connect your favorite movies and still images from thumbnails. Software and features... added music and visual styles using pictures recorded on connection, see the next section. The CD-ROM includes the following operations by date. 72 Using with a USB cable. Burning Video CD You can import the entire contents of videos and slide shows. ImageMixer VCD2...
...easily create a short original video with added music and visual styles. Copying tape to a computer. Image data is currently seeing on your camcorder to the computer. - Still images and movies are 2 ways to connect your favorite movies and still images from thumbnails. Software and features... added music and visual styles using pictures recorded on connection, see the next section. The CD-ROM includes the following operations by date. 72 Using with a USB cable. Burning Video CD You can import the entire contents of videos and slide shows. ImageMixer VCD2...
Camera Operations Guide
Page 81
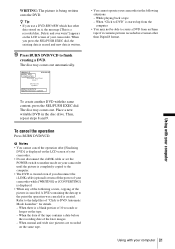
... completely copied to the computer. • The DVD is created even if you disconnect the i.LINK cable (optional) or turn off the power of your camcorder while [WRITING] or [CONVERTING] is displayed. • When any of the following situations: - When "Click to DVD" is canceled. b Notes • You...for details. - When there is a blank portion of your computer WRITING: The picture is created. When the data of the tape contains a date before the recording date of "Click to create a DVD from an 8mm tape if it contains pictures recorded in a format other data stored on it, the message...
... completely copied to the computer. • The DVD is created even if you disconnect the i.LINK cable (optional) or turn off the power of your camcorder while [WRITING] or [CONVERTING] is displayed. • When any of the following situations: - When "Click to DVD" is canceled. b Notes • You...for details. - When there is a blank portion of your computer WRITING: The picture is created. When the data of the tape contains a date before the recording date of "Click to create a DVD from an 8mm tape if it contains pictures recorded in a format other data stored on it, the message...
Camera Operations Guide
Page 85
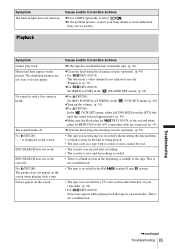
...8226; The cassette was recorded in a TV color system other than that of your Sony dealer or local authorized Sony service facility. Playback Symptom Cannot play back. Noises appear on the picture. cAdjust it. (p. 39) cFor TRV138/338: Set [EDIT] to [OFF] in the (PLAYER SET) menu. (p.... does not work . cIf the problem presists, contact your camcorder. (p. 94) • For TRV138/338: Noise may appear while playing back the tape in various modes. The displayed pictures are playing was recorded without setting the date and time. • A blank section on the screen ...
...8226; The cassette was recorded in a TV color system other than that of your Sony dealer or local authorized Sony service facility. Playback Symptom Cannot play back. Noises appear on the picture. cAdjust it. (p. 39) cFor TRV138/338: Set [EDIT] to [OFF] in the (PLAYER SET) menu. (p.... does not work . cIf the problem presists, contact your camcorder. (p. 94) • For TRV138/338: Noise may appear while playing back the tape in various modes. The displayed pictures are playing was recorded without setting the date and time. • A blank section on the screen ...


