Camera Operations Guide
Page 2
... restart the application or disconnect and connect the communication cable (USB, etc.) again. You can help preserve our environment by returning your Sony dealer regarding recycling of rechargeable batteries, call : Sony Customer Information Center 1-800-222-SONY (7669). b Notice If static electricity or electromagnetism ...-942-2230 This device complies with Part 15 of electric shock to the presence of Conformity Trade Name: SONY Model No.: DCR-TRV280 Responsible Party: Sony Electronics Inc. This symbol is intended to alert the user to the following two conditions: (1) This device...
... restart the application or disconnect and connect the communication cable (USB, etc.) again. You can help preserve our environment by returning your Sony dealer regarding recycling of rechargeable batteries, call : Sony Customer Information Center 1-800-222-SONY (7669). b Notice If static electricity or electromagnetism ...-942-2230 This device complies with Part 15 of electric shock to the presence of Conformity Trade Name: SONY Model No.: DCR-TRV280 Responsible Party: Sony Electronics Inc. This symbol is intended to alert the user to the following two conditions: (1) This device...
Camera Operations Guide
Page 3
... off and on the LCD screen and the viewfinder. Reorient or relocate the receiving antenna. - The supplied interface cable must be used with the instructions, may be contrary to make sure the picture and sound are captured using extremely... with the limits for details. CCD-TRV138: TRV138 CCD-TRV338: TRV338 DCR-TRV280: TRV280 Instructions with the limits for a Class B digital device, pursuant to insert the connector plug in illustrating the operating procedures. For disposal or recycling information, please contact your camcorder if necessary (p. 19). ,continued...
... off and on the LCD screen and the viewfinder. Reorient or relocate the receiving antenna. - The supplied interface cable must be used with the instructions, may be contrary to make sure the picture and sound are captured using extremely... with the limits for details. CCD-TRV138: TRV138 CCD-TRV338: TRV338 DCR-TRV280: TRV280 Instructions with the limits for a Class B digital device, pursuant to insert the connector plug in illustrating the operating procedures. For disposal or recycling information, please contact your camcorder if necessary (p. 19). ,continued...
Camera Operations Guide
Page 11
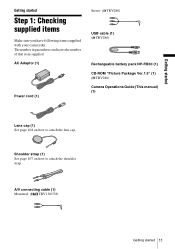
A/V connecting cable (1) Monaural: ( TRV138/338) Getting started Step 1: Checking supplied items Make sure you have following items supplied with your camcorder. The number in parentheses indicates the number of that item supplied. Shoulder strap (1) See page 107 on how to attach the shoulder strap. AC Adaptor (1) Power cord (1) Stereo: ( TRV280) USB cable (1) ( TRV280) Rechargeable battery...
A/V connecting cable (1) Monaural: ( TRV138/338) Getting started Step 1: Checking supplied items Make sure you have following items supplied with your camcorder. The number in parentheses indicates the number of that item supplied. Shoulder strap (1) See page 107 on how to attach the shoulder strap. AC Adaptor (1) Power cord (1) Stereo: ( TRV280) USB cable (1) ( TRV280) Rechargeable battery...
Camera Operations Guide
Page 27
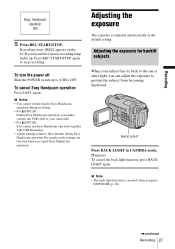
... exposure for backlit subjects When your subject has its back to the sun or other light, you cannot connect the USB cable to your camcorder. • For TRV280: You cannot use Easy Handycam operation together with USB Streaming. • All the settings return to their defaults during recording. • For TRV280: During Easy...
... exposure for backlit subjects When your subject has its back to the sun or other light, you cannot connect the USB cable to your camcorder. • For TRV280: You cannot use Easy Handycam operation together with USB Streaming. • All the settings return to their defaults during recording. • For TRV280: During Easy...
Camera Operations Guide
Page 36
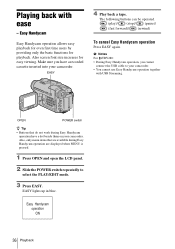
.... b Notes For TRV280: • During Easy Handycam operation, you have a dot beside them on your camcorder. • You cannot use Easy Handycam operation together with ease - Also screen font size increases for playback. Easy Handycam Easy Handycam operation allows easy playback for even first time users ...easy viewing. The following buttons can be operated. (play)/ (stop)/ (pause)/ (fast forward)/ (rewind) To cancel Easy Handycam operation Press EASY again. Make sure you cannot connect the USB cable to select the PLAY/EDIT mode. 3 Press EASY. EASY lights up in blue.
.... b Notes For TRV280: • During Easy Handycam operation, you have a dot beside them on your camcorder. • You cannot use Easy Handycam operation together with ease - Also screen font size increases for playback. Easy Handycam Easy Handycam operation allows easy playback for even first time users ...easy viewing. The following buttons can be operated. (play)/ (stop)/ (pause)/ (fast forward)/ (rewind) To cancel Easy Handycam operation Press EASY again. Make sure you cannot connect the USB cable to select the PLAY/EDIT mode. 3 Press EASY. EASY lights up in blue.
Camera Operations Guide
Page 39
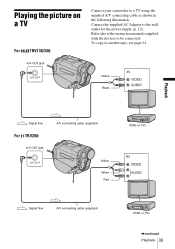
Refer also to the instruction manuals supplied with the devices to another tape, see page 61. To copy to be connected. Connect the supplied AC Adaptor to a TV using the supplied A/V connecting cable as shown in the following illustration. A/V OUT jack Yellow Black Playback Signal flow For TRV280: A/V OUT jack A/V connecting cable (supplied) Yellow White Red VCRs or TVs Signal flow A/V connecting cable (supplied) VCRs or TVs ,continued Playback 39 Playing the picture on a TV For TRV138/338: Connect your camcorder to the wall outlet for the power supply (p. 12).
Refer also to the instruction manuals supplied with the devices to another tape, see page 61. To copy to be connected. Connect the supplied AC Adaptor to a TV using the supplied A/V connecting cable as shown in the following illustration. A/V OUT jack Yellow Black Playback Signal flow For TRV280: A/V OUT jack A/V connecting cable (supplied) Yellow White Red VCRs or TVs Signal flow A/V connecting cable (supplied) VCRs or TVs ,continued Playback 39 Playing the picture on a TV For TRV138/338: Connect your camcorder to the wall outlet for the power supply (p. 12).
Camera Operations Guide
Page 40
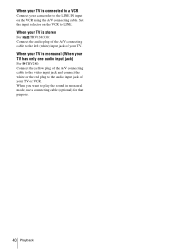
When your TV is stereo For TRV138/338: Connect the audio plug of the A/V connecting cable to the left (white) input jack of your TV. When your TV is monaural (When your TV has only one audio input jack) For TRV280: Connect the yellow plug of the A/V connecting cable to the video input jack... TV or VCR. When you want to play the sound in monaural mode, use a connecting cable (optional) for that purpose. 40 Playback Set the input selector on the VCR using the A/V connecting cable. When your TV is connected to a VCR Connect your camcorder to the LINE IN input on the VCR to LINE.
When your TV is stereo For TRV138/338: Connect the audio plug of the A/V connecting cable to the left (white) input jack of your TV. When your TV is monaural (When your TV has only one audio input jack) For TRV280: Connect the yellow plug of the A/V connecting cable to the video input jack... TV or VCR. When you want to play the sound in monaural mode, use a connecting cable (optional) for that purpose. 40 Playback Set the input selector on the VCR using the A/V connecting cable. When your TV is connected to a VCR Connect your camcorder to the LINE IN input on the VCR to LINE.
Camera Operations Guide
Page 55
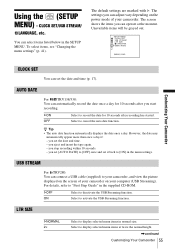
AUTO DATE For TRV138/338: You can operate at twice the normal height. ,continued Customizing Your Camcorder 55 you start recording. Select to deactivate the USB Streaming function. The default settings are marked with G. The screen shows the items you can ...function. CLOCK SET/USB STREAM/ LANGUAGE, etc. SETUP MENU CLOCK SET USB STREAM LTR SIZE LANGUAGE DEMO MODE [MENU] : END Customizing Your Camcorder CLOCK SET You can connect a USB cable (supplied) to [ON] in the supplied CD-ROM. Select to display selected menu items at the moment. USB STREAM For TRV280: You...
AUTO DATE For TRV138/338: You can operate at twice the normal height. ,continued Customizing Your Camcorder 55 you start recording. Select to deactivate the USB Streaming function. The default settings are marked with G. The screen shows the items you can ...function. CLOCK SET/USB STREAM/ LANGUAGE, etc. SETUP MENU CLOCK SET USB STREAM LTR SIZE LANGUAGE DEMO MODE [MENU] : END Customizing Your Camcorder CLOCK SET You can connect a USB cable (supplied) to [ON] in the supplied CD-ROM. Select to display selected menu items at the moment. USB STREAM For TRV280: You...

Camera Operations Guide
Page 59
A/V connecting cable (supplied) Signal flow Yellow Black VCRs Dubbing/Editing ,continued Dubbing/Editing 59 Connect your camcorder on other recording devices (p. 61). Dubbing/Editing Connecting to a VCR For TRV138/338: A/V OUT jack You can also record the picture from a VCR to a VCR as shown in the following illustration. For TRV280, you can create a copy of the picture recorded on your camcorder to a tape on your camcorder (p. 66).
A/V connecting cable (supplied) Signal flow Yellow Black VCRs Dubbing/Editing ,continued Dubbing/Editing 59 Connect your camcorder on other recording devices (p. 61). Dubbing/Editing Connecting to a VCR For TRV138/338: A/V OUT jack You can also record the picture from a VCR to a VCR as shown in the following illustration. For TRV280, you can create a copy of the picture recorded on your camcorder to a tape on your camcorder (p. 66).
Camera Operations Guide
Page 60
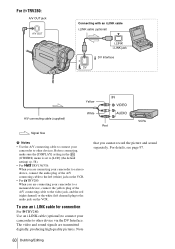
...in the (OTHERS) menu is set to [LCD] (the default setting) (p. 58). • For TRV138/338: When you are connecting your camcorder to a stereo device, connect the audio plug of the A/V connecting cable to the video jack, and the red (right channel) or the white (left channel) plug to other... digitally, producing high quality pictures. For details, see page 97. 60 Dubbing/Editing To use an i.LINK cable for connection For TRV280: Use an i.LINK cable (optional) to connect your camcorder to the audio jack on the VCR. • For TRV280: When you cannot record the picture and sound...
...in the (OTHERS) menu is set to [LCD] (the default setting) (p. 58). • For TRV138/338: When you are connecting your camcorder to a stereo device, connect the audio plug of the A/V connecting cable to the video jack, and the red (right channel) or the white (left channel) plug to other... digitally, producing high quality pictures. For details, see page 97. 60 Dubbing/Editing To use an i.LINK cable for connection For TRV280: Use an i.LINK cable (optional) to connect your camcorder to the audio jack on the VCR. • For TRV280: When you cannot record the picture and sound...
Camera Operations Guide
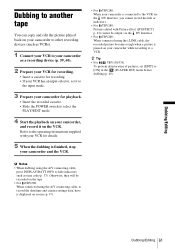
Page 61
...cannot be recorded on the tape. • For TRV280: When connected using the A/V connecting cable, to record the date/time and camera settings data, have it displayed on screen (p. 37). z Tip • For TRV138/338: To prevent deterioration of pictures, set it on the VCR. b Notes • ... mode. 4 Start the playback on your camcorder, and record it to the input mode. 3 Prepare your camcorder for details. 5 When the dubbing is finished, stop your camcorder and the VCR. • For TRV280: When your camcorder is paused on your camcorder while recording to a VCR. Dubbing/Editing...
...cannot be recorded on the tape. • For TRV280: When connected using the A/V connecting cable, to record the date/time and camera settings data, have it displayed on screen (p. 37). z Tip • For TRV138/338: To prevent deterioration of pictures, set it on the VCR. b Notes • ... mode. 4 Start the playback on your camcorder, and record it to the input mode. 3 Prepare your camcorder for details. 5 When the dubbing is finished, stop your camcorder and the VCR. • For TRV280: When your camcorder is paused on your camcorder while recording to a VCR. Dubbing/Editing...
Camera Operations Guide
Page 62
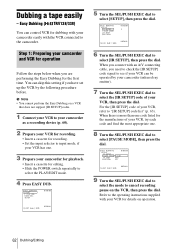
... the first time. b Note • You cannot perform the Easy Dubbing on operation. 62 Dubbing/Editing When you connect with an A/V connecting cable, you need to check the [IR SETUP] code signal to see if your VCR can skip this setting if you are performing the Easy Dubbing... a recording device (p. 60). 2 Prepare your VCR for recording. • Insert a cassette for recording. • Set the input selector to the camcorder. Easy Dubbing ( TRV138/338) You can control VCR for editing. • Slide the POWER switch repeatedly to "[IR SETUP] code list" (p. 63). For the [IR SETUP]...
... the first time. b Note • You cannot perform the Easy Dubbing on operation. 62 Dubbing/Editing When you connect with an A/V connecting cable, you need to check the [IR SETUP] code signal to see if your VCR can skip this setting if you are performing the Easy Dubbing... a recording device (p. 60). 2 Prepare your VCR for recording. • Insert a cassette for recording. • Set the input selector to the camcorder. Easy Dubbing ( TRV138/338) You can control VCR for editing. • Slide the POWER switch repeatedly to "[IR SETUP] code list" (p. 63). For the [IR SETUP]...
Camera Operations Guide
Page 66
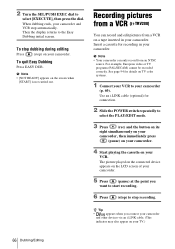
... not carried out. Recording pictures from a VCR ( TRV280) You can only record from a VCR on TV color systems. 1 Connect your camcorder. Use an i.LINK cable (optional) for details on a tape inserted in your VCR to select [EXECUTE], then press the dial. When dubbing ends, your VCR.... picture played on the connected device appears on the LCD screen of your camcorder. 5 Press (pause) at the point you connect your camcorder and other devices via an i.LINK cable. (This indicator may also appear on your camcorder and VCR stop recording. To quit Easy Dubbing Press EASY DUB. b...
... not carried out. Recording pictures from a VCR ( TRV280) You can only record from a VCR on TV color systems. 1 Connect your camcorder. Use an i.LINK cable (optional) for details on a tape inserted in your VCR to select [EXECUTE], then press the dial. When dubbing ends, your VCR.... picture played on the connected device appears on the LCD screen of your camcorder. 5 Press (pause) at the point you connect your camcorder and other devices via an i.LINK cable. (This indicator may also appear on your camcorder and VCR stop recording. To quit Easy Dubbing Press EASY DUB. b...
Camera Operations Guide
Page 67
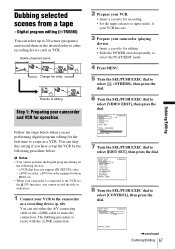
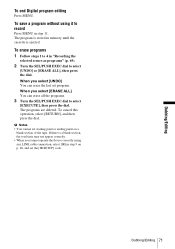
... [VIDEO EDIT], then press the dial. Dubbing selected scenes from a tape - a DVD recorder, a DVD recorder equipped with an HDD, etc • When your camcorder is easier with the i.LINK connection. 2 Prepare your VCR. • Insert a cassette for recording. • Set the input selector to input mode, if your ... by the following devices: - LINK [MENU] : END ,continued Dubbing/Editing 67 Dubbing/Editing Digital program editing ( TRV280) You can use either the A/V connecting cable or the i.LINK cable to the camcorder as VCR. VIDEO EDIT EDIT SET CONTROL 0:08:55:06 IR i.
... [VIDEO EDIT], then press the dial. Dubbing selected scenes from a tape - a DVD recorder, a DVD recorder equipped with an HDD, etc • When your camcorder is easier with the i.LINK connection. 2 Prepare your VCR. • Insert a cassette for recording. • Set the input selector to input mode, if your ... by the following devices: - LINK [MENU] : END ,continued Dubbing/Editing 67 Dubbing/Editing Digital program editing ( TRV280) You can use either the A/V connecting cable or the i.LINK cable to the camcorder as VCR. VIDEO EDIT EDIT SET CONTROL 0:08:55:06 IR i.
Camera Operations Guide
Page 68
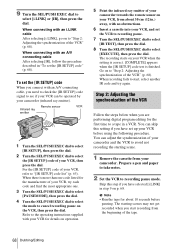
...program editing for about 30 cm (12 in.) away, with an A/V connecting cable After selecting [IR], follow the procedure described in a VCR. Refer to "Step 2: Adjusting the synchronization of your camcorder towards the remote sensor on the VCR, then press the dial. The recording starts... on to the operating instructions supplied with an i.LINK cable After selecting [i.LINK], go on p. 68. The starting scene. 1 ...
...program editing for about 30 cm (12 in.) away, with an A/V connecting cable After selecting [IR], follow the procedure described in a VCR. Refer to "Step 2: Adjusting the synchronization of your camcorder towards the remote sensor on the VCR, then press the dial. The recording starts... on to the operating instructions supplied with an i.LINK cable After selecting [i.LINK], go on p. 68. The starting scene. 1 ...
Camera Operations Guide
Page 70
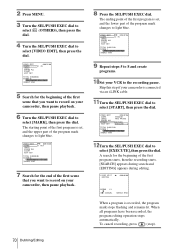
... OUT TOTAL 0:00:00:00 SCENE 0 [MENU] : END 7 Search for the end of the first scene that you want to record on your camcorder, then pause playback. 6 Turn the SEL/PUSH EXEC dial to select [MARK], then press the dial. A search for the beginning of the first ...I DEO ED I T EDITING 0:00:06:00 SCENE 1 / 1 [ ] : CANCEL [MENU] : END When a program is connected via an i.LINK cable. 11Turn the SEL/PUSH EXEC dial to 8 and create programs. 10Set your camcorder is recorded, the program mark stops flashing and remains lit. VIDEO EDIT MARK UNDO ERASE ALL START EDIT SET...
... OUT TOTAL 0:00:00:00 SCENE 0 [MENU] : END 7 Search for the end of the first scene that you want to record on your camcorder, then pause playback. 6 Turn the SEL/PUSH EXEC dial to select [MARK], then press the dial. A search for the beginning of the first ...I DEO ED I T EDITING 0:00:06:00 SCENE 1 / 1 [ ] : CANCEL [MENU] : END When a program is connected via an i.LINK cable. 11Turn the SEL/PUSH EXEC dial to 8 and create programs. 10Set your camcorder is recorded, the program mark stops flashing and remains lit. VIDEO EDIT MARK UNDO ERASE ALL START EDIT SET...
Camera Operations Guide
Page 71
... 1 to select [UNDO] or [ERASE ALL], then press the dial. If there is ejected. The programs are deleted. To save a program without using an i.LINK cable connection, select [IR] in "Recording the selected scenes as programs" (p. 69). 2 Turn the SEL/PUSH EXEC dial to 4 in step 9 on a blank section of the...
... 1 to select [UNDO] or [ERASE ALL], then press the dial. If there is ejected. The programs are deleted. To save a program without using an i.LINK cable connection, select [IR] in "Recording the selected scenes as programs" (p. 69). 2 Turn the SEL/PUSH EXEC dial to 4 in step 9 on a blank section of the...
Camera Operations Guide
Page 72
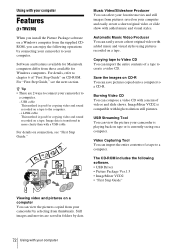
... resolution still pictures. Automatic Music Video Producer You can easily create a short original video with a USB cable. USB Streaming Tool You can view the picture your camcorder to your computer. Using with your computer Features ( TRV280) When you install the Picture Package software on...• ImageMixer VCD2 • "First Step Guide" Viewing video and pictures on a computer You can view the pictures copied from your camcorder by connecting your camcorder to a computer. - Image data is currently seeing on a tape. Still images and movies are 2 ways to a computer. Burning ...
... resolution still pictures. Automatic Music Video Producer You can easily create a short original video with a USB cable. USB Streaming Tool You can view the picture your camcorder to your computer. Using with your computer Features ( TRV280) When you install the Picture Package software on...• ImageMixer VCD2 • "First Step Guide" Viewing video and pictures on a computer You can view the pictures copied from your camcorder by connecting your camcorder to a computer. - Image data is currently seeing on a tape. Still images and movies are 2 ways to a computer. Burning ...
Camera Operations Guide
Page 73
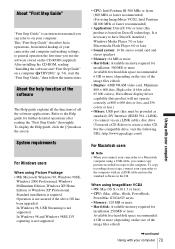
... size of your computer Refer to a Macintosh computer using a USB cable, you use the standard software in the OS. In Windows 98, USB Streaming is an instruction manual you can refer to on your camcorder to the Help guide for installation 250 MB or more Available free hard...Step Guide" "First Step Guide" is not supported. This "First Step Guide" describes basic operations, from a tape, connect your camcorder to the computer with your camcorder and computer and making settings, to general operation the first time you cannot copy pictures recorded on the CD-ROM (supplied). System ...
... size of your computer Refer to a Macintosh computer using a USB cable, you use the standard software in the OS. In Windows 98, USB Streaming is an instruction manual you can refer to on your camcorder to the Help guide for installation 250 MB or more Available free hard...Step Guide" "First Step Guide" is not supported. This "First Step Guide" describes basic operations, from a tape, connect your camcorder to the computer with your camcorder and computer and making settings, to general operation the first time you cannot copy pictures recorded on the CD-ROM (supplied). System ...
Camera Operations Guide
Page 79
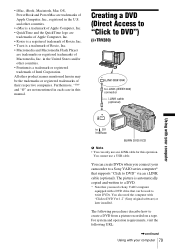
...software) or later installed. The picture is automatically copied and written to a DVD. * Note that can only use a USB cable. You also need a Sony VAIO computer equipped with your computer 79 • iMac, iBook, Macintosh, Mac OS, PowerBook and PowerMac are trademarks of Apple ...Corporation. Creating a DVD (Direct Access to "Click to DVD") ( TRV280) to i.LINK (IEEE1394) connector i.LINK cable (optional) Using with a DVD drive that you connect your camcorder to a Sony VAIO series computer* that supports "Click to DV Interface BURN DVD/VCD b Note • You can be the trademarks...
...software) or later installed. The picture is automatically copied and written to a DVD. * Note that can only use a USB cable. You also need a Sony VAIO computer equipped with your computer 79 • iMac, iBook, Macintosh, Mac OS, PowerBook and PowerMac are trademarks of Apple ...Corporation. Creating a DVD (Direct Access to "Click to DVD") ( TRV280) to i.LINK (IEEE1394) connector i.LINK cable (optional) Using with a DVD drive that you connect your camcorder to a Sony VAIO series computer* that supports "Click to DV Interface BURN DVD/VCD b Note • You can be the trademarks...


