
User Manual (ENGLISH)
Page 7
...ENGLISH Advanced Recording ...36 Use of various Functions ...36 Setting menu items ...36 Set the camcorder to CAMERA or PLAYER mode and M.REC or M.PLAY mode ...37 Availability of functions in ...(WHITE BALANCE) ...44 Zooming In and Out ...45 Tele MACRO ...45 Digital Zoom ...46 DIS (Digital Image Stabilizer) ...47 DSE (Digital Special Effects) SELECT ...48 Selecting an effect ...49 REC MODE ...50 AUDIO...Low Shutter Speed) ...58 EASY Mode (for Beginners) ...59 AF/MF (Auto Focus/Manual Focus) ...60 Auto Focusing ...60 Manual Focusing ...60 BLC (Back Light Compensation) ...61 Fade In and Out ...62 To...
...ENGLISH Advanced Recording ...36 Use of various Functions ...36 Setting menu items ...36 Set the camcorder to CAMERA or PLAYER mode and M.REC or M.PLAY mode ...37 Availability of functions in ...(WHITE BALANCE) ...44 Zooming In and Out ...45 Tele MACRO ...45 Digital Zoom ...46 DIS (Digital Image Stabilizer) ...47 DSE (Digital Special Effects) SELECT ...48 Selecting an effect ...49 REC MODE ...50 AUDIO...Low Shutter Speed) ...58 EASY Mode (for Beginners) ...59 AF/MF (Auto Focus/Manual Focus) ...60 Auto Focusing ...60 Manual Focusing ...60 BLC (Back Light Compensation) ...61 Fade In and Out ...62 To...

User Manual (ENGLISH)
Page 22
Battery level (see page 60) 8. Manual focus (see page 26) 2. Zoom position (see page 7) 28. USB 13. DEW (...59) 3. DV 26 1 2 : 0 0 A M J A N . 1 0 , 2 0 0 4 [ 1 1 ] 24 11 Easy mode (see page 76) 31. DSE (Digital Special Effects) mode (see page 57) 9. Shutter speed and EXPOSURE (see page 48) 4. Audio playback channel 26. NITE PIX (see page 53) 12. DATE/TIME... 4 11 9 10 ZOOM 8 SHUTTER EXPOSURE OSD in minutes) 18. C 5 5 min 27 28 1 6 bit 30 ENTER : VOL. ENGLISH Getting to Know Your Camcorder OSD (On Screen Display in CAMERA and PLAYER modes) 1.
Battery level (see page 60) 8. Manual focus (see page 26) 2. Zoom position (see page 7) 28. USB 13. DEW (...59) 3. DV 26 1 2 : 0 0 A M J A N . 1 0 , 2 0 0 4 [ 1 1 ] 24 11 Easy mode (see page 76) 31. DSE (Digital Special Effects) mode (see page 57) 9. Shutter speed and EXPOSURE (see page 48) 4. Audio playback channel 26. NITE PIX (see page 53) 12. DATE/TIME... 4 11 9 10 ZOOM 8 SHUTTER EXPOSURE OSD in minutes) 18. C 5 5 min 27 28 1 6 bit 30 ENTER : VOL. ENGLISH Getting to Know Your Camcorder OSD (On Screen Display in CAMERA and PLAYER modes) 1.

User Manual (ENGLISH)
Page 60
...PROGRAM AE WHT. Each time you want and then press the ENTER button to change the values. Setting the Quick menu 1. Notes I FOCUS (Auto Focus/Manual Focus) (see page 60) - I Quick menu function will not operate in PROGRAM AE, you can set values for SHUTTER SPEED and EXPOSURE by selecting... ( For more information, see page 44) - Set the camcorder to either Manual Focus (MF) or Auto Focus ( ). If you select FOCUS and press the ENTER button, the FOCUS is switched to CAMERA mode. 2. You can...
...PROGRAM AE WHT. Each time you want and then press the ENTER button to change the values. Setting the Quick menu 1. Notes I FOCUS (Auto Focus/Manual Focus) (see page 60) - I Quick menu function will not operate in PROGRAM AE, you can set values for SHUTTER SPEED and EXPOSURE by selecting... ( For more information, see page 44) - Set the camcorder to either Manual Focus (MF) or Auto Focus ( ). If you select FOCUS and press the ENTER button, the FOCUS is switched to CAMERA mode. 2. You can...

User Manual (ENGLISH)
Page 61
I If you should begin the recording with a SHUTTER SPEED of 1/1000 or higher, make sure the sun is selected, manual changes are automatically switched and/or deactivated. 1. Recommended Shutter speeds when recording ✤ Outdoor sports such as golf or tennis : 1/2000 or 1/4000. ...want to use the selected shutter speed and exposure value, you want and then press the ENTER button. I The camcorder returns to the auto shutter setting and auto exposure setting when you manually change to CAMERA mode. 2. Set the power switch to the EASY, SLOW SHUTTER modes. I If you set ...
I If you should begin the recording with a SHUTTER SPEED of 1/1000 or higher, make sure the sun is selected, manual changes are automatically switched and/or deactivated. 1. Recommended Shutter speeds when recording ✤ Outdoor sports such as golf or tennis : 1/2000 or 1/4000. ...want to use the selected shutter speed and exposure value, you want and then press the ENTER button. I The camcorder returns to the auto shutter setting and auto exposure setting when you manually change to CAMERA mode. 2. Set the power switch to the EASY, SLOW SHUTTER modes. I If you set ...

User Manual (ENGLISH)
Page 64
... DIAL up or down until the object is better to use of your recording. ✤ Manual focusing may obtain better results by snow. FOCUS MF VOL/MF STBY 0 : 0 0 : 0 0 5 3 min 1 2 : 0 0 A M J A N . 10 . 2 0 0 4 d. Set the power switch to the camcorder, others further away. I M. c. Very shiny or glossy surfaces like an athlete or a crowd. 2 1. Turn the...
... DIAL up or down until the object is better to use of your recording. ✤ Manual focusing may obtain better results by snow. FOCUS MF VOL/MF STBY 0 : 0 0 : 0 0 5 3 min 1 2 : 0 0 A M J A N . 10 . 2 0 0 4 d. Set the power switch to the camcorder, others further away. I M. c. Very shiny or glossy surfaces like an athlete or a crowd. 2 1. Turn the...

User Manual (ENGLISH)
Page 70
... OFF ON POWER NITE PIX STBY 0 : 0 0 : 0 0 6 0 min Notes NITE PIX I The maximum recording distance using the NITE PIX function, focus manually. I If focusing is difficult with the hand. 66 I If you to OFF. outdoors by day), the recorded picture may be tinted green. I (NITE PIX indicator...) appears on automatically. 3. I The infrared(invisible rays) light is about 3 m (about 10 feet). Set the camcorder to ON. I Do not cover the Infrared Light with the auto focus mode when using the infrared light is turned on the LCD monitor. To...
... OFF ON POWER NITE PIX STBY 0 : 0 0 : 0 0 6 0 min Notes NITE PIX I The maximum recording distance using the NITE PIX function, focus manually. I If focusing is difficult with the hand. 66 I If you to OFF. outdoors by day), the recorded picture may be tinted green. I (NITE PIX indicator...) appears on automatically. 3. I The infrared(invisible rays) light is about 3 m (about 10 feet). Set the camcorder to ON. I Do not cover the Infrared Light with the auto focus mode when using the infrared light is turned on the LCD monitor. To...

User Manual (ENGLISH)
Page 74
... plug : Audio(L)-mono I If you connect the cable to the Audio/Video Jack, you use the AC Power Adapter as the power source for the camcorder. I Even if you use an S-VIDEO (optional) cable plug to PLAYER mode. 3. ENGLISH Playback Tape Playback ✤ The playback function works in a car or...cable. Set the power switch on the LCD ✤ It is practical to the TV or VCR user's manual. 4. I You may use an S-VIDEO (optional) cable, you need to VIDEO. Playback on the camcorder to obtain better quality pictures if you connect to a monaural TV or VCR, connect the yellow plug (...
... plug : Audio(L)-mono I If you connect the cable to the Audio/Video Jack, you use the AC Power Adapter as the power source for the camcorder. I Even if you use an S-VIDEO (optional) cable plug to PLAYER mode. 3. ENGLISH Playback Tape Playback ✤ The playback function works in a car or...cable. Set the power switch on the LCD ✤ It is practical to the TV or VCR user's manual. 4. I You may use an S-VIDEO (optional) cable, you need to VIDEO. Playback on the camcorder to obtain better quality pictures if you connect to a monaural TV or VCR, connect the yellow plug (...

User Manual (ENGLISH)
Page 84
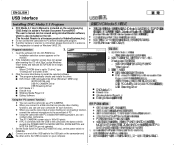
...mode switch to Tape, set to begin installation. - ENGLISH USB interface Installing DVC Media 5.1 Program ✤ DVC Media 5.1 User's Manual is included on the accompanying CD(D:\help\) in advance. ✤ This explanation is based on Windows® 98SE OS. Installation selection... Player 9.0 I The program automatically checks and installs the driver. Connect one end of AdobeSystems,Inc.) ✤ Do not connect the camcorder to the camcorder, the buttons which excepts the POWER SWITCH, MODE SWITCH, ZOOM SWITCH and NITE PIX SWITCH are not operated. 1. Program installation 1. ...
...mode switch to Tape, set to begin installation. - ENGLISH USB interface Installing DVC Media 5.1 Program ✤ DVC Media 5.1 User's Manual is included on the accompanying CD(D:\help\) in advance. ✤ This explanation is based on Windows® 98SE OS. Installation selection... Player 9.0 I The program automatically checks and installs the driver. Connect one end of AdobeSystems,Inc.) ✤ Do not connect the camcorder to the camcorder, the buttons which excepts the POWER SWITCH, MODE SWITCH, ZOOM SWITCH and NITE PIX SWITCH are not operated. 1. Program installation 1. ...

User Manual (ENGLISH)
Page 85
...the USB port on your computer. If you must be damaged. Connect the other end of USB streaming, refer to the DVC Media 5.1 User's Manual. Select [Confirm] and disconnect the USB cable when the Windows Splash screen appears. Notes I If you disconnect the USB cable from the PC ... Cable USB DV AUDIO /VIDEO S-VIDEO MIC 81 Connecting to select [Eject]. 2. If this occurs, remove all USB devices from the PC and reconnect the camcorder. Set the mode switch to TAPE, set the power switch to CAMERA or PLAYER. 2. Execute the DVC Media 5.1 program. If a PC is MPEG4....
...the USB port on your computer. If you must be damaged. Connect the other end of USB streaming, refer to the DVC Media 5.1 User's Manual. Select [Confirm] and disconnect the USB cable when the Windows Splash screen appears. Notes I If you disconnect the USB cable from the PC ... Cable USB DV AUDIO /VIDEO S-VIDEO MIC 81 Connecting to select [Eject]. 2. If this occurs, remove all USB devices from the PC and reconnect the camcorder. Set the mode switch to TAPE, set the power switch to CAMERA or PLAYER. 2. Execute the DVC Media 5.1 program. If a PC is MPEG4....

User Manual (ENGLISH)
Page 108
... a broken block image during playback. Check the record protection tab on the screen when is blurred. The image in the Manual Focus mode. Check the POWER switch. Check the battery pack or the AC Power Adapter. while recording. The atmospheric temperature ... normally. The camcorder goes off automatically. This is normal operation and it . When you are recording brighter. You have reached the end of the cassette. ENGLISH Troubleshooting ✤ If these instructions do not solve your problem, contact your nearest Samsung authorized service center...
... a broken block image during playback. Check the record protection tab on the screen when is blurred. The image in the Manual Focus mode. Check the POWER switch. Check the battery pack or the AC Power Adapter. while recording. The atmospheric temperature ... normally. The camcorder goes off automatically. This is normal operation and it . When you are recording brighter. You have reached the end of the cassette. ENGLISH Troubleshooting ✤ If these instructions do not solve your problem, contact your nearest Samsung authorized service center...

User Manual (ENGLISH)
Page 3
... Use of various Functions 36 Setting menu items 36 Set the camcorder to CAMERA or PLAYER mode and M.REC or M.PLAY mode (SCD103/D105 only 37 Availability of functions in each mode 38 CLOCK ... BALANCE (WHITE BALANCE 44 Zooming In and Out 45 Tele MACRO 45 Digital Zoom 46 DIS (Digital Image Stabilizer 47 DSE (Digital Special Effects) SELECT 48 Selecting an effect 49 REC MODE 50 AUDIO MODE...SHUTTER(Low Shutter Speed 58 EASY Mode (for Beginners 59 AF/MF (Auto Focus/Manual Focus 60 Auto Focusing 60 Manual Focusing 60 BLC (Back Light Compensation 61 Fade In and Out 62 To Start Recording...
... Use of various Functions 36 Setting menu items 36 Set the camcorder to CAMERA or PLAYER mode and M.REC or M.PLAY mode (SCD103/D105 only 37 Availability of functions in each mode 38 CLOCK ... BALANCE (WHITE BALANCE 44 Zooming In and Out 45 Tele MACRO 45 Digital Zoom 46 DIS (Digital Image Stabilizer 47 DSE (Digital Special Effects) SELECT 48 Selecting an effect 49 REC MODE 50 AUDIO MODE...SHUTTER(Low Shutter Speed 58 EASY Mode (for Beginners 59 AF/MF (Auto Focus/Manual Focus 60 Auto Focusing 60 Manual Focusing 60 BLC (Back Light Compensation 61 Fade In and Out 62 To Start Recording...

User Manual (ENGLISH)
Page 18
.... POWER NITE PIX (see page 57) 9. C 5 5 min 27 28 1 6 bit 30 ENTER : VOL. Shutter speed and EXPOSURE (see page 67) 32. DSE (Digital Special Effects) mode (see page 60) 8. Manual focus (see page 48) 4. DEW (see page 45) 18 OSD in CAMERA mode 23 32 22 21 20 19 1 REC 2 EASY M - 0 : 0 0 : 0 0 18... 7 MF NITE PIX 14 13 SHUTTER P EXPOSURE 12 1 2 : 0 0 A M 31 JAN . 10 , 2 0 0 4 11 9 10 ZOOM 8 SHUTTER EXPOSURE OSD in minutes) 18. ENGLISH Getting to Know Your Camcorder OSD (On Screen Display in CAMERA and PLAYER modes) 1.
.... POWER NITE PIX (see page 57) 9. C 5 5 min 27 28 1 6 bit 30 ENTER : VOL. Shutter speed and EXPOSURE (see page 67) 32. DSE (Digital Special Effects) mode (see page 60) 8. Manual focus (see page 48) 4. DEW (see page 45) 18 OSD in CAMERA mode 23 32 22 21 20 19 1 REC 2 EASY M - 0 : 0 0 : 0 0 18... 7 MF NITE PIX 14 13 SHUTTER P EXPOSURE 12 1 2 : 0 0 A M 31 JAN . 10 , 2 0 0 4 11 9 10 ZOOM 8 SHUTTER EXPOSURE OSD in minutes) 18. ENGLISH Getting to Know Your Camcorder OSD (On Screen Display in CAMERA and PLAYER modes) 1.

User Manual (ENGLISH)
Page 56
...Advanced Recording I Quick menu function will not operate in PROGRAM AE, you want and then press the ENTER button to either Manual Focus (MF) or Auto Focus I FOCUS (Auto Focus/Manual Focus) (see page 60) - Turn the MENU DIAL to select a function you want to CAMERA mode. 2. BALANCE... (see the next page. For more information, see page 44) I selecting ( ) icon and pressing the ENTER button. Set the camcorder to use the Quick menu. ...
...Advanced Recording I Quick menu function will not operate in PROGRAM AE, you want and then press the ENTER button to either Manual Focus (MF) or Auto Focus I FOCUS (Auto Focus/Manual Focus) (see page 60) - Turn the MENU DIAL to select a function you want to CAMERA mode. 2. BALANCE... (see the next page. For more information, see page 44) I selecting ( ) icon and pressing the ENTER button. Set the camcorder to use the Quick menu. ...

User Manual (ENGLISH)
Page 57
... M.REC modes. ✤ SHUTTER SPEED and EXPOSURE values can select SHUTTER SPEED and I sure the sun is selected, manual changes are automatically switched and/or deactivated. 1. I setting when you manually change to 1/60, 1/100, 1/250, 1/500, 1/1000, 1/2000, 1/4000 or 1/10000. Recommended Shutter speeds...; coasters : 1/1000, 1/500 or 1/250 ✤ ✤ Indoor sports such as smooth when a high shutter speed is set. I I The camcorder returns to ON, or change the shutter speed and the exposure value when I You see the ( ) icon, and then press the ENTER button. ...
... M.REC modes. ✤ SHUTTER SPEED and EXPOSURE values can select SHUTTER SPEED and I sure the sun is selected, manual changes are automatically switched and/or deactivated. 1. I setting when you manually change to 1/60, 1/100, 1/250, 1/500, 1/1000, 1/2000, 1/4000 or 1/10000. Recommended Shutter speeds...; coasters : 1/1000, 1/500 or 1/250 ✤ ✤ Indoor sports such as smooth when a high shutter speed is set. I I The camcorder returns to ON, or change the shutter speed and the exposure value when I You see the ( ) icon, and then press the ENTER button. ...

User Manual (ENGLISH)
Page 60
... feature, as it enables you to concentrate on the creative side of Auto Focus. a Auto Focusing ✤ If you are inexperienced in the use of camcorders, we recommend that make use of your recording. ✤ Manual focusing may obtain better results by snow.
... feature, as it enables you to concentrate on the creative side of Auto Focus. a Auto Focusing ✤ If you are inexperienced in the use of camcorders, we recommend that make use of your recording. ✤ Manual focusing may obtain better results by snow.

User Manual (ENGLISH)
Page 66
Set the camcorder to ON. Slide the NITE PIX switch to CAMERA mode. 2. Notes I The maximum recording distance using the I NITE PIX function, focus manually. I Do not cover the Infrared Light with the auto focus mode when using the infrared light is I 66 ENGLISH Advanced Recording NITE PIX (0 lux recording) &#...
Set the camcorder to ON. Slide the NITE PIX switch to CAMERA mode. 2. Notes I The maximum recording distance using the I NITE PIX function, focus manually. I Do not cover the Infrared Light with the auto focus mode when using the infrared light is I 66 ENGLISH Advanced Recording NITE PIX (0 lux recording) &#...

User Manual (ENGLISH)
Page 70
...plug : Audio(L)-mono I The red plug : Audio(R) S-VIDEO input Video input-Yellow Audio input Camcorder I TV (left)-White Audio input I (right)-Red Audio/Video USB DV AUDIO /VIDEO I Refer to the TV or VCR user's manual. I - Play the tape. If you need to connect an audio cable. Set the power ...switch on the TV to VIDEO. Turn on the TV and set the TV/VIDEO selector on the camcorder to PLAYER mode. 3. I If you connect the cable...
...plug : Audio(L)-mono I The red plug : Audio(R) S-VIDEO input Video input-Yellow Audio input Camcorder I TV (left)-White Audio input I (right)-Red Audio/Video USB DV AUDIO /VIDEO I Refer to the TV or VCR user's manual. I - Play the tape. If you need to connect an audio cable. Set the power ...switch on the TV to VIDEO. Turn on the TV and set the TV/VIDEO selector on the camcorder to PLAYER mode. 3. I If you connect the cable...
User Manual (ENGLISH)
Page 80
...'s Portable Document Format(PDF) The user's manual can conduct video conference. ✤ ✤ ✤ The PC CAMERA's screen size is 160x120 pixels. ✤ ✤ If PC is connected with the USB to the camcorder, the buttons which is also included on the... OS. I The program automatically checks and installs the driver. Program installation 3. 1. I I DVC Driver: USB removable Disk Driver (Windows® 98SE only) (SCD103/D105 only) USB PC CAMERA Driver USB Streaming Driver I DVC Media 5.1 I DirectX 9.0a I I Windows Media Player 9.0 I I Editing Software I I Using...
...'s Portable Document Format(PDF) The user's manual can conduct video conference. ✤ ✤ ✤ The PC CAMERA's screen size is 160x120 pixels. ✤ ✤ If PC is connected with the USB to the camcorder, the buttons which is also included on the... OS. I The program automatically checks and installs the driver. Program installation 3. 1. I I DVC Driver: USB removable Disk Driver (Windows® 98SE only) (SCD103/D105 only) USB PC CAMERA Driver USB Streaming Driver I DVC Media 5.1 I DirectX 9.0a I I Windows Media Player 9.0 I I Editing Software I I Using...

User Manual (ENGLISH)
Page 81
...your computer. If you disconnect the USB cable from 81 the PC and reconnect the camcorder. Select [Confirm] and disconnect the USB cable when the Windows Splash ✤ screen appears. Set the mode switch to TAPE (SCD103/D105 only), set the power switch to select [Eject]. 2. Select the removable ... description of the USB cable to the USB jack on the camcorder and the other end to the USB port on your computer. 3. Set the mode switch to memory, set the power switch to the DVC Media 5.1 User's Manual. Connect one end of USB streaming, refer to CAMERA or PLAYER...
...your computer. If you disconnect the USB cable from 81 the PC and reconnect the camcorder. Select [Confirm] and disconnect the USB cable when the Windows Splash ✤ screen appears. Set the mode switch to TAPE (SCD103/D105 only), set the power switch to select [Eject]. 2. Select the removable ... description of the USB cable to the USB jack on the camcorder and the other end to the USB port on your computer. 3. Set the mode switch to memory, set the power switch to the DVC Media 5.1 User's Manual. Connect one end of USB streaming, refer to CAMERA or PLAYER...

User Manual (ENGLISH)
Page 104
...is not a failure or defect. 11044 ENGLISH Troubleshooting ✤ If these instructions do not solve your problem, contact your ✤ nearest Samsung authorized service center. does not operate You have reached the beginning or end of the cassette. A vertical strip appears The contrast between ...you see a blue screen during the RECORD SEARCH. The image in the Manual Focus mode. The video heads may be recharged, Use another battery pack. Symptom Explanation/Solution You cannot switch the camcorder on the screen when is normal operation and it . Check the battery...
...is not a failure or defect. 11044 ENGLISH Troubleshooting ✤ If these instructions do not solve your problem, contact your ✤ nearest Samsung authorized service center. does not operate You have reached the beginning or end of the cassette. A vertical strip appears The contrast between ...you see a blue screen during the RECORD SEARCH. The image in the Manual Focus mode. The video heads may be recharged, Use another battery pack. Symptom Explanation/Solution You cannot switch the camcorder on the screen when is normal operation and it . Check the battery...


