

User Manual (ENGLISH)
Page 3
These openings must not be walked on the label. POWER-CORD PROTECTION: Power-supply cords should be routed so that they exit from battery power, or other ) or a 3-wire grounding type plug, a plug having one blade wider than the other sources, refer to insert ...of grounding to conductors, location of antenna-discharge unit, connection to grounding electrodes and requirements for ventilation to ensure reliable operation of the CAMCORDER and to be sure the antenna or cable system is grounded to provide some protection against them, paying particular attention to cords or plugs...
These openings must not be walked on the label. POWER-CORD PROTECTION: Power-supply cords should be routed so that they exit from battery power, or other ) or a 3-wire grounding type plug, a plug having one blade wider than the other sources, refer to insert ...of grounding to conductors, location of antenna-discharge unit, connection to grounding electrodes and requirements for ventilation to ensure reliable operation of the CAMCORDER and to be sure the antenna or cable system is grounded to provide some protection against them, paying particular attention to cords or plugs...

User Manual (ENGLISH)
Page 6
... To use the AC Power adapter and DC Cable ...23 To select the CAMCORDER mode...23 Using the Lithium Ion Battery Pack ...24 Charging the Lithium Ion Battery Pack ...24 Table of continuous recording time based on model and battery type ...25 Battery level display ...26 Inserting and Ejecting a Cassette ...27 BASIC Recording ...28 Making...
... To use the AC Power adapter and DC Cable ...23 To select the CAMCORDER mode...23 Using the Lithium Ion Battery Pack ...24 Charging the Lithium Ion Battery Pack ...24 Table of continuous recording time based on model and battery type ...25 Battery level display ...26 Inserting and Ejecting a Cassette ...27 BASIC Recording ...28 Making...
User Manual (ENGLISH)
Page 11
... compartment opened and the battery pack removed. for at least two hours in atmospheric temperature may get wet. from outside during winter.) - from rain, sea water, and any other program materials may be repaired. 7 If the (DEW) protection feature is activated, leave the camcorder for example: - If the camcorder gets wet, it may...
... compartment opened and the battery pack removed. for at least two hours in atmospheric temperature may get wet. from outside during winter.) - from rain, sea water, and any other program materials may be repaired. 7 If the (DEW) protection feature is activated, leave the camcorder for example: - If the camcorder gets wet, it may...

User Manual (ENGLISH)
Page 12
... more than the LCD when making a long recording, because the LCD uses up more battery power. * When the battery reaches the end of its life, please contact your camcorder is left in CAMERA mode, and it . - A brand new battery pack is fitted firmly into place. ENGLISH Notes and Safety Instructions Notes regarding the Video...
... more than the LCD when making a long recording, because the LCD uses up more battery power. * When the battery reaches the end of its life, please contact your camcorder is left in CAMERA mode, and it . - A brand new battery pack is fitted firmly into place. ENGLISH Notes and Safety Instructions Notes regarding the Video...
User Manual (ENGLISH)
Page 14
... battery 1. The lithium battery for the camcorder lasts about 6 months under normal operation from time of children. Replace only with a new one(type CR2025). 4. Should a battery be swallowed, consult a doctor immediately. 10 The lithium battery maintains the clock function and user settings; When the lithium battery ... you set the DATE/TIME to ON. even if the battery pack or AC adapter is incorrectly replaced. When this occurs, replace the lithium battery with the same or equivalent type. Warning: Keep the LITHIUM BATTERY out of reach of installation. 3. There is a danger...
... battery 1. The lithium battery for the camcorder lasts about 6 months under normal operation from time of children. Replace only with a new one(type CR2025). 4. Should a battery be swallowed, consult a doctor immediately. 10 The lithium battery maintains the clock function and user settings; When the lithium battery ... you set the DATE/TIME to ON. even if the battery pack or AC adapter is incorrectly replaced. When this occurs, replace the lithium battery with the same or equivalent type. Warning: Keep the LITHIUM BATTERY out of reach of installation. 3. There is a danger...
User Manual (ENGLISH)
Page 16
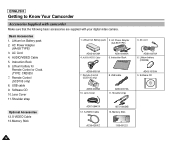
...Your Camcorder Accessories Supplied with camcorder Make sure that the following basic accessories are supplied with your digital video camera. Lithium battery for Remote Control or Clock. (TYPE: CR2025) 7. Lithium Ion Battery pack 2. USB cable AD59-00085A 10. AC cord AD39-00076A 6. Lithium battery (... TYPE) 3. Shoulder strap Optional Accessories 12.S-VIDEO Cable 13.Memory Stick AD97-08447A 12. Instruction Book AD39-00001A 7. Lithium Ion Battery pack 2. Remote Control (SCD105 only) 8. Remote Control (SCD105 only) 8. AC Cord 4. AUDIO/VIDEO Cable AD44-00090A 5. ...
...Your Camcorder Accessories Supplied with camcorder Make sure that the following basic accessories are supplied with your digital video camera. Lithium battery for Remote Control or Clock. (TYPE: CR2025) 7. Lithium Ion Battery pack 2. USB cable AD59-00085A 10. AC cord AD39-00076A 6. Lithium battery (... TYPE) 3. Shoulder strap Optional Accessories 12.S-VIDEO Cable 13.Memory Stick AD97-08447A 12. Instruction Book AD39-00001A 7. Lithium Ion Battery pack 2. Remote Control (SCD105 only) 8. Remote Control (SCD105 only) 8. AC Cord 4. AUDIO/VIDEO Cable AD44-00090A 5. ...

User Manual (ENGLISH)
Page 19
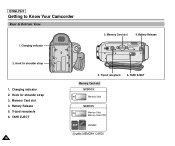
... NITE PIX switch 7. External MIC in 14. DV jack 10. Focus adjustment knob 3. Power switch (CAMERA or PLAYER) 6. Slow shutter ENGLISH 6. Slow shutter 8. LITHIUM Battery Holder 8. START/STOP button 5. PHOTO button (see page 65) 4. DV jack 10. S-VIDEO jack 12. S-VIDEO jack 12. Jack Cover 13. Zoom lever 2. ... MIC in 14. Hook for handstrap 15. USB jack 9. USB jack 9. Jack Cover 13. NITE PIX switch 7. Hook for handstrap 15. LITHIUM Battery Holder 15 Audio/Video jack 11. Focus adjustment knob 3. Getting to Know Your Camcorder Right & Top View 1.
... NITE PIX switch 7. External MIC in 14. DV jack 10. Focus adjustment knob 3. Power switch (CAMERA or PLAYER) 6. Slow shutter ENGLISH 6. Slow shutter 8. LITHIUM Battery Holder 8. START/STOP button 5. PHOTO button (see page 65) 4. DV jack 10. S-VIDEO jack 12. S-VIDEO jack 12. Jack Cover 13. Zoom lever 2. ... MIC in 14. Hook for handstrap 15. USB jack 9. USB jack 9. Jack Cover 13. NITE PIX switch 7. Hook for handstrap 15. LITHIUM Battery Holder 15 Audio/Video jack 11. Focus adjustment knob 3. Getting to Know Your Camcorder Right & Top View 1.
User Manual (ENGLISH)
Page 20
ENGLISH Getting to Know Your Camcorder Rear & Bottom View 1. Hook for shoulder strap 1. Hook for shoulder strap 3. Memory Card slot 4. Battery Release 5. Tripod receptacle 6. Memory Card slot 4. TAPE EJECT 16 5. Tripod receptacle 6. Charging indicator 2. Charging indicator 3. Battery Release 2. TAPE EJECT Memory Card slot SCD103 Memory Stick SCD105 Memory Stick Memory Stick PRO SD/MMC (Usable MEMORY CARD)
ENGLISH Getting to Know Your Camcorder Rear & Bottom View 1. Hook for shoulder strap 1. Hook for shoulder strap 3. Memory Card slot 4. Battery Release 5. Tripod receptacle 6. Memory Card slot 4. TAPE EJECT 16 5. Tripod receptacle 6. Charging indicator 2. Charging indicator 3. Battery Release 2. TAPE EJECT Memory Card slot SCD103 Memory Stick SCD105 Memory Stick Memory Stick PRO SD/MMC (Usable MEMORY CARD)

User Manual (ENGLISH)
Page 22
... min 27 28 1 6 bit 30 ENTER : VOL. USB 13. Audio recording mode (see page 48) 4. PHOTO mode 22. DSE (Digital Special Effects) mode (see page 51) 16. Shutter speed and EXPOSURE (see page 53) 12. DATE/TIME (see page 57) 9. REMOTE ...(SCD105 only) 14. Remaining Tape (measured in CAMERA and PLAYER modes) 1. PB DSE (see page 26) 2. Battery level (see page 75) 30. NITE PIX (see page 67) 32. POWER NITE PIX (see page 66) 11. BLC (Back... focus (see page 42) 5. DEW (see page 7) 28. ENGLISH Getting to Know Your Camcorder OSD (On Screen Display in minutes) 18.
... min 27 28 1 6 bit 30 ENTER : VOL. USB 13. Audio recording mode (see page 48) 4. PHOTO mode 22. DSE (Digital Special Effects) mode (see page 51) 16. Shutter speed and EXPOSURE (see page 53) 12. DATE/TIME (see page 57) 9. REMOTE ...(SCD105 only) 14. Remaining Tape (measured in CAMERA and PLAYER modes) 1. PB DSE (see page 26) 2. Battery level (see page 75) 30. NITE PIX (see page 67) 32. POWER NITE PIX (see page 66) 11. BLC (Back... focus (see page 42) 5. DEW (see page 7) 28. ENGLISH Getting to Know Your Camcorder OSD (On Screen Display in minutes) 18.

User Manual (ENGLISH)
Page 24
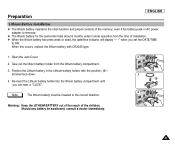
You purchase the camcorder. - Set the camcorder to stop recording. 20 Press START/STOP again when you use the Remote Control (SCD105 only) Battery Installation for the Remote Control ✤ You need to insert or replace the lithium battery when : - Self Record using the Remote Control When you wish to CAMERA mode. ... START/STOP button to cancel the Self Timer function before recording, press the SELF TIMER button. 4. In the last one second of the battery. Press the SELF TIMER button until the appropriate indicator is displayed in 10 seconds. 1. If you insert the lithium...
You purchase the camcorder. - Set the camcorder to stop recording. 20 Press START/STOP again when you use the Remote Control (SCD105 only) Battery Installation for the Remote Control ✤ You need to insert or replace the lithium battery when : - Self Record using the Remote Control When you wish to CAMERA mode. ... START/STOP button to cancel the Self Timer function before recording, press the SELF TIMER button. 4. In the last one second of the battery. Press the SELF TIMER button until the appropriate indicator is displayed in 10 seconds. 1. If you insert the lithium...
User Manual (ENGLISH)
Page 25
.../time indicator will display "- - - Warning: Keep the LITHIUM BATTERY out of the reach of the memory; Should any battery be inserted in the Lithium battery holder, with CR2025 type. 1. even if the battery pack or AC power adapter is removed. ✤ The lithium battery for the camcorder lasts about 6 months under normal operation from the lithium...
.../time indicator will display "- - - Warning: Keep the LITHIUM BATTERY out of the reach of the memory; Should any battery be inserted in the Lithium battery holder, with CR2025 type. 1. even if the battery pack or AC power adapter is removed. ✤ The lithium battery for the camcorder lasts about 6 months under normal operation from the lithium...

User Manual (ENGLISH)
Page 27
... a Power Source There are two types of AA-E8 TYPE. Power Switch ENGLISH To select the CAMCORDER mode ✤ If you want to your resident country. 3. MEMORY CARD TAPE 23 To use this unit as a DSC (Digital Still Camera), set the mode switch to MEMORY CARD position. The AC Power Adapter and... AC Power adapter and DC Cable 1. Connect the DC cable to the DC jack socket of the camcorder. (When the battery is attached on the power switch and turning it to a wall socket. Set the camcorder to each mode by holding down the tab on the set, you want to use this unit...
... a Power Source There are two types of AA-E8 TYPE. Power Switch ENGLISH To select the CAMCORDER mode ✤ If you want to your resident country. 3. MEMORY CARD TAPE 23 To use this unit as a DSC (Digital Still Camera), set the mode switch to MEMORY CARD position. The AC Power Adapter and... AC Power adapter and DC Cable 1. Connect the DC cable to the DC jack socket of the camcorder. (When the battery is attached on the power switch and turning it to a wall socket. Set the camcorder to each mode by holding down the tab on the set, you want to use this unit...

User Manual (ENGLISH)
Page 28
...% ~ 75% 75% ~ 90% 90 ~ 100% Error - I To prevent reduction in the life and capacity of the battery pack, always remove it from the 5 camcorder. Notes I Even with the power switched off for a second and off , the battery pack will start to off, and the charging indicator will still discharge if it is charging...
...% ~ 75% 75% ~ 90% 90 ~ 100% Error - I To prevent reduction in the life and capacity of the battery pack, always remove it from the 5 camcorder. Notes I Even with the power switched off for a second and off , the battery pack will start to off, and the charging indicator will still discharge if it is charging...

User Manual (ENGLISH)
Page 29
...recording time LCD ON VIEWFINDER ON Approx. 1hr 30min Approx. 2hr SB-LS220 Approx. 3hr 30min Approx. 3hr 10min Approx. 4hr 10min Notes I The battery pack should be reduced if it is fully recharged. It may cause leakage, heat generation, induce fire and overheating. I Do not allow the + ...and - I Do not disassemble, process, press, or heat the Battery Pack. I The life and capacity of the battery pack will be recharged in an environment of between 32°F (0°C) and 104°F (40°C). Preparation Using the Lithium...
...recording time LCD ON VIEWFINDER ON Approx. 1hr 30min Approx. 2hr SB-LS220 Approx. 3hr 30min Approx. 3hr 10min Approx. 4hr 10min Notes I The battery pack should be reduced if it is fully recharged. It may cause leakage, heat generation, induce fire and overheating. I Do not allow the + ...and - I Do not disassemble, process, press, or heat the Battery Pack. I The life and capacity of the battery pack will be recharged in an environment of between 32°F (0°C) and 104°F (40°C). Preparation Using the Lithium...

User Manual (ENGLISH)
Page 30
...a cold environment. The recording time becomes very short in the battery pack. Fully charged a b. 20~40% used b c. 40~80% used c d. 80~95% used (flickers) d (The camcorder will turn off soon, change the battery as soon as the approximate continuous recording time given in the ...operating instructions are provided (red and grey)-you actually use the camcorder, the remaining battery time may choose which one indicates charged and which indicates discharged. As the environmental temperature and conditions may differ ...
...a cold environment. The recording time becomes very short in the battery pack. Fully charged a b. 20~40% used b c. 40~80% used c d. 80~95% used (flickers) d (The camcorder will turn off soon, change the battery as soon as the approximate continuous recording time given in the ...operating instructions are provided (red and grey)-you actually use the camcorder, the remaining battery time may choose which one indicates charged and which indicates discharged. As the environmental temperature and conditions may differ ...

User Manual (ENGLISH)
Page 32
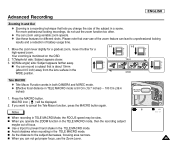
... indicates that STBY is displayed on the LCD. 28 I Insert a cassette. (see page 27) 2. Connect a Power source to the camcorder. (see page 23) (A battery pack or a AC power adapter) 1 2 I Make sure the image you want to record appears on the LCD. I STBY is displayed. I If the protection tab of ...
... indicates that STBY is displayed on the LCD. 28 I Insert a cassette. (see page 27) 2. Connect a Power source to the camcorder. (see page 23) (A battery pack or a AC power adapter) 1 2 I Make sure the image you want to record appears on the LCD. I STBY is displayed. I If the protection tab of ...

User Manual (ENGLISH)
Page 33
..., PLAYER, M.REC, M.PLAY modes. I OSD Language is initialized to highlight INITIAL and press the ENTER button. 3. Turn the MENU DIAL to the English when Lithium battery is exhausted or changed. ENGLISH 1. Press the MENU button. Using the MENU DIAL, select the LANGUAGE and press the ENTER button. CAM MODE INITIAL SET...
..., PLAYER, M.REC, M.PLAY modes. I OSD Language is initialized to highlight INITIAL and press the ENTER button. 3. Turn the MENU DIAL to the English when Lithium battery is exhausted or changed. ENGLISH 1. Press the MENU button. Using the MENU DIAL, select the LANGUAGE and press the ENTER button. CAM MODE INITIAL SET...

User Manual (ENGLISH)
Page 34
This Auto Power off automatically. REC SEARCH -- button in STBY mode, your camcorder will switch off feature is left in reverse for as long as you keep each button pressed down. ✤ If you to play it will ... mode. Note Mosaic shaped distortion may appear on the screen while in STBY mode. ENGLISH Basic Recording When a cassette is loaded and the camcorder is designed to save battery power. enables you to CAMERA. REC SEARCH REC SEARCH 30 Record Search (REC SEARCH) ✤ You can view a recording using the REC SEARCH...
This Auto Power off automatically. REC SEARCH -- button in STBY mode, your camcorder will switch off feature is left in reverse for as long as you keep each button pressed down. ✤ If you to play it will ... mode. Note Mosaic shaped distortion may appear on the screen while in STBY mode. ENGLISH Basic Recording When a cassette is loaded and the camcorder is designed to save battery power. enables you to CAMERA. REC SEARCH REC SEARCH 30 Record Search (REC SEARCH) ✤ You can view a recording using the REC SEARCH...

User Manual (ENGLISH)
Page 38
... the LCD screen and set the brightness or color if necessary. 4. I The camcorder stops automatically after connecting the camcorder to a TV or VCR. (see page 70) I You can monitor the playback picture on the LCD monitor. ✤ Make sure that the battery pack is complete. 4 5. I You can view the picture you have recorded...
... the LCD screen and set the brightness or color if necessary. 4. I The camcorder stops automatically after connecting the camcorder to a TV or VCR. (see page 70) I You can monitor the playback picture on the LCD monitor. ✤ Make sure that the battery pack is complete. 4 5. I You can view the picture you have recorded...
User Manual (ENGLISH)
Page 49
... that lets you want to unprofessional looking recordings, do not use the zoom function too often. ✤ You can record a subject that over-use of battery usage time. 1-1 1-2 1. TELE 3. I Avoid shadows when recording in TELE MACRO Mode, the FOCUS speed may be displayed. 2. Notes I Use a tripod to the subject decreases, focusing...
... that lets you want to unprofessional looking recordings, do not use the zoom function too often. ✤ You can record a subject that over-use of battery usage time. 1-1 1-2 1. TELE 3. I Avoid shadows when recording in TELE MACRO Mode, the FOCUS speed may be displayed. 2. Notes I Use a tripod to the subject decreases, focusing...


