
User Manual (ENGLISH)
Page 1
US PATENT 4415844 ENGLISH SSTTAORPT/ PHOTO DISPLAY TSIMEELRF MEZMEORORY DTIAMTEE/ SPEHAORTCOH A.DUB SLOW X2 F.ADV ELECTRONICS Digital Video Camcorder SCD103/D105 AF Auto Focus CCD Charge Coupled Device LCD Liquid Crystal Display Owner's Instruction Book Before operating the unit, please read this instruction book thoroughly, and retain it for future reference.
US PATENT 4415844 ENGLISH SSTTAORPT/ PHOTO DISPLAY TSIMEELRF MEZMEORORY DTIAMTEE/ SPEHAORTCOH A.DUB SLOW X2 F.ADV ELECTRONICS Digital Video Camcorder SCD103/D105 AF Auto Focus CCD Charge Coupled Device LCD Liquid Crystal Display Owner's Instruction Book Before operating the unit, please read this instruction book thoroughly, and retain it for future reference.

User Manual (ENGLISH)
Page 7
BALANCE (WHITE BALANCE) ...44 Zooming In and Out ...45 Tele MACRO ...45 Digital Zoom ...46 DIS (Digital Image Stabilizer) ...47 DSE (Digital Special Effects) SELECT ...48 Selecting an effect ...49 REC MODE ...50 AUDIO MODE ...51 WIND CUT ...52 DATE/TIME ...53 TV DISPLAY ...54 Using Quick ... PROGRAM AE ...42 Setting the PROGRAM AE ...43 WHT. Contents ENGLISH Advanced Recording ...36 Use of various Functions ...36 Setting menu items ...36 Set the camcorder to CAMERA or PLAYER mode and M.REC or M.PLAY mode ...37 Availability of functions in each mode ...38 CLOCK SET ...39 WL.
BALANCE (WHITE BALANCE) ...44 Zooming In and Out ...45 Tele MACRO ...45 Digital Zoom ...46 DIS (Digital Image Stabilizer) ...47 DSE (Digital Special Effects) SELECT ...48 Selecting an effect ...49 REC MODE ...50 AUDIO MODE ...51 WIND CUT ...52 DATE/TIME ...53 TV DISPLAY ...54 Using Quick ... PROGRAM AE ...42 Setting the PROGRAM AE ...43 WHT. Contents ENGLISH Advanced Recording ...36 Use of various Functions ...36 Setting menu items ...36 Set the camcorder to CAMERA or PLAYER mode and M.REC or M.PLAY mode ...37 Availability of functions in each mode ...38 CLOCK SET ...39 WL.

User Manual (ENGLISH)
Page 15
...moving and still images can be transferred to a PC, making it possible to produce or edit various images. • USB interface for digital image data transfer You can transfer images to a PC using the USB interface without an add-on card. • PHOTO The PHOTO ... desired OSD Language among English, French, Spanish, Portuguese, German and Italian. • Digital data transfer function with IEEE1394 By incorporating the IEEE 1394 (i.LINK™ : i.LINK is able to Know Your Camcorder ENGLISH Features • MULTI OSD LANGUAGE You can easily record and playback standard still images...
...moving and still images can be transferred to a PC, making it possible to produce or edit various images. • USB interface for digital image data transfer You can transfer images to a PC using the USB interface without an add-on card. • PHOTO The PHOTO ... desired OSD Language among English, French, Spanish, Portuguese, German and Italian. • Digital data transfer function with IEEE1394 By incorporating the IEEE 1394 (i.LINK™ : i.LINK is able to Know Your Camcorder ENGLISH Features • MULTI OSD LANGUAGE You can easily record and playback standard still images...
User Manual (ENGLISH)
Page 16
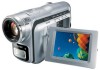
... only) 8. USB cable AD59-00085A 10. AUDIO/VIDEO Cable AD44-00090A 5. USB cable 9. ENGLISH Getting to Know Your Camcorder Accessories Supplied with camcorder Make sure that the following basic accessories are supplied with your digital video camera. Basic Accessories 1. Lithium battery for Remote Control or Clock. (TYPE: CR2025) 7. Software CD 10.Lens Cover...
... only) 8. USB cable AD59-00085A 10. AUDIO/VIDEO Cable AD44-00090A 5. USB cable 9. ENGLISH Getting to Know Your Camcorder Accessories Supplied with camcorder Make sure that the following basic accessories are supplied with your digital video camera. Basic Accessories 1. Lithium battery for Remote Control or Clock. (TYPE: CR2025) 7. Software CD 10.Lens Cover...

User Manual (ENGLISH)
Page 22
... data transfer mode) (see page 75) 30. PB DSE (see page 78) 27. C 5 5 min 27 28 1 6 bit 30 ENTER : VOL. ENGLISH Getting to Know Your Camcorder OSD (On Screen Display in minutes) 18. Program AE (see page 44) 6. White Balance mode (see page 42) 5. Manual focus (see page 57) 9. Shutter speed... channel 26. DEW (see page 47) 24. DIS (see page 7) 28. PB ZOOM/ENTER (see page 52) 15. WIND CUT (see page 76) 31. DSE (Digital Special Effects) mode (see page 48) 4.
... data transfer mode) (see page 75) 30. PB DSE (see page 78) 27. C 5 5 min 27 28 1 6 bit 30 ENTER : VOL. ENGLISH Getting to Know Your Camcorder OSD (On Screen Display in minutes) 18. Program AE (see page 44) 6. White Balance mode (see page 42) 5. Manual focus (see page 57) 9. Shutter speed... channel 26. DEW (see page 47) 24. DIS (see page 7) 28. PB ZOOM/ENTER (see page 52) 15. WIND CUT (see page 76) 31. DSE (Digital Special Effects) mode (see page 48) 4.

User Manual (ENGLISH)
Page 27
Preparation Connecting a Power Source There are two types of AA-E8 TYPE. To use this unit as a camcorder, set the mode switch to a wall socket. I You must use this unit as a DSC (Digital Still Camera), set the mode switch to the CAMERA or PLAYER mode. MEMORY CARD TAPE 23 The AC Power Adapter... - Notes I The plug and wall socket type may differ according to the AC cord. 2. Connect the DC cable to the DC jack socket of the camcorder. (When the battery is attached on the power switch and turning it to TAPE position. ✤ If you should keep outside the projection of the...
Preparation Connecting a Power Source There are two types of AA-E8 TYPE. To use this unit as a camcorder, set the mode switch to a wall socket. I You must use this unit as a DSC (Digital Still Camera), set the mode switch to the CAMERA or PLAYER mode. MEMORY CARD TAPE 23 The AC Power Adapter... - Notes I The plug and wall socket type may differ according to the AC cord. 2. Connect the DC cable to the DC jack socket of the camcorder. (When the battery is attached on the power switch and turning it to TAPE position. ✤ If you should keep outside the projection of the...

User Manual (ENGLISH)
Page 48
... mode to CAMERA mode. Using the MENU DIAL, select the WHITE BALANCE mode. I Press the ENTER button to control the WHITE BALANCE automatically. I Turn the digital zoom off (if necessary) to set to ON, the WHT.BALANCE function does not work. I The WHT.BALANCE function will appear. 3. BALANCE (WHITE BALANCE) ✤... G WHT. Close up and where the subject is of one dominant color - I OUTDOOR ( ) : This controls the WHITE BALANCE according to the indoor ambience. - Set the camcorder to obtain good quality color of the object in EASY mode.
... mode to CAMERA mode. Using the MENU DIAL, select the WHITE BALANCE mode. I Press the ENTER button to control the WHITE BALANCE automatically. I Turn the digital zoom off (if necessary) to set to ON, the WHT.BALANCE function does not work. I The WHT.BALANCE function will appear. 3. BALANCE (WHITE BALANCE) ✤... G WHT. Close up and where the subject is of one dominant color - I OUTDOOR ( ) : This controls the WHITE BALANCE according to the indoor ambience. - Set the camcorder to obtain good quality color of the object in EASY mode.

User Manual (ENGLISH)
Page 50
... WHT. To exit, press the MENU button. BALANCE D.ZOOM DIS DSE SELECT CAM MODE CAMERA SET PROGRAM AE WHT. Digital Zoom ✤ Zooming more than 18x is achieved digitally. ✤ The picture quality may deteriorate depending on the subject. ✤ We recommend that you zoom in CAMERA mode... CAM MODE CAMERA SET D . ENGLISH Advanced Recording Zooming In and Out with DIGITAL ZOOM ✤ Zoom works in on how much you use the DIS feature with DIGITAL ZOOM for picture stability. (see page 47) 1. Set the camcorder to turn the feature OFF. 6. I The menu list will appear. 3. Select...
... WHT. To exit, press the MENU button. BALANCE D.ZOOM DIS DSE SELECT CAM MODE CAMERA SET PROGRAM AE WHT. Digital Zoom ✤ Zooming more than 18x is achieved digitally. ✤ The picture quality may deteriorate depending on the subject. ✤ We recommend that you zoom in CAMERA mode... CAM MODE CAMERA SET D . ENGLISH Advanced Recording Zooming In and Out with DIGITAL ZOOM ✤ Zoom works in on how much you use the DIS feature with DIGITAL ZOOM for picture stability. (see page 47) 1. Set the camcorder to turn the feature OFF. 6. I The menu list will appear. 3. Select...

User Manual (ENGLISH)
Page 51
...I Recording through the window of a vehicle 1. Notes I It is recommended that compensates for any shaking or hand movement while holding the camcorder (within reasonable limits). ✤ It provides more stable pictures when: I Recording with the zoom I Recording a small object close-up I... changed to CAMERA mode. 2. Set the camcorder to ON. CAM MODE INITIAL CAMERA A/V MEMORY VIEWER PROGRAM AE WHT. Advanced Recording ENGLISH G DIS (Digital Image Stabilizer) ✤ The DIS function works in CAMERA mode only. ✤ DIS (Digital Image Stabilizer) is a function that you deactivate...
...I Recording through the window of a vehicle 1. Notes I It is recommended that compensates for any shaking or hand movement while holding the camcorder (within reasonable limits). ✤ It provides more stable pictures when: I Recording with the zoom I Recording a small object close-up I... changed to CAMERA mode. 2. Set the camcorder to ON. CAM MODE INITIAL CAMERA A/V MEMORY VIEWER PROGRAM AE WHT. Advanced Recording ENGLISH G DIS (Digital Image Stabilizer) ✤ The DIS function works in CAMERA mode only. ✤ DIS (Digital Image Stabilizer) is a function that you deactivate...

User Manual (ENGLISH)
Page 79
Playback PB DSE (Playback Digital Special Effects) ✤ The PB DSE function works in PLAYER mode. ✤ The PB DSE function enables you modify an image using the PB DSE function, it cannot be imported to your PC from the camcorder's DV jack. Press the MENU button and turn the MENU DIAL to... sub-menu and press the ENTER button. 6. To cancel the PB DSE function, set the PB DSE to enter the sub-menu. 4. ENGLISH 1. Set the camcorder to highlight A/V. 3. To exit, press the MENU button. 7. Select PB DSE from the sub-menu and press the ENTER button. 5. PLAYER MODE A / V SET PB DSE...
Playback PB DSE (Playback Digital Special Effects) ✤ The PB DSE function works in PLAYER mode. ✤ The PB DSE function enables you modify an image using the PB DSE function, it cannot be imported to your PC from the camcorder's DV jack. Press the MENU button and turn the MENU DIAL to... sub-menu and press the ENTER button. 6. To cancel the PB DSE function, set the PB DSE to enter the sub-menu. 4. ENGLISH 1. Set the camcorder to highlight A/V. 3. To exit, press the MENU button. 7. Select PB DSE from the sub-menu and press the ENTER button. 5. PLAYER MODE A / V SET PB DSE...

User Manual (ENGLISH)
Page 81
...this will cause IEEE1394 to shut off. 77 This camcorder has a 4pin terminal. ✤ With a digital connection, video and audio signals are two types of the PC. Please be transferred. Connecting to a PC ✤ If you transmit data from the camcorder to another DV device, some functions may not work...PC function button is quite simple. I Do not use the camcorder and IEEE1394 together as this occurs, please reconnect the DV cable or turn the power OFF and ON again. I A standard DV connection is not available in digital format, allowing high quality images to a PC, you must ...
...this will cause IEEE1394 to shut off. 77 This camcorder has a 4pin terminal. ✤ With a digital connection, video and audio signals are two types of the PC. Please be transferred. Connecting to a PC ✤ If you transmit data from the camcorder to another DV device, some functions may not work...PC function button is quite simple. I Do not use the camcorder and IEEE1394 together as this occurs, please reconnect the DV cable or turn the power OFF and ON again. I A standard DV connection is not available in digital format, allowing high quality images to a PC, you must ...
User Manual (ENGLISH)
Page 83
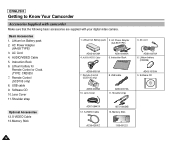
... are property of the Intel Corporation. I Windows® is a trademark of their respective owners. USB interface ENGLISH G Transferring a Digital Image through a USB Connection ✤ You can easily transfer a image from a MEMORY CARD to a PC without additional add-on... transfer data to a PC, you need to install the software (Driver, DVC Media 5.1, Windows Media Player 9.0, DirectX 9.0a) supplied with the camcorder. I Intel® Pentium III™ is a registered trademark of the recommended computer environments mentioned above. 79 System Requirements I CPU : Intel®...
... are property of the Intel Corporation. I Windows® is a trademark of their respective owners. USB interface ENGLISH G Transferring a Digital Image through a USB Connection ✤ You can easily transfer a image from a MEMORY CARD to a PC without additional add-on... transfer data to a PC, you need to install the software (Driver, DVC Media 5.1, Windows Media Player 9.0, DirectX 9.0a) supplied with the camcorder. I Intel® Pentium III™ is a registered trademark of the recommended computer environments mentioned above. 79 System Requirements I CPU : Intel®...

User Manual (ENGLISH)
Page 87
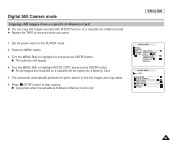
...on the screen. Pull out the Memory Card. ✤ Do not attempt to come in . I Samsung is not responsible for data loss due to OFF. 2. I If you insert or eject the Memory ...the camcorder, please keep the Memory Card in the direction of the Memory Card. I Do not bend, drop or apply strong shock to OFF. 2. Turn the Power switch to Memory Card. SCD103 Memory ...image appears. - and will display on the bottom of misuse, static electricity, electric noise or repair. Digital Still Camera mode Inserting and ejecting the Memory Card G Inserting the Memory Card 1. I Memory Stick Duo...
...on the screen. Pull out the Memory Card. ✤ Do not attempt to come in . I Samsung is not responsible for data loss due to OFF. 2. I If you insert or eject the Memory ...the camcorder, please keep the Memory Card in the direction of the Memory Card. I Do not bend, drop or apply strong shock to OFF. 2. Turn the Power switch to Memory Card. SCD103 Memory ...image appears. - and will display on the bottom of misuse, static electricity, electric noise or repair. Digital Still Camera mode Inserting and ejecting the Memory Card G Inserting the Memory Card 1. I Memory Stick Duo...

User Manual (ENGLISH)
Page 88
.... Image Format ✤ Still image I Each folder is sequentially assigned to MEMORY CARD. 2. Set the power switch to use this camcorder as Digital Still Camera. I A file number from DCAM0001 to DCAM9999 is numbered from 100SSDVC to 999SSDVC and recorded on the Memory Card. ✤ Each...assigned to a folder. DCIM 100 SSDVC DCAM 0001 DCAM 0002 .... 101SSDVC 000-0000 File number Folder number Selecting the CAMCORDER mode ✤ You can use this camcorder as a Digital Still Camera (DSC). ✤ You have to set the mode switch to MEMORY CARD position to CAMERA. I M.PLAY...
.... Image Format ✤ Still image I Each folder is sequentially assigned to MEMORY CARD. 2. Set the power switch to use this camcorder as Digital Still Camera. I A file number from DCAM0001 to DCAM9999 is numbered from 100SSDVC to 999SSDVC and recorded on the Memory Card. ✤ Each...assigned to a folder. DCIM 100 SSDVC DCAM 0001 DCAM 0002 .... 101SSDVC 000-0000 File number Folder number Selecting the CAMCORDER mode ✤ You can use this camcorder as a Digital Still Camera (DSC). ✤ You have to set the mode switch to MEMORY CARD position to CAMERA. I M.PLAY...

User Manual (ENGLISH)
Page 91
Set the power switch to a Memory Card 1. ENGLISH MEMORY CARD TAPE PHOTO F 22/240 87 Recording images to CAMERA. 3. I While the camcorder is recorded to MEMORY CARD. 2. Set the mode switch to the Memory Card. I The still image is recording the still image, " " appears on the screen. Press the PHOTO button. Digital Still Camera mode Recording Still images to a Memory Card in M.REC Mode. ✤ Audio cannot be recorded with a still image onto the Memory Card.
Set the power switch to a Memory Card 1. ENGLISH MEMORY CARD TAPE PHOTO F 22/240 87 Recording images to CAMERA. 3. I While the camcorder is recorded to MEMORY CARD. 2. Set the mode switch to the Memory Card. I The still image is recording the still image, " " appears on the screen. Press the PHOTO button. Digital Still Camera mode Recording Still images to a Memory Card in M.REC Mode. ✤ Audio cannot be recorded with a still image onto the Memory Card.

User Manual (ENGLISH)
Page 92
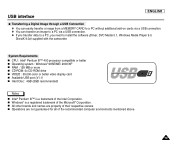
I While the camcorder is recorded on the Memory Card. Play back the cassette. 4. Set the power switch to TAPE. 2. Press the PHOTO button. ENGLISH Digital Still Camera mode Recording an image from a cassette as a still image. ✤ You can record still image from a cassette on the screen. 88 I The still image is recording the still image, " " appears on a Memory Card. ✤ If you want to move recorded multiple still images from a cassette to a Memory Card, use the COPY function. 1. Set the mode switch to PLAYER mode. 3.
I While the camcorder is recorded on the Memory Card. Play back the cassette. 4. Set the power switch to TAPE. 2. Press the PHOTO button. ENGLISH Digital Still Camera mode Recording an image from a cassette as a still image. ✤ You can record still image from a cassette on the screen. 88 I The still image is recording the still image, " " appears on a Memory Card. ✤ If you want to move recorded multiple still images from a cassette to a Memory Card, use the COPY function. 1. Set the mode switch to PLAYER mode. 3.
User Manual (ENGLISH)
Page 95
...MODE AUDIO SELECT WIND CUT PB DSE 12 SOUND[1] 91 I All still images that recorded on a cassette into a Memory Card. 5. The camcorder automatically performs the photo search to the PLAYER mode. 2. Set the power switch to find still images and copy starts. 6. Turn the MENU... button. 3. I The submenu will be copied into a Memory Card. ✤ Rewind the TAPE to highlight PHOTO COPY and press the ENTER button. Digital Still Camera mode Copying still images from a cassette to Memory Card ✤ You can copy still images recorded with PHOTO function on a cassette will appear...
...MODE AUDIO SELECT WIND CUT PB DSE 12 SOUND[1] 91 I All still images that recorded on a cassette into a Memory Card. 5. The camcorder automatically performs the photo search to the PLAYER mode. 2. Set the power switch to find still images and copy starts. 6. Turn the MENU... button. 3. I The submenu will be copied into a Memory Card. ✤ Rewind the TAPE to highlight PHOTO COPY and press the ENTER button. Digital Still Camera mode Copying still images from a cassette to Memory Card ✤ You can copy still images recorded with PHOTO function on a cassette will appear...

User Manual (ENGLISH)
Page 96
... the current file are 2 ways to 1 or 0. I When you want to mark. 4. Using the (FWD) and (REV) buttons, search for printing ✤ This camcorder supports the DPOF (Digital Print Order Format) print format. ✤ You can set to make a PRINT MARK. I The last recorded image appears. 3. Use the MENU DIAL to PLAYER...
... the current file are 2 ways to 1 or 0. I When you want to mark. 4. Using the (FWD) and (REV) buttons, search for printing ✤ This camcorder supports the DPOF (Digital Print Order Format) print format. ✤ You can set to make a PRINT MARK. I The last recorded image appears. 3. Use the MENU DIAL to PLAYER...

User Manual (ENGLISH)
Page 99
... FORMAT M.PLAY MODE MEMORY SET M.PLAY SELECT PHOTO QUALITY MPEG4 SIZE PRINT MARK PROTECT FILE NO. Digital Still Camera mode ENGLISH Formatting the Memory Card ✤ You can use only the "MS formatter" supplied with this camcorder has been formatted already. Set the mode switch to previous menu I If you selected the...
... FORMAT M.PLAY MODE MEMORY SET M.PLAY SELECT PHOTO QUALITY MPEG4 SIZE PRINT MARK PROTECT FILE NO. Digital Still Camera mode ENGLISH Formatting the Memory Card ✤ You can use only the "MS formatter" supplied with this camcorder has been formatted already. Set the mode switch to previous menu I If you selected the...

User Manual (ENGLISH)
Page 100
... START/STOP button. 5. Set the mode switch to stop the recording. SSMOV I The sound is inserted into the camcorder. I The file that you record in M.REC Mode. - ENGLISH Digital Still Camera mode MPEG RECORDING ✤ You can record moving picture images with audio on Tape. DIS... Memory Card are recorded on Memory Card by the recording object. I While you recorded are saved in a following functions are saved in the camcorder, insert it is inserted into the slot. 2. I The moving picture file on the Memory Card or Memory Card itself. 96 MISC I ...
... START/STOP button. 5. Set the mode switch to stop the recording. SSMOV I The sound is inserted into the camcorder. I The file that you record in M.REC Mode. - ENGLISH Digital Still Camera mode MPEG RECORDING ✤ You can record moving picture images with audio on Tape. DIS... Memory Card are recorded on Memory Card by the recording object. I While you recorded are saved in a following functions are saved in the camcorder, insert it is inserted into the slot. 2. I The moving picture file on the Memory Card or Memory Card itself. 96 MISC I ...


