User Manual (ENGLISH)
Page 6
...22 Attaching the Lens Cover...22 Connecting a Power Source ...23 To use the AC Power adapter and DC Cable ...23 To select the CAMCORDER mode...23 Using the Lithium Ion Battery Pack ...24 Charging the Lithium Ion Battery Pack ...24 Table of continuous recording time based on model... and battery type ...25 Battery level display ...26 Inserting and Ejecting a Cassette ...27 BASIC Recording ...28 Making your First Recording ...28 Selecting OSD LANGUAGE ...29 Record Search (REC SEARCH) ...30 Hints for Stable ...
...22 Attaching the Lens Cover...22 Connecting a Power Source ...23 To use the AC Power adapter and DC Cable ...23 To select the CAMCORDER mode...23 Using the Lithium Ion Battery Pack ...24 Charging the Lithium Ion Battery Pack ...24 Table of continuous recording time based on model... and battery type ...25 Battery level display ...26 Inserting and Ejecting a Cassette ...27 BASIC Recording ...28 Making your First Recording ...28 Selecting OSD LANGUAGE ...29 Record Search (REC SEARCH) ...30 Hints for Stable ...

User Manual (ENGLISH)
Page 9
Contents ENGLISH Inserting and ejecting the Memory Card ...83 Structure of folders and files on the Memory Card ...84 Image Format ...84 Selecting the CAMCORDER mode ...84 MEMORY FILE NUMBER ...85 Selecting the image quality ...86 Select the image quality ...86 ...moving picture sizes ...97 MPEG Playback ...98 Maintenance...99 After finishing a recording ...99 Cleaning and Maintaining the Camcorder...100 Cleaning the Video Heads ...100 Using Your Camcorder Abroad ...101 Power sources ...101 Color system ...101 Troubleshooting...102 Troubleshooting ...102 Self Diagnosis Display ...102 Moisture...
Contents ENGLISH Inserting and ejecting the Memory Card ...83 Structure of folders and files on the Memory Card ...84 Image Format ...84 Selecting the CAMCORDER mode ...84 MEMORY FILE NUMBER ...85 Selecting the image quality ...86 Select the image quality ...86 ...moving picture sizes ...97 MPEG Playback ...98 Maintenance...99 After finishing a recording ...99 Cleaning and Maintaining the Camcorder...100 Cleaning the Video Heads ...100 Using Your Camcorder Abroad ...101 Power sources ...101 Color system ...101 Troubleshooting...102 Troubleshooting ...102 Self Diagnosis Display ...102 Moisture...
User Manual (ENGLISH)
Page 20
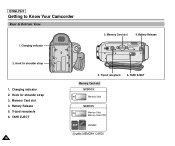
Battery Release 2. TAPE EJECT Memory Card slot SCD103 Memory Stick SCD105 Memory Stick Memory Stick PRO SD/MMC (Usable MEMORY CARD) Charging indicator 2. Memory Card slot 4. TAPE EJECT 16 5. Charging indicator 3. Hook for shoulder strap 3. Battery Release 5. Tripod receptacle 6. Memory Card slot 4. Tripod receptacle 6. ENGLISH Getting to Know Your Camcorder Rear & Bottom View 1. Hook for shoulder strap 1.
Battery Release 2. TAPE EJECT Memory Card slot SCD103 Memory Stick SCD105 Memory Stick Memory Stick PRO SD/MMC (Usable MEMORY CARD) Charging indicator 2. Memory Card slot 4. TAPE EJECT 16 5. Charging indicator 3. Hook for shoulder strap 3. Battery Release 5. Tripod receptacle 6. Memory Card slot 4. Tripod receptacle 6. ENGLISH Getting to Know Your Camcorder Rear & Bottom View 1. Hook for shoulder strap 1.

User Manual (ENGLISH)
Page 31
...an upright position and avoid storing it clicks into the cassette holder with magnets or magnetic interference. Connect a power source and slide the TAPE EJECT switch and open 1 the cassette door. - Close the door completely until 3 it in direct sunlight. b. Removing the tape protection : ...the recording on the cassette, push the safety tab back so that it covers the hole. d. Close the cassette door. - Preparation Inserting and Ejecting a Cassette ✤ When inserting a tape or closing a cassette holder, do not apply excessive force. b. Press the area marked PUSH on ...
...an upright position and avoid storing it clicks into the cassette holder with magnets or magnetic interference. Connect a power source and slide the TAPE EJECT switch and open 1 the cassette door. - Close the door completely until 3 it in direct sunlight. b. Removing the tape protection : ...the recording on the cassette, push the safety tab back so that it covers the hole. d. Close the cassette door. - Preparation Inserting and Ejecting a Cassette ✤ When inserting a tape or closing a cassette holder, do not apply excessive force. b. Press the area marked PUSH on ...

User Manual (ENGLISH)
Page 72
...soon after using the VIDEO LIGHT, since it remains extremely hot for some time. Set the camcorder to turn on the light, or when you turn on the LCD. If you consult your nearest SAMSUNG dealer for more than 20 minutes. 68 I It is recommended that you want to the CAMERA... mode. 2. I The picture quality may deteriorate if you turn off automatically during ejecting or inserting. I The VIDEO LIGHT can become extremely hot. ...
...soon after using the VIDEO LIGHT, since it remains extremely hot for some time. Set the camcorder to turn on the light, or when you turn on the LCD. If you consult your nearest SAMSUNG dealer for more than 20 minutes. 68 I It is recommended that you want to the CAMERA... mode. 2. I The picture quality may deteriorate if you turn off automatically during ejecting or inserting. I The VIDEO LIGHT can become extremely hot. ...

User Manual (ENGLISH)
Page 78
... ZERO MEMORY (SCD105 only) ✤ The ZERO MEMORY function works in both CAMERA and PLAYER modes. ✤ You can mark a point on a tape that is ejected. -
... ZERO MEMORY (SCD105 only) ✤ The ZERO MEMORY function works in both CAMERA and PLAYER modes. ✤ You can mark a point on a tape that is ejected. -

User Manual (ENGLISH)
Page 85
..., mode switch and NITE PIX operate. USB Cable USB DV AUDIO /VIDEO S-VIDEO MIC 81 Connecting to select [Eject]. 2. If you disconnect the USB cable from the PC or the camcorder while transferring, the data transmission will stop and the data may not work properly. - If a PC is MPEG4...included in the CD) programs must disconnect the cable in the PC. ✤ You can view CAMCORDER video on your PC using USB streaming. Connect a USB cable to the USB port on the camcorder. (USB jack) - Select [Confirm] and disconnect the USB cable when the Windows Splash screen appears...
..., mode switch and NITE PIX operate. USB Cable USB DV AUDIO /VIDEO S-VIDEO MIC 81 Connecting to select [Eject]. 2. If you disconnect the USB cable from the PC or the camcorder while transferring, the data transmission will stop and the data may not work properly. - If a PC is MPEG4...included in the CD) programs must disconnect the cable in the PC. ✤ You can view CAMCORDER video on your PC using USB streaming. Connect a USB cable to the USB port on the camcorder. (USB jack) - Select [Confirm] and disconnect the USB cable when the Windows Splash screen appears...

User Manual (ENGLISH)
Page 86
...still images and MPEG4 movie I Single I You can use most of the camera's functions when recording to the Memory Stick. Inserting or ejecting a Memory Stick while recording or loading an image can not be the trademarks or registered trademarks of Sony Corporation. I If you want to...herein may be used with the SCD103 MODEL. 82 Furthermore, "™"and "®" are trademarks of their respective companies. I While recording or loading an image, do not eject or insert the Memory Stick. - I " " appears on the screen while recording to LOCK. ENGLISH Digital Still Camera mode MEMORY STICK ...
...still images and MPEG4 movie I Single I You can use most of the camera's functions when recording to the Memory Stick. Inserting or ejecting a Memory Stick while recording or loading an image can not be the trademarks or registered trademarks of Sony Corporation. I If you want to...herein may be used with the SCD103 MODEL. 82 Furthermore, "™"and "®" are trademarks of their respective companies. I While recording or loading an image, do not eject or insert the Memory Stick. - I " " appears on the screen while recording to LOCK. ENGLISH Digital Still Camera mode MEMORY STICK ...

User Manual (ENGLISH)
Page 87
... prevent static shock. Save important images separately. If there are no recorded images on the screen. I Samsung is not responsible for data loss due to Memory Card. I The stored contents may be inserted by... the Memory Card, then it in the direction of the camcorder automatically. 3. SCD103 Memory Stick SCD105 Notes Memory Stick Memory Stick PRO I If you insert or eject the Memory Card. I While recording, loading, erasing or ...or repair. Insert the Memory Card in . Digital Still Camera mode Inserting and ejecting the Memory Card G Inserting the Memory Card 1.
... prevent static shock. Save important images separately. If there are no recorded images on the screen. I Samsung is not responsible for data loss due to Memory Card. I The stored contents may be inserted by... the Memory Card, then it in the direction of the camcorder automatically. 3. SCD103 Memory Stick SCD105 Notes Memory Stick Memory Stick PRO I If you insert or eject the Memory Card. I While recording, loading, erasing or ...or repair. Insert the Memory Card in . Digital Still Camera mode Inserting and ejecting the Memory Card G Inserting the Memory Card 1.

User Manual (ENGLISH)
Page 100
... the MPEG REC function, check whether the MEMORY CARD is not in type of the START/STOP button. 5. DIS (Digital Image Stabilizer), Digital Zoom, Fade, Program AE, Digital Special Effect, Slow Shutter. MISC I While you recorded are smaller size and lower definition than one on the Memory Card...STOP button to stop the recording. I You can record 10 ~ 20 seconds continuously in Memory Card, don't eject it or it into the slot. 2. I The sound is inserted into the camcorder. SSMOV I The moving picture images on a Memory Card are saved in two sizes, 160 ✕ 120...
... the MPEG REC function, check whether the MEMORY CARD is not in type of the START/STOP button. 5. DIS (Digital Image Stabilizer), Digital Zoom, Fade, Program AE, Digital Special Effect, Slow Shutter. MISC I While you recorded are smaller size and lower definition than one on the Memory Card...STOP button to stop the recording. I You can record 10 ~ 20 seconds continuously in Memory Card, don't eject it or it into the slot. 2. I The sound is inserted into the camcorder. SSMOV I The moving picture images on a Memory Card are saved in two sizes, 160 ✕ 120...

User Manual (ENGLISH)
Page 103
...or remove the Lithium Ion Battery Pack. I Dust and other foreign materials can reduce the life span of the battery. Slide the TAPE EJECT switch in the direction of the arrow. 99 Set the power switch to the OFF mode. 4. Maintenance ENGLISH After finishing a recording ... 3. Hence, it should be removed from the camcorder. 1. After removing the tape, close the door and store the camcorder in a dust free environment. 3 4 I Press the BATTERY RELEASE button and slide the battery pack in the direction of the arrow. I Please wait while the tape is completely ejected. 1 2 2.
...or remove the Lithium Ion Battery Pack. I Dust and other foreign materials can reduce the life span of the battery. Slide the TAPE EJECT switch in the direction of the arrow. 99 Set the power switch to the OFF mode. 4. Maintenance ENGLISH After finishing a recording ... 3. Hence, it should be removed from the camcorder. 1. After removing the tape, close the door and store the camcorder in a dust free environment. 3 4 I Press the BATTERY RELEASE button and slide the battery pack in the direction of the arrow. I Please wait while the tape is completely ejected. 1 2 2.

User Manual (ENGLISH)
Page 106
...slow there is about 2 minutes Prepare a new one . Eject the tape. If this condition, the tape may condense inside the camcorder, (DEW) is displayed. Leave the camcorder for at least two hours in the camcorder. TAPE END! R * If unresolved contact your local service ... battery. ENGLISH Troubleshooting Troubleshooting ✤ Before contacting a Samsung authorized service center, perform the following simple checks. Self Diagnosis Display Display Blinking Informs that... TAPE END! no tape in camcorder. slow the tape is almost discharged. see below. Moisture...
...slow there is about 2 minutes Prepare a new one . Eject the tape. If this condition, the tape may condense inside the camcorder, (DEW) is displayed. Leave the camcorder for at least two hours in the camcorder. TAPE END! R * If unresolved contact your local service ... battery. ENGLISH Troubleshooting Troubleshooting ✤ Before contacting a Samsung authorized service center, perform the following simple checks. Self Diagnosis Display Display Blinking Informs that... TAPE END! no tape in camcorder. slow the tape is almost discharged. see below. Moisture...

User Manual (ENGLISH)
Page 2
... Strap 22 Attaching the Lens Cover 22 Connecting a Power Source 23 To use the AC Power adapter and DC Cable 23 To select the CAMCORDER mode 23 Using the Lithium Ion Battery Pack 24 Charging the Lithium Ion Battery Pack 24 Table of continuous recording time based on model and... battery type 25 Battery level display 26 Inserting and Ejecting a Cassette 27 BASIC Recording 28 Making your First Recording 28 Selecting OSD LANGUAGE 29 Record Search (REC SEARCH 30 Hints for Stable Image Recording...
... Strap 22 Attaching the Lens Cover 22 Connecting a Power Source 23 To use the AC Power adapter and DC Cable 23 To select the CAMCORDER mode 23 Using the Lithium Ion Battery Pack 24 Charging the Lithium Ion Battery Pack 24 Table of continuous recording time based on model and... battery type 25 Battery level display 26 Inserting and Ejecting a Cassette 27 BASIC Recording 28 Making your First Recording 28 Selecting OSD LANGUAGE 29 Record Search (REC SEARCH 30 Hints for Stable Image Recording...

User Manual (ENGLISH)
Page 4
... 73 X2 Playback (Forward/Reverse ) (SCD105 only 73 Reverse playback (SCD105 only 73 ZERO MEMORY (SCD105 only 74 PB DSE (Playback Digital Special Effects 75 PB ZOOM ...76 IEEE 1394 Data Transfer 77 Transferring IEEE1394 (i.LINK)-DV standard data connections 77 Connecting to a DV device... 80 Using the "removable Disk" function (SCD103/D105 only 81 Using the "USB streaming" function 81 Connecting to a PC 81 Digital Still Camera mode (SCD103/D105 only 82 MEMORY STICK (Optional Accessory 82 Memory Stick Functions 82 Inserting and ejecting the Memory Card 83 Structure of folders and...
... 73 X2 Playback (Forward/Reverse ) (SCD105 only 73 Reverse playback (SCD105 only 73 ZERO MEMORY (SCD105 only 74 PB DSE (Playback Digital Special Effects 75 PB ZOOM ...76 IEEE 1394 Data Transfer 77 Transferring IEEE1394 (i.LINK)-DV standard data connections 77 Connecting to a DV device... 80 Using the "removable Disk" function (SCD103/D105 only 81 Using the "USB streaming" function 81 Connecting to a PC 81 Digital Still Camera mode (SCD103/D105 only 82 MEMORY STICK (Optional Accessory 82 Memory Stick Functions 82 Inserting and ejecting the Memory Card 83 Structure of folders and...

User Manual (ENGLISH)
Page 16
Charging indicator 3. Charging indicator SCD103 2. Battery Release SCD105 5. TAPE EJECT Memory Card slot 1. Hook for shoulder strap 5. Tripod receptacle 6. Hook for shoulder strap 3. TAPE EJECT Memory Stick Memory Stick PRO SD/MMC (Usable MEMORY CARD) 16 Tripod receptacle 6. Memory Card slot (SCD103/D105 only) 4. Battery Release 2. Memory Card slot (SCD103/D105 only) Memory Stick 4. ENGLISH Getting to Know Your Camcorder Rear & Bottom View 1.
Charging indicator 3. Charging indicator SCD103 2. Battery Release SCD105 5. TAPE EJECT Memory Card slot 1. Hook for shoulder strap 5. Tripod receptacle 6. Hook for shoulder strap 3. TAPE EJECT Memory Stick Memory Stick PRO SD/MMC (Usable MEMORY CARD) 16 Tripod receptacle 6. Memory Card slot (SCD103/D105 only) 4. Battery Release 2. Memory Card slot (SCD103/D105 only) Memory Stick 4. ENGLISH Getting to Know Your Camcorder Rear & Bottom View 1.

User Manual (ENGLISH)
Page 27
...: Push the safety tab on the cassette so that it clicks into the cassette holder with magnets or magnetic interference. b. ENGLISH Preparation Inserting and Ejecting a Cassette ✤ When inserting a tape or closing a cassette holder, do not apply ✤ excessive force. ✤ This may cause... something that it in direct sunlight. Note When you no longer wish to keep , a. c. Connect a power source and slide the TAPE EJECT switch and open the 1 2 cassette door. - b. The cassette holding mechanism until you wish to store a tape • a. Press ...
...: Push the safety tab on the cassette so that it clicks into the cassette holder with magnets or magnetic interference. b. ENGLISH Preparation Inserting and Ejecting a Cassette ✤ When inserting a tape or closing a cassette holder, do not apply ✤ excessive force. ✤ This may cause... something that it in direct sunlight. Note When you no longer wish to keep , a. c. Connect a power source and slide the TAPE EJECT switch and open the 1 2 cassette door. - b. The cassette holding mechanism until you wish to store a tape • a. Press ...

User Manual (ENGLISH)
Page 68
...✤ "LP" will blink on the LCD. Set the camcorder to turn on the LIGHT in light is used as a subsidiary... I dealer for some time. ENGLISH Advanced Recording Using the VIDEO LIGHT (SCD103/D105 only) ✤ VIDEO LIGHT works in CAMERA/M.REC mode only.... or soon after using the VIDEO LIGHT, since it off automatically during ejecting or inserting. I 3. I - Notes I turn off automatically when ... otherwise serious injury may turn on the light, or when you consult your nearest SAMSUNG I The VIDEO LIGHT indicator appears on the LCD and the light is turned on...
...✤ "LP" will blink on the LCD. Set the camcorder to turn on the LIGHT in light is used as a subsidiary... I dealer for some time. ENGLISH Advanced Recording Using the VIDEO LIGHT (SCD103/D105 only) ✤ VIDEO LIGHT works in CAMERA/M.REC mode only.... or soon after using the VIDEO LIGHT, since it off automatically during ejecting or inserting. I 3. I - Notes I turn off automatically when ... otherwise serious injury may turn on the light, or when you consult your nearest SAMSUNG I The VIDEO LIGHT indicator appears on the LCD and the light is turned on...

User Manual (ENGLISH)
Page 74
... time code is changed to a tape counter that you want to return to following situations, ZERO MEMORY mode may not function correctly where there is ejected. I M I I I M Notes I When you remove the battery pack or power supply. I In the following ✤ playback. 1. The tape counter with the M 0:00:00(Zero memory indicator...
... time code is changed to a tape counter that you want to return to following situations, ZERO MEMORY mode may not function correctly where there is ejected. I M I I I M Notes I When you remove the battery pack or power supply. I In the following ✤ playback. 1. The tape counter with the M 0:00:00(Zero memory indicator...

User Manual (ENGLISH)
Page 81
... USB devices, the camcorder may be ✤ installed in the PC. ✤ ✤ You can also store it as a moving picture in the "asf" file format, or as a still image in the following way: 1. Set the mode switch to TAPE (SCD103/D105 only), set the power switch to select [Eject]. 2. If this ...occurs, remove all USB devices from 81 the PC and reconnect the camcorder.
... USB devices, the camcorder may be ✤ installed in the PC. ✤ ✤ You can also store it as a moving picture in the "asf" file format, or as a still image in the following way: 1. Set the mode switch to TAPE (SCD103/D105 only), set the power switch to select [Eject]. 2. If this ...occurs, remove all USB devices from 81 the PC and reconnect the camcorder.

User Manual (ENGLISH)
Page 82
...Memory Stick to the Memory I Stick. Furthermore, "™"and "®" are trademarks of Sony Corporation. ENGLISH Digital Still Camera mode MEMORY STICK (Optional Accessory) (SCD103/D105 only) ✤ The Memory Stick stores and manages images recorded by the ✤ camera. Memory ...Stick. G G All other product names mentioned herein may be used with the SCD103 model. ™ ® Inserting or ejecting a Memory Stick while recording or loading I While recording or loading an image, do not eject or insert the Memory Stick. - I I" " appears on a Memory Stick...
...Memory Stick to the Memory I Stick. Furthermore, "™"and "®" are trademarks of Sony Corporation. ENGLISH Digital Still Camera mode MEMORY STICK (Optional Accessory) (SCD103/D105 only) ✤ The Memory Stick stores and manages images recorded by the ✤ camera. Memory ...Stick. G G All other product names mentioned herein may be used with the SCD103 model. ™ ® Inserting or ejecting a Memory Stick while recording or loading I While recording or loading an image, do not eject or insert the Memory Stick. - I I" " appears on a Memory Stick...


