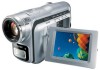

User Manual (ENGLISH)
Page 7
...36 Set the camcorder to CAMERA or PLAYER mode and M.REC or M.PLAY mode ...37 Availability of functions in each mode ...38 CLOCK SET ...39 WL. BALANCE (WHITE BALANCE) ...44 Zooming In and Out ...45 Tele MACRO ...45 Digital Zoom ...46 DIS (Digital Image Stabilizer) ...47 DSE (Digital Special Effects) ......56 SHUTTER SPEED & EXPOSURE ...57 SLOW SHUTTER(Low Shutter Speed) ...58 EASY Mode (for Beginners) ...59 AF/MF (Auto Focus/Manual Focus) ...60 Auto Focusing ...60 Manual Focusing ...60 BLC (Back Light Compensation) ...61 Fade In and Out ...62 To Start Recording ...62 To Stop Recording (use FADE ...
...36 Set the camcorder to CAMERA or PLAYER mode and M.REC or M.PLAY mode ...37 Availability of functions in each mode ...38 CLOCK SET ...39 WL. BALANCE (WHITE BALANCE) ...44 Zooming In and Out ...45 Tele MACRO ...45 Digital Zoom ...46 DIS (Digital Image Stabilizer) ...47 DSE (Digital Special Effects) ......56 SHUTTER SPEED & EXPOSURE ...57 SLOW SHUTTER(Low Shutter Speed) ...58 EASY Mode (for Beginners) ...59 AF/MF (Auto Focus/Manual Focus) ...60 Auto Focusing ...60 Manual Focusing ...60 BLC (Back Light Compensation) ...61 Fade In and Out ...62 To Start Recording ...62 To Stop Recording (use FADE ...

User Manual (ENGLISH)
Page 22
... (SCD105 only) (see page 51) 16. Operating mode 20. Message Line 29. C 5 5 min 27 28 1 6 bit 30 ENTER : VOL. ENGLISH Getting to Know Your Camcorder OSD (On Screen Display in minutes) 18. WL. Audio recording mode (see page 74) 17. PHOTO mode 22. DIS (see page 67) 32. POWER NITE...see page 35) 25. Volume control (see page 44) 6. Program AE (see page 53) 12. DATE/TIME (see page 42) 5. PB DSE (see page 60) 8. Manual focus (see page 75) 30. Self recording and waiting timer (SCD105 only) (see pages 59) 3. Easy mode (see page 20) 23. BLC (Back Light Compensation...
... (SCD105 only) (see page 51) 16. Operating mode 20. Message Line 29. C 5 5 min 27 28 1 6 bit 30 ENTER : VOL. ENGLISH Getting to Know Your Camcorder OSD (On Screen Display in minutes) 18. WL. Audio recording mode (see page 74) 17. PHOTO mode 22. DIS (see page 67) 32. POWER NITE...see page 35) 25. Volume control (see page 44) 6. Program AE (see page 53) 12. DATE/TIME (see page 42) 5. PB DSE (see page 60) 8. Manual focus (see page 75) 30. Self recording and waiting timer (SCD105 only) (see pages 59) 3. Easy mode (see page 20) 23. BLC (Back Light Compensation...

User Manual (ENGLISH)
Page 60
... AE, you select FOCUS and press the ENTER button, the FOCUS is switched to CAMERA mode. 2. I SHUTTER SPEED & EXPOSURE - I FOCUS (Auto Focus/Manual Focus) (see page 60) - If you want to change the values. Each time you can choose between Auto and WHT.BALANCE values it they have...select WHT. Turn the MENU DIAL to select a function you want and then press the ENTER button to use the Quick menu. Set the camcorder to either Manual Focus (MF) or Auto Focus ( ). Each time you can set values for SHUTTER SPEED and EXPOSURE by selecting ( For more information, see...
... AE, you select FOCUS and press the ENTER button, the FOCUS is switched to CAMERA mode. 2. I SHUTTER SPEED & EXPOSURE - I FOCUS (Auto Focus/Manual Focus) (see page 60) - If you want to change the values. Each time you can choose between Auto and WHT.BALANCE values it they have...select WHT. Turn the MENU DIAL to select a function you want and then press the ENTER button to use the Quick menu. Set the camcorder to either Manual Focus (MF) or Auto Focus ( ). Each time you can set values for SHUTTER SPEED and EXPOSURE by selecting ( For more information, see...

User Manual (ENGLISH)
Page 61
... 1/4000 or 1/10000. I EXPOSURE can be set to ON, or change the shutter speed and the exposure value when Auto-exposure option is selected, manual changes are automatically switched and/or deactivated. 1. To exit from the setting screen, select the icon ( ) and press the ENTER button. I You see...and then press the ENTER button. I Turn the MENU DIAL to select the item you manually change to the auto shutter setting and auto exposure setting when you see a screen on the LCD. I The camcorder returns to the EASY, SLOW SHUTTER modes. I The image may not seem as basketball :...
... 1/4000 or 1/10000. I EXPOSURE can be set to ON, or change the shutter speed and the exposure value when Auto-exposure option is selected, manual changes are automatically switched and/or deactivated. 1. To exit from the setting screen, select the icon ( ) and press the ENTER button. I You see...and then press the ENTER button. I Turn the MENU DIAL to select the item you manually change to the auto shutter setting and auto exposure setting when you see a screen on the LCD. I The camcorder returns to the EASY, SLOW SHUTTER modes. I The image may not seem as basketball :...

User Manual (ENGLISH)
Page 64
...manually. 1 a. People or objects moving constantly or quickly like a car. Turn the MENU DIAL up or down until the FOCUS is highlighted and then press the ENTER button. b. I Zoom out a little if focusing is difficult. 4. I M. a b Auto Focusing ✤ If you are inexperienced in the use of camcorders... enables you to CAMERA mode. 2. d. Turn the MENU DIAL up or down until the object is in focus. To return to the camcorder, others further away. A picture containing several objects, some close to AF (Auto Focus: ), press the ENTER button again. 60 3 M. c. ...
...manually. 1 a. People or objects moving constantly or quickly like a car. Turn the MENU DIAL up or down until the FOCUS is highlighted and then press the ENTER button. b. I Zoom out a little if focusing is difficult. 4. I M. a b Auto Focusing ✤ If you are inexperienced in the use of camcorders... enables you to CAMERA mode. 2. d. Turn the MENU DIAL up or down until the object is in focus. To return to the camcorder, others further away. A picture containing several objects, some close to AF (Auto Focus: ), press the ENTER button again. 60 3 M. c. ...

User Manual (ENGLISH)
Page 70
... situations (ex. OFF ON POWER NITE PIX STBY 0 : 0 0 : 0 0 6 0 min Notes NITE PIX I (NITE PIX indicator) appears on automatically. 3. Set the camcorder to ON. I The maximum recording distance using the NITE PIX function, focus manually. outdoors by day), the recorded picture may be tinted green. Slide the NITE PIX switch to CAMERA mode. 2.
... situations (ex. OFF ON POWER NITE PIX STBY 0 : 0 0 : 0 0 6 0 min Notes NITE PIX I (NITE PIX indicator) appears on automatically. 3. Set the camcorder to ON. I The maximum recording distance using the NITE PIX function, focus manually. outdoors by day), the recorded picture may be tinted green. Slide the NITE PIX switch to CAMERA mode. 2.

User Manual (ENGLISH)
Page 74
... using the LCD when in PLAYER mode only. I Refer to a TV which has Audio/Video input jacks 1. If you will not hear sound from the Camcorder's speakers. 70 Turn on the TV and set the TV/VIDEO selector on the LCD ✤ It is practical to PLAYER mode. 3. I Even if ... TV or VCR and the white plug (Audio L) to connect an audio cable. Connecting to the TV or VCR user's manual. 4. S-VIDEO input TV Video input-Yellow Audio input (left)-White Camcorder Audio input (right)-Red Audio/Video USB DV AUDIO /VIDEO S-VIDEO MIC S-VIDEO Notes I The red plug : Audio(R) - Play ...
... using the LCD when in PLAYER mode only. I Refer to a TV which has Audio/Video input jacks 1. If you will not hear sound from the Camcorder's speakers. 70 Turn on the TV and set the TV/VIDEO selector on the LCD ✤ It is practical to PLAYER mode. 3. I Even if ... TV or VCR and the white plug (Audio L) to connect an audio cable. Connecting to the TV or VCR user's manual. 4. S-VIDEO input TV Video input-Yellow Audio input (left)-White Camcorder Audio input (right)-Red Audio/Video USB DV AUDIO /VIDEO S-VIDEO MIC S-VIDEO Notes I The red plug : Audio(R) - Play ...

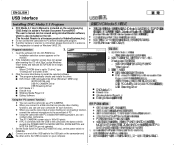
User Manual (ENGLISH)
Page 84
... disconnect it in adobe's Portable Document Format(PDF) The user's manual can conduct video conference. ✤ The PC CAMERA's screen size is 160x120 pixels. ✤ If PC is connected with the USB to the camcorder, the buttons which is also included on the CD. (The ...- Program installation 1. Connect one end of PC. ✤ Using the camcorder with PC installed Net-meeting program, you use your computer. 80 ENGLISH USB interface Installing DVC Media 5.1 Program ✤ DVC Media 5.1 User's Manual is included on the accompanying CD(D:\help\) in advance. ✤ This explanation...
... disconnect it in adobe's Portable Document Format(PDF) The user's manual can conduct video conference. ✤ The PC CAMERA's screen size is 160x120 pixels. ✤ If PC is connected with the USB to the camcorder, the buttons which is also included on the CD. (The ...- Program installation 1. Connect one end of PC. ✤ Using the camcorder with PC installed Net-meeting program, you use your computer. 80 ENGLISH USB interface Installing DVC Media 5.1 Program ✤ DVC Media 5.1 User's Manual is included on the accompanying CD(D:\help\) in advance. ✤ This explanation...

User Manual (ENGLISH)
Page 85
...of USB streaming, refer to the DVC Media 5.1 User's Manual. Connecting to select [Eject]. 2. Select [Confirm] and disconnect the USB cable when the Windows Splash screen appears. If you disconnect the USB cable from the PC or the camcorder while transferring, the data transmission will stop and the data... end of the USB cable into the proper terminal on your computer. If this occurs, remove all USB devices from the PC and reconnect the camcorder. If a PC is MPEG4. ✤ To use USB STREAMING, the DVC Media 5.1, DirectX 9.0a and Windows Media Player 9.0(included in the CD...
...of USB streaming, refer to the DVC Media 5.1 User's Manual. Connecting to select [Eject]. 2. Select [Confirm] and disconnect the USB cable when the Windows Splash screen appears. If you disconnect the USB cable from the PC or the camcorder while transferring, the data transmission will stop and the data... end of the USB cable into the proper terminal on your computer. If this occurs, remove all USB devices from the PC and reconnect the camcorder. If a PC is MPEG4. ✤ To use USB STREAMING, the DVC Media 5.1, DirectX 9.0a and Windows Media Player 9.0(included in the CD...

User Manual (ENGLISH)
Page 86
... while recording or loading an image can use most of the camera's functions when recording to the Memory Stick. ENGLISH Digital Still Camera mode MEMORY STICK (Optional Accessory) ✤ The Memory Stick stores and manages images recorded by the camera.... TM G "Memory Stick" and are not mentioned in each case in this manual. I " " appears on the Memory Stick to the Memory Stick. G "Memory Stick PRO" can not be the trademarks or...- TM G All other product names mentioned herein may be used with the SCD103 MODEL. 82
... while recording or loading an image can use most of the camera's functions when recording to the Memory Stick. ENGLISH Digital Still Camera mode MEMORY STICK (Optional Accessory) ✤ The Memory Stick stores and manages images recorded by the camera.... TM G "Memory Stick" and are not mentioned in each case in this manual. I " " appears on the Memory Stick to the Memory Stick. G "Memory Stick PRO" can not be the trademarks or...- TM G All other product names mentioned herein may be used with the SCD103 MODEL. 82

User Manual (ENGLISH)
Page 108
...or end of the cassette. recording a dark Make the background bright to CAMERA. You have left the camcorder set to reduce the contrast or background. The image in the Manual Focus mode. work. Check the POWER switch. START/STOP button Check the POWER switch is blurred. ...The battery pack is fully exhausted. ENGLISH Troubleshooting ✤ If these instructions do not solve your problem, contact your nearest Samsung authorized service center. The...
...or end of the cassette. recording a dark Make the background bright to CAMERA. You have left the camcorder set to reduce the contrast or background. The image in the Manual Focus mode. work. Check the POWER switch. START/STOP button Check the POWER switch is blurred. ...The battery pack is fully exhausted. ENGLISH Troubleshooting ✤ If these instructions do not solve your problem, contact your nearest Samsung authorized service center. The...

User Manual (ENGLISH)
Page 111
... is due to you may not apply to improper workmanship or defective material, SEA will automatically be performed by calling toll free: 1-800 SAMSUNG (1-800-726-7864). EXCLUSIONS (WHAT IS NOT COVERED) This warranty does not cover damage due to State. 107 Labor 90 days carry-in... flood and/or other rights which are explained in the instruction manual are not covered under the terms of God; This warranty will repair or replace the product at it's option. Warranty (SEA users only) SAMSUNG LIMITED WARRANTY SAMSUNG Electronics America Inc. (SEA), warrants that occurs in shipping. ...
... is due to you may not apply to improper workmanship or defective material, SEA will automatically be performed by calling toll free: 1-800 SAMSUNG (1-800-726-7864). EXCLUSIONS (WHAT IS NOT COVERED) This warranty does not cover damage due to State. 107 Labor 90 days carry-in... flood and/or other rights which are explained in the instruction manual are not covered under the terms of God; This warranty will repair or replace the product at it's option. Warranty (SEA users only) SAMSUNG LIMITED WARRANTY SAMSUNG Electronics America Inc. (SEA), warrants that occurs in shipping. ...

User Manual (ENGLISH)
Page 3
... Use of various Functions 36 Setting menu items 36 Set the camcorder to CAMERA or PLAYER mode and M.REC or M.PLAY mode (SCD103/D105 only 37 Availability of functions in each mode 38 CLOCK... SET 39 WL. BALANCE (WHITE BALANCE 44 Zooming In and Out 45 Tele MACRO 45 Digital Zoom 46 DIS (Digital Image Stabilizer 47 DSE (Digital...SHUTTER(Low Shutter Speed 58 EASY Mode (for Beginners 59 AF/MF (Auto Focus/Manual Focus 60 Auto Focusing 60 Manual Focusing 60 BLC (Back Light Compensation 61 Fade In and Out 62 To Start ...
... Use of various Functions 36 Setting menu items 36 Set the camcorder to CAMERA or PLAYER mode and M.REC or M.PLAY mode (SCD103/D105 only 37 Availability of functions in each mode 38 CLOCK... SET 39 WL. BALANCE (WHITE BALANCE 44 Zooming In and Out 45 Tele MACRO 45 Digital Zoom 46 DIS (Digital Image Stabilizer 47 DSE (Digital...SHUTTER(Low Shutter Speed 58 EASY Mode (for Beginners 59 AF/MF (Auto Focus/Manual Focus 60 Auto Focusing 60 Manual Focusing 60 BLC (Back Light Compensation 61 Fade In and Out 62 To Start ...

User Manual (ENGLISH)
Page 18
ENGLISH Getting to Know Your Camcorder OSD (On Screen Display in minutes) 18. DSE (Digital Special Effects) mode (see page 66) 11. NITE PIX (see page 48) 4. DATE/TIME (see page 51) 16. WL. Audio recording mode (see page 53) ... 27 28 1 6 bit 30 ENTER : VOL. PB DSE (see page 7) 28. Battery level (see page 74) 17. Zero memory indicator (SCD105 only) (see page 26) 2. Manual focus (see page 45) 18 OSD in CAMERA mode 23 32 22 21 20 19 1 REC 2 EASY M - 0 : 0 0 : 0 0 18 3 MIRROR 5 5 min 17 6 BLC 16 4 TAPE ! 28...
ENGLISH Getting to Know Your Camcorder OSD (On Screen Display in minutes) 18. DSE (Digital Special Effects) mode (see page 66) 11. NITE PIX (see page 48) 4. DATE/TIME (see page 51) 16. WL. Audio recording mode (see page 53) ... 27 28 1 6 bit 30 ENTER : VOL. PB DSE (see page 7) 28. Battery level (see page 74) 17. Zero memory indicator (SCD105 only) (see page 26) 2. Manual focus (see page 45) 18 OSD in CAMERA mode 23 32 22 21 20 19 1 REC 2 EASY M - 0 : 0 0 : 0 0 18 3 MIRROR 5 5 min 17 6 BLC 16 4 TAPE ! 28...

User Manual (ENGLISH)
Page 56
... function, release the M.FOCUS(MF) mode. 56 DIS MIRROR SHUTTER EXPOSURE I STBY 0 : 0 0 : 0 0 I FOCUS (Auto Focus/Manual Focus) (see page 60) - I WHT. For more information, see page 44) I ( ). Setting the Quick menu 1. Set the camcorder to either Manual Focus (MF) or Auto Focus I - BALANCE and press the ENTER button, you select FOCUS and press...
... function, release the M.FOCUS(MF) mode. 56 DIS MIRROR SHUTTER EXPOSURE I STBY 0 : 0 0 : 0 0 I FOCUS (Auto Focus/Manual Focus) (see page 60) - I WHT. For more information, see page 44) I ( ). Setting the Quick menu 1. Set the camcorder to either Manual Focus (MF) or Auto Focus I - BALANCE and press the ENTER button, you select FOCUS and press...

User Manual (ENGLISH)
Page 57
... values can select SHUTTER SPEED and I sure the sun is selected, manual changes are automatically switched and/or deactivated. 1. I You see the ( ) icon, and then press the ENTER button. I I The camcorder returns to the EASY, SLOW SHUTTER modes. ENGLISH Advanced Recording SHUTTER SPEED...✤ SHUTTER SPEED and EXPOSURE are applied first. I When recording with the shutter speed and the exposure I setting when you manually change to the auto shutter setting and auto exposure I adjustment screens displayed on which you should begin the recording with a SHUTTER SPEED...
... values can select SHUTTER SPEED and I sure the sun is selected, manual changes are automatically switched and/or deactivated. 1. I You see the ( ) icon, and then press the ENTER button. I I The camcorder returns to the EASY, SLOW SHUTTER modes. ENGLISH Advanced Recording SHUTTER SPEED...✤ SHUTTER SPEED and EXPOSURE are applied first. I When recording with the shutter speed and the exposure I setting when you manually change to the auto shutter setting and auto exposure I adjustment screens displayed on which you should begin the recording with a SHUTTER SPEED...

User Manual (ENGLISH)
Page 60
...3 min I 1 2 : 0 0 A M J A N . 10 . 2 0 0 4 c. A person enveloped in fog or surrounded by adjusting the focus manually. Set the power switch to the camcorder, others further away. ENGLISH Advanced Recording AF/MF (Auto Focus/Manual Focus) ✤ The AF/MF function works in CAMERA, M.REC mode only. ✤ In most situations, it... Focus. a Auto Focusing ✤ If you are inexperienced in the use of camcorders, we recommend that make use of your recording. ✤ Manual focusing may obtain better results by snow. A picture containing several objects, some ...
...3 min I 1 2 : 0 0 A M J A N . 10 . 2 0 0 4 c. A person enveloped in fog or surrounded by adjusting the focus manually. Set the power switch to the camcorder, others further away. ENGLISH Advanced Recording AF/MF (Auto Focus/Manual Focus) ✤ The AF/MF function works in CAMERA, M.REC mode only. ✤ In most situations, it... Focus. a Auto Focusing ✤ If you are inexperienced in the use of camcorders, we recommend that make use of your recording. ✤ Manual focusing may obtain better results by snow. A picture containing several objects, some ...

User Manual (ENGLISH)
Page 66
... 10 feet). Notes I The maximum recording distance using the I If you to record a ✤ subject in normal recording situations (ex. I I NITE PIX function, focus manually. Set the camcorder to ON. outdoors by day), the recorded picture may be tinted green. Slide the NITE PIX switch to CAMERA mode. 2. I If focusing is difficult...
... 10 feet). Notes I The maximum recording distance using the I If you to record a ✤ subject in normal recording situations (ex. I I NITE PIX function, focus manually. Set the camcorder to ON. outdoors by day), the recorded picture may be tinted green. Slide the NITE PIX switch to CAMERA mode. 2. I If focusing is difficult...

User Manual (ENGLISH)
Page 70
I Refer to the S-VIDEO MIC audio input of the TV or VCR and the white plug (Audio L) to the TV or VCR user's manual. If you connect to a monaural TV or S-VIDEO VCR, connect the yellow plug (Video) to the video input of the TV or VCR. 2. Turn ...VIDEO (optional) cable to VIDEO. I The yellow plug : Video I The white plug : Audio(L)-mono I The red plug : Audio(R) S-VIDEO input Video input-Yellow Audio input Camcorder I TV (left)-White Audio input I (right)-Red Audio/Video USB DV AUDIO /VIDEO I 4. I I Even if you connect the cable to connect an audio cable. Set...
I Refer to the S-VIDEO MIC audio input of the TV or VCR and the white plug (Audio L) to the TV or VCR user's manual. If you connect to a monaural TV or S-VIDEO VCR, connect the yellow plug (Video) to the video input of the TV or VCR. 2. Turn ...VIDEO (optional) cable to VIDEO. I The yellow plug : Video I The white plug : Audio(L)-mono I The red plug : Audio(R) S-VIDEO input Video input-Yellow Audio input Camcorder I TV (left)-White Audio input I (right)-Red Audio/Video USB DV AUDIO /VIDEO I 4. I I Even if you connect the cable to connect an audio cable. Set...
User Manual (ENGLISH)
Page 80
... below to begin installation. - Set the mode switch to Tape (SCD103/D105 only), set to "D:drive", type "D:/setup.exe" and press Enter. ENGLISH USB interface Installing DVC Media 5.1 Program ✤ DVC Media 5.1 User's Manual is included on the accompanying ✤ CD(D:\help\) in advance....5.1 I DirectX 9.0a I I Windows Media Player 9.0 I I Editing Software I I Using the "PC camera" function ✤ You can use this camcorder as a PC CAMERA. ✤ When you connect to PC before installing the program. ✤ ✤ ✤ If another camera or scanner is ...
... below to begin installation. - Set the mode switch to Tape (SCD103/D105 only), set to "D:drive", type "D:/setup.exe" and press Enter. ENGLISH USB interface Installing DVC Media 5.1 Program ✤ DVC Media 5.1 User's Manual is included on the accompanying ✤ CD(D:\help\) in advance....5.1 I DirectX 9.0a I I Windows Media Player 9.0 I I Editing Software I I Using the "PC camera" function ✤ You can use this camcorder as a PC CAMERA. ✤ When you connect to PC before installing the program. ✤ ✤ ✤ If another camera or scanner is ...

