
User Manual (ENGLISH)
Page 9
... ejecting the Memory Card ...83 Structure of folders and files on the Memory Card ...84 Image Format ...84 Selecting the CAMCORDER mode ...84 MEMORY FILE NUMBER ...85 Selecting the image quality ...86 Select the image quality ...86 Number of images on the Memory Card ...86 Recording Still images to a Memory Card in M.REC Mode ...87 Recording images to a Memory Card ...87 Recording...
... ejecting the Memory Card ...83 Structure of folders and files on the Memory Card ...84 Image Format ...84 Selecting the CAMCORDER mode ...84 MEMORY FILE NUMBER ...85 Selecting the image quality ...86 Select the image quality ...86 Number of images on the Memory Card ...86 Recording Still images to a Memory Card in M.REC Mode ...87 Recording images to a Memory Card ...87 Recording...

User Manual (ENGLISH)
Page 15
... Your Camcorder ENGLISH Features • MULTI OSD LANGUAGE You can select the desired OSD Language among English, French, Spanish, Portuguese, German and Italian. • Digital data transfer function with IEEE1394 By incorporating the IEEE 1394 (i.LINK™ : i.LINK is able to record a subject in a dark place. • Digital Still Camera function I Using Memory Card, you...
... Your Camcorder ENGLISH Features • MULTI OSD LANGUAGE You can select the desired OSD Language among English, French, Spanish, Portuguese, German and Italian. • Digital data transfer function with IEEE1394 By incorporating the IEEE 1394 (i.LINK™ : i.LINK is able to record a subject in a dark place. • Digital Still Camera function I Using Memory Card, you...

User Manual (ENGLISH)
Page 18
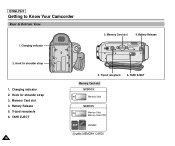
... M.PLAY - ENTER button 10. MENU button 8. MENU button 8. Function buttons PLAYER - Function buttons EASY REC SEARCH FADE BLC REV FWD S.SHOW MULTI DISP. 2. Mode switch (MEMORY CARD/TAPE) 6. ENGLISH Getting to Know Your Camcorder Left Side View 1. PB ZOOM/MACRO 3. DC jack 14
... M.PLAY - ENTER button 10. MENU button 8. MENU button 8. Function buttons PLAYER - Function buttons EASY REC SEARCH FADE BLC REV FWD S.SHOW MULTI DISP. 2. Mode switch (MEMORY CARD/TAPE) 6. ENGLISH Getting to Know Your Camcorder Left Side View 1. PB ZOOM/MACRO 3. DC jack 14
User Manual (ENGLISH)
Page 20
Memory Card slot 4. Battery Release 2. Memory Card slot 4. TAPE EJECT 16 5. Charging indicator 3. Charging indicator 2. ENGLISH Getting to Know Your Camcorder Rear & Bottom View 1. Tripod receptacle 6. TAPE EJECT Memory Card slot SCD103 Memory Stick SCD105 Memory Stick Memory Stick PRO SD/MMC (Usable MEMORY CARD) Hook for shoulder strap 3. Battery Release 5. Tripod receptacle 6. Hook for shoulder strap 1.
Memory Card slot 4. Battery Release 2. Memory Card slot 4. TAPE EJECT 16 5. Charging indicator 3. Charging indicator 2. ENGLISH Getting to Know Your Camcorder Rear & Bottom View 1. Tripod receptacle 6. TAPE EJECT Memory Card slot SCD103 Memory Stick SCD105 Memory Stick Memory Stick PRO SD/MMC (Usable MEMORY CARD) Hook for shoulder strap 3. Battery Release 5. Tripod receptacle 6. Hook for shoulder strap 1.

User Manual (ENGLISH)
Page 23
...on the OSD, even when the OSD is turned OFF and the key input is switched ON or OFF. - Image recording and loading indicator E. C. CARD (MEMORY CARD) indicator D. Print Mark (see page 84) B. ERASE PROTECTION indicator (see page 53) - Getting to turn the DATE/TIME ON or OFF. (... M.REC/M.PLAY modes) A. You may also use the Quick Menu to Know Your Camcorder ENGLISH OSD (On Screen Display in CAMERA/M.REC mode) 19 MPEG4 SCREEN SIZE OSD in M.PLAY mode H FG SLIDE 0 0 1 2 2 / 2 4 0 MEMORY CARD ! The DATE/TIME is not affected when the OSD function is displayed for 3...
...on the OSD, even when the OSD is turned OFF and the key input is switched ON or OFF. - Image recording and loading indicator E. C. CARD (MEMORY CARD) indicator D. Print Mark (see page 84) B. ERASE PROTECTION indicator (see page 53) - Getting to turn the DATE/TIME ON or OFF. (... M.REC/M.PLAY modes) A. You may also use the Quick Menu to Know Your Camcorder ENGLISH OSD (On Screen Display in CAMERA/M.REC mode) 19 MPEG4 SCREEN SIZE OSD in M.PLAY mode H FG SLIDE 0 0 1 2 2 / 2 4 0 MEMORY CARD ! The DATE/TIME is not affected when the OSD function is displayed for 3...

User Manual (ENGLISH)
Page 27
... can be connected to your resident country. 3. Connect the AC Power adapter to a wall socket. MEMORY CARD TAPE 23 Set the camcorder to each mode by holding down the tab on the set the mode switch to MEMORY CARD position. I You must use the AC Power adapter and DC Cable 1. To use the AC Power... the mode switch to TAPE position. ✤ If you want to use this unit as a DSC (Digital Still Camera), set , you should keep outside the projection of the camcorder. (When the battery is attached on the power switch and turning it to the DC jack socket of the DC cable.) 4. The ...
... can be connected to your resident country. 3. Connect the AC Power adapter to a wall socket. MEMORY CARD TAPE 23 Set the camcorder to each mode by holding down the tab on the set the mode switch to MEMORY CARD position. I You must use the AC Power adapter and DC Cable 1. To use the AC Power... the mode switch to TAPE position. ✤ If you want to use this unit as a DSC (Digital Still Camera), set , you should keep outside the projection of the camcorder. (When the battery is attached on the power switch and turning it to the DC jack socket of the DC cable.) 4. The ...

User Manual (ENGLISH)
Page 40
... AV AUDIO MODE AUDIO SELECT Searching pictures recorded in TAPE Copying pictures from TAPE onto the Memory Card Selecting Sound Quality for recording Selecting the Audio playback channel WIND CUT Minimizing wind noise PB DSE Selecting Digital Special Effect during the playback ( ✩ ) : This Function works on model SCD105 only. 3366 CAMERA ✔...
... AV AUDIO MODE AUDIO SELECT Searching pictures recorded in TAPE Copying pictures from TAPE onto the Memory Card Selecting Sound Quality for recording Selecting the Audio playback channel WIND CUT Minimizing wind noise PB DSE Selecting Digital Special Effect during the playback ( ✩ ) : This Function works on model SCD105 only. 3366 CAMERA ✔...

User Manual (ENGLISH)
Page 41
... SELECT PHOTO QUALITY MPEG4 SIZE PRINT MARK PROTECT FILE NO. Advanced Recording MENU SUB MENU MEMORY VIEWER M. ENGLISH G Set the camcorder to playback Selecting Image Quality ✔ ✔ ✔ Selecting Image Resolution ✔ Print images recorded on a Memory Card ✔ Preventing Accidental Erasure ✔ File Naming Options ✔ ✔ ✔ Deleting Files ✔ Formatting...
... SELECT PHOTO QUALITY MPEG4 SIZE PRINT MARK PROTECT FILE NO. Advanced Recording MENU SUB MENU MEMORY VIEWER M. ENGLISH G Set the camcorder to playback Selecting Image Quality ✔ ✔ ✔ Selecting Image Resolution ✔ Print images recorded on a Memory Card ✔ Preventing Accidental Erasure ✔ File Naming Options ✔ ✔ ✔ Deleting Files ✔ Formatting...
User Manual (ENGLISH)
Page 83
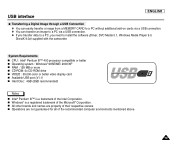
...a registered trademark of the Intel Corporation. USB interface ENGLISH G Transferring a Digital Image through a USB Connection ✤ You can easily transfer a image from a MEMORY CARD to a PC without additional add-on cards via a USB connection. ✤ You can transfer an image to a... PC via a USB connection. ✤ If you transfer data to a PC, you need to install the software (Driver, DVC Media 5.1, Windows Media Player 9.0, DirectX 9.0a) supplied with the camcorder...
...a registered trademark of the Intel Corporation. USB interface ENGLISH G Transferring a Digital Image through a USB Connection ✤ You can easily transfer a image from a MEMORY CARD to a PC without additional add-on cards via a USB connection. ✤ You can transfer an image to a... PC via a USB connection. ✤ If you transfer data to a PC, you need to install the software (Driver, DVC Media 5.1, Windows Media Player 9.0, DirectX 9.0a) supplied with the camcorder...

User Manual (ENGLISH)
Page 85
... to a PC 1. USB Cable USB DV AUDIO /VIDEO S-VIDEO MIC 81 Connect the other USB devices, the camcorder may be installed in the PC. ✤ You can easily transfer data from a Memory Card to the USB port on a PC. 1. Select [Confirm] and disconnect the USB cable when the Windows Splash... screen appears. Connect one end of the USB cable to the USB jack on the camcorder and the other end to a PC without additional ...
... to a PC 1. USB Cable USB DV AUDIO /VIDEO S-VIDEO MIC 81 Connect the other USB devices, the camcorder may be installed in the PC. ✤ You can easily transfer data from a Memory Card to the USB port on a PC. 1. Select [Confirm] and disconnect the USB cable when the Windows Splash... screen appears. Connect one end of the USB cable to the USB jack on the camcorder and the other end to a PC without additional ...

User Manual (ENGLISH)
Page 87
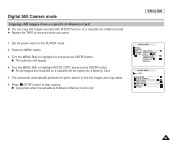
... of the camcorder. I Do not bend, drop or apply strong shock to OFF. 2. Digital Still Camera mode Inserting and ejecting the Memory Card G Inserting the Memory Card 1. I Memory Stick Duo type or RS-MMC (SC-D105 MODEL only) should be changed or lost as a result of the Memory Card. ENGLISH G Ejecting the Memory Card 1. Insert the Memory Card in . Pull out the Memory Card. ✤...
... of the camcorder. I Do not bend, drop or apply strong shock to OFF. 2. Digital Still Camera mode Inserting and ejecting the Memory Card G Inserting the Memory Card 1. I Memory Stick Duo type or RS-MMC (SC-D105 MODEL only) should be changed or lost as a result of the Memory Card. ENGLISH G Ejecting the Memory Card 1. Insert the Memory Card in . Pull out the Memory Card. ✤...

User Manual (ENGLISH)
Page 88
....... 101SSDVC 000-0000 File number Folder number Selecting the CAMCORDER mode ✤ You can use this camcorder as a Digital Still Camera (DSC). ✤ You have to set the mode switch to MEMORY CARD position to MEMORY CARD. 2. I M.PLAY mode (Memory PLAYBACK mode) 1. Set the mode switch to PLAYER.... 84 Set the power switch to MEMORY CARD. 2. I The number of pixels...
....... 101SSDVC 000-0000 File number Folder number Selecting the CAMCORDER mode ✤ You can use this camcorder as a Digital Still Camera (DSC). ✤ You have to set the mode switch to MEMORY CARD position to MEMORY CARD. 2. I M.PLAY mode (Memory PLAYBACK mode) 1. Set the mode switch to PLAYER.... 84 Set the power switch to MEMORY CARD. 2. I The number of pixels...

User Manual (ENGLISH)
Page 89
... existing files, the new image will begin after the last file's number 1. DELETE FORMAT PHOTO SF 320X240 000 SERIES Notes I When using a Memory Card that contains image files from another device, numbering the file will be set as follows: I The menu list will continue after the largest number ... the FILE NO. To exit, press the MENU button. Digital Still Camera mode ENGLISH MEMORY FILE NUMBER ✤ File numbers will be given to images in order of recording when still images are stored on the Memory Card. ✤ MEMORY FILE NUMBERS may be named as the next number in the...
... existing files, the new image will begin after the last file's number 1. DELETE FORMAT PHOTO SF 320X240 000 SERIES Notes I When using a Memory Card that contains image files from another device, numbering the file will be set as follows: I The menu list will continue after the largest number ... the FILE NO. To exit, press the MENU button. Digital Still Camera mode ENGLISH MEMORY FILE NUMBER ✤ File numbers will be given to images in order of recording when still images are stored on the Memory Card. ✤ MEMORY FILE NUMBERS may be named as the next number in the...

User Manual (ENGLISH)
Page 90
...button to confirm the image quality. Press the ENTER button. 8. To exit, press the MENU button. ENGLISH Digital Still Camera mode Selecting the image quality ✤ You can record varies depending on the Memory Card QUALITY 8MB 16MB SUPER FINE Approx. 45 Approx. 90 FINE Approx. 85 Approx. 170 NORMAL Approx. 155 ... PHOTO SF 320X240 000 SERIES G Number of a still images to highlight PHOTO QUALITY in the submenu. 7. Set the power switch to the CAMERA mode. 3. MEMORY CARD TAPE M.REC MODE MEMORY SET M.PLAY SELECT PHOTO QUALITY MPEG4 SIZE PRINT MARK PROTECT FILE NO.
...button to confirm the image quality. Press the ENTER button. 8. To exit, press the MENU button. ENGLISH Digital Still Camera mode Selecting the image quality ✤ You can record varies depending on the Memory Card QUALITY 8MB 16MB SUPER FINE Approx. 45 Approx. 90 FINE Approx. 85 Approx. 170 NORMAL Approx. 155 ... PHOTO SF 320X240 000 SERIES G Number of a still images to highlight PHOTO QUALITY in the submenu. 7. Set the power switch to the CAMERA mode. 3. MEMORY CARD TAPE M.REC MODE MEMORY SET M.PLAY SELECT PHOTO QUALITY MPEG4 SIZE PRINT MARK PROTECT FILE NO.

User Manual (ENGLISH)
Page 91
Recording images to MEMORY CARD. 2. Press the PHOTO button. Set the mode switch to a Memory Card 1. Digital Still Camera mode Recording Still images to CAMERA. 3. ENGLISH MEMORY CARD TAPE PHOTO F 22/240 87 Set the power switch to a Memory Card in M.REC Mode. ✤ Audio cannot be recorded with a still image onto the Memory Card. I While the camcorder is recorded to the Memory Card. I The still image is recording the still image, " " appears on the screen.
Recording images to MEMORY CARD. 2. Press the PHOTO button. Set the mode switch to a Memory Card 1. Digital Still Camera mode Recording Still images to CAMERA. 3. ENGLISH MEMORY CARD TAPE PHOTO F 22/240 87 Set the power switch to a Memory Card in M.REC Mode. ✤ Audio cannot be recorded with a still image onto the Memory Card. I While the camcorder is recorded to the Memory Card. I The still image is recording the still image, " " appears on the screen.

User Manual (ENGLISH)
Page 92
Set the power switch to TAPE. 2. Set the mode switch to PLAYER mode. 3. I The still image is recording the still image, " " appears on the Memory Card. I While the camcorder is recorded on the screen. 88 Play back the cassette. 4. ENGLISH Digital Still Camera mode Recording an image from a cassette as a still image. ✤ You can record still image from a cassette on a Memory Card. ✤ If you want to move recorded multiple still images from a cassette to a Memory Card, use the COPY function. 1. Press the PHOTO button.
Set the power switch to TAPE. 2. Set the mode switch to PLAYER mode. 3. I The still image is recording the still image, " " appears on the Memory Card. I While the camcorder is recorded on the screen. 88 Play back the cassette. 4. ENGLISH Digital Still Camera mode Recording an image from a cassette as a still image. ✤ You can record still image from a cassette on a Memory Card. ✤ If you want to move recorded multiple still images from a cassette to a Memory Card, use the COPY function. 1. Press the PHOTO button.

User Manual (ENGLISH)
Page 93
...no recorded images on the last image will take you are on the Memory Card, NO STORED PHOTO! EASY REC SEARCH FADE BLC REV FWD S.SHOW MULTI DISP. I To view the next image : press the (FWD) button. Digital Still Camera mode ENGLISH Viewing Still images ✤ You can playback ...to PLAYER mode. I To view the previous image : press the (REV) button. To stop the slide show 1. I All images will display on the Memory Card. ✤ There are 3 ways to search for the desired still image. I Slide show : To view all images automatically and in consecutive order. Set ...
...no recorded images on the last image will take you are on the Memory Card, NO STORED PHOTO! EASY REC SEARCH FADE BLC REV FWD S.SHOW MULTI DISP. I To view the next image : press the (FWD) button. Digital Still Camera mode ENGLISH Viewing Still images ✤ You can playback ...to PLAYER mode. I To view the previous image : press the (REV) button. To stop the slide show 1. I All images will display on the Memory Card. ✤ There are 3 ways to search for the desired still image. I Slide show : To view all images automatically and in consecutive order. Set ...

User Manual (ENGLISH)
Page 94
... six images, press the (REV). To view six stored images on single screen, press the MULTI DISP. button again. button. I Turn the MENU DIAL to MEMORY CARD. 2. Notes I To display the next six images, press the (FWD). 19 20 21 22 100-0025 23 24 [24/24] EASY REC SEARCH FADE BLC... mode. I A selection mark ( ) appears under the image. Set the power switch to single playback mode, press the MULTI DISP. I The last recorded image appears. 3. ENGLISH Digital Still Camera mode To view the Multi Display 1.
... six images, press the (REV). To view six stored images on single screen, press the MULTI DISP. button again. button. I Turn the MENU DIAL to MEMORY CARD. 2. Notes I To display the next six images, press the (FWD). 19 20 21 22 100-0025 23 24 [24/24] EASY REC SEARCH FADE BLC... mode. I A selection mark ( ) appears under the image. Set the power switch to single playback mode, press the MULTI DISP. I The last recorded image appears. 3. ENGLISH Digital Still Camera mode To view the Multi Display 1.
User Manual (ENGLISH)
Page 95
...cassette into a Memory Card. 5. Digital Still Camera mode Copying still images from a cassette to Memory Card ✤ You can copy still images recorded with PHOTO function on a cassette will appear. 4. I Copy stops when the cassette is finished or Memory Card is full. The camcorder automatically performs the... photo search to highlight PHOTO COPY and press the ENTER button. I The submenu will be copied into a Memory Card. ✤ Rewind the TAPE to the point which...
...cassette into a Memory Card. 5. Digital Still Camera mode Copying still images from a cassette to Memory Card ✤ You can copy still images recorded with PHOTO function on a cassette will appear. 4. I Copy stops when the cassette is finished or Memory Card is full. The camcorder automatically performs the... photo search to highlight PHOTO COPY and press the ENTER button. I The submenu will be copied into a Memory Card. ✤ Rewind the TAPE to the point which...

User Manual (ENGLISH)
Page 96
... button. 7. Using the (FWD) and (REV) buttons, search for printing ✤ This camcorder supports the DPOF (Digital Print Order Format) print format. ✤ You can set to 1 or 0. Turn the MENU DIAL to MEMORY CARD. 2. Use the MENU DIAL to highlight MEMORY and press the ENTER button. DELETE FORMAT PHOTO SF 320X240 000 SERIES M.PLAY...
... button. 7. Using the (FWD) and (REV) buttons, search for printing ✤ This camcorder supports the DPOF (Digital Print Order Format) print format. ✤ You can set to 1 or 0. Turn the MENU DIAL to MEMORY CARD. 2. Use the MENU DIAL to highlight MEMORY and press the ENTER button. DELETE FORMAT PHOTO SF 320X240 000 SERIES M.PLAY...


