User Manual (ENGLISH)
Page 8
... (SCD105 only) ...73 X2 Playback (Forward/Reverse ) (SCD105 only) ...73 Reverse playback (SCD105 only) ...73 ZERO MEMORY (SCD105 only) ...74 PB DSE (Playback Digital Special Effects) ...75 PB ZOOM ...76 IEEE 1394 Data Transfer ...77 Transferring IEEE1394 (i.LINK)-DV standard data connections ...77... DV device ...77 Connecting to a PC ...77 System requirements ...78 Recording with a DV connection cable ...78 USB interface ...79 Transferring a Digital Image through a USB Connection ...79 System Requirements ...79 Installing DVC Media 5.1 Program ...80 Using the "PC camera" function...80 Using the ...
... (SCD105 only) ...73 X2 Playback (Forward/Reverse ) (SCD105 only) ...73 Reverse playback (SCD105 only) ...73 ZERO MEMORY (SCD105 only) ...74 PB DSE (Playback Digital Special Effects) ...75 PB ZOOM ...76 IEEE 1394 Data Transfer ...77 Transferring IEEE1394 (i.LINK)-DV standard data connections ...77... DV device ...77 Connecting to a PC ...77 System requirements ...78 Recording with a DV connection cable ...78 USB interface ...79 Transferring a Digital Image through a USB Connection ...79 System Requirements ...79 Installing DVC Media 5.1 Program ...80 Using the "PC camera" function...80 Using the ...

User Manual (ENGLISH)
Page 9
... Inserting and ejecting the Memory Card ...83 Structure of folders and files on the Memory Card ...84 Image Format ...84 Selecting the CAMCORDER mode ...84 MEMORY FILE NUMBER ...85 Selecting the image quality ...86 Select the image quality ...86 Number of images on the Memory Card ...86 Recording Still images to a Memory Card in M.REC Mode...
... Inserting and ejecting the Memory Card ...83 Structure of folders and files on the Memory Card ...84 Image Format ...84 Selecting the CAMCORDER mode ...84 MEMORY FILE NUMBER ...85 Selecting the image quality ...86 Select the image quality ...86 Number of images on the Memory Card ...86 Recording Still images to a Memory Card in M.REC Mode...

User Manual (ENGLISH)
Page 15
Getting to Know Your Camcorder ENGLISH Features • MULTI OSD LANGUAGE You can select the desired OSD Language among English, French, Spanish, Portuguese, German and Italian. • Digital data transfer function with IEEE1394 By incorporating the IEEE 1394 (i.LINK™ : i.LINK is a serial data ..., making it possible to record video onto a Memory Card. • MULTI MEMORY CARD SLOT (SCD105 only) Multi Memory Card Slot is able to record a subject in a dark place. • Digital Still Camera function I Using Memory Card, you to use the Memory Stick, the MMC and the SD. 11 I...
Getting to Know Your Camcorder ENGLISH Features • MULTI OSD LANGUAGE You can select the desired OSD Language among English, French, Spanish, Portuguese, German and Italian. • Digital data transfer function with IEEE1394 By incorporating the IEEE 1394 (i.LINK™ : i.LINK is a serial data ..., making it possible to record video onto a Memory Card. • MULTI MEMORY CARD SLOT (SCD105 only) Multi Memory Card Slot is able to record a subject in a dark place. • Digital Still Camera function I Using Memory Card, you to use the Memory Stick, the MMC and the SD. 11 I...
User Manual (ENGLISH)
Page 16
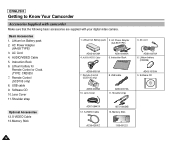
... 12 Instruction Book 6. Lithium battery for Remote Control or Clock. (TYPE: CR2025) 7. Basic Accessories 1. AC Cord 4. Memory Stick AC39-42001Z 1109-001221 3. ENGLISH Getting to Know Your Camcorder Accessories Supplied with camcorder Make sure that the following basic accessories are supplied with your digital video camera. Lithium Ion Battery pack 2. Instruction Book AD39-00001A 7.
... 12 Instruction Book 6. Lithium battery for Remote Control or Clock. (TYPE: CR2025) 7. Basic Accessories 1. AC Cord 4. Memory Stick AC39-42001Z 1109-001221 3. ENGLISH Getting to Know Your Camcorder Accessories Supplied with camcorder Make sure that the following basic accessories are supplied with your digital video camera. Lithium Ion Battery pack 2. Instruction Book AD39-00001A 7.

User Manual (ENGLISH)
Page 18
PB ZOOM/MACRO 3. LIGHT 5. DC jack 2. LIGHT 5. DC jack 14 ENGLISH Getting to Know Your Camcorder Left Side View 1. CAMERA EASY : (REW) REC SEARCH - : (FF) REC SEARCH + : (PLAY/STILL) FADE : (STOP) BLC M.PLAY - MENU dial(VOL/MF)...9. DISPLAY 4. MENU button 8. MENU dial (VOL/MF) 9. PB ZOOM/MACRO 3. MENU button 8. V. REV FWD SLIDE SHOW MULTI DISP. 7. DISPLAY 4. Mode switch (MEMORY CARD/TAPE) 6. Function buttons PLAYER - Speaker 7. ENTER button 10. Mode switch 6. V. Function buttons EASY REC SEARCH FADE BLC REV FWD S.SHOW MULTI DISP. 2. Speaker ...
PB ZOOM/MACRO 3. LIGHT 5. DC jack 2. LIGHT 5. DC jack 14 ENGLISH Getting to Know Your Camcorder Left Side View 1. CAMERA EASY : (REW) REC SEARCH - : (FF) REC SEARCH + : (PLAY/STILL) FADE : (STOP) BLC M.PLAY - MENU dial(VOL/MF)...9. DISPLAY 4. MENU button 8. MENU dial (VOL/MF) 9. PB ZOOM/MACRO 3. MENU button 8. V. REV FWD SLIDE SHOW MULTI DISP. 7. DISPLAY 4. Mode switch (MEMORY CARD/TAPE) 6. Function buttons PLAYER - Speaker 7. ENTER button 10. Mode switch 6. V. Function buttons EASY REC SEARCH FADE BLC REV FWD S.SHOW MULTI DISP. 2. Speaker ...
User Manual (ENGLISH)
Page 20
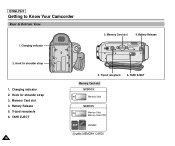
Hook for shoulder strap 1. TAPE EJECT 16 5. ENGLISH Getting to Know Your Camcorder Rear & Bottom View 1. Charging indicator 2. Tripod receptacle 6. Hook for shoulder strap 3. TAPE EJECT Memory Card slot SCD103 Memory Stick SCD105 Memory Stick Memory Stick PRO SD/MMC (Usable MEMORY CARD) Memory Card slot 4. Memory Card slot 4. Battery Release 2. Battery Release 5. Charging indicator 3. Tripod receptacle 6.
Hook for shoulder strap 1. TAPE EJECT 16 5. ENGLISH Getting to Know Your Camcorder Rear & Bottom View 1. Charging indicator 2. Tripod receptacle 6. Hook for shoulder strap 3. TAPE EJECT Memory Card slot SCD103 Memory Stick SCD105 Memory Stick Memory Stick PRO SD/MMC (Usable MEMORY CARD) Memory Card slot 4. Memory Card slot 4. Battery Release 2. Battery Release 5. Charging indicator 3. Tripod receptacle 6.

User Manual (ENGLISH)
Page 21
.... F. SELF TIMER 4. PHOTO SEARCH 6. DATE/TIME 14. (SLOW) 13. (STILL) 12. (STOP) 11. Zoom 16. ADV (see page 20) 4. Getting to Know Your Camcorder Remote control (SCD105 only) 1. ZERO MEMORY (see page 72) 11. Direction ( , ) (see page 74) 5. DATE/TIME 16. A.DUB (see page 73) 17. F. Zoom 18. X2 15. ADV 10...
.... F. SELF TIMER 4. PHOTO SEARCH 6. DATE/TIME 14. (SLOW) 13. (STILL) 12. (STOP) 11. Zoom 16. ADV (see page 20) 4. Getting to Know Your Camcorder Remote control (SCD105 only) 1. ZERO MEMORY (see page 72) 11. Direction ( , ) (see page 74) 5. DATE/TIME 16. A.DUB (see page 73) 17. F. Zoom 18. X2 15. ADV 10...

User Manual (ENGLISH)
Page 22
... page 66) 11. NITE PIX (see page 26) 2. DIS (see page 75) 30. PB DSE (see page 47) 24. Manual focus (see page 48) 4. DSE (Digital Special Effects) mode (see page 60) 8. Audio recording mode (see page 67) 32. Operating mode 20. REMOTE (SCD105 only) 14. POWER NITE PIX (see page... 51) 16. WL. PHOTO mode 22. USB 13. Zero memory indicator (SCD105 only) (see page 74) 17. ENGLISH Getting to Know Your Camcorder OSD (On Screen Display in minutes) 18.
... page 66) 11. NITE PIX (see page 26) 2. DIS (see page 75) 30. PB DSE (see page 47) 24. Manual focus (see page 48) 4. DSE (Digital Special Effects) mode (see page 60) 8. Audio recording mode (see page 67) 32. Operating mode 20. REMOTE (SCD105 only) 14. POWER NITE PIX (see page... 51) 16. WL. PHOTO mode 22. USB 13. Zero memory indicator (SCD105 only) (see page 74) 17. ENGLISH Getting to Know Your Camcorder OSD (On Screen Display in minutes) 18.

User Manual (ENGLISH)
Page 23
... the DATE/TIME on or off - Folder number-file number (see page 55) (only in M.REC mode E DC SF 2 2 / 2 4 0 B 3 5 2 2 min I . CARD (MEMORY CARD) indicator D. Image counter - Image recording and loading indicator E. You may also use the Quick Menu to Know Your Camcorder ENGLISH OSD (On Screen Display in M.PLAY mode H FG SLIDE...
... the DATE/TIME on or off - Folder number-file number (see page 55) (only in M.REC mode E DC SF 2 2 / 2 4 0 B 3 5 2 2 min I . CARD (MEMORY CARD) indicator D. Image counter - Image recording and loading indicator E. You may also use the Quick Menu to Know Your Camcorder ENGLISH OSD (On Screen Display in M.PLAY mode H FG SLIDE...

User Manual (ENGLISH)
Page 24
START/ STOP PHOTO DISPLAY SELF ZERO DATE/ TIMER MEMORY TIME PHOTO SEARCH A.DUB SLOW X2 Self F.ADV Timer 3. Press the START/STOP button to CAMERA mode. 2. ENGLISH Preparation How to use the Self Timer ... one second of the battery. If you wish to cancel the Self Timer function before recording, press the SELF TIMER button. 4. You purchase the camcorder. - Set the camcorder to start the timer. - Press START/STOP again when you want to stop recording. 20 The remote control doesn't work. ✤ Ensure that you...
START/ STOP PHOTO DISPLAY SELF ZERO DATE/ TIMER MEMORY TIME PHOTO SEARCH A.DUB SLOW X2 Self F.ADV Timer 3. Press the START/STOP button to CAMERA mode. 2. ENGLISH Preparation How to use the Self Timer ... one second of the battery. If you wish to cancel the Self Timer function before recording, press the SELF TIMER button. 4. You purchase the camcorder. - Set the camcorder to start the timer. - Press START/STOP again when you want to stop recording. 20 The remote control doesn't work. ✤ Ensure that you...
User Manual (ENGLISH)
Page 25
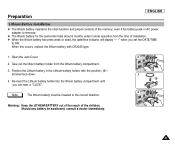
even if the battery pack or AC power adapter is removed. ✤ The lithium battery for the camcorder lasts about 6 months under normal operation from the lithium battery compartment. 3. Take out the lithium battery holder from the time of the...the date/time indicator will display "- - - Preparation ENGLISH Lithium Battery Installation ✤ The lithium battery maintains the clock function and preset contents of the memory; Should any battery be inserted in the Lithium battery holder, with CR2025 type. 1. When this occurs, replace the lithium battery with the positive ( ) ...
even if the battery pack or AC power adapter is removed. ✤ The lithium battery for the camcorder lasts about 6 months under normal operation from the lithium battery compartment. 3. Take out the lithium battery holder from the time of the...the date/time indicator will display "- - - Preparation ENGLISH Lithium Battery Installation ✤ The lithium battery maintains the clock function and preset contents of the memory; Should any battery be inserted in the Lithium battery holder, with CR2025 type. 1. When this occurs, replace the lithium battery with the positive ( ) ...

User Manual (ENGLISH)
Page 27
... Adapter and AC cord : used for indoor recording. - The Battery Pack : used for outdoor recording. Set the camcorder to each mode by holding down the tab on the set the mode switch to MEMORY CARD position. To use the AC Power adapter of AA-E8 TYPE. Connect the AC Power adapter to... AC cord to the AC cord. 2. Power Switch ENGLISH To select the CAMCORDER mode ✤ If you want to use this unit as a camcorder, set the mode switch to TAPE position. ✤ If you want to use this unit as a DSC (Digital Still Camera), set , you should keep outside the projection of the...
... Adapter and AC cord : used for indoor recording. - The Battery Pack : used for outdoor recording. Set the camcorder to each mode by holding down the tab on the set the mode switch to MEMORY CARD position. To use the AC Power adapter of AA-E8 TYPE. Connect the AC Power adapter to... AC cord to the AC cord. 2. Power Switch ENGLISH To select the CAMCORDER mode ✤ If you want to use this unit as a camcorder, set the mode switch to TAPE position. ✤ If you want to use this unit as a DSC (Digital Still Camera), set , you should keep outside the projection of the...

User Manual (ENGLISH)
Page 33
... press the ENTER button. I OSD Language is initialized to confirm the OSD LANGUAGE. 5. Turn the MENU DIAL to the selected language. CAM MODE INITIAL CAMERA A/V MEMORY VIEWER CLOCK SET WL. I "LANGUAGE" and "LANGUAGE SELECT" are always indicated in CAMERA, PLAYER, M.REC, M.PLAY modes. I The menu list will appear. 2. Select LANGUAGE from...
... press the ENTER button. I OSD Language is initialized to confirm the OSD LANGUAGE. 5. Turn the MENU DIAL to the selected language. CAM MODE INITIAL CAMERA A/V MEMORY VIEWER CLOCK SET WL. I "LANGUAGE" and "LANGUAGE SELECT" are always indicated in CAMERA, PLAYER, M.REC, M.PLAY modes. I The menu list will appear. 2. Select LANGUAGE from...

User Manual (ENGLISH)
Page 36
...Open the LCD screen, and the LCD switches on the conditions under where you are using the camcorder (indoors or outdoors for example), you can adjust ; CAM MODE INITIAL CAMERA A/V MEMORY VIEWER LCD ADJUST DATE/TIME TV DISPLAY CAM MODE VIEWER SET LCD ADJUST DATE / TIME TV ...that it highlights the menu item you are recording or playing back directly. ✤ Depending on . 3. ENGLISH Basic Recording Adjusting the LCD ✤ Your camcorder is playing. 2. I COLOR ADJUST 1. I BRIGHT SELECT I BRIGHT ADJUST I In the PLAYER mode, you may only setup the LCD while the tape ...
...Open the LCD screen, and the LCD switches on the conditions under where you are using the camcorder (indoors or outdoors for example), you can adjust ; CAM MODE INITIAL CAMERA A/V MEMORY VIEWER LCD ADJUST DATE/TIME TV DISPLAY CAM MODE VIEWER SET LCD ADJUST DATE / TIME TV ...that it highlights the menu item you are recording or playing back directly. ✤ Depending on . 3. ENGLISH Basic Recording Adjusting the LCD ✤ Your camcorder is playing. 2. I COLOR ADJUST 1. I BRIGHT SELECT I BRIGHT ADJUST I In the PLAYER mode, you may only setup the LCD while the tape ...

User Manual (ENGLISH)
Page 40
... Selecting the Digital Image Stabilizing Setting the Digital special effect REC MODE Selecting the recording speed PHOTO SEARCH PHOTO COPY AV AUDIO MODE AUDIO SELECT Searching pictures recorded in TAPE Copying pictures from TAPE onto the Memory Card Selecting Sound Quality for recording ...Selecting the Audio playback channel WIND CUT Minimizing wind noise PB DSE Selecting Digital Special Effect during the playback ( ✩ ) : This Function works ...
... Selecting the Digital Image Stabilizing Setting the Digital special effect REC MODE Selecting the recording speed PHOTO SEARCH PHOTO COPY AV AUDIO MODE AUDIO SELECT Searching pictures recorded in TAPE Copying pictures from TAPE onto the Memory Card Selecting Sound Quality for recording ...Selecting the Audio playback channel WIND CUT Minimizing wind noise PB DSE Selecting Digital Special Effect during the playback ( ✩ ) : This Function works ...

User Manual (ENGLISH)
Page 41
...10004; ✔ ✔ Selecting Image Resolution ✔ Print images recorded on a Memory Card ✔ Preventing Accidental Erasure ✔ File Naming Options ✔ ✔ ✔ Deleting Files ✔ Formatting the Memory Card ✔ Setting the Brightness and colour Tones of the LCD ✔ ✔...SIZE PRINT MARK PROTECT FILE NO. ENGLISH G Set the camcorder to CAMERA or PLAYER mode and M.REC or M.PLAY mode 1. REC M. The MENU OSD is displayed. Advanced Recording MENU SUB MENU MEMORY VIEWER M. DELETE FORMAT LCD ADJUST DATE/TIME TV DISPLAY...
...10004; ✔ ✔ Selecting Image Resolution ✔ Print images recorded on a Memory Card ✔ Preventing Accidental Erasure ✔ File Naming Options ✔ ✔ ✔ Deleting Files ✔ Formatting the Memory Card ✔ Setting the Brightness and colour Tones of the LCD ✔ ✔...SIZE PRINT MARK PROTECT FILE NO. ENGLISH G Set the camcorder to CAMERA or PLAYER mode and M.REC or M.PLAY mode 1. REC M. The MENU OSD is displayed. Advanced Recording MENU SUB MENU MEMORY VIEWER M. DELETE FORMAT LCD ADJUST DATE/TIME TV DISPLAY...

User Manual (ENGLISH)
Page 43
.... Using the MENU DIAL, change the month setting. 8. I The month will blink. 9. Using the MENU DIAL, change the year setting. 6. ENGLISH CAM MODE INITIAL CAMERA A/V MEMORY VIEWER CLOCK SET WL. Turn the MENU DIAL to the sub menu. 11.To exit, press the MENU button. will appear, and a few seconds later...
.... Using the MENU DIAL, change the month setting. 8. I The month will blink. 9. Using the MENU DIAL, change the year setting. 6. ENGLISH CAM MODE INITIAL CAMERA A/V MEMORY VIEWER CLOCK SET WL. Turn the MENU DIAL to the sub menu. 11.To exit, press the MENU button. will appear, and a few seconds later...

User Manual (ENGLISH)
Page 44
... press the ENTER button. 5. Turn the MENU DIAL to enable or disable the remote control. To exit, press the MENU button. CAM MODE INITIAL CAMERA A/V MEMORY VIEWER CLOCK SET WL. I If you set the remote to enable or disable the remote control for 3 seconds and disappear on the LCD. The setting... from the submenu. 4. I The menu list will blink for use it, the remote control icon will appear. 2. Use the MENU DIAL to use with the camcorder. 1. REMOTE (SCD105 only) ✤ The WL.
... press the ENTER button. 5. Turn the MENU DIAL to enable or disable the remote control. To exit, press the MENU button. CAM MODE INITIAL CAMERA A/V MEMORY VIEWER CLOCK SET WL. I If you set the remote to enable or disable the remote control for 3 seconds and disappear on the LCD. The setting... from the submenu. 4. I The menu list will blink for use it, the remote control icon will appear. 2. Use the MENU DIAL to use with the camcorder. 1. REMOTE (SCD105 only) ✤ The WL.

User Manual (ENGLISH)
Page 45
... LANGUAGE DEMONSTRATION ENGLISH I The DEMONSTRATION mode is automatically activated when the camcorder is inserted in the camcorder. ✤ The demonstration operates repeatedly until the DEMONSTRATION mode switched OFF... a tape inserted in the camcorder). Advanced Recording ENGLISH G DEMONSTRATION ✤ Demonstration automatically shows you the major functions that are included with your camcorder so that you do not...switching to highlight INITIAL and press the ENTER button. 4. Set the camcorder to OFF. To activate the DEMONSTRATION, set the DEMONSTRATION to CAMERA mode....
... LANGUAGE DEMONSTRATION ENGLISH I The DEMONSTRATION mode is automatically activated when the camcorder is inserted in the camcorder. ✤ The demonstration operates repeatedly until the DEMONSTRATION mode switched OFF... a tape inserted in the camcorder). Advanced Recording ENGLISH G DEMONSTRATION ✤ Demonstration automatically shows you the major functions that are included with your camcorder so that you do not...switching to highlight INITIAL and press the ENTER button. 4. Set the camcorder to OFF. To activate the DEMONSTRATION, set the DEMONSTRATION to CAMERA mode....

User Manual (ENGLISH)
Page 47
... button to highlight CAMERA and press the ENTER button. 3. I While setting the NITE PIX to confirm the PROGRAM AE mode. 6. ENGLISH CAM MODE INITIAL CAMERA A/V MEMORY VIEWER PROGRAM AE WHT. SPEED Notes I Press the ENTER button to ON, the PROGRAM AE function does not work. I The menu list will not operate...
... button to highlight CAMERA and press the ENTER button. 3. I While setting the NITE PIX to confirm the PROGRAM AE mode. 6. ENGLISH CAM MODE INITIAL CAMERA A/V MEMORY VIEWER PROGRAM AE WHT. SPEED Notes I Press the ENTER button to ON, the PROGRAM AE function does not work. I The menu list will not operate...


