User Manual (ENGLISH)
Page 14
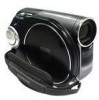
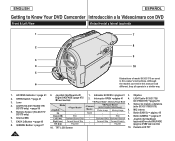
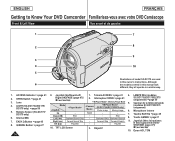
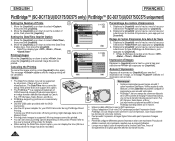
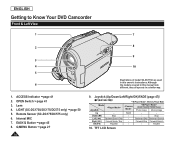
... con DVD Front & Left View Vistas frontal y lateral izquierda PHOTO 1 7 2 8 9 3 4 10 5 Illustrations of model SC-DC175 are used in this manual look different, they all operate in this owner's instructions. OPEN Switch page 41 3. Stop 8. Joystick (Arriba/Abajo/ 7. Forward Skip Forward Search Izquierda/Derecha/OK)/FADE 8. Objetivo 2. LIGHT (SC-DC173U/DC175/ DC575 only) page 50 5. Interruptor OPEN página 41 4. : Memory Player Mode Mode Joystick (SC-DC173...
... con DVD Front & Left View Vistas frontal y lateral izquierda PHOTO 1 7 2 8 9 3 4 10 5 Illustrations of model SC-DC175 are used in this manual look different, they all operate in this owner's instructions. OPEN Switch page 41 3. Stop 8. Joystick (Arriba/Abajo/ 7. Forward Skip Forward Search Izquierda/Derecha/OK)/FADE 8. Objetivo 2. LIGHT (SC-DC173U/DC175/ DC575 only) page 50 5. Interruptor OPEN página 41 4. : Memory Player Mode Mode Joystick (SC-DC173...

User Manual (ENGLISH)
Page 30
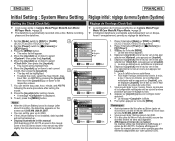
...és After the Lithium Battery loses its charge (after about 6 months), the date/time appears on your DVD Camcorder elementos reales de su Videocámara con DVD. 30 ENGLISH ESPAÑOL Initial Setting : System Menu Setting Ajuste inicial: Ajuste del menú System Setting the Clock (Clock Set) Ajuste del reloj (Clock Set) Clock setup works in Camera Mode/Player Mode/M.Cam Mode/ La confi...
...és After the Lithium Battery loses its charge (after about 6 months), the date/time appears on your DVD Camcorder elementos reales de su Videocámara con DVD. 30 ENGLISH ESPAÑOL Initial Setting : System Menu Setting Ajuste inicial: Ajuste del menú System Setting the Clock (Clock Set) Ajuste del reloj (Clock Set) Clock setup works in Camera Mode/Player Mode/M.Cam Mode/ La confi...
User Manual (ENGLISH)
Page 14
Although 6 the models covered in this manual look different, they all operate in this owner's instructions. ACCESS Indicator page 41 2. Remote Sensor (SC-DC175/ DC575 only) 6. Microphone interne 7. OPEN Switch page 41 3. Interrupteur OPEN page 41 : Memory Player Mode (SC-DC173(U)/DC175/DC575 only) Photo image Moving image Up Down () Left () Right () OK () Stop Backward Search/ Skip Forward Search/ Skip Play/Still...
Although 6 the models covered in this manual look different, they all operate in this owner's instructions. ACCESS Indicator page 41 2. Remote Sensor (SC-DC175/ DC575 only) 6. Microphone interne 7. OPEN Switch page 41 3. Interrupteur OPEN page 41 : Memory Player Mode (SC-DC173(U)/DC175/DC575 only) Photo image Moving image Up Down () Left () Right () OK () Stop Backward Search/ Skip Forward Search/ Skip Play/Still...
User Manual (ENGLISH)
Page 30
... l'interrupteur [Power] sur [ (Camera)] ou [ (Player)]. 3. Placez l'interrupteur [Mode] sur [DISC] ou [CARD] (SC-DC173(U)/DC175/DC575 uniquement) 2. Appuyez sur [Joystick] après avoir configuré matin/ aprèsmidi. Le message s'affiche. 9. Set the [Mode] switch to [ (Camera)] or [ (Player)]. 3. Some of SC-DC175 are used in Camera Mode/Player Mode/M.Cam Mode/ M.Player Mode. page 26 The date/time is not installed, data inputted will...
... l'interrupteur [Power] sur [ (Camera)] ou [ (Player)]. 3. Placez l'interrupteur [Mode] sur [DISC] ou [CARD] (SC-DC173(U)/DC175/DC575 uniquement) 2. Appuyez sur [Joystick] après avoir configuré matin/ aprèsmidi. Le message s'affiche. 9. Set the [Mode] switch to [ (Camera)] or [ (Player)]. 3. Some of SC-DC175 are used in Camera Mode/Player Mode/M.Cam Mode/ M.Player Mode. page 26 The date/time is not installed, data inputted will...
User Manual (ENGLISH)
Page 106
... DVD Camcorder. Use the AC power adapter for details. When setting the Date/Time imprint option, you can set the number of Prints 2 1. Remarques Certaines imprimantes peuvent ne pas accueillir l' option Impression Date/Heure. Déplacez le [Joystick] vers le haut ou vers le bas pour sélectionner puis appuyez sur [Joystick]. 2. Turning your DVD Camcorder off during PictBridge Direct Printing. Le menu Date/Time...
... DVD Camcorder. Use the AC power adapter for details. When setting the Date/Time imprint option, you can set the number of Prints 2 1. Remarques Certaines imprimantes peuvent ne pas accueillir l' option Impression Date/Heure. Déplacez le [Joystick] vers le haut ou vers le bas pour sélectionner puis appuyez sur [Joystick]. 2. Turning your DVD Camcorder off during PictBridge Direct Printing. Le menu Date/Time...
User Manual (ENGLISH)
Page 2
... (Remote) (SC-DC175/DC575 only 31 Setting the Beep Sound (Beep Sound 32 Setting the Shutter Sound (Shutter Sound) (SC-DC173(U)/DC175/DC575 only 33 Selecting the OSD Language (Language 34 Viewing the Demonstration (Demonstration 35 Initial Setting : Display Menu Setting 36 Adjusting the LCD Screen (LCD Bright/LCD Color 36 Displaying the Date/Time (Date/Time 37 Setting the TV Display (TV Display 38 DVD Camcorder: Before Recording 39 Using the Viewfinder 39 Using the LCD ENHANCER 39 Various Recording Techniques 40 Inserting and Removing a Disc 41 Selecting the Record Mode (Rec...
... (Remote) (SC-DC175/DC575 only 31 Setting the Beep Sound (Beep Sound 32 Setting the Shutter Sound (Shutter Sound) (SC-DC173(U)/DC175/DC575 only 33 Selecting the OSD Language (Language 34 Viewing the Demonstration (Demonstration 35 Initial Setting : Display Menu Setting 36 Adjusting the LCD Screen (LCD Bright/LCD Color 36 Displaying the Date/Time (Date/Time 37 Setting the TV Display (TV Display 38 DVD Camcorder: Before Recording 39 Using the Viewfinder 39 Using the LCD ENHANCER 39 Various Recording Techniques 40 Inserting and Removing a Disc 41 Selecting the Record Mode (Rec...
User Manual (ENGLISH)
Page 3
... Mode (BLC 48 Using the Color Nite 49 Using the LIGHT (SC-DC173U/DC175/DC575 only) ......... 50 DVD Camcorder: Advanced Recording 51 Cutting Off Wind Noise (Wind Cut 51 Setting the Shutter Speed & Exposure (Shutter/Exposure).. 52 Auto Focus / Manual Focus 53 Programed Automatic Exposure Modes (Program AE) ...... 54 Setting the White Balance 56 Applying Digital Effects 58 Setting the 16:9 Wide mode (16:9 Wide 60 Setting the Digital Image Stabilizer (DIS 61 Zooming In and Out with Digital Zoom (Digital Zoom) ....... 62 DVD Camcorder...
... Mode (BLC 48 Using the Color Nite 49 Using the LIGHT (SC-DC173U/DC175/DC575 only) ......... 50 DVD Camcorder: Advanced Recording 51 Cutting Off Wind Noise (Wind Cut 51 Setting the Shutter Speed & Exposure (Shutter/Exposure).. 52 Auto Focus / Manual Focus 53 Programed Automatic Exposure Modes (Program AE) ...... 54 Setting the White Balance 56 Applying Digital Effects 58 Setting the 16:9 Wide mode (16:9 Wide 60 Setting the Digital Image Stabilizer (DIS 61 Zooming In and Out with Digital Zoom (Digital Zoom) ....... 62 DVD Camcorder...
User Manual (ENGLISH)
Page 6
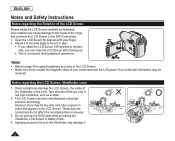
... convenient during playback operations. Open the LCD Screen 90 degrees with it . 6 PHOTO PHOTO Take pictures of the hinge that appear on the LCD Screen. The LCD Screen has been manufactured using high precision technology. Do not pick up the DVD Camcorder by holding the Viewfinder, LCD Screen or Battery Pack. 4. Rotate it to the best angle to record or play. If you can damage the LCD Screen, the inside...
... convenient during playback operations. Open the LCD Screen 90 degrees with it . 6 PHOTO PHOTO Take pictures of the hinge that appear on the LCD Screen. The LCD Screen has been manufactured using high precision technology. Do not pick up the DVD Camcorder by holding the Viewfinder, LCD Screen or Battery Pack. 4. Rotate it to the best angle to record or play. If you can damage the LCD Screen, the inside...
User Manual (ENGLISH)
Page 14
...) 6. Q.MENU Button page 27 14 8 9 10 Illustrations of model SC-DC173U are used in this manual look different, they all operate in this owner's instructions. Although the models covered in a similar way. 9. Stop Left () Backward Search/ Skip - LIGHT (SC-DC173U/DC175/DC575 only) page 50 5. FADE - - Forward Skip Forward Search OK () Play/Still - - ENGLISH Getting to Know Your DVD Camcorder Front & Left View PHOTO 1 7 2 3 4 5 6 1. Joystick...
...) 6. Q.MENU Button page 27 14 8 9 10 Illustrations of model SC-DC173U are used in this manual look different, they all operate in this owner's instructions. Although the models covered in a similar way. 9. Stop Left () Backward Search/ Skip - LIGHT (SC-DC173U/DC175/DC575 only) page 50 5. FADE - - Forward Skip Forward Search OK () Play/Still - - ENGLISH Getting to Know Your DVD Camcorder Front & Left View PHOTO 1 7 2 3 4 5 6 1. Joystick...
User Manual (ENGLISH)
Page 22
... capacity of the Battery Pack you are based on model SC-DC173U The amount of use (DVD Camcorder/Camera/With LCD Screen etc.). Battery Type Charging time LCD ON Viewfinder LCD ON Viewfinder LCD ON Viewfinder Mode SB-LSM80 Approx.1hr 30min Continuous recording time Playback time XP Approx.55min Approx. 1hr Mode SB-LSM160 (not supplied) Approx. 3hr Continuous recording time Playback time XP Approx. 1hr 50min Approx. 1hr 55min SP Approx. 1hr...
... capacity of the Battery Pack you are based on model SC-DC173U The amount of use (DVD Camcorder/Camera/With LCD Screen etc.). Battery Type Charging time LCD ON Viewfinder LCD ON Viewfinder LCD ON Viewfinder Mode SB-LSM80 Approx.1hr 30min Continuous recording time Playback time XP Approx.55min Approx. 1hr Mode SB-LSM160 (not supplied) Approx. 3hr Continuous recording time Playback time XP Approx. 1hr 50min Approx. 1hr 55min SP Approx. 1hr...
User Manual (ENGLISH)
Page 24
... preserve battery power, keep your DVD Camcorder turned off when you need to charge it . 24 The Battery Pack may differ from your SAMSUNG retailer. When the Battery reaches the end of its life, please contact your local dealer. Do not drop the Battery Pack. The remaining battery time may be dealt with a disc inserted, it is left in the instructions. When replacing the battery...
... preserve battery power, keep your DVD Camcorder turned off when you need to charge it . 24 The Battery Pack may differ from your SAMSUNG retailer. When the Battery reaches the end of its life, please contact your local dealer. Do not drop the Battery Pack. The remaining battery time may be dealt with a disc inserted, it is left in the instructions. When replacing the battery...

User Manual (ENGLISH)
Page 30
... the [MENU] button. 8 Notes After the Lithium Battery loses its charge (after setting minute. A message is displayed. 9. Move OK Select MENU Exit 30 Move the [Joystick] up to [DISC] or [CARD]. (SC-DC173(U)/DC175/DC575 only) 4 2. Some of the OSD items shown in this manual OSD illustrations of model SC-DC173U are used in Camera Mode/Player Mode/M.Cam Mode/M.Player Mode. page 26 The date/time is not installed, data inputted will...
... the [MENU] button. 8 Notes After the Lithium Battery loses its charge (after setting minute. A message is displayed. 9. Move OK Select MENU Exit 30 Move the [Joystick] up to [DISC] or [CARD]. (SC-DC173(U)/DC175/DC575 only) 4 2. Some of the OSD items shown in this manual OSD illustrations of model SC-DC173U are used in Camera Mode/Player Mode/M.Cam Mode/M.Player Mode. page 26 The date/time is not installed, data inputted will...

User Manual (ENGLISH)
Page 42
...; Please refer to page 123 for Finalized disc compatibility. Note The Finalize/Format functions are prompted with the message. ENGLISH DVD Camcorder: Before Recording When using a New Disc: Formatting a new Disc Formatting may be able to play the disc on most DVD Players/Recorders/Drives. Differences between and . 42 Format? For a DVD-RW disc: You are not available when the battery level is between Video and VR mode Video (Video Mode) : If the disc has been finalized, you select...
...; Please refer to page 123 for Finalized disc compatibility. Note The Finalize/Format functions are prompted with the message. ENGLISH DVD Camcorder: Before Recording When using a New Disc: Formatting a new Disc Formatting may be able to play the disc on most DVD Players/Recorders/Drives. Differences between and . 42 Format? For a DVD-RW disc: You are not available when the battery level is between Video and VR mode Video (Video Mode) : If the disc has been finalized, you select...

User Manual (ENGLISH)
Page 44
... cable/batteries are displayed on the LCD Screen. The record mode, recording time, the disc type, the format mode, and the title scene number are disconnected, or recording is disabled during recording, an error message will be created. One on the rear and the other function is displayed on the LCD Screen. 5. Connect a power source to [ (Camera)]. Remove the Lens Cover. 3. Tip This DVD Camcorder has two [Record Start/Stop] buttons. ENGLISH PHOTO DVD Camcorder: Basic Recording Making your expected recording time. 4. The title scene number will be switched to the data...
... cable/batteries are displayed on the LCD Screen. The record mode, recording time, the disc type, the format mode, and the title scene number are disconnected, or recording is disabled during recording, an error message will be created. One on the rear and the other function is displayed on the LCD Screen. 5. Connect a power source to [ (Camera)]. Remove the Lens Cover. 3. Tip This DVD Camcorder has two [Record Start/Stop] buttons. ENGLISH PHOTO DVD Camcorder: Basic Recording Making your expected recording time. 4. The title scene number will be switched to the data...
User Manual (ENGLISH)
Page 52
... faster the speed is set. 20 The DVD Camcorder returns to the auto shutter and auto exposure settings when you change the Shutter Speed and the Exposure value when Program AE option is selected, manual changes are displayed. ENGLISH DVD Camcorder: Advanced Recording Setting the Shutter Speed & Exposure (Shutter/Exposure) The Shutter Speed function works only in both Camera Mode and M.Cam Mode. page 26 Setting the Exposure allows you to open and close. Set the [Mode] switch to [DISC] or [CARD]. (SC-DC173(U)/DC175...
... faster the speed is set. 20 The DVD Camcorder returns to the auto shutter and auto exposure settings when you change the Shutter Speed and the Exposure value when Program AE option is selected, manual changes are displayed. ENGLISH DVD Camcorder: Advanced Recording Setting the Shutter Speed & Exposure (Shutter/Exposure) The Shutter Speed function works only in both Camera Mode and M.Cam Mode. page 26 Setting the Exposure allows you to open and close. Set the [Mode] switch to [DISC] or [CARD]. (SC-DC173(U)/DC175...
User Manual (ENGLISH)
Page 57
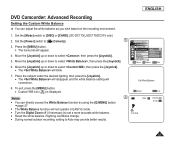
... [MENU] button. The menu list will commence. Set the [Power] switch to [DISC] or [CARD]. (SC-DC173(U)/DC175/DC575 only) 2. ENGLISH DVD Camcorder: Advanced Recording Setting the Custom White Balance You can directly access the White Balance function by using the [Q.MENU] button. page 27 The White Balance function will not operate in EASY.Q mode. Turn the Digital Zoom off (if necessary) to set a more accurate white balance. Reset the white balance if lighting conditions change. During normal outdoor recording, setting to Auto may...
... [MENU] button. The menu list will commence. Set the [Power] switch to [DISC] or [CARD]. (SC-DC173(U)/DC175/DC575 only) 2. ENGLISH DVD Camcorder: Advanced Recording Setting the Custom White Balance You can directly access the White Balance function by using the [Q.MENU] button. page 27 The White Balance function will not operate in EASY.Q mode. Turn the Digital Zoom off (if necessary) to set a more accurate white balance. Reset the white balance if lighting conditions change. During normal outdoor recording, setting to Auto may...

User Manual (ENGLISH)
Page 110
... supported.) 1. Click on on the Setup screen. Driver software is mapped to restart the PC. View Movie Recordings and Photos on the Setup screen. If the is not installed, it is no need to "D:Drive". Video Codec Click on on PC: DV Driver - Video Codec - Type "D:\autorun.exe" and then press ENTER, if your CD-ROM drive is installed automatically. Video Codec - Installing Driver - Click on to display a dialog. Application Installation - PC Camera/USB Streaming function: DV Driver...
... supported.) 1. Click on on the Setup screen. Driver software is mapped to restart the PC. View Movie Recordings and Photos on the Setup screen. If the is not installed, it is no need to "D:Drive". Video Codec Click on on PC: DV Driver - Video Codec - Type "D:\autorun.exe" and then press ENTER, if your CD-ROM drive is installed automatically. Video Codec - Installing Driver - Click on to display a dialog. Application Installation - PC Camera/USB Streaming function: DV Driver...
User Manual (ENGLISH)
Page 113
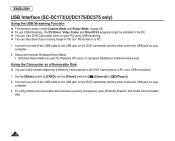
... be operated. 1. Connect one end of the PC to enable voice communication. Using the DVD Camcorder with PC Net-meeting program installed, you can be supported depending on your DVD Camcorder for video conferencing (such as a PC Camera. When you connect to the USB connector on the video conferencing software. Set the [Mode] switch to [ (Camera)]. 3. Set the [Power] switch to [DISC]. 1 2. In this case, connect an external microphone to the soundcard of the USB cable...
... be operated. 1. Connect one end of the PC to enable voice communication. Using the DVD Camcorder with PC Net-meeting program installed, you can be supported depending on your DVD Camcorder for video conferencing (such as a PC Camera. When you connect to the USB connector on the video conferencing software. Set the [Mode] switch to [ (Camera)]. 3. Set the [Power] switch to [DISC]. 1 2. In this case, connect an external microphone to the soundcard of the USB cable...
User Manual (ENGLISH)
Page 114
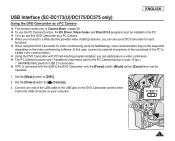
... store it as a Removable Disk You can easily transfer data from a Memory Card inserted in the DVD Camcorder to [ (Camera)] or [ (Player)]. 2. ENGLISH USB Interface (SC-DC173(U)/DC175/DC575 only) Using the USB Streaming Function This function works in both Camera Mode and Player Mode. page 26 To use USB streaming, the DV Driver, Video Codec and DirectX 9.0 programs must be installed in the PC. You can view DVD Camcorder video on your computer. 2.
... store it as a Removable Disk You can easily transfer data from a Memory Card inserted in the DVD Camcorder to [ (Camera)] or [ (Player)]. 2. ENGLISH USB Interface (SC-DC173(U)/DC175/DC575 only) Using the USB Streaming Function This function works in both Camera Mode and Player Mode. page 26 To use USB streaming, the DV Driver, Video Codec and DirectX 9.0 programs must be installed in the PC. You can view DVD Camcorder video on your computer. 2.
User Manual (ENGLISH)
Page 122
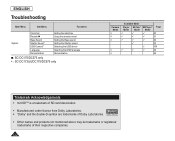
ENGLISH Troubleshooting Main Menu Sub Menu Functions System Clock Set Remote Beep Sound Shutter Sound* USB Connect* Language Demonstration Setting the date/time Using the remote control Setting the Beep sound Setting the Shutter sound Selecting the USB device Selecting the OSD language Demonstration : SC-DC175/DC575 only * : SC-DC173(U)/DC175/DC575 only Camera Mode Available Mode Player M.Cam* Mode Mode M.Player* Page Mode ...
ENGLISH Troubleshooting Main Menu Sub Menu Functions System Clock Set Remote Beep Sound Shutter Sound* USB Connect* Language Demonstration Setting the date/time Using the remote control Setting the Beep sound Setting the Shutter sound Selecting the USB device Selecting the OSD language Demonstration : SC-DC175/DC575 only * : SC-DC173(U)/DC175/DC575 only Camera Mode Available Mode Player M.Cam* Mode Mode M.Player* Page Mode ...


