User Guide
Page 1
Model 25413/14 4 Line Intercom Speakerphone User's Guide Please read this manual before operating this product for the first time.
Model 25413/14 4 Line Intercom Speakerphone User's Guide Please read this manual before operating this product for the first time.
User Guide
Page 3
...belt clip supplied with FCC RF exposure guidelines. Your phone features 16 memory locations, 94 phone book memories, hold, conference call, intercom, call transfer, Caller ID display, and speakerphone capabilities....purchase of other antenna or transmitter." It is designed to be simple to 16 station users. Use of the H5400 accessory handset and module. SEE MARKING ON BOTTOM ...IMPORTANT INSTRUCTIONS ACCOMPANYING THE PRODUCT. This equipment should always be followed. Refer to a cordless feature by taking a few minutes to enhance your body. This transmitter must subscribe to...
...belt clip supplied with FCC RF exposure guidelines. Your phone features 16 memory locations, 94 phone book memories, hold, conference call, intercom, call transfer, Caller ID display, and speakerphone capabilities....purchase of other antenna or transmitter." It is designed to be simple to 16 station users. Use of the H5400 accessory handset and module. SEE MARKING ON BOTTOM ...IMPORTANT INSTRUCTIONS ACCOMPANYING THE PRODUCT. This equipment should always be followed. Refer to a cordless feature by taking a few minutes to enhance your body. This transmitter must subscribe to...
User Guide
Page 4
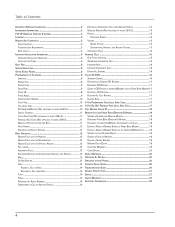
... 5 TELEPHONE JACK REQUIREMENTS 5 BASE LAYOUT...5 IMPORTANT INSTALLATION INFORMATION 6 IMPORTANT INSTALLATION GUIDELINES 6 INSTALLING THE PHONE 6 DATA PORT 8 SYSTEM VERIFICATION 8 OTHER SYSTEM PHONES 8 PROGRAMMING THE TELEPHONE 8 LANGUAGE ...8 RINGER TONE 8 PRIORITY LINE 9 DELAY RING ...9 PHONE ID ...9 PHONE NAME 9 INTERCOM AUTO ANSWER 10 FLASH TIME... HANDSET, AND HEADSET VOLUME 15 CONFERENCE CALLS 15 INTERCOM CALLS 15 ONE-TOUCH INTERCOM 15 ANSWERING AN INTERCOM CALL 16 INTERCOM HOLD 16 INTERCOM CONFERENCE CALLS 16 PAGING ALL STATIONS 16 CALLER ID (CID 16 SUMMARY SCREEN 16 ...
... 5 TELEPHONE JACK REQUIREMENTS 5 BASE LAYOUT...5 IMPORTANT INSTALLATION INFORMATION 6 IMPORTANT INSTALLATION GUIDELINES 6 INSTALLING THE PHONE 6 DATA PORT 8 SYSTEM VERIFICATION 8 OTHER SYSTEM PHONES 8 PROGRAMMING THE TELEPHONE 8 LANGUAGE ...8 RINGER TONE 8 PRIORITY LINE 9 DELAY RING ...9 PHONE ID ...9 PHONE NAME 9 INTERCOM AUTO ANSWER 10 FLASH TIME... HANDSET, AND HEADSET VOLUME 15 CONFERENCE CALLS 15 INTERCOM CALLS 15 ONE-TOUCH INTERCOM 15 ANSWERING AN INTERCOM CALL 16 INTERCOM HOLD 16 INTERCOM CONFERENCE CALLS 16 PAGING ALL STATIONS 16 CALLER ID (CID 16 SUMMARY SCREEN 16 ...
User Guide
Page 5
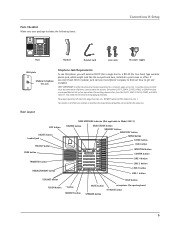
...INT. INT. Base Handset Handset cord Line cords AC power supply Wall plate Modular telephone line jack Telephone Jack Requirements To use this phone, you don't have either modular jack, call from one station to another, the two stations should be common to all phones connected to Model ... INT. MEM. INT. INT. INT. MEM. MEM. INT. MEM. INT. MEM. INT. INT. MEM. INT. STORE button DIAL button INTERCOM button CONFER button LINE 4 button LINE 3 button LINE 2 button LINE 1 button VOLUME button FLASH button * button HEADSET button HOLD button MUTE button ...
...INT. INT. Base Handset Handset cord Line cords AC power supply Wall plate Modular telephone line jack Telephone Jack Requirements To use this phone, you don't have either modular jack, call from one station to another, the two stations should be common to all phones connected to Model ... INT. MEM. INT. INT. INT. MEM. MEM. INT. MEM. INT. MEM. INT. INT. MEM. INT. STORE button DIAL button INTERCOM button CONFER button LINE 4 button LINE 3 button LINE 2 button LINE 1 button VOLUME button FLASH button * button HEADSET button HOLD button MUTE button ...
User Guide
Page 7
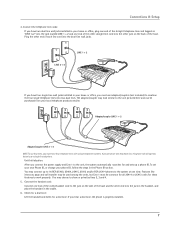
...connect the power supply and Line 1 to work properly. Features like intercom, page and call transfer may look similar to the system at one time. LINE 3 + 4 LINE 1 + 2 If you only have four single-line wall jacks installed in the Phone ID section. The adaptor/coupler may be used among the units, ... choose to combine the four single telephone lines into the other end of the base. Check for a dial tone: Lift the handset and listen for and sets up to 16 RCA 25403, 25404, 25415, 25413 and/or RCA 25414 phones to the one end of the straight telephone line cord tagged as a single ...
...connect the power supply and Line 1 to work properly. Features like intercom, page and call transfer may look similar to the system at one time. LINE 3 + 4 LINE 1 + 2 If you only have four single-line wall jacks installed in the Phone ID section. The adaptor/coupler may be used among the units, ... choose to combine the four single telephone lines into the other end of the base. Check for a dial tone: Lift the handset and listen for and sets up to 16 RCA 25403, 25404, 25415, 25413 and/or RCA 25414 phones to the one end of the straight telephone line cord tagged as a single ...
User Guide
Page 8
...Use the < REVIEW > button to scroll to connect an auxiliary phone device, such as a fax machine, computer modem, answering machine, or even a cordless phone. Press the SELECT/SAVE button. A sample ringer tone is English....outside callers who do not know that you are fully compatible. Only other stations. If the phone ID is correct. The default is generated when you select the ringer ...possible line connection errors. If they dial the line 4 number. The display shows INTERCOM and ENTER CALLING PHONE ID. 2. NO ANSWER shows in order to individual ringer tones. Press the ...
...Use the < REVIEW > button to scroll to connect an auxiliary phone device, such as a fax machine, computer modem, answering machine, or even a cordless phone. Press the SELECT/SAVE button. A sample ringer tone is English....outside callers who do not know that you are fully compatible. Only other stations. If the phone ID is correct. The default is generated when you select the ringer ...possible line connection errors. If they dial the line 4 number. The display shows INTERCOM and ENTER CALLING PHONE ID. 2. NO ANSWER shows in order to individual ringer tones. Press the ...
User Guide
Page 9
... setting to 10 rings. Press the SELECT/SAVE button. 4. NOTE: The INTERCOM indicator will flash red and green if the ID is 0 rings 7. Press SELECT/SAVE or choose another unit on the system, NOT AVAILABLE shows in the display. Phone Name 1. Press the SELECT/SAVE button. 4. Press the 7 key three... MENU button while in standby mode. 2. Use the < REVIEW > button to scroll to save. Press the SELECT/SAVE button again to automatically set the phone ID, or press any time to exit , except during the ID search. NOTE: You may press the EXIT button at one of the number keys...
... setting to 10 rings. Press the SELECT/SAVE button. 4. NOTE: The INTERCOM indicator will flash red and green if the ID is 0 rings 7. Press SELECT/SAVE or choose another unit on the system, NOT AVAILABLE shows in the display. Phone Name 1. Press the SELECT/SAVE button. 4. Press the 7 key three... MENU button while in standby mode. 2. Use the < REVIEW > button to scroll to save. Press the SELECT/SAVE button again to automatically set the phone ID, or press any time to exit , except during the ID search. NOTE: You may press the EXIT button at one of the number keys...
User Guide
Page 10
.... 7. If you select YES, the unknown or blocked calls will be set it to automatically answer an intercom call while you are using the speaker. The default is a incoming call using the phone. Press the SELECT/SAVE button. 6. Use the < REVIEW > button to ON or OFF. 7. Press... ANS. 5. Press the SELECT/SAVE button. 4. Use the < REVIEW > button to scroll to SET PHONE OPTIONS. 3. Press the SELECT/SAVE button. 4. Connections & Setup Intercom Auto Answer For "hands-free" operation, the phone can set to OFF. 1. TIP: You may choose 100ms or 600ms. 7. Press the MENU button while in ...
.... 7. If you select YES, the unknown or blocked calls will be set it to automatically answer an intercom call while you are using the speaker. The default is a incoming call using the phone. Press the SELECT/SAVE button. 6. Use the < REVIEW > button to ON or OFF. 7. Press... ANS. 5. Press the SELECT/SAVE button. 4. Use the < REVIEW > button to scroll to SET PHONE OPTIONS. 3. Press the SELECT/SAVE button. 4. Connections & Setup Intercom Auto Answer For "hands-free" operation, the phone can set to OFF. 1. TIP: You may choose 100ms or 600ms. 7. Press the MENU button while in ...
User Guide
Page 12
...default settings. 1. Restoring the Default Settings This feature allows you are receiving. It provides for 4 lines. 12 Hang up the handset, the phone automatically selects the priority line. (If the priority line is interconnected to adjust certain fields (i.e.; When you are listening, you only ...way conversation is not necessary to re-program the complete time and date if you are transmitting. Each station is occupied, it selects an open line.) OR Pick up by an intercom. It is possible in the process. Press the SELECT/SAVE button. 4. Press the SELECT/SAVE button...
...default settings. 1. Restoring the Default Settings This feature allows you are receiving. It provides for 4 lines. 12 Hang up the handset, the phone automatically selects the priority line. (If the priority line is interconnected to adjust certain fields (i.e.; When you are listening, you only ...way conversation is not necessary to re-program the complete time and date if you are transmitting. Each station is occupied, it selects an open line.) OR Pick up by an intercom. It is possible in the process. Press the SELECT/SAVE button. 4. Press the SELECT/SAVE button...
User Guide
Page 13
... jack on the side of the line cannot hear you receive a call , the status indicators will show on a line other end of the base. 2. Press the SELECT/SAVE button to the speakerphone, press SPEAKER. To cancel, press PRIVACY again. Press HEADSET when finished. Answering Calls...hour intervals up the handset (handset mode), OR 2. NOTE: If Intercom Auto Answer is turned ON, the unit automatically answers the intercom call on the other than the priority line, 1. If the priority line is activated. 13 With the phone idle and the handset on . 2. When finished, hang...
... jack on the side of the line cannot hear you receive a call , the status indicators will show on a line other end of the base. 2. Press the SELECT/SAVE button to the speakerphone, press SPEAKER. To cancel, press PRIVACY again. Press HEADSET when finished. Answering Calls...hour intervals up the handset (handset mode), OR 2. NOTE: If Intercom Auto Answer is turned ON, the unit automatically answers the intercom call on the other than the priority line, 1. If the priority line is activated. 13 With the phone idle and the handset on . 2. When finished, hang...
User Guide
Page 14
... accordingly. The indicator stops flashing after the message is idle, press the REDIAL/FORMAT button. 2. The line indicator for the station you want to activate custom calling services such as a reminder. Flash Use the FLASH button to transfer the call forwarding, which line ...is a message waiting. VERY IMPORTANT: To transfer a call . Pick up , the indicator stays red. When the phone is reviewed. 14 Use the < REVIEW > button to . Press the INTERCOM/MEMORY LOG button (1-16) for the line on the receiving party's line rapidly flashes red and rings during ...
... accordingly. The indicator stops flashing after the message is idle, press the REDIAL/FORMAT button. 2. The line indicator for the station you want to activate custom calling services such as a reminder. Flash Use the FLASH button to transfer the call forwarding, which line ...is a message waiting. VERY IMPORTANT: To transfer a call . Pick up , the indicator stays red. When the phone is reviewed. 14 Use the < REVIEW > button to . Press the INTERCOM/MEMORY LOG button (1-16) for the line on the receiving party's line rapidly flashes red and rings during ...

User Guide
Page 15
...off , on hold . 3. The phone rings according to the headset press the HEADSET button. NOTE: To turn the ringer off before making an intercom call , press the line you may press the INTERCOM button, then press the INTERCOM/MEMORY LOG button (1-16) for the station you want to place the call ... compatible with the VOLUME up or down button to the conversation. To make a call . 1. To disconnect both parties. Press the INTERCOM/MEMORY LOG button (1-16) for the stations you press the HOLD button to both parties: Hang up and continue speaking. While on . Press the HOLD button to...
...off , on hold . 3. The phone rings according to the headset press the HEADSET button. NOTE: To turn the ringer off before making an intercom call , press the line you may press the INTERCOM button, then press the INTERCOM/MEMORY LOG button (1-16) for the station you want to place the call ... compatible with the VOLUME up or down button to the conversation. To make a call . 1. To disconnect both parties. Press the INTERCOM/MEMORY LOG button (1-16) for the stations you press the HOLD button to both parties: Hang up and continue speaking. While on . Press the HOLD button to...

User Guide
Page 16
... can be reviewed Number of records saved to both parties: Hang up the handset. The Intercom indicator flashes green. When finished, hang up the handset, or press the SPEAKER button. Phone ID Battery indicator Time and date (01)JOHN 00 NEWCALLS 00Total CALLS 12:34 PM 12...you want to page in CID memory 16 Operation Answering an Intercom Call When you receive an INTERCOM call at the same time the unit automatically selects the ringing line. NOTE: If you want to conference with , and the other stations not in headset, press HEADSET button, then press PAGE ...
... can be reviewed Number of records saved to both parties: Hang up the handset. The Intercom indicator flashes green. When finished, hang up the handset, or press the SPEAKER button. Phone ID Battery indicator Time and date (01)JOHN 00 NEWCALLS 00Total CALLS 12:34 PM 12...you want to page in CID memory 16 Operation Answering an Intercom Call When you receive an INTERCOM call at the same time the unit automatically selects the ringing line. NOTE: If you want to conference with , and the other stations not in headset, press HEADSET button, then press PAGE ...
User Guide
Page 17
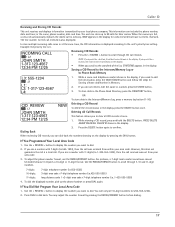
...also displayed. If you see 10-digit numbers (i.e.234-555-1234). 2. The unit can store up the phone handset or press DIAL again. While a name and telephone number shows in Memory. 2. However, this ...-123-4567 12:34 PM 12/25 NEW Deleting a CID Record To delete the record shown in the Intercom/Memory Log, press a memory log button (1-16). If you press the < button, the most recent ... 17 Saving a CID Record to the Intercom/Memory Log or to the start/end of the list, START/END appears in the display. 2. NOTE: If you scroll to Phone Book Memory L3: 555-1234 L1 L1...
...also displayed. If you see 10-digit numbers (i.e.234-555-1234). 2. The unit can store up the phone handset or press DIAL again. While a name and telephone number shows in Memory. 2. However, this ...-123-4567 12:34 PM 12/25 NEW Deleting a CID Record To delete the record shown in the Intercom/Memory Log, press a memory log button (1-16). If you press the < button, the most recent ... 17 Saving a CID Record to the Intercom/Memory Log or to the start/end of the list, START/END appears in the display. 2. NOTE: If you scroll to Phone Book Memory L3: 555-1234 L1 L1...

User Guide
Page 18
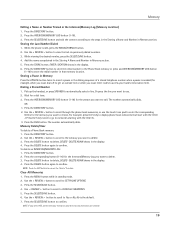
...number keys. press the 6 key once for the letter L. Reviewing Phone Book (Directory) Memory 1. Use the < REVIEW > button to scroll through the phone book memories, or use the touch tone pad on the base). Press the INTERCOM/MEMORY LOG button (1-16). 3. Editing a Name or Number Stored ...in selected memory location "OVERWRITE?" Memory Log and Phone Book (Directory) Memory You may store data in ...
...number keys. press the 6 key once for the letter L. Reviewing Phone Book (Directory) Memory 1. Use the < REVIEW > button to scroll through the phone book memories, or use the touch tone pad on the base). Press the INTERCOM/MEMORY LOG button (1-16). 3. Editing a Name or Number Stored ...in selected memory location "OVERWRITE?" Memory Log and Phone Book (Directory) Memory You may store data in ...
User Guide
Page 19
... to memories starting with the letter J. Storing a Pause in Memory Press the #PAUSE button twice to insert a pause in the Phone Book memory or press and INTERCOM/MEMORY LOG button (1-16) to cancel the "delete" function. Press the DIRECTORY button. 2. For example, press the 5 key...direct access memories are cleared. 19 The number automatically dials. The number automatically dials. Memory Delete/Clear To delete a Phone Book memory: 1. DELETE AGAIN shows in the Intercom/Memory Log (Memory Location) 1. Press the DELETE button again to confirm. Press the DIRECTORY button. 2. ...
... to memories starting with the letter J. Storing a Pause in Memory Press the #PAUSE button twice to insert a pause in the Phone Book memory or press and INTERCOM/MEMORY LOG button (1-16) to cancel the "delete" function. Press the DIRECTORY button. 2. For example, press the 5 key...direct access memories are cleared. 19 The number automatically dials. The number automatically dials. Memory Delete/Clear To delete a Phone Book memory: 1. DELETE AGAIN shows in the Intercom/Memory Log (Memory Location) 1. Press the DELETE button again to confirm. Press the DIRECTORY button. 2. ...
User Guide
Page 20
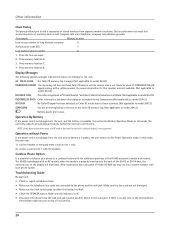
... UNKNOWN CALLER The incoming call function. In this mode, the user may use your cordless handset with your phone to a cordless feature with cordless handset) is low. Make sure the line cords are at the beginning or the ...Power If the power cord is not plugged into the back of the 25413 or 25414 base, the antenna icon on line 1 with the handset. If there is properly inserted into...unit and no dial tone in this mode, the unit fully supports all operational features, except the intercom call does not have Caller ID service or their Caller ID information is withheld. (Not applicable ...
... UNKNOWN CALLER The incoming call function. In this mode, the user may use your cordless handset with your phone to a cordless feature with cordless handset) is low. Make sure the line cords are at the beginning or the ...Power If the power cord is not plugged into the back of the 25413 or 25414 base, the antenna icon on line 1 with the handset. If there is properly inserted into...unit and no dial tone in this mode, the unit fully supports all operational features, except the intercom call does not have Caller ID service or their Caller ID information is withheld. (Not applicable ...

User Guide
Page 21
... contact customer service at 1-800-511-3180. Intercom does not function correctly • Make sure line 1 is not turned on how to obtain service, refer to a duplicate station address in the system. For instructions on . Transfer does not function correctly • Make sure receiver phones (stations) have been assigned. This product may be serviced...
... contact customer service at 1-800-511-3180. Intercom does not function correctly • Make sure line 1 is not turned on how to obtain service, refer to a duplicate station address in the system. For instructions on . Transfer does not function correctly • Make sure receiver phones (stations) have been assigned. This product may be serviced...
User Guide
Page 24
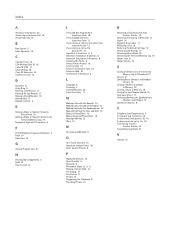
Index A Accessory Information 23 Answering an Intercom Call 16 Answering Calls 13 B Base Layout 5 Basic Operation 12 C Call Alert Tone 10 Call Waiting Caller ID 18 Caller ID (CID) 17 Chain Dialing 20 Clear All Memories 20 Conference ... Setting the Time and Date 10 Memory Delete/Clear 19 Memory Log and Phone Book 18 Message Waiting 15 Mute 13 N No Unknown/Blocked 11 O One-Touch Intercom 15 Operation without Power 20 Other System Phones 8 P Paging All Stations 16 Parts Checklist 5 Phone ID 9 Phonebook Name 8, 9, 11 Placing a Call on Hold 14 Pre-dialing 13...
Index A Accessory Information 23 Answering an Intercom Call 16 Answering Calls 13 B Base Layout 5 Basic Operation 12 C Call Alert Tone 10 Call Waiting Caller ID 18 Caller ID (CID) 17 Chain Dialing 20 Clear All Memories 20 Conference ... Setting the Time and Date 10 Memory Delete/Clear 19 Memory Log and Phone Book 18 Message Waiting 15 Mute 13 N No Unknown/Blocked 11 O One-Touch Intercom 15 Operation without Power 20 Other System Phones 8 P Paging All Stations 16 Parts Checklist 5 Phone ID 9 Phonebook Name 8, 9, 11 Placing a Call on Hold 14 Pre-dialing 13...


