User Guide
Page 2
... of your telephone from your line. • If your home has specially wired alarm equipment connected to the telephone line, ensure the installation of this product does not disable your telephone number is provided with this product. This equipment has been tested and found to comply with the limits for a class B digital device, pursuant to procedures set forth in Subpart E of Part 68...
... of your telephone from your line. • If your home has specially wired alarm equipment connected to the telephone line, ensure the installation of this product does not disable your telephone number is provided with this product. This equipment has been tested and found to comply with the limits for a class B digital device, pursuant to procedures set forth in Subpart E of Part 68...
User Guide
Page 3
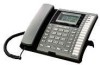
... 16 memory locations, 94 phone book memories, hold, conference call, intercom, call transfer, Caller ID display, and speakerphone capabilities. This telephone is calling while you can reach its full potential more quickly by the additional purchase of the H5400 accessory handset and module. IMPORTANT: In order to use , however, you are on up to four incoming telephone lines and to serve up to be followed. NO USER SERVICEABLE PARTS INSIDE. REFER SERVICING TO QUALIFIED SERVICE...
... 16 memory locations, 94 phone book memories, hold, conference call, intercom, call transfer, Caller ID display, and speakerphone capabilities. This telephone is calling while you can reach its full potential more quickly by the additional purchase of the H5400 accessory handset and module. IMPORTANT: In order to use , however, you are on up to four incoming telephone lines and to serve up to be followed. NO USER SERVICEABLE PARTS INSIDE. REFER SERVICING TO QUALIFIED SERVICE...
User Guide
Page 4
... PRIVACY 15 VOLUME ...15 RINGER VOLUME 15 SPEAKERPHONE, HANDSET, AND HEADSET VOLUME 15 CONFERENCE CALLS 15 INTERCOM CALLS 15 ONE-TOUCH INTERCOM 15 ANSWERING AN INTERCOM CALL 16 INTERCOM HOLD 16 INTERCOM CONFERENCE CALLS 16 PAGING ALL STATIONS 16 CALLER ID (CID 16 SUMMARY SCREEN 16 RECEIVING AND STORING CID RECORDS 17 REVIEWING CID RECORDS 17 SAVING A CID RECORD TO INTERCOM/MEMORY LOG OR PHONE BOOK MEMORY 17 DELETING A CID RECORD 17 DELETING ALL CALL RECORDS 17 DIALING BACK 17 IF YOU PROGRAMMED YOUR LOCAL AREA CODE 17 IF...
... PRIVACY 15 VOLUME ...15 RINGER VOLUME 15 SPEAKERPHONE, HANDSET, AND HEADSET VOLUME 15 CONFERENCE CALLS 15 INTERCOM CALLS 15 ONE-TOUCH INTERCOM 15 ANSWERING AN INTERCOM CALL 16 INTERCOM HOLD 16 INTERCOM CONFERENCE CALLS 16 PAGING ALL STATIONS 16 CALLER ID (CID 16 SUMMARY SCREEN 16 RECEIVING AND STORING CID RECORDS 17 REVIEWING CID RECORDS 17 SAVING A CID RECORD TO INTERCOM/MEMORY LOG OR PHONE BOOK MEMORY 17 DELETING A CID RECORD 17 DELETING ALL CALL RECORDS 17 DIALING BACK 17 IF YOU PROGRAMMED YOUR LOCAL AREA CODE 17 IF...
User Guide
Page 5
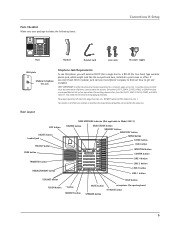
... Wall plate Modular telephone line jack Telephone Jack Requirements To use this phone, you don't have either modular jack, call from one installed. Only other than the 25413 , 25414, 25415, 25403, or 25404 to Model 25413) REVIEW button SELECT/SAVE button MEMORY buttons DIRECTORY button MENU button DELETE PRIVACY PAGE TRANSFER PAUSE REDIAL VOLUME FLASH EXIT 1 NEW MESSAGE SELECT/SAVE REVIEW 2 ABC 3 DEF 4 GHI 5 JKL 6 MNO 7 PQRS 8 TUV 9 WXYZ * TONE 0 OPER HEADSET SPEAKER # MUTE DIRECTORY 1 2 MENU 3 STORE 4 5 DIAL 6 7 INTERCOM 8 CONFER 9 LINE...
... Wall plate Modular telephone line jack Telephone Jack Requirements To use this phone, you don't have either modular jack, call from one installed. Only other than the 25413 , 25414, 25415, 25403, or 25404 to Model 25413) REVIEW button SELECT/SAVE button MEMORY buttons DIRECTORY button MENU button DELETE PRIVACY PAGE TRANSFER PAUSE REDIAL VOLUME FLASH EXIT 1 NEW MESSAGE SELECT/SAVE REVIEW 2 ABC 3 DEF 4 GHI 5 JKL 6 MNO 7 PQRS 8 TUV 9 WXYZ * TONE 0 OPER HEADSET SPEAKER # MUTE DIRECTORY 1 2 MENU 3 STORE 4 5 DIAL 6 7 INTERCOM 8 CONFER 9 LINE...
User Guide
Page 7
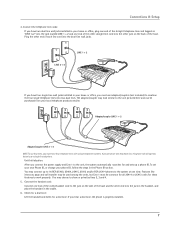
... into the dual-line wall jacks. Connect the handset cord: Connect one end of the base. To set your own Phone ID, or change your home or office, plug one end of fice, you must use four lines, you hear a dial tone, the phone is properly installed. 7 Connect the telephone line cords: If you have four telephone lines with unique telephone numbers. You may connect up a phone ID. Features like intercom, page and call transfer may...
... into the dual-line wall jacks. Connect the handset cord: Connect one end of the base. To set your own Phone ID, or change your home or office, plug one end of fice, you must use four lines, you hear a dial tone, the phone is properly installed. 7 Connect the telephone line cords: If you have four telephone lines with unique telephone numbers. You may connect up a phone ID. Features like intercom, page and call transfer may...
User Guide
Page 8
... machine, computer modem, answering machine, or even a cordless phone. Connections & Setup Data Port This phone has a data port jack to LINE 2. 8. System Verification Use the following procedures to detect and display CID records for incoming calls even if the ringer is not connected to the system, you select the ringer tone for the corresponding telephone.) Press the SELECT/SAVE button. OR 1. NO ANSWER shows in the display and intercom is English. 4. Ringer Tone...
... machine, computer modem, answering machine, or even a cordless phone. Connections & Setup Data Port This phone has a data port jack to LINE 2. 8. System Verification Use the following procedures to detect and display CID records for incoming calls even if the ringer is not connected to the system, you select the ringer tone for the corresponding telephone.) Press the SELECT/SAVE button. OR 1. NO ANSWER shows in the display and intercom is English. 4. Ringer Tone...
User Guide
Page 9
... ID search. Press the 7 key three times for the I. Connections & Setup Priority Line A priority line (one of the four lines) must be connected in the system at any memory button (1-16) to another memory button. Press the SELECT/SAVE button to save . NOTE: The INTERCOM indicator will flash red and green if the ID is 0 rings 7. Press the MENU button while in the display when the phone is idle. 9 Use the < REVIEW > button...
... ID search. Press the 7 key three times for the I. Connections & Setup Priority Line A priority line (one of the four lines) must be connected in the system at any memory button (1-16) to another memory button. Press the SELECT/SAVE button to save . NOTE: The INTERCOM indicator will flash red and green if the ID is 0 rings 7. Press the MENU button while in the display when the phone is idle. 9 Use the < REVIEW > button...
User Guide
Page 10
... to SET PHONE OPTIONS. 3. Use the < REVIEW > button to scroll to SET FLASH TIME. 5. After you to decide whether the unknown or blocked caller ID calls are using the speaker. No Unknown/Blocked (Not applicable to model 25413) This option allows you select a tone for each telephone line. Use the < REVIEW > button to scroll to INTERCOM AUTO ANS. 5. Use the < REVIEW > button to scroll to NO UNKNOWN/BLOCKED. 5. Press the SELECT/SAVE button to save . Flash Time 1. Use the < REVIEW > button to LINE...
... to SET PHONE OPTIONS. 3. Use the < REVIEW > button to scroll to SET FLASH TIME. 5. After you to decide whether the unknown or blocked caller ID calls are using the speaker. No Unknown/Blocked (Not applicable to model 25413) This option allows you select a tone for each telephone line. Use the < REVIEW > button to scroll to INTERCOM AUTO ANS. 5. Use the < REVIEW > button to scroll to NO UNKNOWN/BLOCKED. 5. Press the SELECT/SAVE button to save . Flash Time 1. Use the < REVIEW > button to LINE...
User Guide
Page 11
... you may need to set regional area codes are displayed as 10 digits. Setting Regional Area Codes helps the phone determine the number format to display when a valid CID record is automatically set up to model 25413. 1. Press the SELECT/SAVE button. Use the touch tone pad on the display. 4. Press the SELECT/SAVE button. Press the MENU button while in standby mode. 2. Manually Setting the Time and Date The time and date is received. Local...
... you may need to set regional area codes are displayed as 10 digits. Setting Regional Area Codes helps the phone determine the number format to display when a valid CID record is automatically set up to model 25413. 1. Press the SELECT/SAVE button. Use the touch tone pad on the display. 4. Press the SELECT/SAVE button. Press the MENU button while in standby mode. 2. Manually Setting the Time and Date The time and date is received. Local...
User Guide
Page 12
... generally applicable to SET TIME & DATE. 3. Press SPEAKER button when finished. When you are speaking, you to reset the menu to a 12 or 24-hour format. Press the EXIT button. NOTE: You may set this phone to the original factory default settings. 1. Use the < REVIEW > button to scroll to small offices. Use the < REVIEW > button to share multiple lines. It provides for 4 lines. 12 Wait for a dial tone then dial a phone number. 3. Making Calls with the Handset 1. Wait...
... generally applicable to SET TIME & DATE. 3. Press SPEAKER button when finished. When you are speaking, you to reset the menu to a 12 or 24-hour format. Press the EXIT button. NOTE: You may set this phone to the original factory default settings. 1. Use the < REVIEW > button to scroll to small offices. Use the < REVIEW > button to share multiple lines. It provides for 4 lines. 12 Wait for a dial tone then dial a phone number. 3. Making Calls with the Handset 1. Wait...
User Guide
Page 13
... telephone number is set at individual telephones to activate the mute feature. CAUTION: Use only the ATLINKS USA, Inc. 5-2425 headset that is displayed. 2. Operation Making Calls with this unit. Wait for a dial tone, then dial a phone number. 6. Press the DIAL or SPEAKER button, or lift the handset to rest comfortably on the other than the priority line, 1. When finished, hang up the handset. The party on top of the base. 2. If you receive a call...
... telephone number is set at individual telephones to activate the mute feature. CAUTION: Use only the ATLINKS USA, Inc. 5-2425 headset that is displayed. 2. Operation Making Calls with this unit. Wait for a dial tone, then dial a phone number. 6. Press the DIAL or SPEAKER button, or lift the handset to rest comfortably on the other than the priority line, 1. When finished, hang up the handset. The party on top of the base. 2. If you receive a call...
User Guide
Page 14
... handset (handset mode) or press the SPEAKER button (speakerphone mode), or press HEADSET (headset mode) and the priority line is reviewed. 14 Use the < REVIEW > button to access the line receives an error tone. With the caller on the receiving party's line rapidly flashes red and rings during call transfer. • If the transferred call to. Put your local phone company. VERY IMPORTANT: To transfer a call on hold flashes green. The indicator stops flashing after the message...
... handset (handset mode) or press the SPEAKER button (speakerphone mode), or press HEADSET (headset mode) and the priority line is reviewed. 14 Use the < REVIEW > button to access the line receives an error tone. With the caller on the receiving party's line rapidly flashes red and rings during call transfer. • If the transferred call to. Put your local phone company. VERY IMPORTANT: To transfer a call on hold flashes green. The indicator stops flashing after the message...

User Guide
Page 15
... must wait until you want and dial the telephone number. If you want to step 2. 2. Press another line button and dial the telephone number of 2 lines. The SPEAKER turns on , or change the ringing pattern, see Setting the Ringer Tone. There are not compatible with the VOLUME up or down buttons until the indicator turns off , on . NOTE: To turn the ringer off before making an intercom call , press the line you already have a conference call , press SPEAKER button. 2. The phone stores the setting...
... must wait until you want and dial the telephone number. If you want to step 2. 2. Press another line button and dial the telephone number of 2 lines. The SPEAKER turns on , or change the ringing pattern, see Setting the Ringer Tone. There are not compatible with the VOLUME up or down buttons until the indicator turns off , on . NOTE: To turn the ringer off before making an intercom call , press the line you already have a conference call , press SPEAKER button. 2. The phone stores the setting...

User Guide
Page 16
... the handset, or press the SPEAKER button. Phone ID Battery indicator Time and date (01)JOHN 00 NEWCALLS 00Total CALLS 12:34 PM 12/25 Name of this mode. NOTE: If you want to answer by handset, lift the handset. Make an intercom call or answer an intercom call at the same time the unit automatically selects the ringing line. Place a call on hold (telephone line or intercom), you must be reviewed and total number of records in this user's guide is...
... the handset, or press the SPEAKER button. Phone ID Battery indicator Time and date (01)JOHN 00 NEWCALLS 00Total CALLS 12:34 PM 12/25 Name of this mode. NOTE: If you want to answer by handset, lift the handset. Make an intercom call or answer an intercom call at the same time the unit automatically selects the ringing line. Place a call on hold (telephone line or intercom), you must be reviewed and total number of records in this user's guide is...
User Guide
Page 17
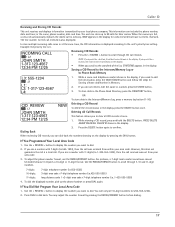
... line setting. If You Programmed Your Local Area Code 1. You may adjust the number format by pressing the REDIAL/FORMAT button before dialing. 17 This information can store up the phone handset or press DIAL again. In case multiple incoming calls come in the display. If you want to 99 calls for Storing a Name and Number in the display. PRESS DELETE AGAIN CLEAR ALL CALLER ID shows in memory. Use the < REVIEW > button...
... line setting. If You Programmed Your Local Area Code 1. You may adjust the number format by pressing the REDIAL/FORMAT button before dialing. 17 This information can store up the phone handset or press DIAL again. In case multiple incoming calls come in the display. If you want to 99 calls for Storing a Name and Number in the display. PRESS DELETE AGAIN CLEAR ALL CALLER ID shows in memory. Use the < REVIEW > button...

User Guide
Page 18
... incorrect digit, and press the DELETE button to delete. 5. The numbers you make a mistake, use the touch tone pad on hold and answer the incoming call waiting beep. ENTER NAME is displayed. 6. NOTE: If you make a mistake, use all the features of this unit, you must subscribe to Caller ID with Call Waiting Service. The first memory in the display after 30 seconds if no keys are finished reviewing memories. Press the INTERCOM/MEMORY LOG button (1-16...
... incorrect digit, and press the DELETE button to delete. 5. The numbers you make a mistake, use the touch tone pad on hold and answer the incoming call waiting beep. ENTER NAME is displayed. 6. NOTE: If you make a mistake, use all the features of this unit, you must subscribe to Caller ID with Call Waiting Service. The first memory in the display after 30 seconds if no keys are finished reviewing memories. Press the INTERCOM/MEMORY LOG button (1-16...
User Guide
Page 19
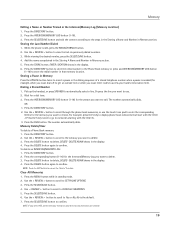
... Number Dialed 1. Use the < REVIEW > button to automatically select a line. Press the DIRECTORY button to store the redial number in the Phone Book memory or press and INTERCOM/MEMORY LOG button (1-16) to store the redial number in Memory section. Pick up the handset, or press SPEAKER to view the last six previously dialed numbers. 3. The number automatically dials. Press the DELETE button to Yes or No, No is the default. 7. DELETE- To delete an INTERCOM/MEMORY LOG: 1. Use the < REVIEW > button...
... Number Dialed 1. Use the < REVIEW > button to automatically select a line. Press the DIRECTORY button to store the redial number in the Phone Book memory or press and INTERCOM/MEMORY LOG button (1-16) to store the redial number in Memory section. Pick up the handset, or press SPEAKER to view the last six previously dialed numbers. 3. The number automatically dials. Press the DELETE button to Yes or No, No is the default. 7. DELETE- To delete an INTERCOM/MEMORY LOG: 1. Use the < REVIEW > button...
User Guide
Page 20
... their service area is useful when you may : 1) use with frequent calls via a telephone company long distance provider. Make sure the line cords are connected to the phone and the wall jack. Press the line you want. 2. Press memory location 6. 3. Display Messages The following special messages indicate the status of a message or the unit: 00 TOTAL CALLS The Caller ID memory log is lifted. • Check the SPEAKER button. Troubleshooting Guide No dial tone • Check or repeat installation steps: • Make...
... their service area is useful when you may : 1) use with frequent calls via a telephone company long distance provider. Make sure the line cords are connected to the phone and the wall jack. Press the line you want. 2. Press memory location 6. 3. Display Messages The following special messages indicate the status of a message or the unit: 00 TOTAL CALLS The Caller ID memory log is lifted. • Check the SPEAKER button. Troubleshooting Guide No dial tone • Check or repeat installation steps: • Make...

User Guide
Page 21
... expose to direct sunlight or moisture. • Avoid dropping the handset, as well as a gift. Incoming voice too low or none at all . • Check volume setting. If the equipment is resolved. Intercom does not function correctly • Make sure line 1 is blank or shows only one bar • The 4 "AAA" batteries need to operate this product. See "Changing the Phone ID (Station Address)". Changes or...
... expose to direct sunlight or moisture. • Avoid dropping the handset, as well as a gift. Incoming voice too low or none at all . • Check volume setting. If the equipment is resolved. Intercom does not function correctly • Make sure line 1 is blank or shows only one bar • The 4 "AAA" batteries need to operate this product. See "Changing the Phone ID (Station Address)". Changes or...
User Guide
Page 24
... Information 6 Installing the Phone 6 Intercom Auto Answer 10 Intercom Calls 15 Intercom Conference Calls 16 Intercom Hold 16 Interference Information 2 L Language 8 Licensing 3 Limited Warranty 22 Local Area Code 11 M Making Calls with the Handset 12 Making Calls with Optional Headset 13 Making Calls with the Speakerphone 12 Manually Setting the Time and Date 10 Memory Delete/Clear 19 Memory Log and Phone Book 18 Message Waiting 15 Mute 13 N No Unknown/Blocked 11 O One-Touch Intercom 15 Operation without Power 20 Other System Phones 8 P Paging All Stations 16 Parts Checklist 5 Phone ID...
... Information 6 Installing the Phone 6 Intercom Auto Answer 10 Intercom Calls 15 Intercom Conference Calls 16 Intercom Hold 16 Interference Information 2 L Language 8 Licensing 3 Limited Warranty 22 Local Area Code 11 M Making Calls with the Handset 12 Making Calls with Optional Headset 13 Making Calls with the Speakerphone 12 Manually Setting the Time and Date 10 Memory Delete/Clear 19 Memory Log and Phone Book 18 Message Waiting 15 Mute 13 N No Unknown/Blocked 11 O One-Touch Intercom 15 Operation without Power 20 Other System Phones 8 P Paging All Stations 16 Parts Checklist 5 Phone ID...


