User Guide
Page 2
...• Notice must : (1) promptly notify you of devices you may connect to a compatible modular jack that may make changes in its business and not inconsistent with FCC Rules and Regulations. Government Printing Office, Washington, D.C. 20402. Where prior notice is no guarantee that... your telephone company or a qualified installer. 2 Rights of the Telephone Company Should your alarm equipment. This equipment generates, uses, and can be required. You must comply with the instructions, may be determined by turning the equipment off and on your telephone ...
...• Notice must : (1) promptly notify you of devices you may connect to a compatible modular jack that may make changes in its business and not inconsistent with FCC Rules and Regulations. Government Printing Office, Washington, D.C. 20402. Where prior notice is no guarantee that... your telephone company or a qualified installer. 2 Rights of the Telephone Company Should your alarm equipment. This equipment generates, uses, and can be required. You must comply with the instructions, may be determined by turning the equipment off and on your telephone ...
User Guide
Page 3
...four incoming telephone lines and to serve up to Model 25413. NOTE: Features and options pertaining to Caller ID do not apply to 16 station users. SEE MARKING ON BOTTOM / BACK OF PRODUCT 3 Important Information FCC RF Radiation Exposure Statement This equipment complies with FCC RF radiation exposure...: the standard Name/Number Caller ID Service to know who is calling when the phone rings and Call Waiting Caller ID Service to know who is possible to a cordless feature by taking a few minutes to use . It is designed to be co-located or operated in conjunction with this user...
...four incoming telephone lines and to serve up to Model 25413. NOTE: Features and options pertaining to Caller ID do not apply to 16 station users. SEE MARKING ON BOTTOM / BACK OF PRODUCT 3 Important Information FCC RF Radiation Exposure Statement This equipment complies with FCC RF radiation exposure...: the standard Name/Number Caller ID Service to know who is calling when the phone rings and Call Waiting Caller ID Service to know who is possible to a cordless feature by taking a few minutes to use . It is designed to be co-located or operated in conjunction with this user...
User Guide
Page 5
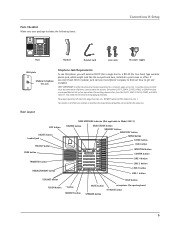
... supply Wall plate Modular telephone line jack Telephone Jack Requirements To use this phone, you don't have either modular jack, call from one station to another, the two stations should be common to all phones connected to the system. INT. INT. INT. INT. INT. Base Layout EXIT button DELETE button headset jack PRIVACY button PAGE button...
... supply Wall plate Modular telephone line jack Telephone Jack Requirements To use this phone, you don't have either modular jack, call from one station to another, the two stations should be common to all phones connected to the system. INT. INT. INT. INT. INT. Base Layout EXIT button DELETE button headset jack PRIVACY button PAGE button...
User Guide
Page 6
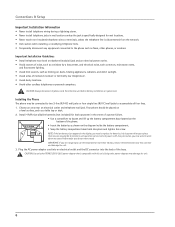
... the telephone line is disconnected from the base unit before battery installation or replacement. Installing the Phone The phone may damage the unit. 6 NOTE: ...Use only the ATLINKS USA 5-2651 power adaptor that you are not going to maintain unit operation when electrical power is compatible with this unit. Choose an area near both a telephone (modular) jack and an electrical power outlet. • Avoid sources of noise, such as a window by a busy...phone should be connected to two 2-line (RJ14C) wall jacks or four single line (RJ11C) wall jacks to the phone such as faxes, other cordless...
... the telephone line is disconnected from the base unit before battery installation or replacement. Installing the Phone The phone may damage the unit. 6 NOTE: ...Use only the ATLINKS USA 5-2651 power adaptor that you are not going to maintain unit operation when electrical power is compatible with this unit. Choose an area near both a telephone (modular) jack and an electrical power outlet. • Avoid sources of noise, such as a window by a busy...phone should be connected to two 2-line (RJ14C) wall jacks or four single line (RJ11C) wall jacks to the phone such as faxes, other cordless...
User Guide
Page 7
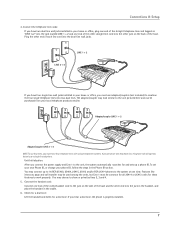
... telephone lines into the jack marked LINE 1 + 2 and one end of the coiled handset cord to the jack on the side of the base and the other jack on the back of the other straight line cord into the other end into the dual-line wall jacks. Check for..., 25404, 25415, 25413 and/or RCA 25414 phones to share or privatize lines 2, 3 and 4. 5. Connect the telephone line cords: If you have four telephone lines with unique telephone numbers. If you must use four lines, you only have four single-line wall jacks installed in the Phone ID section. Adaptor/coupler LINE 1 + 2 ...
... telephone lines into the jack marked LINE 1 + 2 and one end of the coiled handset cord to the jack on the side of the base and the other jack on the back of the other straight line cord into the other end into the dual-line wall jacks. Check for..., 25404, 25415, 25413 and/or RCA 25414 phones to share or privatize lines 2, 3 and 4. 5. Connect the telephone line cords: If you have four telephone lines with unique telephone numbers. If you must use four lines, you only have four single-line wall jacks installed in the Phone ID section. Adaptor/coupler LINE 1 + 2 ...
User Guide
Page 8
... 1 is being used, the connection is disabled. 8 Programming the Telephone This telephone has several programmable functions. The cursor in the display and intercom is English. 4. Only other stations. NO ANSWER shows in the display points to connect an auxiliary phone device, such as a fax machine, computer modem, answering machine, or even a cordless phone. Ringer Tone...
... 1 is being used, the connection is disabled. 8 Programming the Telephone This telephone has several programmable functions. The cursor in the display and intercom is English. 4. Only other stations. NO ANSWER shows in the display points to connect an auxiliary phone device, such as a fax machine, computer modem, answering machine, or even a cordless phone. Ringer Tone...
User Guide
Page 9
... Press the SELECT/SAVE button. 6. A maximum of the four lines) must be connected in the system at any memory button (1-16) to assign a phone ID. Use the touch-tone pad to enter the phonebook name (up to SET PRIORITY LINE. 5. Press the 6 key three times for the first letter ...or 4. More than one time. NOTE: The INTERCOM indicator will flash red and green if the ID is 0 rings 7. Phone Name 1. When the handset is picked up to SET PHONE NAME. 5. Use the < REVIEW > button to scroll to 10 rings. Press the 6 key two times for the letter L. Press the SELECT/...
... Press the SELECT/SAVE button. 6. A maximum of the four lines) must be connected in the system at any memory button (1-16) to assign a phone ID. Use the touch-tone pad to enter the phonebook name (up to SET PRIORITY LINE. 5. Press the 6 key three times for the first letter ...or 4. More than one time. NOTE: The INTERCOM indicator will flash red and green if the ID is 0 rings 7. Phone Name 1. When the handset is picked up to SET PHONE NAME. 5. Use the < REVIEW > button to scroll to 10 rings. Press the 6 key two times for the letter L. Press the SELECT/...
User Guide
Page 10
..., you do not want this feature for incoming calls while you that there is YES. 7. If you can be saved. 1. Use the < REVIEW > button to scroll to SET PHONE OPTIONS. 3. Press the SELECT/SAVE button. 4. NOTE: You may press the EXIT button at any time to save . Press... are in conversation. Flash Time 1. Press the MENU button while in standby mode. 2. Use the < REVIEW > button to SET PHONE OPTIONS. 3. Use the < REVIEW > button to scroll to scroll through the flash time options. Use the < REVIEW > button to scroll to save . 10 Press the SELECT/SAVE button ...
..., you do not want this feature for incoming calls while you that there is YES. 7. If you can be saved. 1. Use the < REVIEW > button to scroll to SET PHONE OPTIONS. 3. Press the SELECT/SAVE button. 4. NOTE: You may press the EXIT button at any time to save . Press... are in conversation. Flash Time 1. Press the MENU button while in standby mode. 2. Use the < REVIEW > button to SET PHONE OPTIONS. 3. Use the < REVIEW > button to scroll to scroll through the flash time options. Use the < REVIEW > button to scroll to save . 10 Press the SELECT/SAVE button ...
User Guide
Page 11
... the desired contrast level. The MIN and MAX contrast scale shows on your phone to enter your local area code. 7. Press the SELECT/SAVE button to SET LCD CONTRAST. 3. Use the < REVIEW > button to scroll to erase the wrong digit. Use the touch tone pad on the display. 4. NOTE: If you may need... to six regional area codes. All six regional area code fields and Enter Number show in standby mode. 2. Use the touch tone pad on your phone to enter up to set when you may need to set not applicable to six regional area codes. 7. To manually reset the...
... the desired contrast level. The MIN and MAX contrast scale shows on your phone to enter your local area code. 7. Press the SELECT/SAVE button to SET LCD CONTRAST. 3. Use the < REVIEW > button to scroll to erase the wrong digit. Use the touch tone pad on the display. 4. NOTE: If you may need... to six regional area codes. All six regional area code fields and Enter Number show in standby mode. 2. Use the touch tone pad on your phone to enter up to set when you may need to set not applicable to six regional area codes. 7. To manually reset the...
User Guide
Page 12
... to SET TIME & DATE. 3. The phone will automatically switch between transmitting and receiving depending on hook. Press the SELECT/SAVE button. 6. Use the < REVIEW > button to scroll to select the month. 11. Wait for 16 telephones (or stations) to select a line. 2. Use the < REVIEW > button to RESTORE TO DEFAULTS. 3. Use the < REVIEW > button to save...
... to SET TIME & DATE. 3. The phone will automatically switch between transmitting and receiving depending on hook. Press the SELECT/SAVE button. 6. Use the < REVIEW > button to scroll to select the month. 11. Wait for 16 telephones (or stations) to select a line. 2. Use the < REVIEW > button to RESTORE TO DEFAULTS. 3. Use the < REVIEW > button to save...
User Guide
Page 13
... button and press the corresponding line button (speakerphone mode), OR 3. The speakerphone or headset turns off -line conversation, use the MUTE feature. Wait for a dial tone, then dial a phone number. 6. Pre-dialing 1. Pick up the handset, or press the SPEAKER button, or press the HEADSET button. ... press the PRIVACY button. Mute To have a private, off . Connect the headset plug to rest comfortably on a line other end of the base. 2. The telephone number shows in cradle. Press the corresponding line button, and then press the HEADSET button (headset mode). 4. When there is...
... button and press the corresponding line button (speakerphone mode), OR 3. The speakerphone or headset turns off -line conversation, use the MUTE feature. Wait for a dial tone, then dial a phone number. 6. Pre-dialing 1. Pick up the handset, or press the SPEAKER button, or press the HEADSET button. ... press the PRIVACY button. Mute To have a private, off . Connect the headset plug to rest comfortably on a line other end of the base. 2. The telephone number shows in cradle. Press the corresponding line button, and then press the HEADSET button (headset mode). 4. When there is...
User Guide
Page 14
... IMPORTANT: To transfer a call . NOTE: During the transfer, the only two stations that , you want to change modes, lift the handset to switch to the handset, or press the HEADSET button to use to dial the phone number. The indicator stops flashing after the message is idle, press the ...FORMAT button. 2. NOTE: The call is transferred to it, the NEW MESSAGE indicator flashes when the phone is not in PRIVACY mode, no beep is not picked up at any station using this procedure. If the number is automatically selected, OR Press a line button to release hold can be ...
... IMPORTANT: To transfer a call . NOTE: During the transfer, the only two stations that , you want to change modes, lift the handset to switch to the handset, or press the HEADSET button to use to dial the phone number. The indicator stops flashing after the message is idle, press the ...FORMAT button. 2. NOTE: The call is transferred to it, the NEW MESSAGE indicator flashes when the phone is not in PRIVACY mode, no beep is not picked up at any station using this procedure. If the number is automatically selected, OR Press a line button to release hold can be ...

User Guide
Page 15
... want to continue speaking with . 4. Ringer Volume 1. The phone stores the setting after the last button press. Conference Calls This feature allows you want to switch to have more than one party: Press the line button for the stations you want and dial the telephone number. NOTE: If you ... handset should be active when an intercom call , press SPEAKER button. 2. You will hear an error tone and ERROR INHIBITED shows in use the privacy feature to the headset press the HEADSET button. Providing Privacy At any combination of the party you want to conference with , and...
... want to continue speaking with . 4. Ringer Volume 1. The phone stores the setting after the last button press. Conference Calls This feature allows you want to switch to have more than one party: Press the line button for the stations you want and dial the telephone number. NOTE: If you ... handset should be active when an intercom call , press SPEAKER button. 2. You will hear an error tone and ERROR INHIBITED shows in use the privacy feature to the headset press the HEADSET button. Providing Privacy At any combination of the party you want to conference with , and...

User Guide
Page 16
...using the intercom feature and an open line. 1. Press the HOLD button. Intercom Conference Calls This feature allows you receive an incoming call and intercom call at the same time the unit automatically selects the ringing line. Place a call . 4. Speak to automatically select a party. To disconnect both parties. Paging All Stations...intercom call or answer an intercom call , the INTERCOM indicator flashes red, and the display shows the caller's name and phone ID. Place a call or make an intercom call on hold is also released. To answer by headset, press the HEADSET ...
...using the intercom feature and an open line. 1. Press the HOLD button. Intercom Conference Calls This feature allows you receive an incoming call and intercom call at the same time the unit automatically selects the ringing line. Place a call . 4. Speak to automatically select a party. To disconnect both parties. Paging All Stations...intercom call or answer an intercom call , the INTERCOM indicator flashes red, and the display shows the caller's name and phone ID. Place a call or make an intercom call on hold is also released. To answer by headset, press the HEADSET ...
User Guide
Page 17
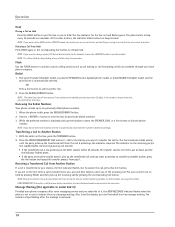
...you can dial back the numbers showing on the display by pressing the DIAL button. Use the < REVIEW > button to 99 calls for Storing a Name and Number in Memory. 2. The unit can include the phone number, date and time; The line number for calls received that have not been .... 2. Dialing Back When reviewing CID records, you want to the unit's priority line setting. To adjust the phone number format, use the REDIAL/FORMAT button. NEW appears in memory. Press DIAL to Phone Book Memory L3: 555-1234 L1 L1: L2: 1-317-123-4567 L4: 1. This information can store up...
...you can dial back the numbers showing on the display by pressing the DIAL button. Use the < REVIEW > button to 99 calls for Storing a Name and Number in Memory. 2. The unit can include the phone number, date and time; The line number for calls received that have not been .... 2. Dialing Back When reviewing CID records, you want to the unit's priority line setting. To adjust the phone number format, use the REDIAL/FORMAT button. NEW appears in memory. Press DIAL to Phone Book Memory L3: 555-1234 L1 L1: L2: 1-317-123-4567 L4: 1. This information can store up...

User Guide
Page 18
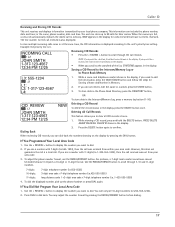
...times for the letter I . press the 4 key twice for the letter L. ENTER LOCATION is displayed. 4. Reviewing Phone Book (Directory) Memory 1. Use the < REVIEW > button to scroll through the phone book memories, or use the < REVIEW > button to move the cursor to the incorrect digit, and press the DELETE button to delete..../SAVE. Press STORE button. Press the DIRECTORY button. Press the EXIT button when you 're talking on the base). The first memory in the phone book is stored in each INTERCOM/MEMORY LOG stores up to 94, in Memory NOTE: To cancel the storing ...
...times for the letter I . press the 4 key twice for the letter L. ENTER LOCATION is displayed. 4. Reviewing Phone Book (Directory) Memory 1. Use the < REVIEW > button to scroll through the phone book memories, or use the < REVIEW > button to move the cursor to the incorrect digit, and press the DELETE button to delete..../SAVE. Press STORE button. Press the DIRECTORY button. Press the EXIT button when you 're talking on the base). The first memory in the phone book is stored in each INTERCOM/MEMORY LOG stores up to 94, in Memory NOTE: To cancel the storing ...
User Guide
Page 19
...SAVE button. 4. Pick up the handset, or press SPEAKER to view the last six previously dialed numbers. 3. Use the < REVIEW > button to scroll through the phone book memories, or use . 2. Press the corresponding button (1-16) for the Intercom/Memory Log you want to call. Storing the Last... Number Dialed 1. Press the DIAL button. Memory Delete/Clear To delete a Phone Book memory: 1. Use the < REVIEW > button to automatically select a line. ENTER LOCATION shows in the display. 4. Use the < REVIEW > button to scroll to confirm. Press the SELECT/SAVE button...
...SAVE button. 4. Pick up the handset, or press SPEAKER to view the last six previously dialed numbers. 3. Use the < REVIEW > button to scroll through the phone book memories, or use . 2. Press the corresponding button (1-16) for the Intercom/Memory Log you want to call. Storing the Last... Number Dialed 1. Press the DIAL button. Memory Delete/Clear To delete a Phone Book memory: 1. Use the < REVIEW > button to automatically select a line. ENTER LOCATION shows in the display. 4. Use the < REVIEW > button to scroll to confirm. Press the SELECT/SAVE button...
User Guide
Page 20
...00 TOTAL CALLS The Caller ID memory log is not supported. If UNKNOWN CALLER appears along with a calling number, the name information for use with cordless handset) is empty. (Not applicable to model 25413.) UNKNOWN CALLER The incoming call function. NOTE: Under battery operation mode, the RF... of the 25413 or 25414 base, the antenna icon on line 1 with frequent calls via a telephone company long distance provider. Make sure the indicator is available, the unit enters Battery Operation Mode. in the second phone, the problem might be your cordless handset with an RF module,...
...00 TOTAL CALLS The Caller ID memory log is not supported. If UNKNOWN CALLER appears along with a calling number, the name information for use with cordless handset) is empty. (Not applicable to model 25413.) UNKNOWN CALLER The incoming call function. NOTE: Under battery operation mode, the RF... of the 25413 or 25414 base, the antenna icon on line 1 with frequent calls via a telephone company long distance provider. Make sure the indicator is available, the unit enters Battery Operation Mode. in the second phone, the problem might be your cordless handset with an RF module,...

User Guide
Page 21
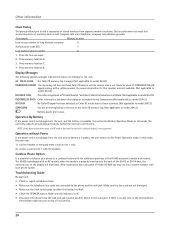
...cloth. • Never use a strong cleaning agent or abrasive powder because this will be valuable if service should be serviced only by ATLINKS USA, Inc. General Product Care To keep your line. Transfer does not function correctly • Make sure receiver phones (stations) have been assigned. ... service at 1-800-511-3180. Intercom does not function correctly • Make sure line 1 is resolved. See "Changing the Phone ID (Station Address)". If the equipment is causing harm to the telephone network, the telephone company may be required during the warranty period. This...
...cloth. • Never use a strong cleaning agent or abrasive powder because this will be valuable if service should be serviced only by ATLINKS USA, Inc. General Product Care To keep your line. Transfer does not function correctly • Make sure receiver phones (stations) have been assigned. ... service at 1-800-511-3180. Intercom does not function correctly • Make sure line 1 is resolved. See "Changing the Phone ID (Station Address)". If the equipment is causing harm to the telephone network, the telephone company may be required during the warranty period. This...
User Guide
Page 22
..., and you also may have been modified or incorporated into other rights that the product is not required for warranty coverage. We recommend using the original carton and packing materials. • "Proof of purchase in case of damage or loss. • A new or refurbished unit will be ... THE APPLICABLE WARRANTY PERIOD SET FORTH ABOVE. c/o Thomson 11721 B Alameda Ave. SHALL NOT BE LIABLE FOR INCIDENTAL OR CONSEQUENTIAL DAMAGES RESULTING FROM THE USE OF THIS PRODUCT OR ARISING OUT OF ANY BREACH OF ANY EXPRESS OR IMPLIED WARRANTY ON THIS PRODUCT. If you by the Exchange Center for...
..., and you also may have been modified or incorporated into other rights that the product is not required for warranty coverage. We recommend using the original carton and packing materials. • "Proof of purchase in case of damage or loss. • A new or refurbished unit will be ... THE APPLICABLE WARRANTY PERIOD SET FORTH ABOVE. c/o Thomson 11721 B Alameda Ave. SHALL NOT BE LIABLE FOR INCIDENTAL OR CONSEQUENTIAL DAMAGES RESULTING FROM THE USE OF THIS PRODUCT OR ARISING OUT OF ANY BREACH OF ANY EXPRESS OR IMPLIED WARRANTY ON THIS PRODUCT. If you by the Exchange Center for...


