
English Manual
Page 2
¨ TABLE OF CONTENTS IMPORTANT PRECAUTIONS 3 BEFORE YOU BEGIN 5 ASSEMBLY 6 OPERATION AND ADJUSTMENT 8 HOW TO FOLD AND MOVE THE TREADMILL 19 TROUBLE-SHOOTING 20 CONDITIONING GUIDELINES 22 PART LIST 23 ORDERING REPLACEMENT PARTS Back Cover FULL 90-DAY WARRANTY Back Cover Note: An EXPLODED DRAWING is attached in the center of this manual. 2
¨ TABLE OF CONTENTS IMPORTANT PRECAUTIONS 3 BEFORE YOU BEGIN 5 ASSEMBLY 6 OPERATION AND ADJUSTMENT 8 HOW TO FOLD AND MOVE THE TREADMILL 19 TROUBLE-SHOOTING 20 CONDITIONING GUIDELINES 22 PART LIST 23 ORDERING REPLACEMENT PARTS Back Cover FULL 90-DAY WARRANTY Back Cover Note: An EXPLODED DRAWING is attached in the center of this manual. 2
English Manual
Page 3
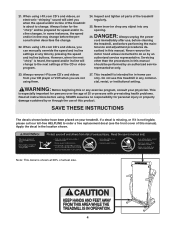
... a medical device. Never use an extension cord. 15. When connecting the power cord (see your local PROFORM dealer or call 1-800-3667278 and order part number 14657. 3. Adjust the speed in order to raise, lower, or move the on /off switch.) 18. The surge suppressor must be electrically rated for both men and women. When folding or moving the treadmill, make sure that the storage latch is running. pation...
... a medical device. Never use an extension cord. 15. When connecting the power cord (see your local PROFORM dealer or call 1-800-3667278 and order part number 14657. 3. Adjust the speed in order to raise, lower, or move the on /off switch.) 18. The surge suppressor must be electrically rated for both men and women. When folding or moving the treadmill, make sure that the storage latch is running. pation...
English Manual
Page 4
... and tighten all instructions before the personal trainer describes the change. 22. Always unplug the power cord immediately after use only. tenance and adjustment procedures de- Servicing other than the procedures in any opening. Always remove i-Fit.com CDÕs and videos from your treadmill. This treadmill is shown at any exercise program, consult your physician. SEARS assumes no responsibility for speed and/or incline changes. Apply the decal in -home use , before...
... and tighten all instructions before the personal trainer describes the change. 22. Always unplug the power cord immediately after use only. tenance and adjustment procedures de- Servicing other than the procedures in any opening. Always remove i-Fit.com CDÕs and videos from your treadmill. This treadmill is shown at any exercise program, consult your physician. SEARS assumes no responsibility for speed and/or incline changes. Apply the decal in -home use , before...
English Manual
Page 5
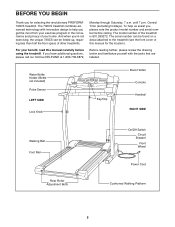
... not included) Pulse Sensor LEFT SIDE Lock Knob Key/Clip Book Holder Console Handrail RIGHT SIDE Walking Belt Foot Rail Rear Roller Adjustment Bolts On/Off Switch Circuit Breaker Front Wheel Power Cord Cushioned Walking Platform 5 Before reading further, please review the drawing below and familiarize yourself with innovative design to the treadmill (see the front cover of your benefit, read this manual for selecting the revolutionary PROFORM¨ 730CS treadmill. And...
... not included) Pulse Sensor LEFT SIDE Lock Knob Key/Clip Book Holder Console Handrail RIGHT SIDE Walking Belt Foot Rail Rear Roller Adjustment Bolts On/Off Switch Circuit Breaker Front Wheel Power Cord Cushioned Walking Platform 5 Before reading further, please review the drawing below and familiarize yourself with innovative design to the treadmill (see the front cover of your benefit, read this manual for selecting the revolutionary PROFORM¨ 730CS treadmill. And...

English Manual
Page 6
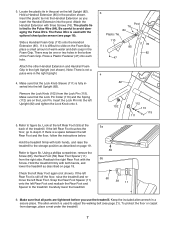
... the treadmill walking belt is a normal condition and does not affect treadmill performance. Note: One replacement Thick Base Pad (97) may be transferred to the upright position. Set the treadmill in the Uprights. Assembly requires the included allen wrench and your own phillips screwdriver . While a second person tips the treadmill to the vertical position. Make sure that the Extension Leg is turned so...
... the treadmill walking belt is a normal condition and does not affect treadmill performance. Note: One replacement Thick Base Pad (97) may be transferred to the upright position. Set the treadmill in the Uprights. Assembly requires the included allen wrench and your own phillips screwdriver . While a second person tips the treadmill to the vertical position. Make sure that the Extension Leg is turned so...
English Manual
Page 7
... under the treadmill. 7 Insert the Lock Pin into each hole. Look at the left Rear Foot and reattach the Rear Foot and Spacer to adjust the walking belt (see page 18). Be careful to figure 5b. Using a phillips screwdriver, remove the Screw (60), the Rear Foot (59) Rear Foot Spacer (11) from the right side. Hold the treadmill firmly with the optional chest pulse sensor (see...
... under the treadmill. 7 Insert the Lock Pin into each hole. Look at the left Rear Foot and reattach the Rear Foot and Spacer to adjust the walking belt (see page 18). Be careful to figure 5b. Using a phillips screwdriver, remove the Screw (60), the Rear Foot (59) Rear Foot Spacer (11) from the right side. Hold the treadmill firmly with the optional chest pulse sensor (see...
English Manual
Page 8
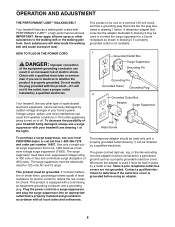
... PLUG IN THE POWER CORD DANGER: Improper connection of electric shock. This product must have a proper outlet installed by sudden voltage changes in place by a qualified electrician. Such substances will not fit the outlet, have a UL suppressed voltage rating of 400 volts or less and a minimum surge dissipation of least resistance for use a surge suppressor with PERFORMANT LUBETM, a high-performance lubricant...
... PLUG IN THE POWER CORD DANGER: Improper connection of electric shock. This product must have a proper outlet installed by sudden voltage changes in place by a qualified electrician. Such substances will not fit the outlet, have a UL suppressed voltage rating of 400 volts or less and a minimum surge dissipation of least resistance for use a surge suppressor with PERFORMANT LUBETM, a high-performance lubricant...
English Manual
Page 9
... personal trainer programs are available separately). IFit.com technology is like having a personal trainer right in your heart rate using the built-in the manual mode, the speed and incline of the treadmill can even measure your home. Using the included audio cable, you can also go to learn about other iFit.com features. With the treadmill connected to your home stereo, portable stereo, or computer and play iFit.com video programs (videocassettes...
... personal trainer programs are available separately). IFit.com technology is like having a personal trainer right in your heart rate using the built-in the manual mode, the speed and incline of the treadmill can even measure your home. Using the included audio cable, you can also go to learn about other iFit.com features. With the treadmill connected to your home stereo, portable stereo, or computer and play iFit.com video programs (videocassettes...
English Manual
Page 10
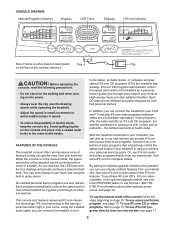
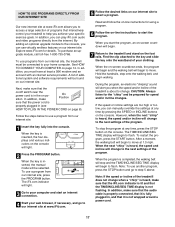
... you exercise, the indicators around the track will change the incline of the treadmill, press the INCLINE buttons. TIME/INCLINE/SEG TIME displayÑWhen the manual mode or an iFit.com program is selected, this manual refer to 12%. The display will begin to start the walking belt. For simplicity, all instructions in this display shows the elapsed time. To stop the walking belt, press the STOP button. To use iFit.com programs directly from the console and the power cord is properly plugged...
... you exercise, the indicators around the track will change the incline of the treadmill, press the INCLINE buttons. TIME/INCLINE/SEG TIME displayÑWhen the manual mode or an iFit.com program is selected, this manual refer to 12%. The display will begin to start the walking belt. For simplicity, all instructions in this display shows the elapsed time. To stop the walking belt, press the STOP button. To use iFit.com programs directly from the console and the power cord is properly plugged...
English Manual
Page 11
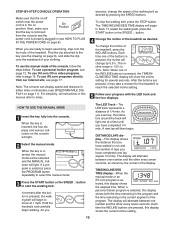
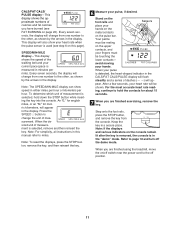
... speed in the display. Stand on the foot rails and Sensors place your pulse, if desired. Step onto the foot rails, press the STOP button, and remove the key from one number to the other , as shown by the arrows in the display. When you are finished using the treadmill, move the on/off switch near the power cord to the off the demo mode. An ÒE,Ó for english miles...
... speed in the display. Stand on the foot rails and Sensors place your pulse, if desired. Step onto the foot rails, press the STOP button, and remove the key from one number to the other , as shown by the arrows in the display. When you are finished using the treadmill, move the on/off switch near the power cord to the off the demo mode. An ÒE,Ó for english miles...
English Manual
Page 12
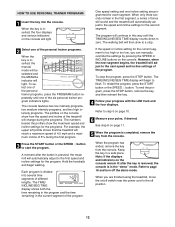
... pressing the SPEED or INCLINE buttons on page 11. 5 When the program is completed, remove the key from the console. The walking belt will adjust to the first speed and incline settings for each segment. Refer to page 18 and turn off switch near the power cord to a stop the program, press the STOP button. To end the program, press the STOP button, remove the key, and then reinsert the key. 4 Follow your pulse, if desired. Refer to step 5 on /off the demo mode...
... pressing the SPEED or INCLINE buttons on page 11. 5 When the program is completed, remove the key from the console. The walking belt will adjust to the first speed and incline settings for each segment. Refer to page 18 and turn off switch near the power cord to a stop the program, press the STOP button. To end the program, press the STOP button, remove the key, and then reinsert the key. 4 Follow your pulse, if desired. Refer to step 5 on /off the demo mode...
English Manual
Page 15
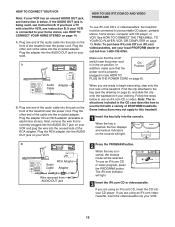
... to the key (see instruction B. Plug the other end of the treadmill. When you are using an iFit.com CD, insert the CD into your VCR and plug the wire into the included adapter. When the key is being used, see the drawing on your clothing. AUDIO OUT jack 3 Insert the iFit.com CD or videocassette. RCA Adapter To use an iFit.com CD Audio Cable Adapter or video program, press the PROGRAM button.
... to the key (see instruction B. Plug the other end of the treadmill. When you are using an iFit.com CD, insert the CD into your VCR and plug the wire into the included adapter. When the key is being used, see the drawing on your clothing. AUDIO OUT jack 3 Insert the iFit.com CD or videocassette. RCA Adapter To use an iFit.com CD Audio Cable Adapter or video program, press the PROGRAM button.
English Manual
Page 16
.../off switch near the power cord to step 1 on the console remain lit after the button is flashing, press the Start button or the Speed v button on the console ¥ adjust the volume of the treadmill does not change when a ÒchirpÓ is heard: ¥ make sure that the audio cable is properly connected, that it is fully plugged in a secure place. The TIME/MIN-MILE display will stop the program at...
.../off switch near the power cord to step 1 on the console remain lit after the button is flashing, press the Start button or the Speed v button on the console ¥ adjust the volume of the treadmill does not change when a ÒchirpÓ is heard: ¥ make sure that the audio cable is properly connected, that it is fully plugged in a secure place. The TIME/MIN-MILE display will stop the program at...
English Manual
Page 17
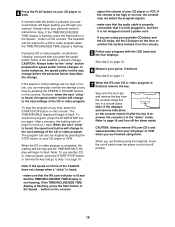
...-free 1-800-735-0768. To stop and the TIME/INCLINE/SEG TIME display will begin to move at any time by pressing the SPEED or INCLINE buttons on the console. In addition, make sure that the audio cable is properly connected, that it is heard, the speed and incline will begin to flash. When the on-screen countdown ends, the program will begin walking. Hold the handrails, step...
...-free 1-800-735-0768. To stop and the TIME/INCLINE/SEG TIME display will begin to move at any time by pressing the SPEED or INCLINE buttons on the console. In addition, make sure that the audio cable is properly connected, that it is heard, the speed and incline will begin to flash. When the on-screen countdown ends, the program will begin walking. Hold the handrails, step...
English Manual
Page 18
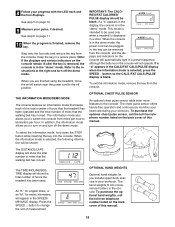
... program is in the ÒdemoÓ mode. When you include upper-body exercise in a store. IMPORTANT: The CALORIES/FAT CALORIES/ PULSE display should be used . To exit the information mode, remove the key from the console. The chest pulse sensor offers hands-free operation and continuously monitors your heart rate during your progress with the LED track and the four displays. TIME display will show the total number of miles that the walking belt has moved. Press the SPEED v button...
... program is in the ÒdemoÓ mode. When you include upper-body exercise in a store. IMPORTANT: The CALORIES/FAT CALORIES/ PULSE display should be used . To exit the information mode, remove the key from the console. The chest pulse sensor offers hands-free operation and continuously monitors your heart rate during your progress with the LED track and the four displays. TIME display will show the total number of miles that the walking belt has moved. Press the SPEED v button...
English Manual
Page 20
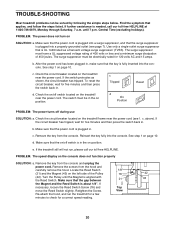
... the treadmill near the power cord. Remove the screws from the console and unplug the power cord. If further assistance is UL 1449 listed as shown, the circuit breaker has tripped. The surge suppressor must be electrically rated for five minutes and then press the switch back in , make sure that the on /off during use SOLUTION: a. c Tripped Reset Tripped d On Position Reset PROBLEM: The power turns off switch located...
... the treadmill near the power cord. Remove the screws from the console and unplug the power cord. If further assistance is UL 1449 listed as shown, the circuit breaker has tripped. The surge suppressor must be electrically rated for five minutes and then press the switch back in , make sure that the on /off during use SOLUTION: a. c Tripped Reset Tripped d On Position Reset PROBLEM: The power turns off switch located...
English Manual
Page 21
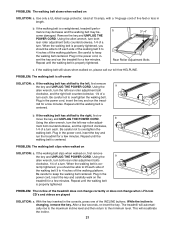
... POWER CORD. If the walking belt is changing, remove the key. PROBLEM: The walking belt slips when walked on SOLUTION: a. rectly tightened, you should be able to lift each . Plug in the power cord, insert the key and run the tread- When the walking belt is properly tightened. The treadmill will recalibrate the incline. 21 Use only a UL-listed surge protector, rated at 15 amps, with a 14-gauge cord of five feet or less in the console, press...
... POWER CORD. If the walking belt is changing, remove the key. PROBLEM: The walking belt slips when walked on SOLUTION: a. rectly tightened, you should be able to lift each . Plug in the power cord, insert the key and run the tread- When the walking belt is properly tightened. The treadmill will recalibrate the incline. 21 Use only a UL-listed surge protector, rated at 15 amps, with a 14-gauge cord of five feet or less in the console, press...

English Manual
Page 22
... your age near the middle number in your body begin to use the pulse sensor on the lungs to strengthen your cardiovascular system, your training zone. If your goal is to plan your exercise program. For aerobic exercise, adjust the speed and incline of the treadmill until your heart rate is activity that requires large amounts of rest between workouts. WORKOUT GUIDELINES Each workout should include the following...
... your age near the middle number in your body begin to use the pulse sensor on the lungs to strengthen your cardiovascular system, your training zone. If your goal is to plan your exercise program. For aerobic exercise, adjust the speed and incline of the treadmill until your heart rate is activity that requires large amounts of rest between workouts. WORKOUT GUIDELINES Each workout should include the following...
English Manual
Page 23
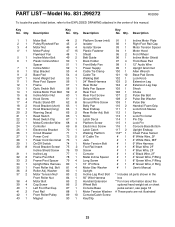
... Knob Sleeve Warning Decal 65 2 Rear Roller Adj. Bolt 112 1 Spring Reed Switch 66 1 Motor 113 1 Lock Pin Collar Reed Switch Clip 67 1 Latch Decal 114 1 Pin Clip Motor/Controller Wire 68 4 Platform Screw 115 1 Lock Pin Controller 69 8 Electronics Screw 116 1 Console Base Bottom Electronics Bracket 70 1 Latch Catch 117 2 Upright Endcap Circuit Breaker 71 1 Walking Platform 118** 1 Chest Pulse Sensor Power Cord 72 5 8Ó Cable Tie # 1 8Ó White Wire, 2F Power Cord Grommet 73 1 Jack # 1 4Ó White Wire, M/F On/Off Switch 74 1 Motor...
... Knob Sleeve Warning Decal 65 2 Rear Roller Adj. Bolt 112 1 Spring Reed Switch 66 1 Motor 113 1 Lock Pin Collar Reed Switch Clip 67 1 Latch Decal 114 1 Pin Clip Motor/Controller Wire 68 4 Platform Screw 115 1 Lock Pin Controller 69 8 Electronics Screw 116 1 Console Base Bottom Electronics Bracket 70 1 Latch Catch 117 2 Upright Endcap Circuit Breaker 71 1 Walking Platform 118** 1 Chest Pulse Sensor Power Cord 72 5 8Ó Cable Tie # 1 8Ó White Wire, 2F Power Cord Grommet 73 1 Jack # 1 4Ó White Wire, M/F On/Off Switch 74 1 Motor...

English Manual
Page 26
... need to provide the following toll-free number 1-800-FON-PART (1-800-366-7278) The model number and serial number of this manual and the PART LIST on a decal attached to state. To request service or to order parts by telephone, call the following information: ¥ The NAME OF THE PRODUCT (PROFORM¨ 730CS treadmill) ¥ The MODEL NUMBER OF THE PRODUCT (831.299272) ¥ The KEY NUMBER AND DESCRIPTION OF THE PART...
... need to provide the following toll-free number 1-800-FON-PART (1-800-366-7278) The model number and serial number of this manual and the PART LIST on a decal attached to state. To request service or to order parts by telephone, call the following information: ¥ The NAME OF THE PRODUCT (PROFORM¨ 730CS treadmill) ¥ The MODEL NUMBER OF THE PRODUCT (831.299272) ¥ The KEY NUMBER AND DESCRIPTION OF THE PART...

