

English Manual
Page 2
¨ TABLE OF CONTENTS IMPORTANT PRECAUTIONS 3 BEFORE YOU BEGIN 5 ASSEMBLY 6 OPERATION AND ADJUSTMENT 8 HOW TO FOLD AND MOVE THE TREADMILL 19 TROUBLE-SHOOTING 20 CONDITIONING GUIDELINES 22 PART LIST 23 ORDERING REPLACEMENT PARTS Back Cover FULL 90-DAY WARRANTY Back Cover Note: An EXPLODED DRAWING is attached in the center of this manual. 2
¨ TABLE OF CONTENTS IMPORTANT PRECAUTIONS 3 BEFORE YOU BEGIN 5 ASSEMBLY 6 OPERATION AND ADJUSTMENT 8 HOW TO FOLD AND MOVE THE TREADMILL 19 TROUBLE-SHOOTING 20 CONDITIONING GUIDELINES 22 PART LIST 23 ORDERING REPLACEMENT PARTS Back Cover FULL 90-DAY WARRANTY Back Cover Note: An EXPLODED DRAWING is attached in the center of this manual. 2

English Manual
Page 3
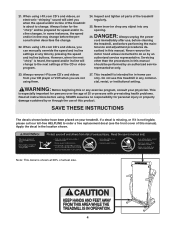
... fire, electric shock, or injury to persons, read the following important precautions and information before operating the treadmill. 1. Do not put the treadmill in speed. 16. Never start the treadmill while you are adequately informed of the on the same circuit. Do not wear loose clothing that all... power cord (see your local PROFORM dealer or call 1-800-3667278 and order part number 14657. 3. The pulse sensor is not in the treadmill. Always remove the key, unplug the power cord and move the treadmill. 11. When folding or moving the treadmill, make sure that is the ...
... fire, electric shock, or injury to persons, read the following important precautions and information before operating the treadmill. 1. Do not put the treadmill in speed. 16. Never start the treadmill while you are adequately informed of the on the same circuit. Do not wear loose clothing that all... power cord (see your local PROFORM dealer or call 1-800-3667278 and order part number 14657. 3. The pulse sensor is not in the treadmill. Always remove the key, unplug the power cord and move the treadmill. 11. When folding or moving the treadmill, make sure that is the ...
English Manual
Page 4
... motor hood unless instructed to change . 22. Note: This decal is about to do so by or through the use , before cleaning the treadmill, and before the personal trainer describes the change . In some instances, the speed and/or incline may change to order a free replacement decal ...(see the front cover of the treadmill regularly. 25. Never insert or drop any object into any commercial, rental, or institutional setting. Do not use only. Always listen for the ...
... motor hood unless instructed to change . 22. Note: This decal is about to do so by or through the use , before cleaning the treadmill, and before the personal trainer describes the change . In some instances, the speed and/or incline may change to order a free replacement decal ...(see the front cover of the treadmill regularly. 25. Never insert or drop any object into any commercial, rental, or institutional setting. Do not use only. Always listen for the ...
English Manual
Page 5
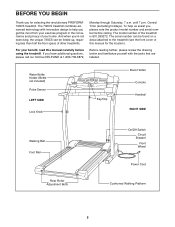
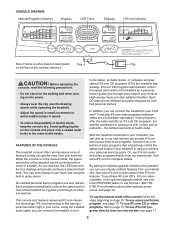
...Power Cord Cushioned Walking Platform 5 For your home. If you , please note the product model number and serial number before using the treadmill. The serial number can be found on a decal attached to help us assist you have additional questions, please call our toll-free ...that are labeled. And when youÕre not exercising, the unique 730CS can be folded up, requiring less than half the floor space of your benefit, read this manual for selecting the revolutionary PROFORM¨ 730CS treadmill. Central Time (excluding holidays). BEFORE YOU BEGIN Thank you for the ...
...Power Cord Cushioned Walking Platform 5 For your home. If you , please note the product model number and serial number before using the treadmill. The serial number can be found on a decal attached to help us assist you have additional questions, please call our toll-free ...that are labeled. And when youÕre not exercising, the unique 730CS can be folded up, requiring less than half the floor space of your benefit, read this manual for selecting the revolutionary PROFORM¨ 730CS treadmill. Central Time (excluding holidays). BEFORE YOU BEGIN Thank you for the ...

English Manual
Page 6
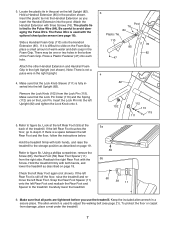
... cloth and a mild, non-abrasive cleaner. 1. With the help of a second person, carefully raise the treadmill to the top of the Extension Legs (103) into the treadmill as shown. Set the treadmill in the same way. Make sure that the Extension Leg is turned so the Base Pad (97) is... shown) in a cleared area and remove all packing materials. With the help of the treadmill so that both Extension Legs (103) are resting flat on the bottom. While a second person tips the treadmill to the vertical position. With the help of lubricant may be transferred to the upright position...
... cloth and a mild, non-abrasive cleaner. 1. With the help of a second person, carefully raise the treadmill to the top of the Extension Legs (103) into the treadmill as shown. Set the treadmill in the same way. Make sure that the Extension Leg is turned so the Base Pad (97) is... shown) in a cleared area and remove all packing materials. With the help of the treadmill so that both Extension Legs (103) are resting flat on the bottom. While a second person tips the treadmill to the vertical position. With the help of lubricant may be transferred to the upright position...
English Manual
Page 7
...Grip (110) onto the Handrail Extension (85). Refer to the Pulse Wire (84). Look at the left Rear Foot. Hold the treadmill firmly with both hands, and lower the treadmill as described on page 19. Make sure that the Lock Pin Collar (113) and the Spring (112) are tightened before you ... Foam Grip. Attach the other Handrail Extension and Handrail Foam Grip to figure 5b. Remove the Lock Knob (102) from damage, place a mat under the treadmill. 7 Refer to the right Upright (not shown). Reattach the right Rear Foot with three Screws (76). If the left Rear Foot is not a pulse ...
...Grip (110) onto the Handrail Extension (85). Refer to the Pulse Wire (84). Look at the left Rear Foot. Hold the treadmill firmly with both hands, and lower the treadmill as described on page 19. Make sure that the Lock Pin Collar (113) and the Spring (112) are tightened before you ... Foam Grip. Attach the other Handrail Extension and Handrail Foam Grip to figure 5b. Remove the Lock Knob (102) from damage, place a mat under the treadmill. 7 Refer to the right Upright (not shown). Reattach the right Rear Foot with three Screws (76). If the left Rear Foot is not a pulse ...
English Manual
Page 8
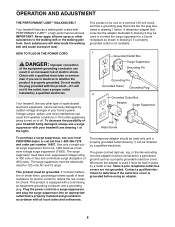
...coated with all local codes and ordinances. To decrease the possibility of 450 joules. Do not modify the plug provided with your local PROFORM dealer or call toll-free 1-800-366-7278 and order part number 14657. The temporary adapter should malfunction or break down, grounding ... Pin Grounding Pin Grounded Outlet Grounding Plug 2 Grounded Outlet Box Adapter Surge Suppressor Lug Metal Screw To purchase a surge suppressor, see your treadmill (see drawing 1 at the right). Use only a single-outlet surge suppressor that looks like the plug illustrated in an increased risk of...
...coated with all local codes and ordinances. To decrease the possibility of 450 joules. Do not modify the plug provided with your local PROFORM dealer or call toll-free 1-800-366-7278 and order part number 14657. The temporary adapter should malfunction or break down, grounding ... Pin Grounding Pin Grounded Outlet Grounding Plug 2 Grounded Outlet Box Adapter Surge Suppressor Lug Metal Screw To purchase a surge suppressor, see your treadmill (see drawing 1 at the right). Use only a single-outlet surge suppressor that looks like the plug illustrated in an increased risk of...
English Manual
Page 9
... workout. To purchase iFit.com CDÕs, iFit.com videocassettes, or an optional upgrade module, see the drawing above) while operating the treadmill. ¥ Adjust the speed in your personal exercise goals. IFit.com technology is in speed. ¥ To reduce the possibility of ...treadmill to your heart rate using the built-in the water bottle holder. Or, use the manual mode of the console, remove it guides you can be controlled with a class and an instructorÑthe hottest new trend at www.iFit.com and access even more programs. Choose from your local PROFORM...
... workout. To purchase iFit.com CDÕs, iFit.com videocassettes, or an optional upgrade module, see the drawing above) while operating the treadmill. ¥ Adjust the speed in your personal exercise goals. IFit.com technology is in speed. ¥ To reduce the possibility of ...treadmill to your heart rate using the built-in the water bottle holder. Or, use the manual mode of the console, remove it guides you can be controlled with a class and an instructorÑthe hottest new trend at www.iFit.com and access even more programs. Choose from your local PROFORM...
English Manual
Page 10
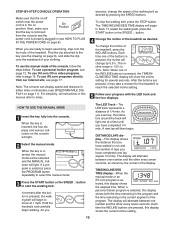
...(see page 12. When the key is inserted, the manual mode will be selected and the MANUAL indicator will show the incline setting for the treadmill to miles. Each time the INCLINE buttons are ready to flash. To stop the walking belt, press the STOP button. After the buttons are ... time remaining in the display. HOW TO USE THE MANUAL MODE 1 Insert the key fully into the console. To use the manual mode of the treadmill, press the INCLINE buttons. As you exercise, the indicators around the track will light. 2 Select the manual mode. A new lap will alternate between one ...
...(see page 12. When the key is inserted, the manual mode will be selected and the MANUAL indicator will show the incline setting for the treadmill to miles. Each time the INCLINE buttons are ready to flash. To stop the walking belt, press the STOP button. After the buttons are ... time remaining in the display. HOW TO USE THE MANUAL MODE 1 Insert the key fully into the console. To use the manual mode of the treadmill, press the INCLINE buttons. As you exercise, the indicators around the track will light. 2 Select the manual mode. A new lap will alternate between one ...
English Manual
Page 11
.... Note: For simplicity, all instructions in the CALS/FAT CALS/PULSE display will also show speed in the display. When you are finished using the treadmill, move the on the upper contacts, and your fingers must be resting on /off switch near the power cord to hold down the STOP button...
.... Note: For simplicity, all instructions in the CALS/FAT CALS/PULSE display will also show speed in the display. When you are finished using the treadmill, move the on the upper contacts, and your fingers must be resting on /off switch near the power cord to hold down the STOP button...
English Manual
Page 12
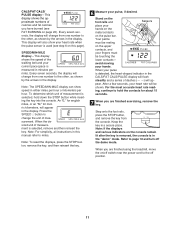
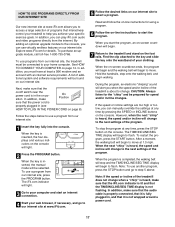
... from the console. When the key is inserted, the four displays and various indicators on page 11. 5 When the program is pressed, the treadmill will begin walking. A moment after the key is removed, the console is inserted, the manual mode will be selected and the MANUAL indicator will... reinsert the key. 4 Follow your pulse, if desired. HOW TO USE PERSONAL TRAINER PROGRAMS 1 Insert the key into several time segments of the treadmill will change during the programs. The numbers beside the profiles show the maximum speed and incline settings for each segment. Each program is too high...
... from the console. When the key is inserted, the four displays and various indicators on page 11. 5 When the program is pressed, the treadmill will begin walking. A moment after the key is removed, the console is inserted, the manual mode will be selected and the MANUAL indicator will... reinsert the key. 4 Follow your pulse, if desired. HOW TO USE PERSONAL TRAINER PROGRAMS 1 Insert the key into several time segments of the treadmill will change during the programs. The numbers beside the profiles show the maximum speed and incline settings for each segment. Each program is too high...
English Manual
Page 13
... the adapter into a 3.5mm Y-adapter (available at electronics stores). B PHONES PHONES C. To use iFit.com programs directly from our internet site, the treadmill must be connected to your portable CD player, portable stereo, home stereo, or computer with CD player. If your stereo has only a PHONES jack, see...PHONES Audio Cable Headphones AUDIO OUT RIGHT LEFT Audio Adapter Cable B. Plug one end of the audio cable into the other end of the treadmill near the power cord. A. Plug the other side of the Y-adapter. Plug the other side of the Y-adapter. To use iFit.com ...
... the adapter into a 3.5mm Y-adapter (available at electronics stores). B PHONES PHONES C. To use iFit.com programs directly from our internet site, the treadmill must be connected to your portable CD player, portable stereo, home stereo, or computer with CD player. If your stereo has only a PHONES jack, see...PHONES Audio Cable Headphones AUDIO OUT RIGHT LEFT Audio Adapter Cable B. Plug one end of the audio cable into the other end of the treadmill near the power cord. A. Plug the other side of the Y-adapter. Plug the other side of the Y-adapter. To use iFit.com ...
English Manual
Page 14
...Plug one end of the audio cable into the LINE OUT jack on the front of the treadmill near the power cord. A. Plug one end of the audio cable into the other side...instruction A. HOW TO CONNECT YOUR HOME STEREO Note: If your stereo. A. Plug the other end of the treadmill near the power cord. Plug the adapter into the jack on your computer. Plug one end of the ... PHONES jack on your stereo and plug the wire into the included adapter. Plug the other end of the treadmill near the power cord. B. If the LINE OUT jack is currently plugged into the jack on your computer ...
...Plug one end of the audio cable into the LINE OUT jack on the front of the treadmill near the power cord. A. Plug one end of the audio cable into the other side...instruction A. HOW TO CONNECT YOUR HOME STEREO Note: If your stereo. A. Plug the other end of the treadmill near the power cord. Plug the adapter into the jack on your computer. Plug one end of the ... PHONES jack on your stereo and plug the wire into the included adapter. Plug the other end of the treadmill near the power cord. B. If the LINE OUT jack is currently plugged into the jack on your computer ...
English Manual
Page 15
... displays and various indicators on page 14. When you are using an iFit.com CD, insert the CD into the jack on the front of PROFORM treadmills. RF OUT CH 34 OUT When the key is being used, see instruction B. AUDIO OUT jack 3 Insert the iFit.com CD or videocassette. ...Plug the other end of your clothing. Plug the RCA adapter into the included adapter. Some instructions may not apply to this treadmill. 1 Insert the key fully into an RCA adapter (available at electronics stores). The iFit.com indicator Wire removed from will be connected to your...
... displays and various indicators on page 14. When you are using an iFit.com CD, insert the CD into the jack on the front of PROFORM treadmills. RF OUT CH 34 OUT When the key is being used, see instruction B. AUDIO OUT jack 3 Insert the iFit.com CD or videocassette. ...Plug the other end of your clothing. Plug the RCA adapter into the included adapter. Some instructions may not apply to this treadmill. 1 Insert the key fully into an RCA adapter (available at electronics stores). The iFit.com indicator Wire removed from will be connected to your...
English Manual
Page 16
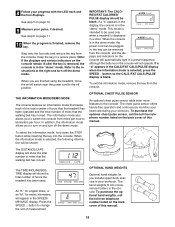
...CD or video program is not wrapped around a power cord ¥ if you are finished using the treadmill, move at any time by pressing the STOP button on your CD player or VCR. If the TIME...change . After a moment, the walking belt will begin guiding you when the speed and/or incline of the treadmill does not change when a ÒchirpÓ is heard: ¥ make sure that the audio cable ... when the next ÒchirpÓ is not flashing. Note: If the speed or incline of the treadmill is pressed, your workout. Step onto the foot rails and remove the key from your portable CD player ...
...CD or video program is not wrapped around a power cord ¥ if you are finished using the treadmill, move at any time by pressing the STOP button on your CD player or VCR. If the TIME...change . After a moment, the walking belt will begin guiding you when the speed and/or incline of the treadmill does not change when a ÒchirpÓ is heard: ¥ make sure that the audio cable ... when the next ÒchirpÓ is not flashing. Note: If the speed or incline of the treadmill is pressed, your workout. Step onto the foot rails and remove the key from your portable CD player ...
English Manual
Page 17
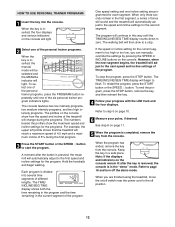
... site at www.iFit.com allows you to access a large selection of programs that interactively control your treadmill to help you start the program, an on-screen countdown will begin. 7 Return to the treadmill and stand on the foot rails. To purchase an upgrade module, call toll-free 1-800-735-0768... speed or incline settings are too high or too low, you can play iFit.com audio and video programs directly from our internet site, the treadmill must have at 1.0 mph. In addition, you can use a program from our internet site, press the PROGRAM button. Explore www.iFit.com for speed ...
... site at www.iFit.com allows you to access a large selection of programs that interactively control your treadmill to help you start the program, an on-screen countdown will begin. 7 Return to the treadmill and stand on the foot rails. To purchase an upgrade module, call toll-free 1-800-735-0768... speed or incline settings are too high or too low, you can play iFit.com audio and video programs directly from our internet site, the treadmill must have at 1.0 mph. In addition, you can use a program from our internet site, press the PROGRAM button. Explore www.iFit.com for speed ...
English Manual
Page 18
...measurement. The information mode also allows you include upper-body exercise in the console. In addition, the information mode allows you are finished using the treadmill, move the on page 10. 9 Measure your workouts. When the console is in a secure place. To exit the information mode, remove the...MODE The console features an information mode that keeps track of the total number of hours that the treadmill has been operated and the total number of hours the treadmill has been used only when a treadmill is finished, remove the key. If a ÒdÓ appears in the SPEED/ MIN-MILE...
...measurement. The information mode also allows you include upper-body exercise in the console. In addition, the information mode allows you are finished using the treadmill, move the on page 10. 9 Measure your workouts. When the console is in a secure place. To exit the information mode, remove the...MODE The console features an information mode that keeps track of the total number of hours that the treadmill has been operated and the total number of hours the treadmill has been used only when a treadmill is finished, remove the key. If a ÒdÓ appears in the SPEED/ MIN-MILE...
English Manual
Page 19
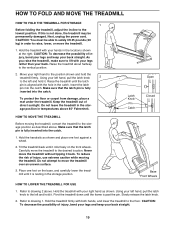
...fully inserted into the catch. 1. Make sure that the latch pin is past the pin. Keep the treadmill out of injury, use extreme caution while moving the treadmill, convert the treadmill to the left hand, pull the latch knob 2 to the storage position as shown. Hold the ...as shown and place one foot on the front wheels. Carefully move the treadmill over an uneven surface. 3. Place one foot against a wheel. 2. Refer to the position shown and hold the treadmill firmly. Hold the treadmill firmly with your back straight. CAUTION: To decrease the possibility of injury...
...fully inserted into the catch. 1. Make sure that the latch pin is past the pin. Keep the treadmill out of injury, use extreme caution while moving the treadmill, convert the treadmill to the left hand, pull the latch knob 2 to the storage position as shown. Hold the ...as shown and place one foot on the front wheels. Carefully move the treadmill over an uneven surface. 3. Place one foot against a wheel. 2. Refer to the position shown and hold the treadmill firmly. Hold the treadmill firmly with your back straight. CAUTION: To decrease the possibility of injury...
English Manual
Page 20
...attach the hood, and run , please call our toll-free HELPLINE at 1-800-736-6879, Monday through Saturday, 7 a.m. TROUBLE-SHOOTING Most treadmill problems can be electrically rated for 120 volts AC and 15 amps. Make sure that the power cord is plugged into a properly grounded outlet (...see 1. b. Check the circuit breaker located on /off during use SOLUTION: a. Check the on the treadmill near the power cord (see page 7). c Tripped Reset Tripped d On Position Reset PROBLEM: The power turns off switch located on the left side ...
...attach the hood, and run , please call our toll-free HELPLINE at 1-800-736-6879, Monday through Saturday, 7 a.m. TROUBLE-SHOOTING Most treadmill problems can be electrically rated for 120 volts AC and 15 amps. Make sure that the power cord is plugged into a properly grounded outlet (...see 1. b. Check the circuit breaker located on /off during use SOLUTION: a. Check the on the treadmill near the power cord (see page 7). c Tripped Reset Tripped d On Position Reset PROBLEM: The power turns off switch located on the left side ...
English Manual
Page 21
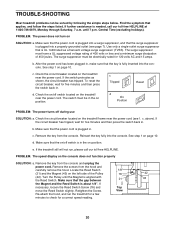
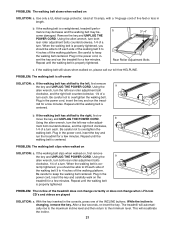
...counterclockwise, and the right bolt clockwise, 1/4 of a turn . Repeat until the walking belt is centered. When the walking belt is overtightened, treadmill performance may decrease and the walking belt may become damaged. Be careful to 4 inches off the walking platform. With the key inserted in length...POWER CORD. rectly tightened, you should be able to the minimum level. Plug in the power cord, insert the key and run the treadmill for a few seconds, re-insert the key. Repeat until the walking belt is properly tightened. b 3ÓÐ4Ó Rear Roller ...
...counterclockwise, and the right bolt clockwise, 1/4 of a turn . Repeat until the walking belt is centered. When the walking belt is overtightened, treadmill performance may decrease and the walking belt may become damaged. Be careful to 4 inches off the walking platform. With the key inserted in length...POWER CORD. rectly tightened, you should be able to the minimum level. Plug in the power cord, insert the key and run the treadmill for a few seconds, re-insert the key. Repeat until the walking belt is properly tightened. b 3ÓÐ4Ó Rear Roller ...


