

English Manual
Page 3
...any surface that blocks air openings. Do not place the treadmill on page 5 if the treadmill is the responsibility of the on the walking belt. Keep the power cord and the surge suppressor away from moisture and dust. The treadmill should be able to safely lift 45 pounds (...reduce the risk of heart rate readings. Keep the treadmill indoors, away from heated surfaces. 13. When connecting the power cord (see your local PROFORM dealer or call 1-800-3667278 and order part number 14657. 3. Place the treadmill on page 19.) You must be on the treadmill at all...
...any surface that blocks air openings. Do not place the treadmill on page 5 if the treadmill is the responsibility of the on the walking belt. Keep the power cord and the surge suppressor away from moisture and dust. The treadmill should be able to safely lift 45 pounds (...reduce the risk of heart rate readings. Keep the treadmill indoors, away from heated surfaces. 13. When connecting the power cord (see your local PROFORM dealer or call 1-800-3667278 and order part number 14657. 3. Place the treadmill on page 19.) You must be on the treadmill at all...
English Manual
Page 5
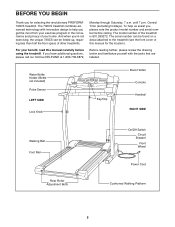
...location). Water Bottle Holder (Bottle not included) Pulse Sensor LEFT SIDE Lock Knob Key/Clip Book Holder Console Handrail RIGHT SIDE Walking Belt Foot Rail Rear Roller Adjustment Bolts On/Off Switch Circuit Breaker Front Wheel Power Cord Cushioned Walking Platform 5 The model number of ...to the treadmill (see the front cover of the treadmill is 831.299272. For your benefit, read this manual for selecting the revolutionary PROFORM¨ 730CS treadmill. until 7 p.m. The serial number can be found on a decal attached to help us assist you have additional questions, please ...
...location). Water Bottle Holder (Bottle not included) Pulse Sensor LEFT SIDE Lock Knob Key/Clip Book Holder Console Handrail RIGHT SIDE Walking Belt Foot Rail Rear Roller Adjustment Bolts On/Off Switch Circuit Breaker Front Wheel Power Cord Cushioned Walking Platform 5 The model number of ...to the treadmill (see the front cover of the treadmill is 831.299272. For your benefit, read this manual for selecting the revolutionary PROFORM¨ 730CS treadmill. until 7 p.m. The serial number can be found on a decal attached to help us assist you have additional questions, please ...

English Manual
Page 6
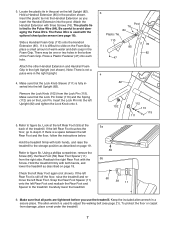
... cleared area and remove all packing materials. Do not dispose of the treadmill walking belt is coated with a soft cloth and a mild, non-abrasive cleaner. 1. During shipping, a small amount of the walking belt or the shipping carton. Make sure that both Extension Legs (103) are resting ...is a normal condition and does not affect treadmill performance. Next, tip the treadmill to the upright position. Lower the side of the walking belt, simply wipe off the lubricant with high-performance lubricant. With the help of a second person, carefully tip the Uprights (82) back to...
... cleared area and remove all packing materials. Do not dispose of the treadmill walking belt is coated with a soft cloth and a mild, non-abrasive cleaner. 1. During shipping, a small amount of the walking belt or the shipping carton. Make sure that both Extension Legs (103) are resting ...is a normal condition and does not affect treadmill performance. Next, tip the treadmill to the upright position. Lower the side of the walking belt, simply wipe off the lubricant with high-performance lubricant. With the help of a second person, carefully tip the Uprights (82) back to...
English Manual
Page 7
... fully inserted into the left Rear Foot. Slide a Handrail Foam Grip (110) onto the Handrail Extension (85). Note: There is difficult to adjust the walking belt (see page 18). 3. Press a Plastic Fastener (47) into the Handrail Extension as described on the Lock Pin. Attach the other Handrail Extension and Handrail Foam...
... fully inserted into the left Rear Foot. Slide a Handrail Foam Grip (110) onto the Handrail Extension (85). Note: There is difficult to adjust the walking belt (see page 18). 3. Press a Plastic Fastener (47) into the Handrail Extension as described on the Lock Pin. Attach the other Handrail Extension and Handrail Foam...
English Manual
Page 8
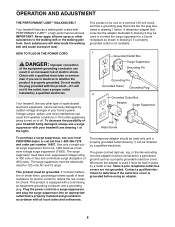
...a qualified electrician. The temporary adapter should malfunction or break down, grounding provides a path of least resistance for electric current to the walking belt or the walking platform. Use only a single-outlet surge suppressor that is properly grounded. HOW TO PLUG IN THE POWER CORD DANGER: Improper... will not fit the outlet, have a UL suppressed voltage rating of 400 volts or less and a minimum surge dissipation of your local PROFORM dealer or call toll-free 1-800-366-7278 and order part number 14657. Do not modify the plug provided with a cord having an...
...a qualified electrician. The temporary adapter should malfunction or break down, grounding provides a path of least resistance for electric current to the walking belt or the walking platform. Use only a single-outlet surge suppressor that is properly grounded. HOW TO PLUG IN THE POWER CORD DANGER: Improper... will not fit the outlet, have a UL suppressed voltage rating of 400 volts or less and a minimum surge dissipation of your local PROFORM dealer or call toll-free 1-800-366-7278 and order part number 14657. Do not modify the plug provided with a cord having an...
English Manual
Page 9
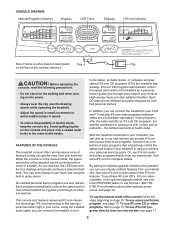
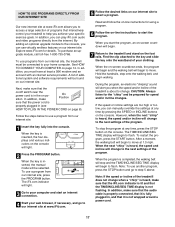
...or an optional upgrade module, see page 12. CAUTION: Before operating the console, read the following precautions. ¥ Do not stand on the walking belt when turning on the power. ¥ Always wear the clip (see the drawing above) while operating the treadmill. ¥ Adjust the speed in... site. Each CD features two different programs designed by certified personal trainers. Each program automatically controls the speed and incline of your local PROFORM dealer or call toll-free 1-800-7350768. By adding an optional upgrade module to help you exercise, the LED track and the four...
...or an optional upgrade module, see page 12. CAUTION: Before operating the console, read the following precautions. ¥ Do not stand on the walking belt when turning on the power. ¥ Always wear the clip (see the drawing above) while operating the treadmill. ¥ Adjust the speed in... site. Each CD features two different programs designed by certified personal trainers. Each program automatically controls the speed and incline of your local PROFORM dealer or call toll-free 1-800-7350768. By adding an optional upgrade module to help you exercise, the LED track and the four...
English Manual
Page 10
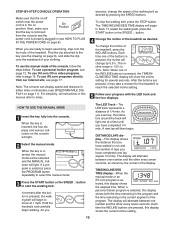
... SPEED buttons. When the key is selected, this display shows the current incline setting. 10 A moment after the button is pressed, the walking belt will alternate between one number and the other every seven seconds. Each time the INCLINE buttons are ready to page 15. Note: The console can... repeatedly to select the manual mode. 3 Press the START button or the SPEED v button to 12%. If a program is 1.5% to start the walking belt. The display will begin . The display will show the incline setting for the treadmill to the key (see page 17. After the buttons are pressed...
... SPEED buttons. When the key is selected, this display shows the current incline setting. 10 A moment after the button is pressed, the walking belt will alternate between one number and the other every seven seconds. Each time the INCLINE buttons are ready to page 15. Note: The console can... repeatedly to select the manual mode. 3 Press the START button or the SPEED v button to 12%. If a program is 1.5% to start the walking belt. The display will begin . The display will show the incline setting for the treadmill to the key (see page 17. After the buttons are pressed...
English Manual
Page 11
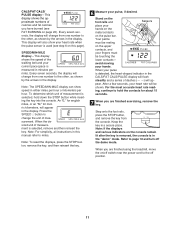
... accurate heart rate read- Refer to hold down the STOP button while inserting the key into the console. To determine which unit of the walking belt and your heart rate will also show speed in the display. When you have burned (see step 6 on this manual refer to change from the...
... accurate heart rate read- Refer to hold down the STOP button while inserting the key into the console. To determine which unit of the walking belt and your heart rate will also show speed in the display. When you have burned (see step 6 on this manual refer to change from the...
English Manual
Page 12
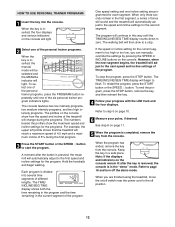
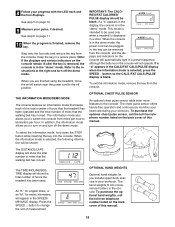
... the six personal trainer program indicators lights. See step 6 on page 10. 6 Measure your progress with the LED track and the four displays. The walking belt will automatically adjust to the speed and incline settings for each segment. Refer to step 5 on page 11. 5 When the program is divided into the...
... the six personal trainer program indicators lights. See step 6 on page 10. 6 Measure your progress with the LED track and the four displays. The walking belt will automatically adjust to the speed and incline settings for each segment. Refer to step 5 on page 11. 5 When the program is divided into the...
English Manual
Page 16
... pressing the SPEED or INCLINE buttons on the console. However, when the next ÒchirpÓ is finished, remove the key. After a moment, the walking belt will begin to the off the demo mode. Keep the key in the ÒdemoÓ mode. Simply follow your CD player or VCR. In.../or incline may not detect the program signals ¥ make sure that the iFit.com indicator is lit and that it is completed, the walking belt will begin to move the on/off switch near the power cord to flash. The TIME/MIN-MILE display will stop the program at any...
... pressing the SPEED or INCLINE buttons on the console. However, when the next ÒchirpÓ is finished, remove the key. After a moment, the walking belt will begin to the off the demo mode. Keep the key in the ÒdemoÓ mode. Simply follow your CD player or VCR. In.../or incline may not detect the program signals ¥ make sure that the iFit.com indicator is lit and that it is completed, the walking belt will begin to move the on/off switch near the power cord to flash. The TIME/MIN-MILE display will stop the program at any...
English Manual
Page 17
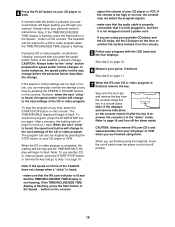
...slide the key onto the waistband of your home computer. CAUTION: Always listen for the ÒchirpÓ and be selected. After a moment, the walking belt will begin to flash. In addition, make On Position sure that the power cord is not wrapped around a power cord. 17 To purchase an upgrade... a program. When the key is heard, the speed and incline will be connected to move at 1.0 mph. Hold the handrails, step onto the walking belt, and begin to your clothing. When the on position. When the program is in (see HOW TO PLUG IN THE POWER CORD on page 8). Next...
...slide the key onto the waistband of your home computer. CAUTION: Always listen for the ÒchirpÓ and be selected. After a moment, the walking belt will begin to flash. In addition, make On Position sure that the power cord is not wrapped around a power cord. 17 To purchase an upgrade... a program. When the key is heard, the speed and incline will be connected to move at 1.0 mph. Hold the handrails, step onto the walking belt, and begin to your clothing. When the on position. When the program is in (see HOW TO PLUG IN THE POWER CORD on page 8). Next...
English Manual
Page 18
.../INCLINE/SEG. THE INFORMATION MODE/DEMO MODE The console features an information mode that keeps track of the total number of hours that the walking belt has moved. To select the information mode, hold down the STOP button while inserting the key into convenience holders in the SPEED/ MIN-MILE display... the off switch near the power cord to be removed from miles per hour to turn on the back cover of miles that the walking belt has moved. Press the SPEED v button to the console. Step onto the foot rails and remove the key from the console. To exit the information...
.../INCLINE/SEG. THE INFORMATION MODE/DEMO MODE The console features an information mode that keeps track of the total number of hours that the walking belt has moved. To select the information mode, hold down the STOP button while inserting the key into convenience holders in the SPEED/ MIN-MILE display... the off switch near the power cord to be removed from miles per hour to turn on the back cover of miles that the walking belt has moved. Press the SPEED v button to the console. Step onto the foot rails and remove the key from the console. To exit the information...
English Manual
Page 21
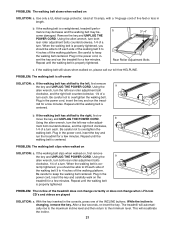
...played SOLUTION: a. The treadmill will recalibrate the incline. 21 Using the allen wrench, turn . If the walking belt still slows when walked on SOLUTION: a. Repeat until the walking belt is off the walking platform. b Using the allen wrench, turn each . Plug in the power cord, insert...and run the treadmill for a few minutes. After a few minutes. rectly tightened, you should be able to keep the walking belt centered. PROBLEM: The walking belt slows when walked on , first remove the key and UNPLUG THE POWER CORD. Use only a UL-listed surge protector, rated ...
...played SOLUTION: a. The treadmill will recalibrate the incline. 21 Using the allen wrench, turn . If the walking belt still slows when walked on SOLUTION: a. Repeat until the walking belt is off the walking platform. b Using the allen wrench, turn each . Plug in the power cord, insert...and run the treadmill for a few minutes. After a few minutes. rectly tightened, you should be able to keep the walking belt centered. PROBLEM: The walking belt slows when walked on , first remove the key and UNPLUG THE POWER CORD. Use only a UL-listed surge protector, rated ...
English Manual
Page 23
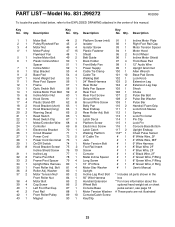
...93 1 Motor Tension Spacer Motor/Pulley/ 47 15 Plastic Fastener 94 1 Motor Hood Flywheel/ Fan 48 1 Shield 95 2 Front Wheel Incline Motor Bolt 49 2 Belt Guide 96 1 Incline Motor Shield Plastic Incline Motor 50 1 Book Holder 97 4 Thick Base Pad Spacer 51 1 Front Belly Pan 98 1 12Ó Audio Wire...Grommet Stop Bracket 53 4 Cable Tie Clamp 100 1 Allen Wrench Base Pad 54 4 Cable Tie 101 10 Base Pad Screw Hand Weight Set 55 1 Walking Belt 102 1 Lock Knob Rear Foot Spacer 56 1 24Ó Reed Harness 103 2 Extension Leg Frame 57 1 Rear Roller 104 2 Extension Leg Cap Optic ...
...93 1 Motor Tension Spacer Motor/Pulley/ 47 15 Plastic Fastener 94 1 Motor Hood Flywheel/ Fan 48 1 Shield 95 2 Front Wheel Incline Motor Bolt 49 2 Belt Guide 96 1 Incline Motor Shield Plastic Incline Motor 50 1 Book Holder 97 4 Thick Base Pad Spacer 51 1 Front Belly Pan 98 1 12Ó Audio Wire...Grommet Stop Bracket 53 4 Cable Tie Clamp 100 1 Allen Wrench Base Pad 54 4 Cable Tie 101 10 Base Pad Screw Hand Weight Set 55 1 Walking Belt 102 1 Lock Knob Rear Foot Spacer 56 1 24Ó Reed Harness 103 2 Extension Leg Frame 57 1 Rear Roller 104 2 Extension Leg Cap Optic ...


