
English Manual
Page 3
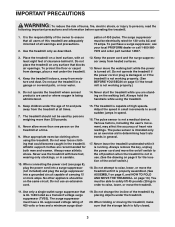
... treadmill only as an exercise aid in determining heart rate trends in general. 17. pation of high speeds. The surge suppressor must be on the walking belt. Do not place the treadmill on the treadmill at a time. 9. To protect the floor or carpet from damage, place a mat under the age of 12... allow more than 250 pounds. 8. Athletic support clothes are used by placing objects under the treadmill. 20. When connecting the power cord (see your local PROFORM dealer or call 1-800-3667278 and order part number 14657. 3. Do not use . (See the drawing on page 5 for 120 volts AC and 15 amps...
... treadmill only as an exercise aid in determining heart rate trends in general. 17. pation of high speeds. The surge suppressor must be on the walking belt. Do not place the treadmill on the treadmill at a time. 9. To protect the floor or carpet from damage, place a mat under the age of 12... allow more than 250 pounds. 8. Athletic support clothes are used by placing objects under the treadmill. 20. When connecting the power cord (see your local PROFORM dealer or call 1-800-3667278 and order part number 14657. 3. Do not use . (See the drawing on page 5 for 120 volts AC and 15 amps...
English Manual
Page 5
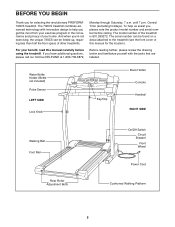
...Holder Console Handrail RIGHT SIDE Walking Belt Foot Rail Rear Roller Adjustment Bolts On/Off Switch Circuit Breaker Front Wheel Power Cord Cushioned Walking Platform 5 To help you get the most from your benefit, read this manual for selecting the revolutionary PROFORM¨ 730CS treadmill. The model number ... this manual carefully before calling. For your exercise program in the convenience and privacy of the treadmill is 831.299272. The 730CS treadmill combines advanced technology with the parts that are labeled. If you , please note the product model number and serial number...
...Holder Console Handrail RIGHT SIDE Walking Belt Foot Rail Rear Roller Adjustment Bolts On/Off Switch Circuit Breaker Front Wheel Power Cord Cushioned Walking Platform 5 To help you get the most from your benefit, read this manual for selecting the revolutionary PROFORM¨ 730CS treadmill. The model number ... this manual carefully before calling. For your exercise program in the convenience and privacy of the treadmill is 831.299272. The 730CS treadmill combines advanced technology with the parts that are labeled. If you , please note the product model number and serial number...

English Manual
Page 6
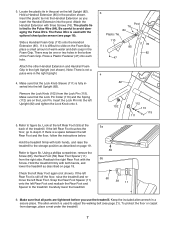
... requires the included allen wrench and your own phillips screwdriver . During shipping, a small amount of the treadmill walking belt is lubricant on the bottom. Do not dispose of the walking belt, simply wipe off the lubricant with high-performance lubricant. Make sure that both Extension Legs (103) are resting... position. With the help of the Extension Legs (103) into the treadmill as shown. This is completed. With the help of the walking belt or the shipping carton. While a second person tips the treadmill to one side and holds it, insert one becomes worn or needs to...
... requires the included allen wrench and your own phillips screwdriver . During shipping, a small amount of the treadmill walking belt is lubricant on the bottom. Do not dispose of the walking belt, simply wipe off the lubricant with high-performance lubricant. Make sure that both Extension Legs (103) are resting... position. With the help of the Extension Legs (103) into the treadmill as shown. This is completed. With the help of the walking belt or the shipping carton. While a second person tips the treadmill to one side and holds it, insert one becomes worn or needs to...
English Manual
Page 7
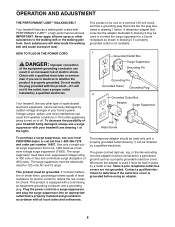
... the treadmill as you use the treadmill. The plastic tie is not a pulse wire in the Foam Grip. Note: There is tied to adjust the walking belt (see page 18). Refer to the right Upright (not shown). Hold the treadmill firmly with three Screws (76). Carefully lower the treadmill. 5a 59 5b...
... the treadmill as you use the treadmill. The plastic tie is not a pulse wire in the Foam Grip. Note: There is tied to adjust the walking belt (see page 18). Refer to the right Upright (not shown). Hold the treadmill firmly with three Screws (76). Carefully lower the treadmill. 5a 59 5b...
English Manual
Page 8
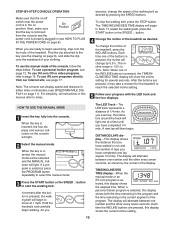
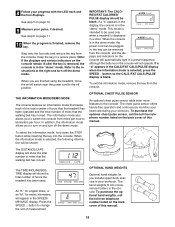
Voltage surges, spikes, and noise interference can result in your local PROFORM dealer or call toll-free 1-800-366-7278 and order part number 14657. Contact a qualified electrician to determine if the outlet box cover is equipped ... a minimum surge dissipation of your treadmill being turned on a nominal 120-volt circuit, and has a grounding plug that is for electric current to the walking belt or the walking platform. Plug the power cord into a surge suppressor, and plug the surge suppressor into an appropriate outlet that looks like the plug illustrated in...
Voltage surges, spikes, and noise interference can result in your local PROFORM dealer or call toll-free 1-800-366-7278 and order part number 14657. Contact a qualified electrician to determine if the outlet box cover is equipped ... a minimum surge dissipation of your treadmill being turned on a nominal 120-volt circuit, and has a grounding plug that is for electric current to the walking belt or the walking platform. Plug the power cord into a surge suppressor, and plug the surge suppressor into an appropriate outlet that looks like the plug illustrated in...
English Manual
Page 9
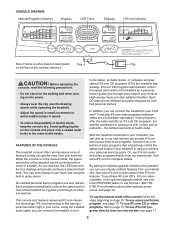
... console, read the following precautions. ¥ Do not stand on the walking belt when turning on the console and place only a sealed water bottle in pulse sensor. Avoid spilling liquids on the power. ¥ Always wear the clip (see your local PROFORM dealer or call toll-free 1-800-7350768. The console also features...
... console, read the following precautions. ¥ Do not stand on the walking belt when turning on the console and place only a sealed water bottle in pulse sensor. Avoid spilling liquids on the power. ¥ Always wear the clip (see your local PROFORM dealer or call toll-free 1-800-7350768. The console also features...
English Manual
Page 10
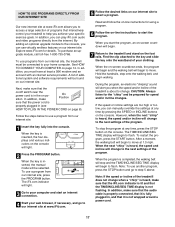
...incline range is selected, press the PROGRAM button repeatedly to select the manual mode. 3 Press the START button or the SPEED v button to start the walking belt. HOW TO USE THE MANUAL MODE 1 Insert the key fully into the console. If a program is 1.5% to flash. Hold the handrails and carefully ...time remaining in the program and the time remaining in the on the console will change the incline of the INCLINE buttons is pressed, the walking belt will alternate between one number and the other every seven seconds. Each time the INCLINE buttons are ready to move at a time until ...
...incline range is selected, press the PROGRAM button repeatedly to select the manual mode. 3 Press the START button or the SPEED v button to start the walking belt. HOW TO USE THE MANUAL MODE 1 Insert the key fully into the console. If a program is 1.5% to flash. Hold the handrails and carefully ...time remaining in the program and the time remaining in the on the console will change the incline of the INCLINE buttons is pressed, the walking belt will alternate between one number and the other every seven seconds. Each time the INCLINE buttons are ready to move at a time until ...
English Manual
Page 11
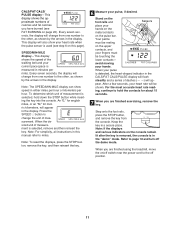
... the unit of dashes (Ñ Ñ) will be touching the lower contactsÑ avoid moving your pulse, if desired. When the desired unit of the walking belt and your current pace (pace is used (see FAT BURNING on the upper contacts, and your fingers must be shown. Note: To reset the displays...
... the unit of dashes (Ñ Ñ) will be touching the lower contactsÑ avoid moving your pulse, if desired. When the desired unit of the walking belt and your current pace (pace is used (see FAT BURNING on the upper contacts, and your fingers must be shown. Note: To reset the displays...
English Manual
Page 12
... incline setting are finished using the treadmill, move the on page 10. 6 Measure your progress with the LED track and the four displays. The walking belt will begin walking. If the speed or incline setting for the program. To stop . When the program has ended, remove the key from the console. Note: If...
... incline setting are finished using the treadmill, move the on page 10. 6 Measure your progress with the LED track and the four displays. The walking belt will begin walking. If the speed or incline setting for the program. To stop . When the program has ended, remove the key from the console. Note: If...
English Manual
Page 16
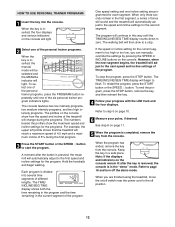
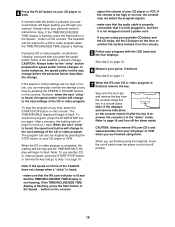
...TIME/INCLINE/SEG TIME display is not flashing. During the CD or video program, an electronic ÒchirpingÓ sound will change . After a moment, the walking belt will begin to step 1 on the console. Step onto the foot rails and remove the key from your CD player or VCR when you are...16 When the CD or video program is flashing. Refer to a CD or video program when the TIME/INCLINE/SEG TIME display is completed, the walking belt will stop the program at 1 mph. Note: To use another flat surface instead of your progress with the LED track and the four displays. Note...
...TIME/INCLINE/SEG TIME display is not flashing. During the CD or video program, an electronic ÒchirpingÓ sound will change . After a moment, the walking belt will begin to step 1 on the console. Step onto the foot rails and remove the key from your CD player or VCR when you are...16 When the CD or video program is flashing. Refer to a CD or video program when the TIME/INCLINE/SEG TIME display is completed, the walking belt will stop the program at 1 mph. Note: To use another flat surface instead of your progress with the LED track and the four displays. Note...
English Manual
Page 17
... pressing the SPEED or INCLINE buttons on our internet site to move . To restart the program, press the START button. After a moment, the walking belt will begin to step 5 above. When the program is inserted, the four displays and various indicators on the console will light. 3 Go to.... Read and follow the on -screen countdown will begin to flash. When the on-screen countdown ends, the program will begin and the walking belt will begin to start the program, an on -line instructions for details. Note: To use virtually endless features on the console. When the...
... pressing the SPEED or INCLINE buttons on our internet site to move . To restart the program, press the START button. After a moment, the walking belt will begin to step 5 above. When the program is inserted, the four displays and various indicators on the console will light. 3 Go to.... Read and follow the on -screen countdown will begin to flash. When the on-screen countdown ends, the program will begin and the walking belt will begin to start the program, an on -line instructions for details. Note: To use virtually endless features on the console. When the...
English Manual
Page 18
See step 6 on the back cover of miles that the walking belt has moved. When you to kilometers per hour to turn on /off switch near the power cord to the instructions at the right and turn ... plugged in your pulse, if desired. TIME display will appear in a secure place. Press the SPEED v button to change the unit of miles that the walking belt has moved.
See step 6 on the back cover of miles that the walking belt has moved. When you to kilometers per hour to turn on /off switch near the power cord to the instructions at the right and turn ... plugged in your pulse, if desired. TIME display will appear in a secure place. Press the SPEED v button to change the unit of miles that the walking belt has moved.
English Manual
Page 21
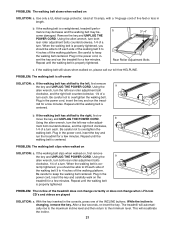
... Plug in the power cord, insert the key and run the treadmill for a few minutes. Repeat until the walking belt is off the walking platform. If the walking belt has shifted to the minimum level. Using the a allen wrench, turn the left rear roller adjustment bolt clockwise,... properly tightened, you should be able to lift each . Be careful to overtighten the walking belt. If the walking belt still slows when walked on SOLUTION: a. If the walking belt has shifted to keep the walking belt centered. Be careful to the right, first re- Be careful not to 4 inches off...
... Plug in the power cord, insert the key and run the treadmill for a few minutes. Repeat until the walking belt is off the walking platform. If the walking belt has shifted to the minimum level. Using the a allen wrench, turn the left rear roller adjustment bolt clockwise,... properly tightened, you should be able to lift each . Be careful to overtighten the walking belt. If the walking belt still slows when walked on SOLUTION: a. If the walking belt has shifted to keep the walking belt centered. Be careful to the right, first re- Be careful not to 4 inches off...
English Manual
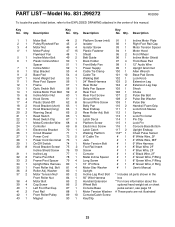
Page 23
...4 Platform Screw 115 1 Lock Pin Controller 69 8 Electronics Screw 116 1 Console Base Bottom Electronics Bracket 70 1 Latch Catch 117 2 Upright Endcap Circuit Breaker 71 1 Walking Platform 118** 1 Chest Pulse Sensor Power Cord 72 5 8Ó Cable Tie # 1 8Ó White Wire, 2F Power Cord Grommet 73 1 Jack # 1 4Ó...Stop Bracket 53 4 Cable Tie Clamp 100 1 Allen Wrench Base Pad 54 4 Cable Tie 101 10 Base Pad Screw Hand Weight Set 55 1 Walking Belt 102 1 Lock Knob Rear Foot Spacer 56 1 24Ó Reed Harness 103 2 Extension Leg Frame 57 1 Rear Roller 104 2 Extension Leg ...
...4 Platform Screw 115 1 Lock Pin Controller 69 8 Electronics Screw 116 1 Console Base Bottom Electronics Bracket 70 1 Latch Catch 117 2 Upright Endcap Circuit Breaker 71 1 Walking Platform 118** 1 Chest Pulse Sensor Power Cord 72 5 8Ó Cable Tie # 1 8Ó White Wire, 2F Power Cord Grommet 73 1 Jack # 1 4Ó...Stop Bracket 53 4 Cable Tie Clamp 100 1 Allen Wrench Base Pad 54 4 Cable Tie 101 10 Base Pad Screw Hand Weight Set 55 1 Walking Belt 102 1 Lock Knob Rear Foot Spacer 56 1 24Ó Reed Harness 103 2 Extension Leg Frame 57 1 Rear Roller 104 2 Extension Leg ...


