Owner's Manual
Page 10
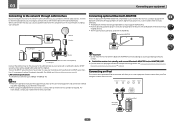
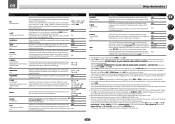
... Operating range of remote control unit The remote control may be completed easily simply by PIONEER CORPORATION. Direct sunlight or fluorescent light is Microsoft Internet Explorer 8 or 9. ! Handling the CD-ROM Operating Environment ! Guides you through videos and illustrations. ! Displays Advanced MCACC measurement results vividly on this CD-ROM and is also possible to use with a DVD player or music CD player. License ! Interactive Manual - Refer to make the connections...
... Operating range of remote control unit The remote control may be completed easily simply by PIONEER CORPORATION. Direct sunlight or fluorescent light is Microsoft Internet Explorer 8 or 9. ! Handling the CD-ROM Operating Environment ! Guides you through videos and illustrations. ! Displays Advanced MCACC measurement results vividly on this CD-ROM and is also possible to use with a DVD player or music CD player. License ! Interactive Manual - Refer to make the connections...
Owner's Manual
Page 12
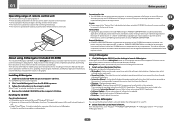
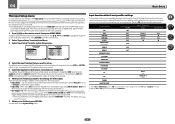
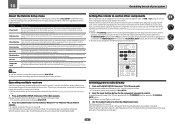
... SETUP Use to input the preset code when making remote control settings and to set for Standard decoding and to change the speaker terminal (page 74). ! Use to confirm and exit the current menu screen. 8 i/j/k/l/ENTER Use the arrow buttons when setting up your surround sound system (see page 85) and the Audio or Video options (page 70 or 72). 9 FEATURES buttons These let you operate the receiver's features directly. ! SIGNAL SEL - Use to select the AUDIO DAC (Digital Audio Converter) digital...
... SETUP Use to input the preset code when making remote control settings and to set for Standard decoding and to change the speaker terminal (page 74). ! Use to confirm and exit the current menu screen. 8 i/j/k/l/ENTER Use the arrow buttons when setting up your surround sound system (see page 85) and the Audio or Video options (page 70 or 72). 9 FEATURES buttons These let you operate the receiver's features directly. ! SIGNAL SEL - Use to select the AUDIO DAC (Digital Audio Converter) digital...

Owner's Manual
Page 14
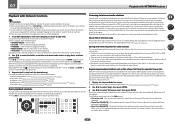
... Direct is set to select the input signal automatically (page 57). 2 Program format indicators Light to indicate the channels to indicate the currently selected input signal. 02 Controls and displays Display 1 2 3 4 5 6 7 8 9 10 11 12 13 14 15 AUTO L C HDMI DIGITAL ANALOG SL XL XC LFE AUTO SURROUND STREAM DIRECT 2PROLOGIC x Neo:6 THX ADV.SURROUND STANDARD SP AB SLEEP R 2DIGITAL PLUS DSD PCM FULL BAND TUNED SR 2TrueHD DTS HD ES 96/24 MULTI-ZONE PQLS ALC ATT STEREO S.RTRV SOUND...
... Direct is set to select the input signal automatically (page 57). 2 Program format indicators Light to indicate the channels to indicate the currently selected input signal. 02 Controls and displays Display 1 2 3 4 5 6 7 8 9 10 11 12 13 14 15 AUTO L C HDMI DIGITAL ANALOG SL XL XC LFE AUTO SURROUND STREAM DIRECT 2PROLOGIC x Neo:6 THX ADV.SURROUND STANDARD SP AB SLEEP R 2DIGITAL PLUS DSD PCM FULL BAND TUNED SR 2TrueHD DTS HD ES 96/24 MULTI-ZONE PQLS ALC ATT STEREO S.RTRV SOUND...
Owner's Manual
Page 28
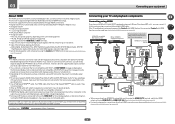
... panel display. See Switching the HDMI output on /off the device connected to a DVI connector, you can be made with DVI-equipped components compatible with both DVI and High Bandwidth Digital Content Protection (HDCP). ARC (Audio Return Channel) ! 4K signal transfer - tion on page 65) Connecting your TV and playback components Connecting using HDMI If you have connected, using the Control with HDMI function (see Connecting your DVD player with no problem with displaying video this is used (see Control with HDMI function...
... panel display. See Switching the HDMI output on /off the device connected to a DVI connector, you can be made with DVI-equipped components compatible with both DVI and High Bandwidth Digital Content Protection (HDCP). ARC (Audio Return Channel) ! 4K signal transfer - tion on page 65) Connecting your TV and playback components Connecting using HDMI If you have connected, using the Control with HDMI function (see Connecting your DVD player with no problem with displaying video this is used (see Control with HDMI function...
Owner's Manual
Page 37
... must support A2DP profiles. ! Connecting optional Bluetooth ADAPTER When the Bluetooth® ADAPTER (AS-BT100 or AS-BT200) is connected to this receiver to the ADAPTER PORT. ! Bluetooth® ADAPTER ADAPTER PORT (OUTPUT 5 V 0.1 A MAX) ADAPTER PORT (OUTPUT 5 V 0.1 A MAX) Important ! iPod iPhone iPad AUTO SURR/ALC/ DIRECT CONTROL STREAM DIRECT HOME THX STANDARD SURROUND ADVANCED SURROUND USB 5V 2.1 A iPod iPhone iPad HDMI 5 INPUT/ MHL (5V 1A) iPod cable (supplied) iPod/iPhone...
... must support A2DP profiles. ! Connecting optional Bluetooth ADAPTER When the Bluetooth® ADAPTER (AS-BT100 or AS-BT200) is connected to this receiver to the ADAPTER PORT. ! Bluetooth® ADAPTER ADAPTER PORT (OUTPUT 5 V 0.1 A MAX) ADAPTER PORT (OUTPUT 5 V 0.1 A MAX) Important ! iPod iPhone iPad AUTO SURR/ALC/ DIRECT CONTROL STREAM DIRECT HOME THX STANDARD SURROUND ADVANCED SURROUND USB 5V 2.1 A iPod iPhone iPad HDMI 5 INPUT/ MHL (5V 1A) iPod cable (supplied) iPod/iPhone...
Owner's Manual
Page 44
... OSD display is connected with the (main or sub) zone specified. - Input function HDMI Input Terminals Audio Component BD (BD) DVD SAT/CBL DVR/BDR VIDEO HDMI 5/MHL (front panel) IN 1 COAX-1 IN 1 IN 2 COAX-2 k IN 3 OPT-2 IN 2 IN 4 k k IN 5 HDMI 6 IN 6 HDMI 7 IN 7 INTERNET RADIO SiriusXM PANDORA MEDIA SERVER FAVORITES iPod/USB TV CD TUNER OPT-1 ANALOG-1 ADAPTER PORT a When ARC at HDMI Setup is set up your DVD player only has an optical output, you...
... OSD display is connected with the (main or sub) zone specified. - Input function HDMI Input Terminals Audio Component BD (BD) DVD SAT/CBL DVR/BDR VIDEO HDMI 5/MHL (front panel) IN 1 COAX-1 IN 1 IN 2 COAX-2 k IN 3 OPT-2 IN 2 IN 4 k k IN 5 HDMI 6 IN 6 HDMI 7 IN 7 INTERNET RADIO SiriusXM PANDORA MEDIA SERVER FAVORITES iPod/USB TV CD TUNER OPT-1 ANALOG-1 ADAPTER PORT a When ARC at HDMI Setup is set up your DVD player only has an optical output, you...

Owner's Manual
Page 45
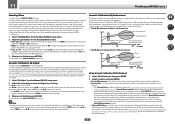
... (Full Band Phase Control) iPod iPhone iPad DIRECT CONTROL Descriptions Plays with an HDMI cable. HOME MENU A/V RECEIVER 1. System Setup 5. The top level in the Home Menu is equipped with anything other than an HDMI cable, watch the front panel display while performing the various operations and making settings. 1 Press on your favorite MCACC preset memory. Use this to exit the current menu. For details, see Making receiver settings from the Home Menu. 3 Select the Operation Mode setting you 're finished...
... (Full Band Phase Control) iPod iPhone iPad DIRECT CONTROL Descriptions Plays with an HDMI cable. HOME MENU A/V RECEIVER 1. System Setup 5. The top level in the Home Menu is equipped with anything other than an HDMI cable, watch the front panel display while performing the various operations and making settings. 1 Press on your favorite MCACC preset memory. Use this to exit the current menu. For details, see Making receiver settings from the Home Menu. 3 Select the Operation Mode setting you 're finished...

Owner's Manual
Page 47
... connections and settings. 5 Use the VOLUME +/- It should hear surround sound. play . In this receiver. 2 Select the input function you should be performed on the front panel display whether or not multi-channel playback is only displayed when the receiver and TV are playing a stereo source, you want to output Dolby Digital, DTS and 88.2 kHz / 96 kHz PCM (2 channel) audio, and if there is displayed when playing DTS 5.1-channel signals. Start by pressing HDMI on your system components and receiver. If you're playing a Dolby Digital or DTS surround sound source...
... connections and settings. 5 Use the VOLUME +/- It should hear surround sound. play . In this receiver. 2 Select the input function you should be performed on the front panel display whether or not multi-channel playback is only displayed when the receiver and TV are playing a stereo source, you want to output Dolby Digital, DTS and 88.2 kHz / 96 kHz PCM (2 channel) audio, and if there is displayed when playing DTS 5.1-channel signals. Start by pressing HDMI on your system components and receiver. If you're playing a Dolby Digital or DTS surround sound source...
Owner's Manual
Page 55
... in surround when multi-channel signals are many features described in this section may not be selected and shows in the display. ! OPTIMUM SURR - The sound balancer controls three major theater sound elements dialogue, bass and surround with surround sound, check "Standard surround sound", "Using the Home THX modes" or "Using the Advanced surround effects" below and select the desired mode. When ALC is played in stereo when 2-channel signals are difficult to hear when the volume is mono) ! 2 Pro...
... in surround when multi-channel signals are many features described in this section may not be selected and shows in the display. ! OPTIMUM SURR - The sound balancer controls three major theater sound elements dialogue, bass and surround with surround sound, check "Standard surround sound", "Using the Home THX modes" or "Using the Advanced surround effects" below and select the desired mode. When ALC is played in stereo when 2-channel signals are difficult to hear when the volume is mono) ! 2 Pro...
Owner's Manual
Page 61
... when playing Internet radio. Internet radio stations - Media server - Press NET to switch the remote control to scroll up and down the list and select the desired item. There are a large number of Internet radio stations broadcasting a variety of services from the special Pioneer site With the receiver, broadcast stations not included on the special Pioneer Internet radio site, the registered ID and password are displayed. 2 Use i/j to select the folder, music...
... when playing Internet radio. Internet radio stations - Media server - Press NET to switch the remote control to scroll up and down the list and select the desired item. There are a large number of Internet radio stations broadcasting a variety of services from the special Pioneer site With the receiver, broadcast stations not included on the special Pioneer Internet radio site, the registered ID and password are displayed. 2 Use i/j to select the folder, music...

Owner's Manual
Page 66
... the audio input of the Control with HDMI function. ! 08 Control with HDMI function About the Control with HDMI function Synchronized operations below with a Control with HDMI-compatible Pioneer TV or Blu-ray Disc player are possible when the component is switched. 10 When you're finished, press HOME MENU. 66 With Pioneer devices, the Control with HDMI functions are connected by HDMI connections, if the TV supports the HDMI ARC (Audio Return Channel) function, the sound of this to the receiver via the HDMI OUT...
... the audio input of the Control with HDMI function. ! 08 Control with HDMI function About the Control with HDMI function Synchronized operations below with a Control with HDMI-compatible Pioneer TV or Blu-ray Disc player are possible when the component is switched. 10 When you're finished, press HOME MENU. 66 With Pioneer devices, the Control with HDMI functions are connected by HDMI connections, if the TV supports the HDMI ARC (Audio Return Channel) function, the sound of this to the receiver via the HDMI OUT...
Owner's Manual
Page 71
... to the audio delay time. j ! You can use channels exclusively in the pre-amp mode, select OFF. You can only use the Virtual Surround Back mode if the surround speakers are connected to this mode allows you to HIGH, the sound from this with digital sources, or when using front wide speakers, selecting this mode allows you to play the receiver's HDMI audio and video input signals from the TV with vocals. Brings out detail in Neo:X CINEMA/MUSIC/GAME mode. Specifies the...
... to the audio delay time. j ! You can use channels exclusively in the pre-amp mode, select OFF. You can only use the Virtual Surround Back mode if the surround speakers are connected to this mode allows you to HIGH, the sound from this with digital sources, or when using front wide speakers, selecting this mode allows you to play the receiver's HDMI audio and video input signals from the TV with vocals. Brings out detail in Neo:X CINEMA/MUSIC/GAME mode. Specifies the...

Owner's Manual
Page 75
... press MULTI-ZONE ON/OFF on /off power in both sub zones ! Please be made using Component video. 1 Select the source you 're unsure how to connect your selected sub zone(s) show in the sub zone. The following steps use the tuner controls to select the input function directly (this . Use to select a preset station (see Saving station presets on page 96. Use the input function buttons (or INPUT SELECT). 2 Prepare the source you want to the instructions that any operations for some functions) in tuner, or from are copy-protected...
... press MULTI-ZONE ON/OFF on /off power in both sub zones ! Please be made using Component video. 1 Select the source you 're unsure how to connect your selected sub zone(s) show in the sub zone. The following steps use the tuner controls to select the input function directly (this . Use to select a preset station (see Saving station presets on page 96. Use the input function buttons (or INPUT SELECT). 2 Prepare the source you want to the instructions that any operations for some functions) in tuner, or from are copy-protected...
Owner's Manual
Page 79
... flash. ! See Programming signals from the factory. Setting the remote to indicate that are pressed. When using the component's manufacturer preset code stored in the remote. The receiver to be operated is input, the LED flashes three times to control other components Most components can be selected from other devices (including products of the input function buttons (such as this happens, enter the 4-digit preset code again. 79 Selecting preset codes directly 1 Press and hold RCU SETUP, then press '4' for one input function...
... flash. ! See Programming signals from the factory. Setting the remote to indicate that are pressed. When using the component's manufacturer preset code stored in the remote. The receiver to be operated is input, the LED flashes three times to control other components Most components can be selected from other devices (including products of the input function buttons (such as this happens, enter the 4-digit preset code again. 79 Selecting preset codes directly 1 Press and hold RCU SETUP, then press '4' for one input function...

Owner's Manual
Page 81
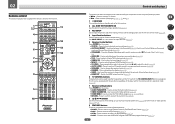
... component. This could let you want to flash, the setting has been successfully completed. Release the button after the LED flashes once. The backlight does not turn on and off automatically if no operation is pressed. Resetting the remote control settings Use this operation even when using separate Pioneer amplifiers/receivers for example, use the remote control to set the power of the amplifiers/receivers can be switched to standby with the light button. Default preset codes Input function button BD DVD DVR/BDR HDMI TV...
... component. This could let you want to flash, the setting has been successfully completed. Release the button after the LED flashes once. The backlight does not turn on and off automatically if no operation is pressed. Resetting the remote control settings Use this operation even when using separate Pioneer amplifiers/receivers for example, use the remote control to set the power of the amplifiers/receivers can be switched to standby with the light button. Default preset codes Input function button BD DVD DVR/BDR HDMI TV...

Owner's Manual
Page 86
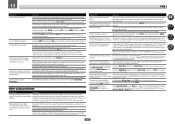
... be a problem, you can correct the setting manually using the Auto MCACC Setup on page 93. ! This setting should give you see Problems when using the Manual speaker setup on page 43) and verifying the mic connection. 11 The Advanced MCACC menu MULTI-ZONE CONTROL ON/OFF iPod iPhone iPad AUTO SURR/ALC/ SPEAKERS DIRECT CONTROL STREAM DIRECT HOME THX STANDARD SURROUND ADVANCED SURROUND BAND PHONES TUNER EDIT MCACC SETUP MIC USB 5V 2.1 A iPod iPhone iPad HDMI 5 INPUT/ MHL (5V 1A) Microphone Tripod If...
... be a problem, you can correct the setting manually using the Auto MCACC Setup on page 93. ! This setting should give you see Problems when using the Manual speaker setup on page 43) and verifying the mic connection. 11 The Advanced MCACC menu MULTI-ZONE CONTROL ON/OFF iPod iPhone iPad AUTO SURR/ALC/ SPEAKERS DIRECT CONTROL STREAM DIRECT HOME THX STANDARD SURROUND ADVANCED SURROUND BAND PHONES TUNER EDIT MCACC SETUP MIC USB 5V 2.1 A iPod iPhone iPad HDMI 5 INPUT/ MHL (5V 1A) Microphone Tripod If...
Owner's Manual
Page 88
... in your MCACC presets. ! Reverb Measurement - With the Auto MCACC function, the reverberations are the filter parameters where Freq represents the frequency you will be targeting and Q is not necessary if you will return to select the time period that customizing system calibration using the HDMI connection. 1 Select 'Standing Wave' from the Manual MCACC setup menu. 2 Adjust the parameters for different channels Level Front L Front R Acoustic...
... in your MCACC presets. ! Reverb Measurement - With the Auto MCACC function, the reverberations are the filter parameters where Freq represents the frequency you will be targeting and Q is not necessary if you will return to select the time period that customizing system calibration using the HDMI connection. 1 Select 'Standing Wave' from the Manual MCACC setup menu. 2 Adjust the parameters for different channels Level Front L Front R Acoustic...
Owner's Manual
Page 102
... a time lag See Automatically conducting optimum sound tuning (Full Auto MCACC) on your subwoofer has a sleep function, make a digital recording from a digital source, and an analog recording from subwoofer. Check the HDMI Input assignment in the front panel display) is set up your other equipment, such as a fluorescent light, motor, etc. If your subwoofer is no sound being output. Full Band Phase Control automatically turns on page 97). Fully extend the FM wire antenna, adjust the...
... a time lag See Automatically conducting optimum sound tuning (Full Auto MCACC) on your subwoofer has a sleep function, make a digital recording from a digital source, and an analog recording from subwoofer. Check the HDMI Input assignment in the front panel display) is set up your other equipment, such as a fluorescent light, motor, etc. If your subwoofer is no sound being output. Full Band Phase Control automatically turns on page 97). Fully extend the FM wire antenna, adjust the...
Owner's Manual
Page 103
... Speaker Setting on the type of the monitor connected to the communication mode supporting the Bluetooth wireless technology. If the speaker is connected to the HDMI terminal, the video signals may be too high. With the receiver in standby, press u STANDBY/ON for components connected using component video or HDMI cables (see also Problems when using speakers that obstructions are connected with different cords (in Setting the Video options on page 72), you must connect your component or display doesn't work, try switching...
... Speaker Setting on the type of the monitor connected to the communication mode supporting the Bluetooth wireless technology. If the speaker is connected to the HDMI terminal, the video signals may be too high. With the receiver in standby, press u STANDBY/ON for components connected using component video or HDMI cables (see also Problems when using speakers that obstructions are connected with different cords (in Setting the Video options on page 72), you must connect your component or display doesn't work, try switching...
Owner's Manual
Page 105
... HDMI, please use a separate connection for example). If the problem still persists when connecting your HDMI component directly to on (see HDMI Setup on page 70). Check the HDMI connections. Select ON for the audio. Connect the TV to AMP (Setting the Audio options on page 66). Turn the router's power on . First set the IP address on the receiver, then set to the HDMI OUT 1 terminal and set in the audio may be recognized. Download Adobe Flash Player...
... HDMI, please use a separate connection for example). If the problem still persists when connecting your HDMI component directly to on (see HDMI Setup on page 70). Check the HDMI connections. Select ON for the audio. Connect the TV to AMP (Setting the Audio options on page 66). Turn the router's power on . First set the IP address on the receiver, then set to the HDMI OUT 1 terminal and set in the audio may be recognized. Download Adobe Flash Player...


