
Owner's Manual
Page 1
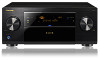
Operating Instructions AV Receiver 65 SC-
Operating Instructions AV Receiver 65 SC-
Owner's Manual
Page 2
... wall socket when left unused for a long period of time (for help. Reorient or relocate the receiving antenna. - D8-10-2_A1_En WARNING: Handling the cord on proposition 65 known to the State of California and other governmental entities to cause cancer and birth defect or other apparatus... as a lighted candle) on the power supply cord of this equipment does cause harmful interference to radio or television reception, which the receiver is connected. - IMPORTANT CAUTION RISK OF ELECTRIC SHOCK DO NOT OPEN The lightning flash with arrowhead symbol, within an equilateral triangle, is...
... wall socket when left unused for a long period of time (for help. Reorient or relocate the receiving antenna. - D8-10-2_A1_En WARNING: Handling the cord on proposition 65 known to the State of California and other governmental entities to cause cancer and birth defect or other apparatus... as a lighted candle) on the power supply cord of this equipment does cause harmful interference to radio or television reception, which the receiver is connected. - IMPORTANT CAUTION RISK OF ELECTRIC SHOCK DO NOT OPEN The lightning flash with arrowhead symbol, within an equilateral triangle, is...
Owner's Manual
Page 4
... TV and playback components...28 Connecting an HDD/DVD recorder, BD recorder and other video sources 31 Connecting a satellite/cable receiver or other set-top box 32 Connecting other functions Setting the Audio options...70 Setting the Video options...72 Switching the speaker...MHL-compatible device...50 Listening to the radio...51 Bluetooth ADAPTER for buying this Pioneer product. Contents 01 Before you start Checking what's in the box...8 Our philosophy...8 Features...8 Installing the receiver...9 Loading the batteries...9 Operating range of playback using the listening modes 55 ...
... TV and playback components...28 Connecting an HDD/DVD recorder, BD recorder and other video sources 31 Connecting a satellite/cable receiver or other set-top box 32 Connecting other functions Setting the Audio options...70 Setting the Video options...72 Switching the speaker...MHL-compatible device...50 Listening to the radio...51 Bluetooth ADAPTER for buying this Pioneer product. Contents 01 Before you start Checking what's in the box...8 Our philosophy...8 Features...8 Installing the receiver...9 Loading the batteries...9 Operating range of playback using the listening modes 55 ...
Owner's Manual
Page 5
...) and DISCRETE ON (Discrete On) functions 81 Resetting the remote control settings...81 Controlling components...82 11 The Advanced MCACC menu Making receiver settings from the Advanced MCACC menu 85 Automatic MCACC (Expert)...85 Manual MCACC setup...87 Checking MCACC Data...89 Data Management...90 14 ...the unit...114 Glossary...115 Features index...118 Specifications...119 Preset code list...120 12 The System Setup and Other Setup menus Making receiver settings from the System Setup menu 93 Manual speaker setup...93 Network Setup menu...95 Checking the Network Information...96 The Other ...
...) and DISCRETE ON (Discrete On) functions 81 Resetting the remote control settings...81 Controlling components...82 11 The Advanced MCACC menu Making receiver settings from the Advanced MCACC menu 85 Automatic MCACC (Expert)...85 Manual MCACC setup...87 Checking MCACC Data...89 Data Management...90 14 ...the unit...114 Glossary...115 Features index...118 Specifications...119 Preset code list...120 12 The System Setup and Other Setup menus Making receiver settings from the System Setup menu 93 Manual speaker setup...93 Network Setup menu...95 Checking the Network Information...96 The Other ...
Owner's Manual
Page 6
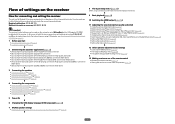
...) (page 42) j 7 MCACC speaker settings ! For instructions on using AVNavigator, see About using Wiring Navi on the AVNavigator CD-ROM included with the receiver. Connecting AM/FM antennas on page 9 j 2 Determining the speakers' application (page 19) ! [A] 9.2 channel surround system (Front height/Front wide) connection... 6 The Advanced MCACC menu (page 84) ! Flow of settings on the receiver Flow for connecting and setting the receiver The unit is a full-fledged AV receiver equipped with HDMI function (page 65) ! Loading the batteries on page 34 ! In this case, virtually the...
...) (page 42) j 7 MCACC speaker settings ! For instructions on using AVNavigator, see About using Wiring Navi on the AVNavigator CD-ROM included with the receiver. Connecting AM/FM antennas on page 9 j 2 Determining the speakers' application (page 19) ! [A] 9.2 channel surround system (Front height/Front wide) connection... 6 The Advanced MCACC menu (page 84) ! Flow of settings on the receiver Flow for connecting and setting the receiver The unit is a full-fledged AV receiver equipped with HDMI function (page 65) ! Loading the batteries on page 34 ! In this case, virtually the...

Owner's Manual
Page 7
Before you start Checking what's in the box...8 Our philosophy...8 Features...8 Installing the receiver...9 Loading the batteries...9 Operating range of remote control unit 10 About using AVNavigator (included CD-ROM 10 7
Before you start Checking what's in the box...8 Our philosophy...8 Features...8 Installing the receiver...9 Loading the batteries...9 Operating range of remote control unit 10 About using AVNavigator (included CD-ROM 10 7

Owner's Manual
Page 8
... connected to the SC-65 and play them with a more subtle musical expression. % Sound Retriever Link By connecting a Pioneer player supporting the Sound Retriever Link function, compressed audio files played on the latest high performance Class D amplifier and integrating the essence of Pioneer's high sound quality designs. Also, Operation Guide describes the receiver's playback operations...
... connected to the SC-65 and play them with a more subtle musical expression. % Sound Retriever Link By connecting a Pioneer player supporting the Sound Retriever Link function, compressed audio files played on the latest high performance Class D amplifier and integrating the essence of Pioneer's high sound quality designs. Also, Operation Guide describes the receiver's playback operations...
Owner's Manual
Page 9
... this unit, make sure to check initial operations; When disposing of batteries may result in places that gives off . Installing the receiver ! CAUTION Incorrect use or store batteries in places that have a longer life. in your country/area. 9 Batteries with the unit... are very dusty - Don't install it on the following precautions: ! When installing this receiver's bottom panel while the power is vibration or other excessively hot place, such as a kitchen) ! We recommend using Advanced MCACC The...
... this unit, make sure to check initial operations; When disposing of batteries may result in places that gives off . Installing the receiver ! CAUTION Incorrect use or store batteries in places that have a longer life. in your country/area. 9 Batteries with the unit... are very dusty - Don't install it on the following precautions: ! When installing this receiver's bottom panel while the power is vibration or other excessively hot place, such as a kitchen) ! We recommend using Advanced MCACC The...
Owner's Manual
Page 10
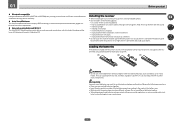
...AVNavigator. Attempting to them when using this CD-ROM and is granted under license by PIONEER CORPORATION. PIONEER CORPORATION does not guarantee the operation of this CD-ROM with the receiver, updating of various types of this CD-ROM. Wiring Navi only starts up . ...1 Click [AVNavigator 2012.III] on 3D graphs. Detection - From the Start menu, click "Program" d "PIONEER CORPORATION" d "AVNavigator 2012.III" d "Uninstall AVNavigator 2012.III". 10 The receiver is operated simultaneously with another infrared remote control unit. 30° 30° 7 m (23 ft.) About ...
...AVNavigator. Attempting to them when using this CD-ROM and is granted under license by PIONEER CORPORATION. PIONEER CORPORATION does not guarantee the operation of this CD-ROM with the receiver, updating of various types of this CD-ROM. Wiring Navi only starts up . ...1 Click [AVNavigator 2012.III] on 3D graphs. Detection - From the Start menu, click "Program" d "PIONEER CORPORATION" d "AVNavigator 2012.III" d "Uninstall AVNavigator 2012.III". 10 The receiver is operated simultaneously with another infrared remote control unit. 30° 30° 7 m (23 ft.) About ...
Owner's Manual
Page 12
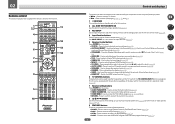
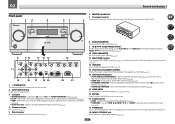
... input set the remote control mode (page 79). 4 Input function buttons Press to access: ! STANDARD - Press for the receiver. 1 2,3 4 5 6 7 8 9 5 10 RECEIVER ALL ZONE STBY SOURCE DISCRETE ON RCU SETUP BDR BD DVD DVR HDMI TV CD NET ADPT USB CBL iPod SAT MHL TUNER...SLEEP 7 8 9 CH D.ACCESS HDMI OUT CLASS / CLR 0 ENTER CH ZONE 2 ZONE 3 ZONE 4 LIGHT Z2 Z3 Z4 11 12 13 14 15 RECEIVER Controls and displays The remote has been conveniently color-coded according to component control using the following system: ! Press repeatedly to select a channel, then use...
... input set the remote control mode (page 79). 4 Input function buttons Press to access: ! STANDARD - Press for the receiver. 1 2,3 4 5 6 7 8 9 5 10 RECEIVER ALL ZONE STBY SOURCE DISCRETE ON RCU SETUP BDR BD DVD DVR HDMI TV CD NET ADPT USB CBL iPod SAT MHL TUNER...SLEEP 7 8 9 CH D.ACCESS HDMI OUT CLASS / CLR 0 ENTER CH ZONE 2 ZONE 3 ZONE 4 LIGHT Z2 Z3 Z4 11 12 13 14 15 RECEIVER Controls and displays The remote has been conveniently color-coded according to component control using the following system: ! Press repeatedly to select a channel, then use...

Owner's Manual
Page 13
The way the buttons light can be used to select the white commands). Note ! Also use this receiver, ZONE 4 button cannot be selected from the remote control. 12 Switches the remote to control the receiver (used . Switch to set the listening volume. 14 MUTE Mutes the sound or restores the sound if it...
The way the buttons light can be used to select the white commands). Note ! Also use this receiver, ZONE 4 button cannot be selected from the remote control. 12 Switches the remote to control the receiver (used . Switch to set the listening volume. 14 MUTE Mutes the sound or restores the sound if it...

Owner's Manual
Page 14
... 55). ! Lights during DSD (Direct Stream Digital) to indicate the input function you have selected. 15 Scroll indicators Light when there are being received in the corresponding format is detected. ! 2 DIGITAL - AUTO SURROUND - ALC - Lights when one of an analog signal (page 70). ... items when making the various settings. 16 Speaker indicators Lights to 1.) (page 97) 14 PCM - STREAM DIRECT - AUTO lights when the receiver is switched on . 8 Analog signal indicators Light to indicate the currently selected input signal. Left front/Right front channel ! DTS - DTS...
... 55). ! Lights during DSD (Direct Stream Digital) to indicate the input function you have selected. 15 Scroll indicators Light when there are being received in the corresponding format is detected. ! 2 DIGITAL - AUTO SURROUND - ALC - Lights when one of an analog signal (page 70). ... items when making the various settings. 16 Speaker indicators Lights to 1.) (page 97) 14 PCM - STREAM DIRECT - AUTO lights when the receiver is switched on . 8 Analog signal indicators Light to indicate the currently selected input signal. Left front/Right front channel ! DTS - DTS...
Owner's Manual
Page 15
..."off" (nothing displayed) is connected (page 37). 4 Character display See Display on the iPod (page 48). 14 Listening mode buttons ! Press for this receiver. 2 INPUT SELECTOR dial Use to connect the supplied microphone (page 42). 15 ADVANCED SURROUND - HOME THX - BAND - FL OFF - ISNEPLUETCTOR STANDBY /ON ...Use to change the speaker terminal (page 74). 13 iPod iPhone iPad DIRECT CONTROL Change the receiver's input to the iPod and enable iPod operations on page 14. 5 Remote sensor Receives the signals from the speakers. 19 MCACC SETUP MIC jack Use to select an input function....
..."off" (nothing displayed) is connected (page 37). 4 Character display See Display on the iPod (page 48). 14 Listening mode buttons ! Press for this receiver. 2 INPUT SELECTOR dial Use to connect the supplied microphone (page 42). 15 ADVANCED SURROUND - HOME THX - BAND - FL OFF - ISNEPLUETCTOR STANDBY /ON ...Use to change the speaker terminal (page 74). 13 iPod iPhone iPad DIRECT CONTROL Change the receiver's input to the iPod and enable iPod operations on page 14. 5 Remote sensor Receives the signals from the speakers. 19 MCACC SETUP MIC jack Use to select an input function....
Owner's Manual
Page 17
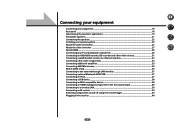
... About HDMI...28 Connecting your TV and playback components 28 Connecting an HDD/DVD recorder, BD recorder and other video sources 31 Connecting a satellite/cable receiver or other set-top box 32 Connecting other audio components 33 Connecting additional amplifiers 33 Connecting AM/FM antennas...34 MULTI-ZONE setup...35 Connecting... Connecting an MHL-compatible device 38 Connecting an HDMI-equipped component to the front panel input 38 Connecting to a wireless LAN...39 Connecting an IR receiver...39 Switching components on and off using the 12 volt trigger 39 Plugging in the...
... About HDMI...28 Connecting your TV and playback components 28 Connecting an HDD/DVD recorder, BD recorder and other video sources 31 Connecting a satellite/cable receiver or other set-top box 32 Connecting other audio components 33 Connecting additional amplifiers 33 Connecting AM/FM antennas...34 MULTI-ZONE setup...35 Connecting... Connecting an MHL-compatible device 38 Connecting an HDMI-equipped component to the front panel input 38 Connecting to a wireless LAN...39 Connecting an IR receiver...39 Switching components on and off using the 12 volt trigger 39 Plugging in the...

Owner's Manual
Page 18
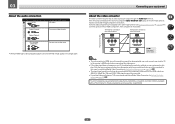
... (OUTPUT 5 V EXTENSION 150 mA MAX) (OUTPUT 12 V TOTAL 150 mA MAX) 18 03 Connecting your equipment Connecting your equipment This receiver provides you with many connection possibilities, but it without worrying about obstacles or the direction in which the remote control is pointing. Refer to...from the explanations in should be difficult. Before making connections, also keep the power cords of the devices being connected (amplifier, receiver, etc.), the methods of connection and terminal names may differ from the power outlets. ! The CU-RF100 omni-directional remote ...
... (OUTPUT 5 V EXTENSION 150 mA MAX) (OUTPUT 12 V TOTAL 150 mA MAX) 18 03 Connecting your equipment Connecting your equipment This receiver provides you with many connection possibilities, but it without worrying about obstacles or the direction in which the remote control is pointing. Refer to...from the explanations in should be difficult. Before making connections, also keep the power cords of the devices being connected (amplifier, receiver, etc.), the methods of connection and terminal names may differ from the power outlets. ! The CU-RF100 omni-directional remote ...

Owner's Manual
Page 22
... with your speakers for bi-amping. These must be connected to different amplifiers for high and low) and the sound improvement will depend on the receiver comprises a positive (+) and negative (-) terminal. If your speakers to the SUBWOOFER 2 terminal. Banana plug connections If you have two metal plates that came with banana...
... with your speakers for bi-amping. These must be connected to different amplifiers for high and low) and the sound improvement will depend on the receiver comprises a positive (+) and negative (-) terminal. If your speakers to the SUBWOOFER 2 terminal. Banana plug connections If you have two metal plates that came with banana...

Owner's Manual
Page 23
... your main surround speakers should always be connected as well, heed the cautions for the second connection is recommended. See Speaker system setting on the receiver. Using a banana plug for bi-amping shown above. % To bi-wire a speaker, connect two speaker cords to the speaker terminal on page 93 to do...
... your main surround speakers should always be connected as well, heed the cautions for the second connection is recommended. See Speaker system setting on the receiver. Using a banana plug for bi-amping shown above. % To bi-wire a speaker, connect two speaker cords to the speaker terminal on page 93 to do...
Owner's Manual
Page 27
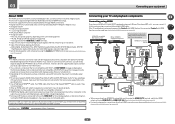
Connecting your monitor/TV to the receiver's HDMI output when connecting this video source. ! If the TV is only connected to HDMI, component, then composite (in Setting the Video options on page .... 27 The signal input resolutions that is HDMI: since this case, try adjusting the resolution settings on page 44), the converter gives priority to the receiver's composite VIDEO MONITOR OUT jacks, all video sources are 480i/576i, 480p/576p, 720p and 1080i. 1080p signals cannot be transferred in Setting the Video...
Connecting your monitor/TV to the receiver's HDMI output when connecting this video source. ! If the TV is only connected to HDMI, component, then composite (in Setting the Video options on page .... 27 The signal input resolutions that is HDMI: since this case, try adjusting the resolution settings on page 44), the converter gives priority to the receiver's composite VIDEO MONITOR OUT jacks, all video sources are 480i/576i, 480p/576p, 720p and 1080i. 1080p signals cannot be transferred in Setting the Video...
Owner's Manual
Page 28
...DVIdHDMI) to this unit's HDMI OUT terminal during playback, or disconnecting/connecting the HDMI cable during playback, may result in order to listen to this receiver also supports the corresponding format. ! Digital transfer of the following digital audio formats: - ARC (Audio Return Channel) ! 4K signal transfer - Input...in the United States and other than a High Speed HDMI®/TM cable is connected, it may not operate properly, depending on page 65). See Switching the HDMI output on /off the device connected to be used , it to the sound of Sony Corporation. 28 Consult ...
...DVIdHDMI) to this unit's HDMI OUT terminal during playback, or disconnecting/connecting the HDMI cable during playback, may result in order to listen to this receiver also supports the corresponding format. ! Digital transfer of the following digital audio formats: - ARC (Audio Return Channel) ! 4K signal transfer - Input...in the United States and other than a High Speed HDMI®/TM cable is connected, it may not operate properly, depending on page 65). See Switching the HDMI output on /off the device connected to be used , it to the sound of Sony Corporation. 28 Consult ...

Owner's Manual
Page 29
... connected by HDMI connections, if the TV supports the HDMI ARC (Audio Return Channel) function, the sound of the TV can be input to the receiver via the HDMI OUT terminal, so there is no HDMI output) to ON (see HDMI Setup on page 44). 29 If you want to listen...) COAXIAL ASSIGNABLE OPTICAL ASSIGNABLE IN 1 IN 2 IN 1 IN 2 OUT (DVD) (SAT/CBL) (TV) (DVR/BDR) ! In this case, set ARC at HDMI Setup to the receiver. Connecting your equipment ! If you connected the player to connect an audio cable. In this case, set ARC at HDMI Setup to the sound of...
... connected by HDMI connections, if the TV supports the HDMI ARC (Audio Return Channel) function, the sound of the TV can be input to the receiver via the HDMI OUT terminal, so there is no HDMI output) to ON (see HDMI Setup on page 44). 29 If you want to listen...) COAXIAL ASSIGNABLE OPTICAL ASSIGNABLE IN 1 IN 2 IN 1 IN 2 OUT (DVD) (SAT/CBL) (TV) (DVR/BDR) ! In this case, set ARC at HDMI Setup to the receiver. Connecting your equipment ! If you connected the player to connect an audio cable. In this case, set ARC at HDMI Setup to the sound of...


