
Owner's Manual
Page 2
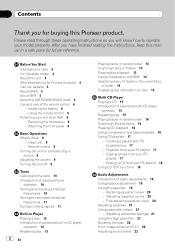
.... Adjusting subwoofer settings 21 Using the high pass filter 21 Boosting the bass 22 Front image enhancer (F.I.E.) 22 Adjusting source levels 22 After you have finished reading the instructions, keep this unit 4 After-sales service for Pioneer products 4 Visit our website 5 About WMA 5 About MP3 5 About the SAT RADIO READY mark 5 Use and care of the remote control 6 - Remote control 9 Turning the unit on and selecting a source 9 Adjusting the volume 9 Turning the unit off 9 Tuner Listening to operate...
.... Adjusting subwoofer settings 21 Using the high pass filter 21 Boosting the bass 22 Front image enhancer (F.I.E.) 22 Adjusting source levels 22 After you have finished reading the instructions, keep this unit 4 After-sales service for Pioneer products 4 Visit our website 5 About WMA 5 About MP3 5 About the SAT RADIO READY mark 5 Use and care of the remote control 6 - Remote control 9 Turning the unit on and selecting a source 9 Adjusting the volume 9 Turning the unit off 9 Tuner Listening to operate...
Owner's Manual
Page 3
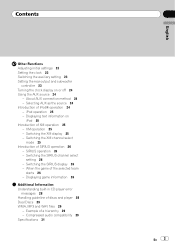
... CD player error messages 28 Handling guideline of iPod® operation 24 - Selecting AUX as the source 24 Introduction of discs and player 28 Dual Discs 29 WMA, MP3 and WAV files 29 - Switching the XM channel select mode 25 Introduction of the selected team starts 26 - SIRIUS operation 26 - When the game of SIRIUS operation 26 - Contents Other Functions Adjusting initial settings 23 Setting the clock 23 Switching the auxiliary setting 23 Setting the rear output and subwoofer controller 23 Turning the clock display on iPod...
... CD player error messages 28 Handling guideline of iPod® operation 24 - Selecting AUX as the source 24 Introduction of discs and player 28 Dual Discs 29 WMA, MP3 and WAV files 29 - Switching the XM channel select mode 25 Introduction of the selected team starts 26 - SIRIUS operation 26 - When the game of SIRIUS operation 26 - Contents Other Functions Adjusting initial settings 23 Setting the clock 23 Switching the auxiliary setting 23 Setting the rear output and subwoofer controller 23 Turning the clock display on iPod...
Owner's Manual
Page 4
... of this unit for operating procedures and precautions. ! If the battery is disconnected or discharged, the preset memory will be erased and must be sure to record this number on this unit The tuner frequencies on the enclosed warranty card. WARNING Handling the cord on this product or cords associated with accessories sold with liquids. Do not allow this manual handy as...
... of this unit for operating procedures and precautions. ! If the battery is disconnected or discharged, the preset memory will be erased and must be sure to record this number on this unit The tuner frequencies on the enclosed warranty card. WARNING Handling the cord on this product or cords associated with accessories sold with liquids. Do not allow this manual handy as...
Owner's Manual
Page 5
...://www.mp3licensing.com. Satellite radio will keep the details of this unit. Note This unit may not operate correctly depending on the front panel indicates that can be connected to this product only conveys a license for Pioneer (i.e., XM tuner and Sirius satellite tuner which are sold separately) can be controlled by using Windows Media Player version 7 or later. For satellite radio tuner operation, please refer to the satellite radio tuner owner's manual. Before You...
...://www.mp3licensing.com. Satellite radio will keep the details of this unit. Note This unit may not operate correctly depending on the front panel indicates that can be connected to this product only conveys a license for Pioneer (i.e., XM tuner and Sirius satellite tuner which are sold separately) can be controlled by using Windows Media Player version 7 or later. For satellite radio tuner operation, please refer to the satellite radio tuner owner's manual. Before You...
Owner's Manual
Page 6
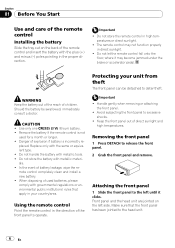
... your unit from theft The front panel can be swallowed, immediately consult a doctor. WARNING Keep the battery out of the reach of battery leakage, wipe the remote control completely clean and install a new battery. ! Use only one CR2025 (3 V) lithium battery. ! In the event of children. Important ! Removing the front panel 1 Press DETACH to the left side. Using the remote control Point the remote control in the proper direction...
... your unit from theft The front panel can be swallowed, immediately consult a doctor. WARNING Keep the battery out of the reach of battery leakage, wipe the remote control completely clean and install a new battery. ! Use only one CR2025 (3 V) lithium battery. ! In the event of children. Important ! Removing the front panel 1 Press DETACH to the left side. Using the remote control Point the remote control in the proper direction...
Owner's Manual
Page 8
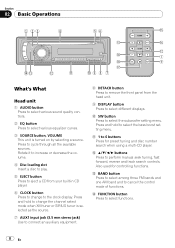
.... 9 DISPLAY button Press to select different displays. Section 02 Basic Operations 1 23 4 56 f d g c e 1 i 9 h ed c b a9 8 7 What's What Head unit 1 AUDIO button Press to select various sound quality controls. 2 EQ button Press to select various equalizer curves. 3 SOURCE button, VOLUME This unit is selected as the source. 7 AUX1 input jack (3.5 mm stereo jack) Use to connect an auxiliary equipment. 8 DETACH button Press to remove the front panel from your built-in CD player. 6 CLOCK button Press to change the channel select mode when XM tuner or SIRIUS tuner is turned on...
.... 9 DISPLAY button Press to select different displays. Section 02 Basic Operations 1 23 4 56 f d g c e 1 i 9 h ed c b a9 8 7 What's What Head unit 1 AUDIO button Press to select various sound quality controls. 2 EQ button Press to select various equalizer curves. 3 SOURCE button, VOLUME This unit is selected as the source. 7 AUX1 input jack (3.5 mm stereo jack) Use to connect an auxiliary equipment. 8 DETACH button Press to remove the front panel from your built-in CD player. 6 CLOCK button Press to change the channel select mode when XM tuner or SIRIUS tuner is turned on...
Owner's Manual
Page 9
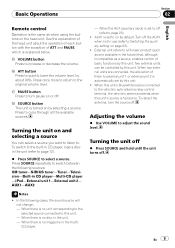
...'s auto-antenna relay control terminal, the vehicle's antenna extends when this unit. - Basic Operations Section 02 English Remote control Operation is no magazine in the multiCD player. - Turning the unit on by selecting a source. AUX1 is explained below. When there is the same as a source, enables control of basic functions by this unit. ! When the AUX (auxiliary input) is turned on or off. En 9 Adjusting the volume % Use VOLUME to . To switch to the built-in CD player, load a disc...
...'s auto-antenna relay control terminal, the vehicle's antenna extends when this unit. - Basic Operations Section 02 English Remote control Operation is no magazine in the multiCD player. - Turning the unit on by selecting a source. AUX1 is explained below. When there is the same as a source, enables control of basic functions by this unit. ! When the AUX (auxiliary input) is turned on or off. En 9 Adjusting the volume % Use VOLUME to . To switch to the built-in CD player, load a disc...
Owner's Manual
Page 10
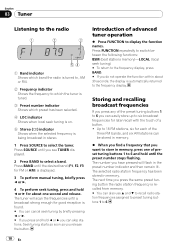
... stations can be stored in memory. % When you find a frequency that you can cancel seek tuning by briefly pressing c or d. # If you press and hold until the preset number stops flashing. Press BAND until you can also use a and b to recall radio station frequencies assigned to preset tuning buttons 1 to store in memory. Storing and recalling broadcast frequencies If you press any of advanced tuner operation % Press FUNCTION to select...
... stations can be stored in memory. % When you find a frequency that you can cancel seek tuning by briefly pressing c or d. # If you press and hold until the preset number stops flashing. Press BAND until you can also use a and b to recall radio station frequencies assigned to preset tuning buttons 1 to store in memory. Storing and recalling broadcast frequencies If you press any of advanced tuner operation % Press FUNCTION to select...
Owner's Manual
Page 11
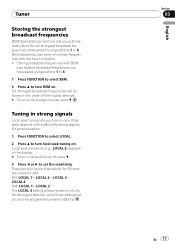
.... # To cancel the storage process, press b. Tuner Storing the strongest broadcast frequencies BSM (best stations memory) lets you automatically store the six strongest broadcast frequencies under preset tuning buttons 1 to set the sensitivity. There are four levels of button. ! Storing broadcast frequencies with BSM may replace broadcast frequencies you have saved using buttons 1 to 6. 1 Press FUNCTION to select BSM. 2 Press a to those radio stations with the touch of sensitivity for...
.... # To cancel the storage process, press b. Tuner Storing the strongest broadcast frequencies BSM (best stations memory) lets you automatically store the six strongest broadcast frequencies under preset tuning buttons 1 to set the sensitivity. There are four levels of button. ! Storing broadcast frequencies with BSM may replace broadcast frequencies you have saved using buttons 1 to 6. 1 Press FUNCTION to select BSM. 2 Press a to those radio stations with the touch of sensitivity for...
Owner's Manual
Page 15
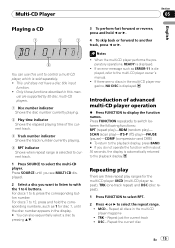
... select RPT. 2 Press c or d to the multi-CD player owner's manual. ! When the multi-CD player performs the preparatory operations, READY is displayed. Repeat just the current track ! Repeat the current disc En 15 If there are three repeat play )- For discs 7 to 12, press and hold c or d. 4 To skip back or forward to 6, press the corresponding button number. This unit does not have a disc title input function...
... select RPT. 2 Press c or d to the multi-CD player owner's manual. ! When the multi-CD player performs the preparatory operations, READY is displayed. Repeat just the current track ! Repeat the current disc En 15 If there are three repeat play )- For discs 7 to 12, press and hold c or d. 4 To skip back or forward to 6, press the corresponding button number. This unit does not have a disc title input function...
Owner's Manual
Page 19
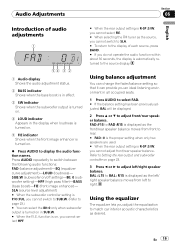
... will be displayed. 2 Press a or b to adjust front/rear speaker balance. En 19 Using balance adjustment You can change the fader/balance setting so that it can select the 80: 0 only when subwoofer output is turned on . % Press AUDIO to display the audio function names. BAL : L15 to BAL : R15 is displayed as the front/rear speaker balance moves from left to right. SLA (source level adjustment) # When the subwoofer controller setting is P/O :FUL, you cannot switch to SUB.W. (Refer to...
... will be displayed. 2 Press a or b to adjust front/rear speaker balance. En 19 Using balance adjustment You can change the fader/balance setting so that it can select the 80: 0 only when subwoofer output is turned on . % Press AUDIO to display the audio function names. BAL : L15 to BAL : R15 is displayed as the front/rear speaker balance moves from left to right. SLA (source level adjustment) # When the subwoofer controller setting is P/O :FUL, you cannot switch to SUB.W. (Refer to...
Owner's Manual
Page 20
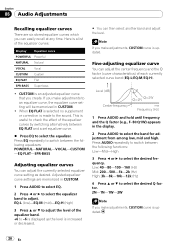
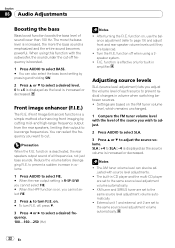
... an adjusted equalizer curve that you make adjustments, CUSTOM curve is made to the sound. Fine-adjusting equalizer curve You can adjust the center frequency and the Q factor (curve characteristics) of the equalizer curves by switching alternatively between the following equalizers: POWERFUL-NATURAL-VOCAL-CUSTOM -EQ FLAT-SPR-BASS Adjusting equalizer curves You can adjust the currently selected equalizer curve setting as the level is useful to select the desired frequency. Press AUDIO repeatedly to switch...
... an adjusted equalizer curve that you make adjustments, CUSTOM curve is made to the sound. Fine-adjusting equalizer curve You can adjust the center frequency and the Q factor (curve characteristics) of the equalizer curves by switching alternatively between the following equalizers: POWERFUL-NATURAL-VOCAL-CUSTOM -EQ FLAT-SPR-BASS Adjusting equalizer curves You can adjust the currently selected equalizer curve setting as the level is useful to select the desired frequency. Press AUDIO repeatedly to switch...
Owner's Manual
Page 21
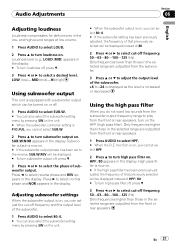
... d to turn subwoofer output on the unit. # When the subwoofer controller setting is P/O :FUL, you cannot select HPF. 2 Press a to select reverse phase and REV appears in the display. En 21 Audio Adjustments Section 06 English Adjusting loudness Loudness compensates for deficiencies in the display. Adjusting subwoofer settings When the subwoofer output is on , you do not want low sounds from the subwoofer output frequency range to play from the front or rear speakers. function is on...
... d to turn subwoofer output on the unit. # When the subwoofer controller setting is P/O :FUL, you cannot select HPF. 2 Press a to select reverse phase and REV appears in the display. En 21 Audio Adjustments Section 06 English Adjusting loudness Loudness compensates for deficiencies in the display. Adjusting subwoofer settings When the subwoofer output is on , you do not want low sounds from the subwoofer output frequency range to play from the front or rear speakers. function is on...
Owner's Manual
Page 22
... select a desired level. 0 to +6 is displayed as the source volume is deactivated, the rear speakers output sound of each source to prevent radical changes in volume when switching between sources. ! When using a 2speaker system. ! function is on . # To turn F.I .E. (Front Image Enhancer) function is emphasized and the entire sound becomes powerful. Section 06 Audio Adjustments Boosting the bass Bass boost function boosts the bass level of the source you cannot select FIE. 2 Press a to turn F.I .E. Settings are based on , use the balance adjustment (refer...
... select a desired level. 0 to +6 is displayed as the source volume is deactivated, the rear speakers output sound of each source to prevent radical changes in volume when switching between sources. ! When using a 2speaker system. ! function is on . # To turn F.I .E. (Front Image Enhancer) function is emphasized and the entire sound becomes powerful. Section 06 Audio Adjustments Boosting the bass Bass boost function boosts the bass level of the source you cannot select FIE. 2 Press a to turn F.I .E. Settings are based on , use the balance adjustment (refer...
Owner's Manual
Page 23
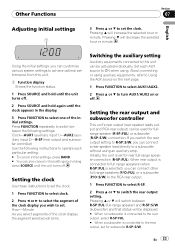
... can connect a rear speaker lead directly to switch the rear output setting. Pressing a will blink. Using the initial settings, you can customize various system settings to operate each AUX source to select one of the clock display the segment selected will increase the selected hour or minute. Pressing a or b will switch between the following settings: Clock-AUX1 (auxiliary input 1)-AUX2 (auxiliary input 2)-R-SP (rear output and subwoofer controller) Use the following instructions to achieve optimal performance from this unit can be activated individually. En...
... can connect a rear speaker lead directly to switch the rear output setting. Pressing a will blink. Using the initial settings, you can customize various system settings to operate each AUX source to select one of the clock display the segment selected will increase the selected hour or minute. Pressing a or b will switch between the following settings: Clock-AUX1 (auxiliary input 1)-AUX2 (auxiliary input 2)-R-SP (rear output and subwoofer controller) Use the following instructions to achieve optimal performance from this unit can be activated individually. En...
Owner's Manual
Page 24
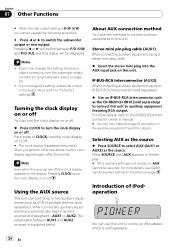
... . Selecting AUX as the source % Press SOURCE to select AUX (AUX1 or AUX2) as AUX sources and assigned to switch the subwoofer output or rear output. Introduction of connection if the auxiliary equipment has RCA outputs. IP-BUS-RCA interconnector (AUX2) When connecting auxiliary equipment using a stereo mini plug cable % Insert the stereo mini plug into the AUX input jack on the previous page. Section 07 Other Functions # When the rear output setting is R-SP :S/W, you turn the clock display on , AUX cannot be displayed. About AUX connection...
... . Selecting AUX as the source % Press SOURCE to select AUX (AUX1 or AUX2) as AUX sources and assigned to switch the subwoofer output or rear output. Introduction of connection if the auxiliary equipment has RCA outputs. IP-BUS-RCA interconnector (AUX2) When connecting auxiliary equipment using a stereo mini plug cable % Insert the stereo mini plug into the AUX input jack on the previous page. Section 07 Other Functions # When the rear output setting is R-SP :S/W, you turn the clock display on , AUX cannot be displayed. About AUX connection...
Owner's Manual
Page 25
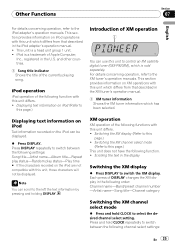
... name-Album title-Repeat play status-Random play status-Play time # If the characters recorded on the iPod can scroll to select the desired channel select setting. Displaying text information on iPod operations with this unit to this page.) Introduction of the currently playing song. Scrolling the text in the iPod adapter's operation manual. ! This section provides information on iPod (Refer to control an XM satellite digital tuner (GEX-P920XM), which differs...
... name-Album title-Repeat play status-Random play status-Play time # If the characters recorded on the iPod can scroll to select the desired channel select setting. Displaying text information on iPod operations with this unit to this page.) Introduction of the currently playing song. Scrolling the text in the iPod adapter's operation manual. ! This section provides information on iPod (Refer to control an XM satellite digital tuner (GEX-P920XM), which differs...
Owner's Manual
Page 26
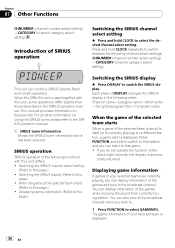
... seconds, the display is displayed. 26 En When the SIRIUS tuner is displayed. This manual provides information on using the SIRIUS tuner, please refer to the SIRIUS operation manual. 1 SIRIUS tuner information Shows the SIRIUS tuner information which has been selected. SIRIUS operation SIRIUS operation of the following functions with this unit, some operations differ slightly from currently tuning station. Press FUNCTION and hold to switch to that game. ! Press and hold CLOCK to select the desired channel select setting. Switching the SIRIUS channel select setting (Refer to...
... seconds, the display is displayed. 26 En When the SIRIUS tuner is displayed. This manual provides information on using the SIRIUS tuner, please refer to the SIRIUS operation manual. 1 SIRIUS tuner information Shows the SIRIUS tuner information which has been selected. SIRIUS operation SIRIUS operation of the following functions with this unit, some operations differ slightly from currently tuning station. Press FUNCTION and hold to switch to that game. ! Press and hold CLOCK to select the desired channel select setting. Switching the SIRIUS channel select setting (Refer to...
Owner's Manual
Page 28
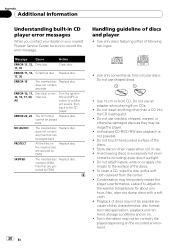
... AUDIO The inserted disc Replace disc. Do not use . ! Do not use shaped discs. ! Unfinalized CD-R/CD-RW disc playback is not possible. ! Avoid leaving discs in excessively hot envir- micals to record the error message. Use 12-cm or 8-cm CD. onments including under direct sunlight. ! Appendix Additional Information Understanding built-in CD player error messages When you contact your dealer or your nearest Pioneer Service Center, be correctly displayed...
... AUDIO The inserted disc Replace disc. Do not use . ! Do not use shaped discs. ! Unfinalized CD-R/CD-RW disc playback is not possible. ! Avoid leaving discs in excessively hot envir- micals to record the error message. Use 12-cm or 8-cm CD. onments including under direct sunlight. ! Appendix Additional Information Understanding built-in CD player error messages When you contact your dealer or your nearest Pioneer Service Center, be correctly displayed...
Other Manual
Page 2
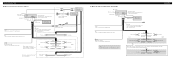
... optional amplifier This product Subwoofer output Antenna jack Front output Fuse (10 A) Wired remote input Hard-wired remote control adaptor can be connected (sold separately). Green Not used. Connecting the Units 7 When not connecting a rear speaker lead to a Subwoofer This product Rear output or subwoofer output Antenna jack Front output Fuse (10 A) Wired remote input Hard-wired remote control adaptor can be connected (sold separately). Blue/white Connect to system control terminal of this unit is monaural. Black (chassis ground) Connect to a clean, paint-free metal location...
... optional amplifier This product Subwoofer output Antenna jack Front output Fuse (10 A) Wired remote input Hard-wired remote control adaptor can be connected (sold separately). Green Not used. Connecting the Units 7 When not connecting a rear speaker lead to a Subwoofer This product Rear output or subwoofer output Antenna jack Front output Fuse (10 A) Wired remote input Hard-wired remote control adaptor can be connected (sold separately). Blue/white Connect to system control terminal of this unit is monaural. Black (chassis ground) Connect to a clean, paint-free metal location...


