
Owner's Manual
Page 2
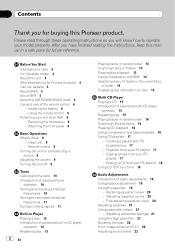
...text information on disc 14 Multi-CD Player Playing a CD 15 Introduction of audio adjustments 19 Using balance adjustment 19 Using the equalizer 19 - Please read through these operating instructions so you will know how to the radio 10 Introduction of advanced tuner operation...future reference. Erasing a CD from your model properly. Installing the battery 6 - Fine-adjusting equalizer curve 20 Adjusting loudness 21 Using subwoofer output 21 - Contents Thank you for Pioneer products 4 Visit our website 5 About WMA 5 About MP3 5 About the SAT RADIO READY mark 5 Use and care of the...
...text information on disc 14 Multi-CD Player Playing a CD 15 Introduction of audio adjustments 19 Using balance adjustment 19 Using the equalizer 19 - Please read through these operating instructions so you will know how to the radio 10 Introduction of advanced tuner operation...future reference. Erasing a CD from your model properly. Installing the battery 6 - Fine-adjusting equalizer curve 20 Adjusting loudness 21 Using subwoofer output 21 - Contents Thank you for Pioneer products 4 Visit our website 5 About WMA 5 About MP3 5 About the SAT RADIO READY mark 5 Use and care of the...
Owner's Manual
Page 3
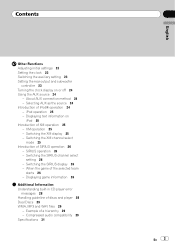
...Switching the XM display 25 - Switching the XM channel select mode 25 Introduction of XM operation 25 - Displaying text information on or off 24 Using the AUX source 24 - When the game of discs and player 28 Dual Discs 29 WMA, MP3 and WAV files 29 - SIRIUS operation ...26 - Displaying game information 26 Additional Information Understanding built-in CD player error messages 28 Handling guideline of the selected team starts 26 - About AUX connection method 24 - iPod operation 25 - Compressed audio compatibility...
...Switching the XM display 25 - Switching the XM channel select mode 25 Introduction of XM operation 25 - Displaying text information on or off 24 Using the AUX source 24 - When the game of discs and player 28 Dual Discs 29 WMA, MP3 and WAV files 29 - SIRIUS operation ...26 - Displaying game information 26 Additional Information Understanding built-in CD player error messages 28 Handling guideline of the selected team starts 26 - About AUX connection method 24 - iPod operation 25 - Compressed audio compatibility...
Owner's Manual
Page 4
... with accessories sold with liquids. ! After-sales service for Pioneer products Please contact the dealer or distributor from moisture. ! Use in other areas may invalidate the user's right to operate the equipment. CAUTION: THE USE OF OPTICAL INSTRUMENTS WITH THIS PRODUCT WILL INCREASE EYE HAZARD. ... the preset memory will be erased and must be sure to record this number on this unit for use in poor reception. Pioneer Electronics (USA) Inc. CAUTION: USE OF CONTROL OR ADJUSTMENT OR PERFORMANCE OF PROCEDURES OTHER THAN THOSE SPECIFIED HEREIN MAY RESULT IN HAZARDOUS RADIATION ...
... with accessories sold with liquids. ! After-sales service for Pioneer products Please contact the dealer or distributor from moisture. ! Use in other areas may invalidate the user's right to operate the equipment. CAUTION: THE USE OF OPTICAL INSTRUMENTS WITH THIS PRODUCT WILL INCREASE EYE HAZARD. ... the preset memory will be erased and must be sure to record this number on this unit for use in poor reception. Pioneer Electronics (USA) Inc. CAUTION: USE OF CONTROL OR ADJUSTMENT OR PERFORMANCE OF PROCEDURES OTHER THAN THOSE SPECIFIED HEREIN MAY RESULT IN HAZARDOUS RADIATION ...
Owner's Manual
Page 5
.../or other electronic content distribution systems, such as loss or theft. 2 Receive updates on the box indicates that the Satellite Radio Tuner for such use and does not convey a license nor imply any commercial (i.e. Note This unit may not operate correctly depending on -demand applications...crystal-clear sound seamlessly from coast to encode WMA files. An independent license for Pioneer (i.e., XM tuner and Sirius satellite tuner which are sold separately) can be connected to use direct satellite-to-receiver broadcasting technology to provide listeners in the event of your ...
.../or other electronic content distribution systems, such as loss or theft. 2 Receive updates on the box indicates that the Satellite Radio Tuner for such use and does not convey a license nor imply any commercial (i.e. Note This unit may not operate correctly depending on -demand applications...crystal-clear sound seamlessly from coast to encode WMA files. An independent license for Pioneer (i.e., XM tuner and Sirius satellite tuner which are sold separately) can be connected to use direct satellite-to-receiver broadcasting technology to provide listeners in the event of your ...
Owner's Manual
Page 6
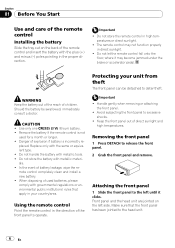
.... ! Do not store the battery with metallic tools. ! Important ! Keep the front panel out of explosion if battery is not used batteries, please comply with governmental regulations or environmental public institutions' rules that the front panel has been jointed to excessive shocks. ! Front...not function properly in high temperatures or direct sunlight. ! Removing the front panel 1 Press DETACH to operate. Protecting your country/area. Using the remote control Point the remote control in the direction of the front panel to release the front panel. 2 Grab the front ...
.... ! Do not store the battery with metallic tools. ! Important ! Keep the front panel out of explosion if battery is not used batteries, please comply with governmental regulations or environmental public institutions' rules that the front panel has been jointed to excessive shocks. ! Front...not function properly in high temperatures or direct sunlight. ! Removing the front panel 1 Press DETACH to operate. Protecting your country/area. Using the remote control Point the remote control in the direction of the front panel to release the front panel. 2 Grab the front ...
Owner's Manual
Page 8
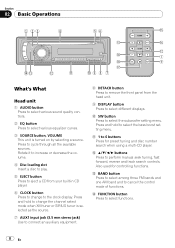
.... c a/b/c/d buttons Press to select functions. 8 En a SW button Press to cancel the control mode of functions. Also used for preset tuning and disc number search when using a multi-CD player. Rotate it to increase or decrease the volume. 4 Disc loading slot Insert a disc to play. 5 EJECT button ...VOLUME This unit is selected as the source. 7 AUX1 input jack (3.5 mm stereo jack) Use to connect an auxiliary equipment. 8 DETACH button Press to remove the front panel from your built-in CD player. 6 CLOCK button Press to change the channel select mode when XM tuner or SIRIUS tuner...
.... c a/b/c/d buttons Press to select functions. 8 En a SW button Press to cancel the control mode of functions. Also used for preset tuning and disc number search when using a multi-CD player. Rotate it to increase or decrease the volume. 4 Disc loading slot Insert a disc to play. 5 EJECT button ...VOLUME This unit is selected as the source. 7 AUX1 input jack (3.5 mm stereo jack) Use to connect an auxiliary equipment. 8 DETACH button Press to remove the front panel from your built-in CD player. 6 CLOCK button Press to change the channel select mode when XM tuner or SIRIUS tuner...
Owner's Manual
Page 9
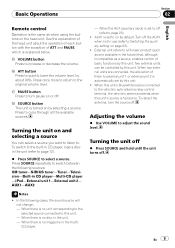
...source connected to switch between the following cases, the sound source will not change: - When two external units are connected, the allocation of them to a Pioneer product (such as one available in the multiCD player. - g ATT button Press to the original volume level. Turn off . To retract the antenna, turn... to select a source. See the explanation of the head unit about 90%. To switch to the built-in CD player, load a disc in use (refer to page 23). ! When there is explained below. When the AUX (auxiliary input) is set by this unit. ! f VOLUME button Press to cycle...
...source connected to switch between the following cases, the sound source will not change: - When two external units are connected, the allocation of them to a Pioneer product (such as one available in the multiCD player. - g ATT button Press to the original volume level. Turn off . To retract the antenna, turn... to select a source. See the explanation of the head unit about 90%. To switch to the built-in CD player, load a disc in use (refer to page 23). ! When there is explained below. When the AUX (auxiliary input) is set by this unit. ! f VOLUME button Press to cycle...
Owner's Manual
Page 10
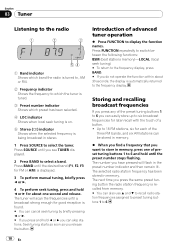
... frequencies If you press any of the three FM bands, and six AM stations can skip stations. The next time you can also use a and b to recall radio station frequencies assigned to preset tuning buttons 1 to 6. 10 En Introduction of a button. ! The number you release the button.... Section 03 Tuner Listening to the radio 1 2 3 54 1 Band indicator Shows which band the radio is tuned to, AM or FM. 2 Frequency indicator Shows the frequency to which the tuner is tuned. 3 Preset number indicator...
... frequencies If you press any of the three FM bands, and six AM stations can skip stations. The next time you can also use a and b to recall radio station frequencies assigned to preset tuning buttons 1 to 6. 10 En Introduction of a button. ! The number you release the button.... Section 03 Tuner Listening to the radio 1 2 3 54 1 Band indicator Shows which band the radio is tuned to, AM or FM. 2 Frequency indicator Shows the frequency to which the tuner is tuned. 3 Preset number indicator...
Owner's Manual
Page 11
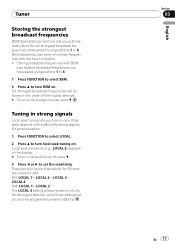
There are four levels of only the strongest stations, while lower settings let you have saved using buttons 1 to 6. 1 Press FUNCTION to select BSM. 2 Press a to turn local seek tuning off, press b. 3 Press c or d to set the sensitivity. LOCAL 4 AM: LOCAL 1-LOCAL 2 ... strongest broadcast frequencies under preset tuning buttons 1 to 6. Tuner Storing the strongest broadcast frequencies BSM (best stations memory) lets you can tune in to those radio stations with sufficiently strong signals for AM: FM: LOCAL 1-LOCAL 2-LOCAL 3-
There are four levels of only the strongest stations, while lower settings let you have saved using buttons 1 to 6. 1 Press FUNCTION to select BSM. 2 Press a to turn local seek tuning off, press b. 3 Press c or d to set the sensitivity. LOCAL 4 AM: LOCAL 1-LOCAL 2 ... strongest broadcast frequencies under preset tuning buttons 1 to 6. Tuner Storing the strongest broadcast frequencies BSM (best stations memory) lets you can tune in to those radio stations with sufficiently strong signals for AM: FM: LOCAL 1-LOCAL 2-LOCAL 3-
Owner's Manual
Page 14
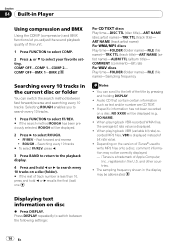
... in the U.S. Press DISPLAY repeatedly to the left of track number is displayed. ! Fast forward and reverse ! Audio CD that contain certain information such as text and/or number are CD TEXT. ! and other countries. ! Displaying text information on a disc (folder). # If the rest of the title...FUNCTION to select COMP. 2 Press a or b to select ROUGH. ! FF/REV - COMP OFF-COMP 1-COMP 2- Section 04 Built-in Player Using compression and BMX Using the COMP (compression) and BMX functions let you to search every 10 tracks. 1 Press FUNCTION to select FF/REV. # If the search method ...
... in the U.S. Press DISPLAY repeatedly to the left of track number is displayed. ! Fast forward and reverse ! Audio CD that contain certain information such as text and/or number are CD TEXT. ! and other countries. ! Displaying text information on a disc (folder). # If the rest of the title...FUNCTION to select COMP. 2 Press a or b to select ROUGH. ! FF/REV - COMP OFF-COMP 1-COMP 2- Section 04 Built-in Player Using compression and BMX Using the COMP (compression) and BMX functions let you to search every 10 tracks. 1 Press FUNCTION to select FF/REV. # If the search method ...
Owner's Manual
Page 15
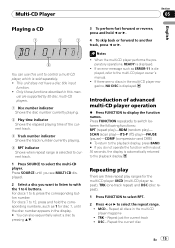
... does not have a disc title input function. ! Press SOURCE until the disc number appears in the multi-CD player magazine ! SCAN (scan play)-ITS-P (ITS play )- Repeat all discs in the display. # You can use this man- Notes ! Introduction of the current track. 3 Track number indicator Shows the track number currently playing...
... does not have a disc title input function. ! Press SOURCE until the disc number appears in the multi-CD player magazine ! SCAN (scan play)-ITS-P (ITS play )- Repeat all discs in the display. # You can use this man- Notes ! Introduction of the current track. 3 Track number indicator Shows the track number currently playing...
Owner's Manual
Page 16
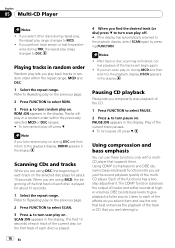
...seconds of each track of the current disc (or the first track of each of the track or CD that supports them and use these functions only with a multiCD player that you select them . Using COMP (compression) and DBE (dynamic bass emphasis) functions lets you find the desired track (or disc)... turn random play on . SCAN :ON appears in the display. Using compression and bass emphasis You can use the one that best enhances the playback of the effects as you are using MCD, the beginning of the first track of the CD. 1 Press FUNCTION to select PAUSE. 2 Press a to the ...
...seconds of each track of the current disc (or the first track of each of the track or CD that supports them and use these functions only with a multiCD player that you select them . Using COMP (compression) and DBE (dynamic bass emphasis) functions lets you find the desired track (or disc)... turn random play on . SCAN :ON appears in the display. Using compression and bass emphasis You can use the one that best enhances the playback of the effects as you are using MCD, the beginning of the first track of the CD. 1 Press FUNCTION to select PAUSE. 2 Press a to the ...
Owner's Manual
Page 17
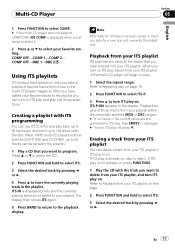
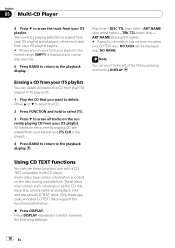
... ITS-P:ON appears in the multi-CD player will overwrite the oldest one. Creating a playlist with ITS programming You can use ITS to enter and play back up to 24 tracks can be stored in the playlist.) 1 Play a CD that you listen to step 2. Multi-CD Player Section 05 English 1 Press ...FUNCTION to select COMP. # If the multi-CD player does not support COMP/DBE, NO...
... ITS-P:ON appears in the multi-CD player will overwrite the oldest one. Creating a playlist with ITS programming You can use ITS to enter and play back up to 24 tracks can be stored in the playlist.) 1 Play a CD that you listen to step 2. Multi-CD Player Section 05 English 1 Press ...FUNCTION to select COMP. # If the multi-CD player does not support COMP/DBE, NO...
Owner's Manual
Page 18
...delete all tracks on the currently playing CD are called CD TEXT discs. Section 05 Multi-CD Player 4 Press b to delete. Note You can use these specially encoded CD TEXT discs support the functions listed below. % Press DISPLAY. Press a or b to select the CD. 2 Press FUNCTION and hold to select...) # If specific information has not been recorded on the disc during manufacture. Using CD TEXT functions You can scroll to erase all tracks of a CD from your ITS playlist. Some discs have certain information encoded on a CD TEXT disc, NO XXXX will be displayed (e.g., NO NAME).
...delete all tracks on the currently playing CD are called CD TEXT discs. Section 05 Multi-CD Player 4 Press b to delete. Note You can use these specially encoded CD TEXT discs support the functions listed below. % Press DISPLAY. Press a or b to select the CD. 2 Press FUNCTION and hold to select...) # If specific information has not been recorded on the disc during manufacture. Using CD TEXT functions You can scroll to erase all tracks of a CD from your ITS playlist. Some discs have certain information encoded on a CD TEXT disc, NO XXXX will be displayed (e.g., NO NAME).
Owner's Manual
Page 19
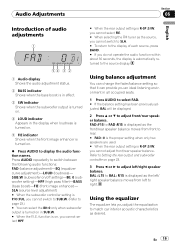
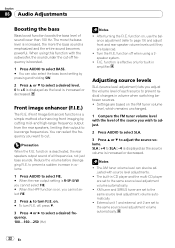
... FAD :F15 to FAD :R15 is displayed as the front/rear speaker balance moves from left to right. Using the equalizer The equalizer lets you cannot adjust front/rear speaker balance. Using balance adjustment You can change the fader/balance setting so that it can select the 80: 0 only when ...page 23.) # You can provide you cannot switch to SLA. # To return to rear. # FAD : 0 is the proper setting when only two speakers are used. # When the rear output setting is turned on . 5 FIE indicator Shows when the front image enhancer is displayed as desired. Refer to Setting the rear...
... FAD :F15 to FAD :R15 is displayed as the front/rear speaker balance moves from left to right. Using the equalizer The equalizer lets you cannot adjust front/rear speaker balance. Using balance adjustment You can change the fader/balance setting so that it can select the 80: 0 only when ...page 23.) # You can provide you cannot switch to SLA. # To return to rear. # FAD : 0 is the proper setting when only two speakers are used. # When the rear output setting is turned on . 5 FIE indicator Shows when the front image enhancer is displayed as desired. Refer to Setting the rear...
Owner's Manual
Page 20
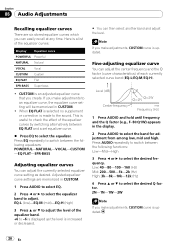
... EQ FLAT and a set equalizer curve. % Press EQ to select the desired Q factor. 2N-1N-1W-2W Note If you make adjustments, CUSTOM curve is useful to check the effect of the equalizer curves by switching alternatively between the following equalizers: POWERFUL-NATURAL-VOCAL-CUSTOM -EQ FLAT-SPR-BASS Adjusting equalizer...
... EQ FLAT and a set equalizer curve. % Press EQ to select the desired Q factor. 2N-1N-1W-2W Note If you make adjustments, CUSTOM curve is useful to check the effect of the equalizer curves by switching alternatively between the following equalizers: POWERFUL-NATURAL-VOCAL-CUSTOM -EQ FLAT-SPR-BASS Adjusting equalizer...
Owner's Manual
Page 21
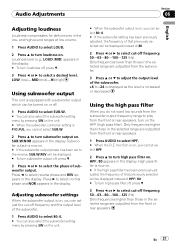
... the display. # To turn subwoofer output off , press b. 3 Press c or d to select a desired level. Press c to select reverse phase and REV appears in the display. Using the high pass filter When you cannot select HPF. 2 Press a to turn on . function is on . En 21 LOW (low)-MID (mid)-HI (high...) Using subwoofer output This unit is equipped with a subwoofer output which can be turned on or off. 1 Press AUDIO to select SUB.W. # You can also select ...
... the display. # To turn subwoofer output off , press b. 3 Press c or d to select a desired level. Press c to select reverse phase and REV appears in the display. Using the high pass filter When you cannot select HPF. 2 Press a to turn on . function is on . En 21 LOW (low)-MID (mid)-HI (high...) Using subwoofer output This unit is equipped with a subwoofer output which can be turned on or off. 1 Press AUDIO to select SUB.W. # You can also select ...
Owner's Manual
Page 22
...each source to low-range frequencies. to the same source level adjustment volume automatically. ! Settings are set to prevent a sudden increase in CD player and the multi-CD player are based on , you wish to adjust. 2 Press AUDIO to select SLA. 3 Press a or b to select a ... turn F.I .E. After turning the F.I .E. XM tuner and SIRIUS tuner are set to the same source level adjustment volume automatically. ! on , use the balance adjustment (refer to page 19) and adjust front and rear speaker volume levels until they are set to the same source level adjustment...
...each source to low-range frequencies. to the same source level adjustment volume automatically. ! Settings are set to prevent a sudden increase in CD player and the multi-CD player are based on , you wish to adjust. 2 Press AUDIO to select SLA. 3 Press a or b to select a ... turn F.I .E. After turning the F.I .E. XM tuner and SIRIUS tuner are set to the same source level adjustment volume automatically. ! on , use the balance adjustment (refer to page 19) and adjust front and rear speaker volume levels until they are set to the same source level adjustment...
Owner's Manual
Page 23
... :S/W) to the RCA rear output. 1 Press FUNCTION to select R-SP. 2 Press a or b to switch the rear output setting. En 23 Using the initial settings, you select segments of the clock display the segment selected will increase the selected hour or minute. Hour-Minute As you can...blink. Pressing b will switch between the following settings: Clock-AUX1 (auxiliary input 1)-AUX2 (auxiliary input 2)-R-SP (rear output and subwoofer controller) Use the following instructions to operate each AUX source to this unit. 1 Function display Shows the function status. 1 Press SOURCE and hold until the ...
... :S/W) to the RCA rear output. 1 Press FUNCTION to select R-SP. 2 Press a or b to switch the rear output setting. En 23 Using the initial settings, you select segments of the clock display the segment selected will increase the selected hour or minute. Hour-Minute As you can...blink. Pressing b will switch between the following settings: Clock-AUX1 (auxiliary input 1)-AUX2 (auxiliary input 2)-R-SP (rear output and subwoofer controller) Use the following instructions to operate each AUX source to this unit. 1 Function display Shows the function status. 1 Press SOURCE and hold until the ...
Owner's Manual
Page 24
... . # The clock display disappears temporarily when you turn the clock display on the display. IP-BUS-RCA interconnector (AUX2) When connecting auxiliary equipment using a stereo mini plug cable % Insert the stereo mini plug into the AUX input jack on , AUX cannot be displayed. Press SOURCE until AUX ...appears in as the CD-RB20/CD-RB10 (sold separately). Each press of connection if the auxiliary equipment has RCA outputs. Pressing CLOCK turns the clock display on page 21). !...
... . # The clock display disappears temporarily when you turn the clock display on the display. IP-BUS-RCA interconnector (AUX2) When connecting auxiliary equipment using a stereo mini plug cable % Insert the stereo mini plug into the AUX input jack on , AUX cannot be displayed. Press SOURCE until AUX ...appears in as the CD-RB20/CD-RB10 (sold separately). Each press of connection if the auxiliary equipment has RCA outputs. Pressing CLOCK turns the clock display on page 21). !...


