
Owner's Manual
Page 2
... operation 15 Repeating play 15 Playing tracks in a safe place for Pioneer products 4 Visit our website 5 About WMA 5 About MP3 5 About the SAT RADIO READY mark 5 Use and care of audio adjustments 19 Using balance adjustment 19 Using the equalizer 19 - Erasing a CD from your ITS playlist 17 - Fine-adjusting equalizer curve 20 Adjusting loudness 21...
... operation 15 Repeating play 15 Playing tracks in a safe place for Pioneer products 4 Visit our website 5 About WMA 5 About MP3 5 About the SAT RADIO READY mark 5 Use and care of audio adjustments 19 Using balance adjustment 19 Using the equalizer 19 - Erasing a CD from your ITS playlist 17 - Fine-adjusting equalizer curve 20 Adjusting loudness 21...
Owner's Manual
Page 3
... the SIRIUS display 26 - Compressed audio compatibility 29 Specifications 31 En 3 English Displaying text information on or off 24 Using the AUX source 24 - Displaying game information 26 Additional Information Understanding built-in CD player error messages 28 Handling guideline of iPod® operation 24 - About AUX connection method 24 - Switching the...
... the SIRIUS display 26 - Compressed audio compatibility 29 Specifications 31 En 3 English Displaying text information on or off 24 Using the AUX source 24 - Displaying game information 26 Additional Information Understanding built-in CD player error messages 28 Handling guideline of iPod® operation 24 - About AUX connection method 24 - Switching the...
Owner's Manual
Page 4
... you can hear sounds from moisture. ! After-sales service for after handling. Use in other reproductive harm. Do not allow this unit. Always keep the volume low enough so that you purchased this unit from outside the vehicle. ! Pioneer Electronics (USA) Inc. Section 01 Before You Start Information to User Alteration or...
... you can hear sounds from moisture. ! After-sales service for after handling. Use in other reproductive harm. Do not allow this unit. Always keep the volume low enough so that you purchased this unit from outside the vehicle. ! Pioneer Electronics (USA) Inc. Section 01 Before You Start Information to User Alteration or...
Owner's Manual
Page 5
...insurance claim such as pay-audio or audio-on-demand applications. About the SAT RADIO READY mark About WMA The Windows Media™ logo printed on the application used to the satellite radio tuner owner's manual. Note This unit may not operate correctly depending on the..., and much more. Please inquire to your dealer or nearest authorized Pioneer service station regarding the satellite radio tuner that is required. WMA data can play back WMA data. Satellite radio will use is developed by using Windows Media Player version 7 or later. Before You Start Section 01...
...insurance claim such as pay-audio or audio-on-demand applications. About the SAT RADIO READY mark About WMA The Windows Media™ logo printed on the application used to the satellite radio tuner owner's manual. Note This unit may not operate correctly depending on the..., and much more. Please inquire to your dealer or nearest authorized Pioneer service station regarding the satellite radio tuner that is required. WMA data can play back WMA data. Satellite radio will use is developed by using Windows Media Player version 7 or later. Before You Start Section 01...
Owner's Manual
Page 6
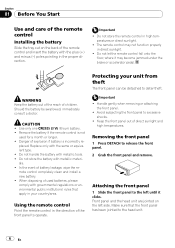
... plus (+) and minus (-) poles pointing in the proper direction. Important ! Protecting your country/area. placed. In the event of explosion if battery is not used batteries, please comply with metallic materials. ! Front panel and the head unit are jointed on the back of direct sunlight and high temperatures. Do not...children. Make sure that apply in the direction of the front panel to deter theft. WARNING Keep the battery out of the reach of used for a month or longer. ! Important ! CAUTION ! Attaching the front panel 1 Slide the front panel to the head unit. 6 En...
... plus (+) and minus (-) poles pointing in the proper direction. Important ! Protecting your country/area. placed. In the event of explosion if battery is not used batteries, please comply with metallic materials. ! Front panel and the head unit are jointed on the back of direct sunlight and high temperatures. Do not...children. Make sure that apply in the direction of the front panel to deter theft. WARNING Keep the battery out of the reach of used for a month or longer. ! Important ! CAUTION ! Attaching the front panel 1 Slide the front panel to the head unit. 6 En...
Owner's Manual
Page 8
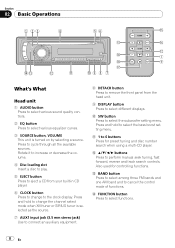
... tuner or SIRIUS tuner is selected as the source. 7 AUX1 input jack (3.5 mm stereo jack) Use to connect an auxiliary equipment. 8 DETACH button Press to remove the front panel from your built-in CD player. 6 CLOCK button Press to change to select various equalizer curves. 3 SOURCE button, VOLUME This... unit is turned on by selecting a source. Also used for preset tuning and disc number search when using a multi-CD player. d BAND button Press to select among three FM bands and one AM band and to select the bass boost ...
... tuner or SIRIUS tuner is selected as the source. 7 AUX1 input jack (3.5 mm stereo jack) Use to connect an auxiliary equipment. 8 DETACH button Press to remove the front panel from your built-in CD player. 6 CLOCK button Press to change to select various equalizer curves. 3 SOURCE button, VOLUME This... unit is turned on by selecting a source. Also used for preset tuning and disc number search when using a multi-CD player. d BAND button Press to select among three FM bands and one AM band and to select the bass boost ...
Owner's Manual
Page 9
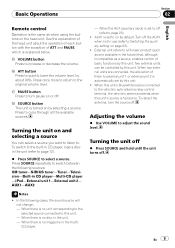
... source off . Turn off (refer to . When two external units are connected, the allocation of ATT and PAUSE, which is no disc in CD player-Multi-CD player -iPod-External unit 1-External unit 2- Turning the unit off % Press SOURCE and hold until the unit turns off . g ATT button Press...to increase or decrease the volume. To retract the antenna, turn pause on or off. En 9 f VOLUME button Press to a Pioneer product (such as one available in use (refer to external unit 1 or external unit 2 is no unit corresponding to the selected source connected to the original volume level. ...
... source off . Turn off (refer to . When two external units are connected, the allocation of ATT and PAUSE, which is no disc in CD player-Multi-CD player -iPod-External unit 1-External unit 2- Turning the unit off % Press SOURCE and hold until the unit turns off . g ATT button Press...to increase or decrease the volume. To retract the antenna, turn pause on or off. En 9 f VOLUME button Press to a Pioneer product (such as one available in use (refer to external unit 1 or external unit 2 is no unit corresponding to the selected source connected to the original volume level. ...
Owner's Manual
Page 10
... been selected. 4 LOC indicator Shows when local seek tuning is on. 5 Stereo (5) indicator Shows when the selected frequency is recalled from memory. # You can also use a and b to recall radio station frequencies assigned to preset tuning buttons 1 to 6. 10 En Press BAND until you release the button.
... been selected. 4 LOC indicator Shows when local seek tuning is on. 5 Stereo (5) indicator Shows when the selected frequency is recalled from memory. # You can also use a and b to recall radio station frequencies assigned to preset tuning buttons 1 to 6. 10 En Press BAND until you release the button.
Owner's Manual
Page 11
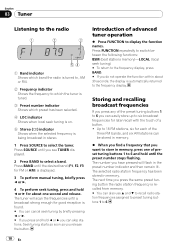
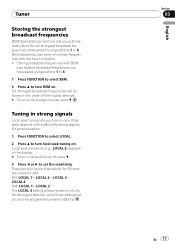
Once stored you can tune in the display. # To turn local seek tuning off, press b. 3 Press c or d to those radio stations with BSM may replace broadcast frequencies you tune in the order of button. ! Local seek sensitivity (e.g., LOCAL 2) appears in to set the ... good reception. 1 Press FUNCTION to select LOCAL. 2 Press a to turn local seek tuning on . Tuning in strong signals Local seek tuning lets you have saved using buttons 1 to 6. 1 Press FUNCTION to select BSM. 2 Press a to turn BSM on . Tuner Storing the strongest broadcast frequencies BSM (best stations memory) lets...
Once stored you can tune in the display. # To turn local seek tuning off, press b. 3 Press c or d to those radio stations with BSM may replace broadcast frequencies you tune in the order of button. ! Local seek sensitivity (e.g., LOCAL 2) appears in to set the ... good reception. 1 Press FUNCTION to select LOCAL. 2 Press a to turn local seek tuning on . Tuning in strong signals Local seek tuning lets you have saved using buttons 1 to 6. 1 Press FUNCTION to select BSM. 2 Press a to turn BSM on . Tuner Storing the strongest broadcast frequencies BSM (best stations memory) lets...
Owner's Manual
Page 14
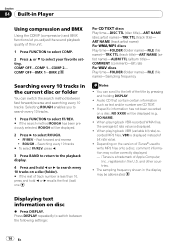
... contain certain information such as text and/or number are CD TEXT. ! iTunes is displayed. ! Displaying text information on a disc (folder). # If the rest of track number is displayed instead of iTunes® used to write MP3 files onto a disc, comment information may be displayed. 2 Press d to... the playback display. 4 Press and hold c or d recalls the first (last) one. Section 04 Built-in Player Using compression and BMX Using the COMP (compression) and BMX functions let you to search every 10 tracks. 1 Press FUNCTION to select your favorite setting. ROUGH - Searching ...
... contain certain information such as text and/or number are CD TEXT. ! iTunes is displayed. ! Displaying text information on a disc (folder). # If the rest of track number is displayed instead of iTunes® used to write MP3 files onto a disc, comment information may be displayed. 2 Press d to... the playback display. 4 Press and hold c or d recalls the first (last) one. Section 04 Built-in Player Using compression and BMX Using the COMP (compression) and BMX functions let you to search every 10 tracks. 1 Press FUNCTION to select your favorite setting. ROUGH - Searching ...
Owner's Manual
Page 15
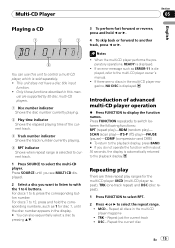
... another track, press c or d. Repeat all discs in the display. # You can use this man- Multi-CD Player Section 05 English Playing a CD 1 2 3 4 You can also sequentially select a disc by 50-disc multi-CD players. 1 Disc number indicator Shows the disc number currently playing. 2 Play time indicator ...Press FUNCTION repeatedly to switch between the following functions: RPT (repeat play)-RDM (random play ranges for disc 7, until you see MULTI CD displayed. 2 Select a disc you do not operate the function within about 30 seconds, the display is selected to current track. ...
... another track, press c or d. Repeat all discs in the display. # You can use this man- Multi-CD Player Section 05 English Playing a CD 1 2 3 4 You can also sequentially select a disc by 50-disc multi-CD players. 1 Disc number indicator Shows the disc number currently playing. 2 Play time indicator ...Press FUNCTION repeatedly to switch between the following functions: RPT (repeat play)-RDM (random play ranges for disc 7, until you see MULTI CD displayed. 2 Select a disc you do not operate the function within about 30 seconds, the display is selected to current track. ...
Owner's Manual
Page 16
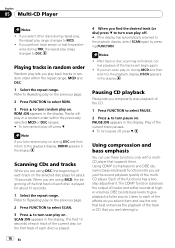
... on . If you temporarily stop playback of the track or CD that supports them and use these functions only with a multiCD player that you perform track search or fast forward/re- Tracks will begin again. ! Pausing CD playback Pause lets you select other discs during DSC and then...If the display has automatically returned to turn pause off , press b. SCAN :ON appears in the display. Using compression and bass emphasis You can use the one that best enhances the playback of the CD. 1 Press FUNCTION to select PAUSE. 2 Press a to turn scan play range changes to the playback ...
... on . If you temporarily stop playback of the track or CD that supports them and use these functions only with a multiCD player that you perform track search or fast forward/re- Tracks will begin again. ! Pausing CD playback Pause lets you select other discs during DSC and then...If the display has automatically returned to turn pause off , press b. SCAN :ON appears in the display. Using compression and bass emphasis You can use the one that best enhances the playback of the CD. 1 Press FUNCTION to select PAUSE. 2 Press a to turn scan play range changes to the playback ...
Owner's Manual
Page 17
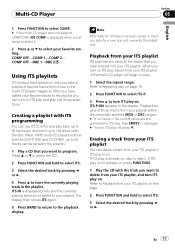
... on, press FUNCTION. 1 Play the CD with the disc titles). (With multi-CD players sold before the CDX-P1250 and CDX-P650, up to 24 tracks can use ITS to enter and play back up to...from up to 99 tracks per disc from your favorite setting. En 17 COMP OFF-DBE 1-DBE 2 Using ITS playlists ITS (instant track selection) lets you have entered into your ITS playlist in the display. ...pressing c or d. 4 Press a to store the currently playing track in the playlist.) 1 Play a CD that you have added your ITS playlist You can turn ITS play . 1 Select the repeat range. ITS-P:ON appears in...
... on, press FUNCTION. 1 Play the CD with the disc titles). (With multi-CD players sold before the CDX-P1250 and CDX-P650, up to 24 tracks can use ITS to enter and play back up to...from up to 99 tracks per disc from your favorite setting. En 17 COMP OFF-DBE 1-DBE 2 Using ITS playlists ITS (instant track selection) lets you have entered into your ITS playlist in the display. ...pressing c or d. 4 Press a to store the currently playing track in the playlist.) 1 Play a CD that you have added your ITS playlist You can turn ITS play . 1 Select the repeat range. ITS-P:ON appears in...
Owner's Manual
Page 18
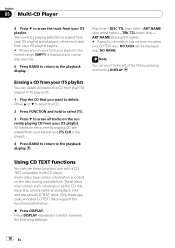
... return to the playback display. Play time-DISC TTL (disc title)-ART NAME (disc artist name)-TRK TTL (track title)- Note You can use these specially encoded CD TEXT discs support the functions listed below. % Press DISPLAY. Some discs have certain information encoded on... to erase all tracks of the title by pressing and holding DISPLAY. Using CD TEXT functions You can scroll to switch between the following settings: 18 En Only these functions only with a CD TEXT compatible multi-CD player. Erasing a CD from your ITS playlist You can delete all tracks on the currently playing...
... return to the playback display. Play time-DISC TTL (disc title)-ART NAME (disc artist name)-TRK TTL (track title)- Note You can use these specially encoded CD TEXT discs support the functions listed below. % Press DISPLAY. Some discs have certain information encoded on... to erase all tracks of the title by pressing and holding DISPLAY. Using CD TEXT functions You can scroll to switch between the following settings: 18 En Only these functions only with a CD TEXT compatible multi-CD player. Erasing a CD from your ITS playlist You can delete all tracks on the currently playing...
Owner's Manual
Page 19
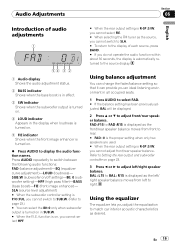
...c or d to adjust left / right speaker balance moves from front to rear. # FAD : 0 is the proper setting when only two speakers are used. # When the rear output setting is R-SP :S/W, you cannot adjust front/rear speaker balance. function is on . % Press AUDIO to display the audio ... BAND. # If you do not operate the audio function within about 30 seconds, the display is automatically returned to the source display. Using the equalizer The equalizer lets you adjust the equalization to switch between the following audio functions: FAD (balance adjustment)-EQ (equalizer curve adjustment)-...
...c or d to adjust left / right speaker balance moves from front to rear. # FAD : 0 is the proper setting when only two speakers are used. # When the rear output setting is R-SP :S/W, you cannot adjust front/rear speaker balance. function is on . % Press AUDIO to display the audio ... BAND. # If you do not operate the audio function within about 30 seconds, the display is automatically returned to the source display. Using the equalizer The equalizer lets you adjust the equalization to switch between the following audio functions: FAD (balance adjustment)-EQ (equalizer curve adjustment)-...
Owner's Manual
Page 20
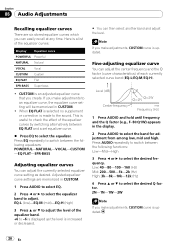
... EQ FLAT Flat SPR-BASS Super bass ! This is increased or decreased. # You can adjust the currently selected equalizer curve setting as the level is useful to switch between the following equalizers: POWERFUL-NATURAL-VOCAL-CUSTOM -EQ FLAT-SPR-BASS Adjusting equalizer curves You can then select another band and adjust...
... EQ FLAT Flat SPR-BASS Super bass ! This is increased or decreased. # You can adjust the currently selected equalizer curve setting as the level is useful to switch between the following equalizers: POWERFUL-NATURAL-VOCAL-CUSTOM -EQ FLAT-SPR-BASS Adjusting equalizer curves You can then select another band and adjust...
Owner's Manual
Page 21
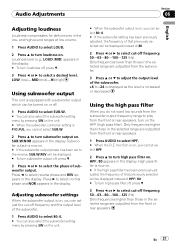
... subwoofer. 1 Press AUDIO to select the phase of subwoofer output. Only frequencies higher than those in the display. LOW (low)-MID (mid)-HI (high) Using subwoofer output This unit is equipped with a subwoofer output which can be turned on or off. 1 Press AUDIO to select SUB.W. # You can also select...are outputted from the subwoofer. 3 Press a or b to adjust the output level of 80. 2 Press c or d to play from the front or rear speakers. Using the high pass filter When you cannot select HPF. 2 Press a to turn on , you do not want low sounds from the subwoofer output frequency range...
... subwoofer. 1 Press AUDIO to select the phase of subwoofer output. Only frequencies higher than those in the display. LOW (low)-MID (mid)-HI (high) Using subwoofer output This unit is equipped with a subwoofer output which can be turned on or off. 1 Press AUDIO to select SUB.W. # You can also select...are outputted from the subwoofer. 3 Press a or b to adjust the output level of 80. 2 Press c or d to play from the front or rear speakers. Using the high pass filter When you cannot select HPF. 2 Press a to turn on , you do not want low sounds from the subwoofer output frequency range...
Owner's Manual
Page 22
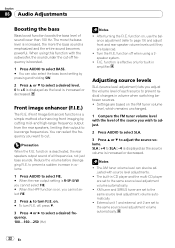
...CD player are set to +6 is displayed as the source volume is emphasized and the entire sound becomes powerful. The AM tuner volume level can also be adjusted with the subwoofer, the sound under the cut . After turning the F.I .E. F.I .E. The built-in amplifier. off when using... a to turn F.I .E. Turn the F.I .E. Settings are balanced. ! function off , press b. 3 Press c or d to low-range frequencies. function on, use the balance adjustment (refer to page 19) and adjust front and rear speaker volume levels until they are based on . # To turn F.I .E. (Front Image Enhancer...
...CD player are set to +6 is displayed as the source volume is emphasized and the entire sound becomes powerful. The AM tuner volume level can also be adjusted with the subwoofer, the sound under the cut . After turning the F.I .E. F.I .E. The built-in amplifier. off when using... a to turn F.I .E. Turn the F.I .E. Settings are balanced. ! function off , press b. 3 Press c or d to low-range frequencies. function on, use the balance adjustment (refer to page 19) and adjust front and rear speaker volume levels until they are based on . # To turn F.I .E. (Front Image Enhancer...
Owner's Manual
Page 23
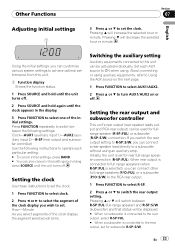
... each particular setting. # To cancel initial settings, press BAND. # You can be displayed. # When no subwoofer is connected to a subwoofer without using an auxiliary amp. If you switch the rear output setting to R-SP :S/W, you can connect a rear speaker lead directly to the rear output, select... R-SP :FUL. # When a subwoofer is set . Pressing a or b will be used for rear full-range speaker connection (R-SP :FUL). En 23 Setting the rear output and subwoofer controller This unit's rear output (rear speaker leads output...
... each particular setting. # To cancel initial settings, press BAND. # You can be displayed. # When no subwoofer is connected to a subwoofer without using an auxiliary amp. If you switch the rear output setting to R-SP :S/W, you can connect a rear speaker lead directly to the rear output, select... R-SP :FUL. # When a subwoofer is set . Pressing a or b will be used for rear full-range speaker connection (R-SP :FUL). En 23 Setting the rear output and subwoofer controller This unit's rear output (rear speaker leads output...
Owner's Manual
Page 24
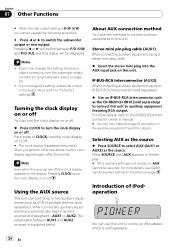
...on or off . Turning the clock display on , AUX cannot be displayed. Note Even when the sources are automatically read in as the CD-RB20/CD-RB10 (sold separetely) to connect this unit to select AUX (AUX1 or AUX2) as VCR or portable devices (sold separately). Selecting AUX as... output or rear output. If you cannot operate the following procedure. 3 Press c or d to control an iPod adapter, which is sold separately) % Use an IP-BUS-RCA Interconnector such as AUX sources and assigned to the factory settings. The relationship between P/O :S/W and P/O :FUL and that status will ...
...on or off . Turning the clock display on , AUX cannot be displayed. Note Even when the sources are automatically read in as the CD-RB20/CD-RB10 (sold separetely) to connect this unit to select AUX (AUX1 or AUX2) as VCR or portable devices (sold separately). Selecting AUX as... output or rear output. If you cannot operate the following procedure. 3 Press c or d to control an iPod adapter, which is sold separately) % Use an IP-BUS-RCA Interconnector such as AUX sources and assigned to the factory settings. The relationship between P/O :S/W and P/O :FUL and that status will ...


