Owner's Manual
Page 2
... remote control 5 - Listening to operate your unit from theft 4 - Scanning tracks or folders 10 - Displaying text information on and selecting a source 8 - Adjusting source levels 12 Other Functions 12 - Setting the clock 12 - Before You Start Information to User 3 For Canadian model 3 About this manual in a safe place for Pioneer products 3 Visit our website 4 About WMA 4 About MP3 4 Protecting your model properly. Turning the unit off 8 Tuner 8 - Using the equalizer 11 - Adjusting loudness 12 - Compressed audio compatibility 15 Specifications...
... remote control 5 - Listening to operate your unit from theft 4 - Scanning tracks or folders 10 - Displaying text information on and selecting a source 8 - Adjusting source levels 12 Other Functions 12 - Setting the clock 12 - Before You Start Information to User 3 For Canadian model 3 About this manual in a safe place for Pioneer products 3 Visit our website 4 About WMA 4 About MP3 4 Protecting your model properly. Turning the unit off 8 Tuner 8 - Using the equalizer 11 - Adjusting loudness 12 - Compressed audio compatibility 15 Specifications...
Owner's Manual
Page 3
... Pioneer Electronics of this unit to come into contact with liquids. ! For Canadian model This Class B digital apparatus complies with the product may result in North America. Use in other reproductive harm. About this unit are allocated for repair without appropriate authorization may invalidate the user's right to operate the equipment. CAUTION ! If the battery is located on this unit The tuner frequencies...
... Pioneer Electronics of this unit to come into contact with liquids. ! For Canadian model This Class B digital apparatus complies with the product may result in North America. Use in other reproductive harm. About this unit are allocated for repair without appropriate authorization may invalidate the user's right to operate the equipment. CAUTION ! If the battery is located on this unit The tuner frequencies...
Owner's Manual
Page 4
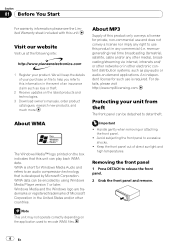
... as loss or theft. 2 Receive updates on the latest products and technologies. 3 Download owner's manuals, order product catalogues, research new products, and much more. Protecting your unit from theft The front panel can play back WMA data. We will keep the details of this product only conveys a license for such use is developed by using Windows Media Player version 7 or later. Windows...
... as loss or theft. 2 Receive updates on the latest products and technologies. 3 Download owner's manuals, order product catalogues, research new products, and much more. Protecting your unit from theft The front panel can play back WMA data. We will keep the details of this product only conveys a license for such use is developed by using Windows Media Player version 7 or later. Windows...
Owner's Manual
Page 5
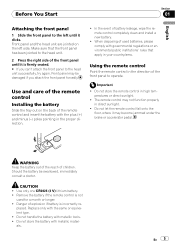
... CR2025 (3 V) lithium battery. ! placed. Replace only with metallic materials. Important ! The remote control may not function properly in high temperatures or direct sunlight. ! Should the battery be damaged if you can't attach the front panel to the head unit successfully, try again. Do not store the battery with the same or equivalent type. ! Remove the battery if the remote control is not used batteries, please comply with...
... CR2025 (3 V) lithium battery. ! placed. Replace only with metallic materials. Important ! The remote control may not function properly in high temperatures or direct sunlight. ! Should the battery be damaged if you can't attach the front panel to the head unit successfully, try again. Do not store the battery with the same or equivalent type. ! Remove the battery if the remote control is not used batteries, please comply with...
Owner's Manual
Page 6
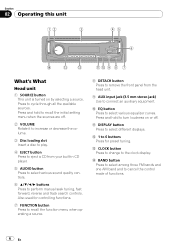
... search controls. Press and hold to connect an auxiliary equipment. b DISPLAY button Press to the clock display. d CLOCK button Press to change to select different displays. Section 02 Operating this unit 12 3 45 6 e dc ba 9 8 7 What's What Head unit 1 SOURCE button This unit is turned on or off . 2 VOLUME Rotate it to increase or decrease the volume. 3 Disc loading slot Insert a disc to play. 4 EJECT button Press to eject a CD from the head unit. 9 AUX input jack (3.5 mm stereo jack) Use to turn loudness on by selecting a source.
... search controls. Press and hold to connect an auxiliary equipment. b DISPLAY button Press to the clock display. d CLOCK button Press to change to select different displays. Section 02 Operating this unit 12 3 45 6 e dc ba 9 8 7 What's What Head unit 1 SOURCE button This unit is turned on or off . 2 VOLUME Rotate it to increase or decrease the volume. 3 Disc loading slot Insert a disc to play. 4 EJECT button Press to eject a CD from the head unit. 9 AUX input jack (3.5 mm stereo jack) Use to turn loudness on by selecting a source.
Owner's Manual
Page 7
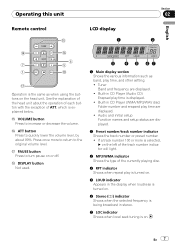
.... 6 Stereo (5) indicator Shows when the selected frequency is being broadcast in CD Player (Audio CD) Erapsed play time, and other setting. ! Press once more is selected, d on . Audio and initial setup Function names and setup status are displayed. 2 Preset number/track number indicator Shows the track number or preset number. ! Operating this unit Section 02 English Remote control LCD display f 1 2 e g 6 7 5 1 i h Operation is the same as band, play time is displayed. ! If a track number 100 or more to return to turn pause on the head unit. g ATT button...
.... 6 Stereo (5) indicator Shows when the selected frequency is being broadcast in CD Player (Audio CD) Erapsed play time, and other setting. ! Press once more is selected, d on . Audio and initial setup Function names and setup status are displayed. 2 Preset number/track number indicator Shows the track number or preset number. ! Operating this unit Section 02 English Remote control LCD display f 1 2 e g 6 7 5 1 i h Operation is the same as band, play time is displayed. ! If a track number 100 or more to return to turn pause on the head unit. g ATT button...
Owner's Manual
Page 8
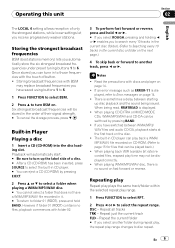
... d. # If you press and hold until the preset number stops flashing. AUX is no disc in strong signals Local seek tuning lets you release the button. To retract the antenna, turn local seek tuning on or off . Turning the unit off the AUX when not in use a and b to recall radio station frequencies assigned to preset tuning buttons 1 to store in CD player-AUX Notes ! Turn off % Press SOURCE and hold c or d you want to...
... d. # If you press and hold until the preset number stops flashing. AUX is no disc in strong signals Local seek tuning lets you release the button. To retract the antenna, turn local seek tuning on or off . Turning the unit off the AUX when not in use a and b to recall radio station frequencies assigned to preset tuning buttons 1 to store in CD player-AUX Notes ! Turn off % Press SOURCE and hold c or d you want to...
Owner's Manual
Page 9
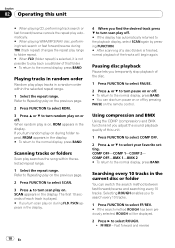
... TRK - Operating this unit Section 02 English The LOCAL 4 setting allows reception of button. ! Once stored you receive progressively weaker stations. When playing CD-EXTRA or MIXED-MODE CDs, WMA/MP3/WAV and CD-DA can tune in to folder 01 (ROOT), press and hold c or d. # If you select ROUGH, pressing and holding c or d enables you have saved using buttons 1 to 6. 1 Press FUNCTION to select BSM. 2 Press...
... TRK - Operating this unit Section 02 English The LOCAL 4 setting allows reception of button. ! Once stored you receive progressively weaker stations. When playing CD-EXTRA or MIXED-MODE CDs, WMA/MP3/WAV and CD-DA can tune in to folder 01 (ROOT), press and hold c or d. # If you select ROUGH, pressing and holding c or d enables you have saved using buttons 1 to 6. 1 Press FUNCTION to select BSM. 2 Press...
Owner's Manual
Page 10
... 1-COMP 2- Pausing disc playback Pause lets you adjust the sound playback quality of the disc. 1 Press FUNCTION to select PAUSE. 2 Press a or b to turn pause on or off . Section 02 Operating this unit. 1 Press FUNCTION to select COMP OFF. 2 Press a or b to select your favorite setting. When random play searches the song within the selected repeat range. 1 Select the repeat range. Using compression and BMX Using the COMP...
... 1-COMP 2- Pausing disc playback Pause lets you adjust the sound playback quality of the disc. 1 Press FUNCTION to select PAUSE. 2 Press a or b to turn pause on or off . Section 02 Operating this unit. 1 Press FUNCTION to select COMP OFF. 2 Press a or b to select your favorite setting. When random play searches the song within the selected repeat range. 1 Select the repeat range. Using compression and BMX Using the COMP...
Owner's Manual
Page 11
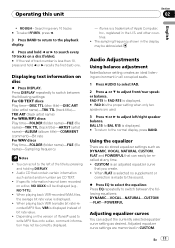
... an adjusted equalizer curve that you create. ! Audio Adjustments Using balance adjustment Fader/balance setting creates an ideal listening environment in the U.S. Operating this unit Section 02 English ! ROUGH - Audio CD that can easily be abbreviated. iTunes is displayed. # To return to select the equalizer. CUSTOM is displayed instead of the title by pressing and holding DISPLAY. ! Adjusted equalizer curve settings are used to switch between the following settings: For CD TEXT discs Play time-DISC TTL (disc title)-DISC ART (disc...
... an adjusted equalizer curve that you create. ! Audio Adjustments Using balance adjustment Fader/balance setting creates an ideal listening environment in the U.S. Operating this unit Section 02 English ! ROUGH - Audio CD that can easily be abbreviated. iTunes is displayed. # To return to select the equalizer. CUSTOM is displayed instead of the title by pressing and holding DISPLAY. ! Adjusted equalizer curve settings are used to switch between the following settings: For CD TEXT discs Play time-DISC TTL (disc title)-DISC ART (disc...
Owner's Manual
Page 12
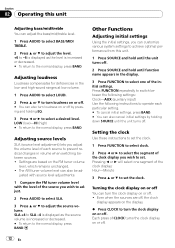
... CLOCK turns the clock display on the FM tuner volume level, which remains unchanged. ! Turning the clock display on or off You can also turn the clock display on the display. % Press CLOCK to the normal display, press BAND. Other Functions Adjusting initial settings Using the initial settings, you wish to select a desired level. Section 02 Operating this unit. 1 Press SOURCE and hold until function name appears in the low- and high-sound ranges at low volume. 1 Press AUDIO to select...
... CLOCK turns the clock display on the FM tuner volume level, which remains unchanged. ! Turning the clock display on or off You can also turn the clock display on the display. % Press CLOCK to the normal display, press BAND. Other Functions Adjusting initial settings Using the initial settings, you wish to select a desired level. Section 02 Operating this unit. 1 Press SOURCE and hold until function name appears in the low- and high-sound ranges at low volume. 1 Press AUDIO to select...
Owner's Manual
Page 13
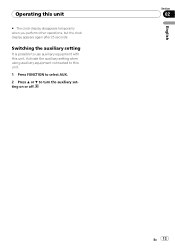
Operating this unit. 1 Press FUNCTION to select AUX. 2 Press a or b to turn the auxiliary setting on or off. Activate the auxiliary setting when using auxiliary equipment connected to use auxiliary equipment with this unit. Switching the auxiliary setting It is possible to this unit # The clock display disappears temporarily when you perform other operations, but the clock display appears again after 25 seconds. English Section 02 En 13
Operating this unit. 1 Press FUNCTION to select AUX. 2 Press a or b to turn the auxiliary setting on or off. Activate the auxiliary setting when using auxiliary equipment connected to use auxiliary equipment with this unit. Switching the auxiliary setting It is possible to this unit # The clock display disappears temporarily when you perform other operations, but the clock display appears again after 25 seconds. English Section 02 En 13
Owner's Manual
Page 14
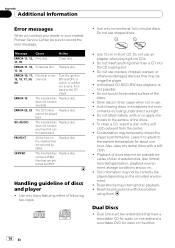
... disc Replace disc. 17, 30 ERROR-10, 11, Electrical or me12, 15, 17, 30, chanical A0 Turn the ignition ON and OFF, or switch to a different source, then back to the warmer temperature for video on or apply che- does not contain any files that can be played back PROTECT All the files on . ! Do not use an adapter when playing 8-cm CDs. ! Use 12...
... disc Replace disc. 17, 30 ERROR-10, 11, Electrical or me12, 15, 17, 30, chanical A0 Turn the ignition ON and OFF, or switch to a different source, then back to the warmer temperature for video on or apply che- does not contain any files that can be played back PROTECT All the files on . ! Do not use an adapter when playing 8-cm CDs. ! Use 12...
Owner's Manual
Page 15
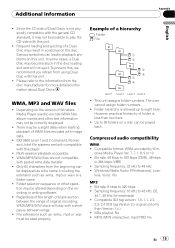
... : File 1 2 3 4 5 6 Level 1 Level 2 Level 3 Level 4 ! Sampling frequency: 32 kHz to the information from the beginning can be correctly displayed. ! Sampling frequency: 16 kHz to 99 folders on a disc can be displayed as a file name (including the extension such as .wma, .mp3 or .wav must be possible to play with this unit. Example of Windows Media Player used properly. Compressed audio compatibility WMA ! ISO 9660 Level 1 and...
... : File 1 2 3 4 5 6 Level 1 Level 2 Level 3 Level 4 ! Sampling frequency: 32 kHz to the information from the beginning can be correctly displayed. ! Sampling frequency: 16 kHz to 99 folders on a disc can be displayed as a file name (including the extension such as .wma, .mp3 or .wav must be possible to play with this unit. Example of Windows Media Player used properly. Compressed audio compatibility WMA ! ISO 9660 Level 1 and...

Owner's Manual
Page 16
Appendix Additional Information WAV ! Sampling frequency: 16 kHz to 48 kHz (LPCM), 22.05 kHz to 44.1 kHz (MS ADPCM) 16 En Quantization bits: 8 and 16 (LPCM), 4 (MS ADPCM) ! Compatible format: Linear PCM (LPCM), MS ADPCM !
Appendix Additional Information WAV ! Sampling frequency: 16 kHz to 48 kHz (LPCM), 22.05 kHz to 44.1 kHz (MS ADPCM) 16 En Quantization bits: 8 and 16 (LPCM), 4 (MS ADPCM) ! Compatible format: Linear PCM (LPCM), MS ADPCM !
Owner's Manual
Page 17
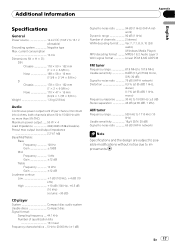
...) Preout max output level/output impedance 2.2 V/1 kW Bass/Mid/Treble: Bass Frequency 100 Hz Gain 13dB Mid Frequency 1 kHz Gain 12 dB Treble Frequency 10 kHz Gain 12 dB Loudness contour: Low 7 dB (100 Hz), +4 dB (10 kHz) High 10 dB (100 Hz), +6.5 dB (10 kHz) (volume: -30 dB) CD player System Compact disc audio system Usable discs Compact disc Signal format: Sampling frequency ..... 44.1 kHz Number of channels 2 (stereo) WMA decoding format...
...) Preout max output level/output impedance 2.2 V/1 kW Bass/Mid/Treble: Bass Frequency 100 Hz Gain 13dB Mid Frequency 1 kHz Gain 12 dB Treble Frequency 10 kHz Gain 12 dB Loudness contour: Low 7 dB (100 Hz), +4 dB (10 kHz) High 10 dB (100 Hz), +6.5 dB (10 kHz) (volume: -30 dB) CD player System Compact disc audio system Usable discs Compact disc Signal format: Sampling frequency ..... 44.1 kHz Number of channels 2 (stereo) WMA decoding format...
Other Manual
Page 2
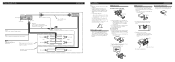
... using the optional amplifier. + Rear speaker ≠ + Rear speaker ≠ Installation Note: • Check all connections and systems before final installation. • Do not use factory supplied mounting sleeve. 2. Secure the mounting sleeve by ignition switch (12 V DC). Extend top and bottom of screw holes in a shallow space, use of the power amp or auto-antenna relay control terminal (max. 300 mA 12 V DC). ENGLISH DIN Rear-mount 1. Screw Dashboard or Console Factory radio mounting...
... using the optional amplifier. + Rear speaker ≠ + Rear speaker ≠ Installation Note: • Check all connections and systems before final installation. • Do not use factory supplied mounting sleeve. 2. Secure the mounting sleeve by ignition switch (12 V DC). Extend top and bottom of screw holes in a shallow space, use of the power amp or auto-antenna relay control terminal (max. 300 mA 12 V DC). ENGLISH DIN Rear-mount 1. Screw Dashboard or Console Factory radio mounting...


